background image

MENUS DES RÉGLAGE 

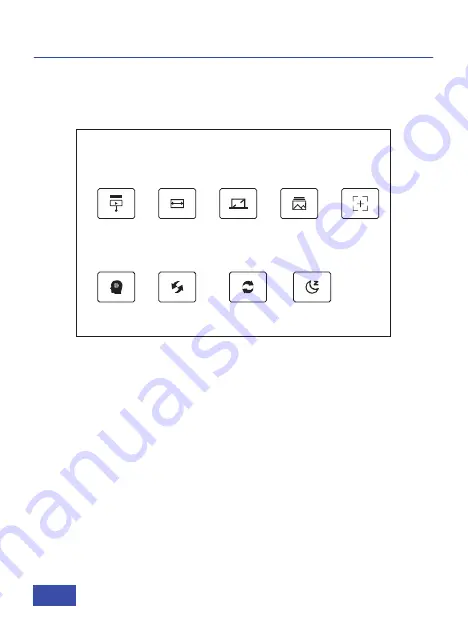
RÉGLAGE D'IMAGE

Sous 

Régler

, vous trouverez les options énumérées ci-dessous. Les 

options du haut sont les 

Réglage d'image

.

Méthode de projection: 

Pour déplacer le mode du projecteur. Les 

options sont : standard, miroir, retourné, et retourné et miroir.

Zoom d'image: 

modifie la taille des objets affichés à l’écran.

Mode proportionnel: 

Le rapport d’aspect est une figure qui identifie la 

taille d’une image par sa largeur et sa hauteur. Les rapports d’aspect 
communs sont 4:3 et 16:9.

Mode image: 

Ajustez les paramètres du projecteur. Ajustez la couleur, 

la luminosité, le contraste et/ou la netteté.

Focusing: 

Réglez la mise au point du projecteur.

Multimédia          Source de signal


 Régler

Réglage d'image

Méthode de 

projection

Zoom

d'image

Mode

proportionnel

Mode

image

Focusing

Réglage système

Langue

Mise à niveau

du logiciel 

Restaurer les

réglages d'usine

Veille

auto

FR 23

Содержание PJ20

Страница 1: ...User Manual PJ20 NexiGo 1080P LCD Projector Installation Video User Manual ...

Страница 2: ...e sure you enjoy your membership If you have any problems please contact us at cs nexigo com any time for further assistance This product is covered by our industry leading 1 year manufacturers warranty Register at nexigo com warranty to get a FREE additional 1 year warranty From all of us here at NexiGo we want to welcome you again to the family We thank you deeply for your trust and for your bus...

Страница 3: ... 1 2 3 4 5 6 9 8 7 1 Power Switch 2 Keystone Adjustment 3 3 5mm Audio Jack 4 AV Input Port 5 USB Input Port 6 USB Input Port Screen Monitor 7 HDMI Input Ports 8 Power Input Jack 9 IR Receiver 10 Lens 11 Up 12 Down 13 Left 14 Right 15 OK 16 Return ...

Страница 4: ...tteries not included 1 x Power Cable 1 x AV Cable 1 x User Manual CONNECTION INTRODUCTION US 03 DVD VCD 1 2 3 4 5 1 Audio device 2 DVD and VCD 3 Mobile hard disk and USB flash disk 4 Mobile hard disk USB flash disk iPhone and iPad 5 TV box TV stick and computer ...

Страница 5: ...ht Up Down Moves the cursor in the on screen display OK Selects the option your cursor is currently on Return Returns to the last screen Input Short Press Displays the source selection bar Menu Long Press Displays the menu Vol Increases the volume level Vol Decreases the volume level Mute Power Switch Focus Out Left Down Return Short Press Input Long Press Menu Focus In Up Right OK Vol Vol ...

Страница 6: ...ection Distance Projection Size Aspect Ratio Projection Ratio Keystone Power Input Integrated Watt Use Input Output Speaker TFT LCD 1920x1080 1920x1080 LED Manual operation 4 8 21 8 ft 40 200 inches 16 9 4 3 1 56 1 Manual correction 15 100V 240V 50 60Hz 140W HDMIx2 USBx2 AVx1 3 5mm audio jackx1 speakers headphones 5Wx1 ...

Страница 7: ...nd it for airflow The projector is designed to be installed in one of four layouts You can either hang the projector from the ceiling via a special mounting bracket NOT INCLUDED or simply place it on a stable surface You may need to change the projection mode so the images project correctly Select Projection Mode under the Setting tab then choose the corresponding projection mode for your needs Ce...

Страница 8: ...Multi media Input Source Setting Picture Setting Projection Mode Image Scaling Aspect Ratio Picture Mode Focusing System Setting OSD Language Software Update Restore Factory Default Auto Sleep US 07 ...

Страница 9: ...f about 3 from unit to unit The above data is for reference only Please use actual measurements when installing the device Note 1 A specific rear projection screen is required to use the rear projection function 2 Please remove the 4 rubber plugs at corners on the bottom of the projector for mounting on the ceiling C K d T 1 2 C B o ...

Страница 10: ... mounting a projector as it often will be mounted above or below the horizontal center line of the screen This will mean that the image will be displayed on the screen at an angle and this will change the shape of the image to a trapezoid instead of a rectangle To correct this please attempt Please use the Keystone Adjustment knob to adjust the vertical keystone if the projection image shows up ti...

Страница 11: ...ure Mode Focusing System Setting OSD Language Software Update Restore Factory Default Auto Sleep US 10 Option2 Remote Control Press and hold one of the focus buttons on the remote until the image is clear If the image does not clear and instead becomes more fuzzy press and hold the other focus button until the image clears up ...

Страница 12: ... 11 Insert a USB drive into either of the USB ports shown in the diagram below In the on screen menu select the Multi media tab Then choose the content which you want to display Movie Music Photo Text This section guides you on how to connect the projector with other equipment ...

Страница 13: ...gram below Open the on screen menu and select the correct HDMI source HDMI1 or HDMI2 in the Input Source tab This will then allow you to display the screen of whatever device has been plugged in DIVX RM 3GP AVI MKV FLV MOV MP4 MPG VOB MPG RMVB RM MP3 AAC WAV LOAS PCM OGG FLAC AC3 Audio Format Multi media Supported Format Photo Format Video Format Text Format JPEG BMP PNG TXT US 12 ...

Страница 14: ...to the RCA jacks on the adapter You can also just use a singular AV cable if this is an option for your device Once connected go into the on screen menu and select AV under Input Source as shown below 640 x 480 800 x 600 Supported Resolution 1024 x 768 1280 x 720 1280 x 800 1280 x 1024 1366 x 768 1440 x 900 1440 x 960 1600 x 1200 1680 x 1050 1920 x 1080 US 13 Multimedia Input Source Setting MultiS...

Страница 15: ...Support Format NTSC PAL US 14 Multimedia Input Source Setting MultiScreen HDMI1 HDMI2 AV ...

Страница 16: ...en For wireless connections Ensure the projector and your device are connected to the same network Instructions on how to connect the projector to a network are available in the Settings Menus section on page 23 Once both devices are connected to the same network or in the case of a wired connection once the device has been plugged into the projector in the on screen menu select the Input Source t...

Страница 17: ... both devices are connected to the same network your computer is Windows 10 or above and has built in dual band WiFi On the projector select Windows Cast from the options On your computer input Windows key K to open the Connect sidebar for Miracast and then select NexiGo PJ20 in the devices list The connection is now complete ...

Страница 18: ... To connect computer with Projector Based on WiFi Display Technology 1 On your computer open the settings menu 2 Access your display settings or screen mirroring 3 Select your Miracastreceiver NexiGo PJ20 Waiting for connection US 17 ...

Страница 19: ...available on iPhone and iPad devices Plug your iPhone or iPad into the USB port Screen Monitor shown in the diagram below On the projector select iOS Cable Cast from the options Tap Trust when the phone tablet shows a message saying trust this device and then enter the device password to finish the connection ...

Страница 20: ...s of opening multi screen functions please refer to the instructions of your Android device for details Additionally there may be third party apps you can download to your android device to provide Miracast functionality We cannot guarantee that this device will work as intended with all android devices Check your device manufacturer for information regarding support for this standard To connect m...

Страница 21: ...t can be mirrored on 3 Select NexiGo PJ20 from the list US 20 IOS CAST SHARE THE SCREEN OF YOUR IPHONE IPAD OR MACBOOK WIRELESSLY USING AIRPLAY To connect make sure both devices are connected to the same network On the projector select iOS Cast from the options Enter into the control center on the iOS device click Screen Mirroring In the list of available mirroring devices select the device NexiGo...

Страница 22: ...connected to the same network On the projector select DLNA from the options On the device you want to cast from open an app that supports casting YouTube is an example and then tap the button on the app that allows you to cast Select NexiGo PJ20 from the list of options Press the play button on the video and it will now display the video via the projector ...

Страница 23: ... a separate update from the primary projector firmware update that you will find in the projector settings This firmware will automatically update so this is only needed in case of an error with the auto updater Restore Factory Default Reset the cast software to factory default Clears the WiFi password and or caches Software Version Shows the current casting firmware version ...

Страница 24: ...he top options are the Picture Setting Projection Mode To shift the mode of the projector The options are standard mirrored flipped and flipped and mirrored Image Scaling Changes the size of the objects shown on the screen Aspect Ratio The aspect ratio is a figure that identifies the size of an image by its width and height Common aspect ratios are 4 3 and 16 9 Picture Mode Adjust projector settin...

Страница 25: ...the projector 1 Please check nexipc com pages pj20 if you have any issues for update downloads 2 Download the latest firmware to a USB flash drive and then insert the flash drive into a USB port on the projector 3 In the on screen menu select Setting System Setting Software Update 4 The software will be updated automatically do not try to use the projector until the update is completed Note The pr...

Страница 26: ...THE SETTING MENU TO LOCATE THESE SETTINGS WiFi Connection Connect your projector to WiFi 1 In the on screen menu select Setting and then scroll down until you see the option labeled WiFi Setting Select that option 2 Select your wireless network from the list as shown below to connect your projector to the WiFi network ...

Страница 27: ... screen menu select Setting and then scroll down until you see the option labeled Bluetooth Select that option 2 Turn on Bluetooth for the projector as well as on the device you would like to connect to and then search the list shown below for the Bluetooth audio device to connect 3 Select that device and pair the two devices The Bluetooth connection is now complete ...

Страница 28: ...nufacturer directly if you have any issues to exercise your warranty 4 Do not modify this equipment 5 Avoid dropping or throwing the projector 6 Do not face the projector lens to the sun 7 Use only the provided power cable 8 Do not place the projector on an uneven or unstable surface or one that is subject to vibration 9 Do not place this device near another device that produces a strong magnetic ...

Страница 29: ...mages are not covered by the warranty 16 If the projector is unused for a prolonged period of time unplug it from the power source 17 If there are any mechanical issues with the projector please contact NexiGo Support to exercise the warranty Do not attempt to repair the item yourself 18 Safe Operational Parameters Operating temperature between 41 F 5 C and 95 F 35 C Operating humidity between 30 ...

Страница 30: ...Benutzerhandbuch PJ20 NexiGo 1080P LCD Projektor Installations Video Benutzerhandbuch ...

Страница 31: ...en Sie uns jederzeit unter cs nexigo com kontaktieren um weitere Unterstützung zu erhalten Für dieses Produkt gilt unsere großzügige 1 Jahres Herstellergarantie Bitte besuchen Sie www nexigo com für weitere Garantieinformationen und registrieren Sie sich auf nexigo com warranty für eine EXTRA EIN JAHRES Garantie Von uns allen hier bei NexiGo möchten wir Sie wieder in der Familie willkommen heißen ...

Страница 32: ...chalter 2 Trapezkorrektur Einstellung 3 3 5 mm Audiobuchse 4 AV Eingangsanschluss 5 USB Eingang 6 USB Eingang Bildschirm Monitor 7 HDMI Eingang 8 Stromanschlussbuchse 9 IR Empfänger 10 Objektiv 11 Auf 12 Ab 13 Links 14 Rechts 15 OK 16 Zurück 1 2 3 4 5 6 9 8 7 ...

Страница 33: ...lich nicht im Lieferumfang enthalten 1 x Netzkabel 1 x AV Kabel 1 x Gebrauchsanweisung 1 Audio Gerät 2 DVD und VCD 3 Mobile Festplatte und USB Flash Disk 4 Mobile Festplatten USB Flash Disks iPhone und iPad 5 TV Box TV Stick und Computer EINFÜHRUNG ZUM ANSCHLUSS DE 03 DVD VCD 1 2 3 4 5 ...

Страница 34: ... Zum Bewegen des Cursors auf dem Bildschirm Anzeige OK Auswahl der Option auf der sich der Cursor gerade befindet Zurück Rückkehr zum letzten Bildschirm Eingabe Kurzer Druck Anzeige der Quellenauswahlleiste Menü Langes Drücken Anzeige des Menüs Vol Erhöhung des Lautstärkepegels Vol Verringerung des Lautstärkepegels Stummschalten Netzschalter Focus Out Links Ab Zurück Kurzer Druck Eingabe Langes Dr...

Страница 35: ...jektion Bildseitenverhältnis Projektionsverhältnis Trapezkorrektur Leistungsaufnahme Integrierte Wattleistung Eingabe Ausgabe Lautsprecher TFT LCD 1920x1080 1920x1080 LED Manuelle Bedienung 4 8 21 8 ft 40 200 inches 16 9 4 3 1 56 1 Manuelle Korrektur 15 100V 240V 50 60Hz 140W HDMIx2 USBx2 AVx1 3 5 mm Audiobuchsex1 kopfhörer oder lautsprecher 5Wx1 DE 05 ...

Страница 36: ...om vorhanden ist Der Projektor ist für die Installation in einer von vier Varianten konzipiert Sie können den Projektor entweder mit einer speziellen Montagehalterung NICHT IM LIEFERUMFANG an der Decke aufhängen oder ihn einfach auf eine stabile Oberfläche stellen Gegebenenfalls müssen Sie den Projektionsmodus ändern damit die Bilder richtig projiziert werden Wählen Sie unter der Registerkarte Ein...

Страница 37: ...Einstellung Bildschirm Einstellungen Projektion sverfahren Bild Zoom Proportio nalmodus Bild modus Focusing Systemeinstellung Sprache Soft Aktualisierung Werkseinstellungen wiederherstellen Automatischer Standby Betrieb DE 07 ...

Страница 38: ...ät zu Gerät Die oben genannten Daten dienen nur als Referenz Bitte verwenden Sie bei der Installation des Geräts die tatsächlichen Maße Hinweis 1 Zur Nutzung der Rückprojektionsfunktion ist eine spezielle Rückprojektionswand erforderlich 2 Bitte entfernen Sie die 4 Gummistopfen an den Ecken an der Unterseite des Projektors für die Montage an der Decke ...

Страница 39: ...rifft die Anpassung des Bildes eines Projektors der ein schräges Bild anzeigt Dies ist oft ein Problem bei der Montage eines Projektors weil er oft über oder unter der horizontalen Mittellinie der Leinwand montiert wird Dies bedeutet dass das Bild auf der Leinwand in einem Winkel angezeigt wird wodurch sich die Form des Bildes in ein Trapez statt in ein Rechteck ändert Versuchen Sie bitte dies zu ...

Страница 40: ...edienung gedrückt bis das Bild klar ist Wenn das Bild nicht klar wird und stattdessen unscharf wird halten Sie die andere Fokustaste gedrückt bis das Bild klarer wird Option1 Bildschirmmenü Gehen Sie im Menü zur Registerkarte Einstellung wählen Sie Focusing und halten Sie dann die Links Rechts Taste auf dem Projektorbedienfeld oder die Links Rechts Taste auf der Fernbedienung gedrückt bis das Bild...

Страница 41: ...e ein USB Laufwerk in einen der USB Anschlüsse ein wie unten in der Abbildung gezeigt Wählen Sie im Menü auf dem Bildschirm die Registerkarte Multimedia Wählen Sie dann den Inhalt den Sie anzeigen möchten Film Musik Bilder Doc Hier erfahren Sie wie Sie den Projektor mit anderen Geräten verbinden können DE 11 ...

Страница 42: ...ecken Sie ein HDMI Kabel in das Gerät das Sie an den Projektor anschließen möchten und stecken Sie dann das andere Ende des HDMI Kabels in den in der folgenden Abbildung gezeigten HDMI Anschluss Öffnen Sie das Bildschirmmenü und wählen Sie die HDMI Quelle HDMI1 oder HDMI2 auf der Registerkarte Signalquelle Nun können Sie den Bildschirm des angeschlossenen Geräts anzeigen device has been plugged in...

Страница 43: ...Buchsen des Adapters Sie können auch einfach ein einzelnes AV Kabel verwenden wenn dies für Ihr Gerät eine Option ist Sobald das Gerät angeschlossen ist gehen Sie in das Bildschirmmenü und stellen Sie AV unter Signalquelle ein siehe unten 640 x 480 800 x 600 Unterstützte Auflösung 1024 x 768 1280 x 720 1280 x 800 1280 x 1024 1366 x 768 1440 x 900 1440 x 960 1600 x 1200 1680 x 1050 1920 x 1080 Mult...

Страница 44: ...Unterstützungsformat NTSC PAL Multimedia Signalquelle Einstellung DE 14 ...

Страница 45: ...sen Verbindungen Stellen Sie sicher dass der Projektor und Ihr Gerät mit demselben Netzwerk verbunden sind Anweisungen zum Anschluss des Projektors an ein Netzwerk finden Sie unter dem Abschnitt Einstellungs menüs auf Seite 51 Wenn beide Geräte mit demselben Netzwerk verbunden sind bzw bei einer kabelgebundenen Verbindung nachdem das Gerät an den Projektor angeschlossen ist wählen Sie im Bildschir...

Страница 46: ...t demselben Netzwerk verbunden sind Ihr Computer Windows 10 oder höher ist und über integriertes Dualband WLAN verfügt Auf dem Projektor wählen Sie Windows Cast aus den Optionen Geben Sie auf Ihrem Computer die Tastenkombination Windows K ein um die Seitenleiste Verbinden für Miracast zu öffnen und wählen Sie dann NexiGo PJ20 in der Geräteliste Die Verbindung ist nun hergestellt DE 16 ...

Страница 47: ...r Based on Projektor der auf der WiFi Display Technologie basiert 1 Öffnen Sie auf Ihrem Computer das Einstellungsmenü 2 Greifen Sie auf Ihre Anzeigeeinstellungen oder die Bildschirmspiegelung zu 3 Wählen Sie Ihren Miracast Empfänger NexiGo PJ20 Waiting for connection Beamer computer DE 17 ...

Страница 48: ...en erhältlich Stecken Sie Ihr iPhone oder iPad in den USB Anschluss Screen Monitor wie in der Abbildung unten dargestellt Auf dem Projektor wählen Sie iOS Cable Cast aus den Optionen Wenn auf dem Telefon Tablet die Meldung Diesem Gerät vertrauen angezeigt wird tippen Sie auf Vertrauen und geben Sie dann das Gerätepasswort ein um die Verbindung herzustellen DE 18 ...

Страница 49: ...sich die Liste der verfügbaren Mirroring Geräte an und wählen Sie NexiGo PJ20 aus der Liste aus Die Verbindung ist nun hergestellt MIRACAST TEILEN SIE DEN BILDSCHIRM VON IHREM ANDROID TELEFON TABLET DRAHTLOS Hinweis Bei Android Geräten kann die Funktionalität von Miracast unterschiedlich sein Die meisten Geräte unterstützen es in irgendeiner Weise OnePlus Google Pixel Search Cast Samsung Search Sm...

Страница 50: ...lung Aus der Liste der verfügbaren Spiegelungsgeräte wählen Sie das Gerät NexiGo PJ20 aus der Liste aus Die Verbindung ist nun hergestellt Spiegeln Sie Ihr iPhone iPad oder Ihren iPod touch Stellen Sie sicher dass Ihr iOS Gerät mit demselben Netzwerk wie Ihr Projektor verbunden ist oder verbinden Sie das iOS Gerät per Projektor mit dem AP 1 Öffnen Sie auf Ihrem iOS Gerät dasControl Center und tipp...

Страница 51: ...nden sind Auf dem Projektor wählen Sie DLNA aus den Optionen Öffnen Sie auf dem Gerät von dem Sie das Casting durchführen möchten eine App die das Casting unterstützt z B YouTube und tippen Sie dann auf die Schaltfläche in der App die das Casting ermöglicht Wählen Sie NexiGo PJ20 aus der Liste der Optionen Drücken Sie die Wieder gabetaste auf dem Video und das Video wird nun über den Projektor ang...

Страница 52: ...primären Projektor Firmware Aktualisierung getrennte Aktualisierung die Sie in den Projektoreinstellungen finden Diese Firmware wird automatisch aktualisiert so dass dies nur im Falle eines Fehlers mit dem Auto Updater erforderlich ist Werkseinstellungen wiederherstellen Zurücksetzen der Cast Software auf die Werkseinstellungen Löscht das WiFi Passwort und oder die Caches Software Version Anzeige ...

Страница 53: ...m angezeigten Objekte Proportionalmodus Das Seitenverhältnis gibt die Größe eines Bildes durch seine Breite und Höhe an Übliche Seitenverhältnisse sind 4 3 und 16 9 Bildmodus Zum Anpassen der Projektoreinstellungen Passen Sie Farbe Helligkeit Kontrast und oder Schärfe an Focusing Stellen Sie den Fokus des Projektors ein Multimedia Signalquelle Einstellung Bildschirm Einstellungen Projektion sverfa...

Страница 54: ...ware auf ein USB Flash Laufwerk herunter und stecken Sie das Flash Laufwerk in einen USB Anschluss des Projektors 3 Im Bildschirmmenü wählen Sie Einstellung Systemeinstellung Software Aktualisierung 4 Die Software lässt sich automatisch aktualisieren Versuchen Sie nicht den Projektor zu benutzen bevor die Aktualisierung abgeschlossen ist Multimedia Signalquelle Einstellung Bildschirm Einstellungen...

Страница 55: ...tors auf die Werkseinstellungen Automatischer Standby Betrieb Zur Einstellung eines Timers mit dem der Projektor automatisch ausgeschaltet wird VERBINDUNGSEINSTELLUNGEN BLÄTTERN SIE AUF DER REGISTERKARTE EINSTELLUNGEN NACH UNTEN UM DIESE EINSTELLUNGEN ZU FINDEN WiFi Verbindung Verbinden Sie Ihren Projektor mit WiFi 1 Im Bildschirmmenü wählen Sie WiFi Setting und blättern Sie dann nach unten bis Si...

Страница 56: ...us 2 Aktivieren Sie Bluetooth für den Projektor sowie für das Gerät mit dem Sie eine Verbindung herstellen möchten und suchen Sie dann in der unten angezeigten Liste nach dem Bluetooth Audiogerät das Sie verbinden möchten 3 Wählen Sie das Gerät aus und koppeln Sie die beiden Geräte Die Bluetooth Verbindung ist nun hergestellt Verbindungseinstellungen WIFI Setting Bluetooth Multimedia Signalquelle ...

Страница 57: ...ungsschaltkreise Ein versehentlicher Kontakt kann zu einem schweren Stromschlag führen und tödlich enden Führen Sie keine eigenen Wartungsarbeiten an diesem Produkt durch Bitte wenden Sie sich bei Problemen direkt an den Hersteller um Ihre Garantie in Anspruch zu nehmen 4 Ändern Sie dieses Gerät nicht 5 Vermeiden Sie es den Projektor fallen zu lassen oder zu werfen 6 Halten Sie das Objektiv des Pr...

Страница 58: ...rojektors nicht blockiert werden da dies zu Schäden am Gerät führen oder eine Brandgefahr darstellen kann 15 Dieses Gerät kann durch Flüssigkeiten beschädigt werden Um Schäden zu vermeiden halten Sie Flüssigkeiten vom Gerät fern Flüssigkeitsschäden sind nicht durch die Garantie abgedeckt 16 Ziehen Sie den Netzstecker wenn der Projektor über einen längeren Zeitraum nicht benutzt wird 17 Bei mechani...

Страница 59: ...Mode d emploi PJ20 Projecteur LCD NexiGo 1080P Vidéo d installation Mode d emploi ...

Страница 60: ...ir une aide supplémentaire Ce produit est couvert par notre généreuse garantie fabricant d un an Veuillez consulter le site www nexigo com pour plus d informations sur la garantie et enregistrez vous sur nexigo com warranty pour bénéficier d une garantie supplémentaire d un an De la part de nous tous ici à NexiGo nous voulons vous souhaiter à nouveau la bienvenue dans la famille Nous vous remercio...

Страница 61: ...é de voûte Ajustement 3 Prise Audio de 3 5 mm 4 Prise audio du port d entrée AV 5 Port d entrée USB 6 Port d entrée USB Moniteur d écran 7 Port d entrée HDMI 8 Prise d entrée d alimentation 9 IR Récepteur 10 Lentille 11 Haut 12 Bas 13 Gauche 14 Droite 15 OK 16 Retour 7 1 2 3 4 5 6 9 8 7 ...

Страница 62: ...n incluses 1 x Câble d alimentation 1 x Câble AV 1 x Manuel de l utilisateur 1 Dispositif audio 2 DVD et VCD 3 Disque dur mobile et disque flash USB 4 Disque dur mobile disque flash USB iPhone et iPad 5 Boîtier TV bâton TV et ordinateur INTRODUCTION À LA CONNEXION FR 03 DVD VCD 1 2 3 4 5 ...

Страница 63: ...e curseur dans l écran affichage OK Sélectionne l optuon sur lequel votre curseur se trouve actuellement Retour Retourne au dernier écran D entrée Pression Courte affiche la barre de sélection de la source Menu Appui Long affiche le menu Vol Augmente le niveau de volume Vol Diminue le niveau de volume Muet Interrupteur d alimentation Focus Out Gauche Bas Retour Pression Courte D entrée Appui Long ...

Страница 64: ... projection Rapport de forme Rapport de projection Clé de voûte Entrée de puissance Utilisation intégrée en watts Entrée Sortie Haut parleur TFT LCD 1920x1080 1920x1080 LED Manuel fonctionnement 4 8 21 8 ft 40 200 inches 16 9 4 3 1 56 1 Manuel correction 15 100V 240V 50 60Hz 140W HDMIx2 USBx2 AVx1 Prise Audio de 3 5 mmx1 écouteurs or haut parleurs 5Wx1 FR 05 ...

Страница 65: ...taille la forme et la position de votre écran Emplacement d une prise de courant appropriée S assurer que le projecteur a suffisamment d espace autour pour le flux d air Le projecteur est conçu pour être installé dans l une des quatre configurations Vous pouvez suspendre le projecteur au plafond via un support de montage spécial NON INCLUS ou simplement le placer sur une surface stable Vous devrez...

Страница 66: ... Source de signal Régler Réglage d image Méthode de projection Zoom d image Mode proportionnel Mode image Focusing Réglage système Langue Mise à niveau du logiciel Restaurer les réglages d usine Veille auto FR 07 ...

Страница 67: ... l autre Les données ci dessus sont fournies à titre de référence seulement Veuillez utiliser des mesures réelles lors de l installation de l appareil Remarque 1 Un écran de projection arrière spécifique est nécessaire pour utiliser la fonction de projection arrière 2 Veuillez retirer les 4 bouchons en caoutchouc dans les coins au bas du projecteur pour le montage au plafond ...

Страница 68: ...ing consiste à ajuster l image d un projecteur qui affiche une image inclinée C est souvent un problème lors du montage d un projecteur car il sera souvent monté au dessus ou en dessous de la ligne centrale horizontale de l écran Cela signifie que l image sera affichée sur l écran à un angle et cela changera la forme de l image à un trapèze au lieu d un rectangle Pour corriger cette erreur veuille...

Страница 69: ...nde jusqu à ce que l image soit nette Si l image ne s éclaircit pas et devient plus floue maintenez l autre bouton de mise au point enfoncé jusqu à ce que l image s éclaircisse Option1 Menu à l écran Dans le menu accédez à l onglet Régler sélectionnez Focusing puis maintenez enfoncé le bouton Gauche Droite du panneau du projecteur ou le bouton Gauche Droite de la télécommande jusqu à ce que l imag...

Страница 70: ...érez une clé USB dans l un des ports USB indiqués dans le diagramme ci dessous Dans le menu à l écran sélectionnez l onglet Multimédia Choisissez ensuite le contenu que vous voulez afficher Film Musique Photo Doc Cette section vous indique comment connecter le projecteur à d autres équipements FR 11 ...

Страница 71: ...ssous Ouvrez le menu à l écran et sélectionnez la source HDMI HDMI1 ou HDMI2 dans l onglet Source de signal Cela vous permettra ensuite d afficher l écran de n importe quel appareil qui a été branché DIVX RM 3GP AVI MKV FLV MOV MP4 MPG VOB MPG RMVB RM MP3 AAC WAV LOAS PCM OGG FLAC AC3 Audio Format Format multimédia pris en charge Photo Format Photo Format Doc Format JPEG BMP PNG TXT FR 12 ...

Страница 72: ...essous puis connectez les prises RCA de l appareil aux prises RCA de l adaptateur Vous pouvez également utiliser un seul câble AV si c est une option pour votre appareil Une fois connecté accédez au menu à l écran et sélectionnez AV sous Source de signal comme indiqué ci dessous 640 x 480 800 x 600 Unterstützte Auflösung 1024 x 768 1280 x 720 1280 x 800 1280 x 1024 1366 x 768 1440 x 900 1440 x 960...

Страница 73: ...Formats pris en charge NTSC PAL Multimédia Source de signal Régler FR 14 ...

Страница 74: ...s sans fil Assurez vous que le projecteur et votre appareil sont connectés au même réseau Des instructions sur la façon de connecter le projecteur à un réseau sont disponibles dans la section Menus des Régler à la page 77 Une fois que les deux appareils sont connectés au même réseau ou dans le cas d une connexion filaire une fois que l appareil a été branché au projecteur dans le menu à l écran sé...

Страница 75: ...eau que votre ordinateur est équipé de Windows 10 ou supérieur et qu il dispose d une connexion Wi Fi double bande intégrée Sur le projecteur sélectionnez Windows Cast dans les options Sur votre ordinateur entrez le bouton Windows K pour ouvrir la barre latérale Connect pour Miracast puis sélectionnez NexiGo PJ20 dans la liste des appareils La connexion est maintenant terminée FR 16 ...

Страница 76: ...rojecteur basé sur basé sur la technologie d affichage WiFi 1 Sur votre ordinateur ouvrez le menu des paramètres 2 Accédez à vos paramètres d affichage ou à la duplication d écran 3 Sélectionnez votre récepteur Miracast NexiGo PJ20 Waiting for connection Projecteur l ordinateur FR 17 ...

Страница 77: ...Phone et iPad Branchez votre iPhone ou iPad dans le port USB Screen Monitor indiqué dans le diagramme ci dessous Sur le projecteur sélectionnez iOS Cable Cast parmi les options Appuyez sur Trust lorsque le téléphone tablette affiche un message disant faire confiance à cet appareil puis entrez le mot de passe de l appareil pour terminer la connexion FR 18 ...

Страница 78: ...isponibles et sélectionnez le NexiGo PJ20 dans la liste La connexion est maintenant terminée MIRACAST PARTAGER L ÉCRAN DU TÉLÉPHONE ANDROID TABLETTE SANS FIL Remarque les appareils Android peuvent avoir des fonctionnalités mixtes avec Miracast La plupart des appareils le supporteront d une manière ou d une autre OnePlus Google Pixel Search Cast Samsung Search Smart View Sony Search Screen Mirrorin...

Страница 79: ...a liste des périphériques miroirs disponibles sélectionnez l appareil NexiGo PJ20 dans la liste La connexion est maintenant terminée Mettez en miroir votre iPhone iPad ou iPod touch Assurez vous que votre appareil iOS est connecté au même réseau que votre projecteur ou connectez un appareil iOS avec AP par projecteur 1 Sur votre appareil iOS ouvrez le Centre de contrôle et appuyez sur Mise en miro...

Страница 80: ...u Sur le projecteur sélectionnez DLNA dans les options Sur l appareil à partir duquel vous voulez lancer ouvrez une application qui prend en charge la diffusion YouTube en est un exemple puis appuyez sur le bouton de l application qui vous permet de lancer Sélectionnez NexiGo PJ20 dans la liste des options Appuyez sur le bouton de lecture de la vidéo et il va maintenant afficher la vidéo via le pr...

Страница 81: ...ur séparée de la mise à jour du micrologiciel du projecteur principal que vous trouverez dans les paramètres du projecteur Ce micrologiciel se met automatiquement à jour ce qui n est nécessaire qu en cas d erreur avec le logiciel de mise à jour automatique Restaurez défaut usine Réinitialisez le logiciel de coulée à défaut usine Efface le mot de passe WiFi et ou cache Version du logiciel affiche l...

Страница 82: ...tionnel Le rapport d aspect est une figure qui identifie la taille d une image par sa largeur et sa hauteur Les rapports d aspect communs sont 4 3 et 16 9 Mode image Ajustez les paramètres du projecteur Ajustez la couleur la luminosité le contraste et ou la netteté Focusing Réglez la mise au point du projecteur Multimédia Source de signal Régler Réglage d image Méthode de projection Zoom d image M...

Страница 83: ...ge système Mise à niveau du logiciel 4 Le logiciel sera mis à jour automatiquement n essayez pas d utiliser le projecteur tant que la mise à jour n est pas terminée Remarque Tous les envois courants sur le marché sont livrés avec le firmware le plus récent vous n avez pas à le mettre à jour Le projecteur sera réinitialisé après les mises à jour logicielles tous les paramètres enregistrés seront eff...

Страница 84: ...N FAITES DÉFILER L ÉCRAN DANS L ONGLET PARAMÈTRES POUR TROUVER CES PARAMÈTRES Connexion WiFi connectez votre projecteur au WiFi 1 Dans le menu à l écran sélectionnez Régler puis faites défiler vers le bas jusqu à ce que vous voyiez l option intitulée WiFi Setting Sélectionnez cette option 2 Sélectionnez votre réseau sans fil dans la liste ci dessous pour connecter votre projecteur au réseau WiFi F...

Страница 85: ...tooth Sélectionnez cette option 2 Activez Bluetooth pour le projecteur ainsi que sur l appareil auquel vous souhaitez vous connecter puis recherchez la liste ci dessous pour le périphérique audio Bluetooth à connecter 3 Sélectionnez cet appareil et jumelez les deux appareils La connexion Bluetooth est maintenant terminée Paramètres de connexion WIFI Setting Bluetooth Multimédia Source de signal Ré...

Страница 86: ...tel peut entraîner un choc électrique grave et entraîner la mort N essayez pas de faire l entretien de ce produit vous même Veuillez contacter directement le fabricant si vous avez des problèmes pour exercer votre garantie 4 Ne pas modifier cet équipement 5 Évitez de laisser tomber ou de lancer le projecteur 6 Ne pas faire face au soleil avec la lentille du projecteur 7 Utilisez uniquement le câbl...

Страница 87: ... cela pourrait endommager l unité ou créer un risque d incendie 15 Cet appareil peut être endommagé par des liquides Gardez les liquides à l écart de l appareil pour éviter tout dommage Les dommages liquides ne sont pas couverts par la garantie 16 Si le projecteur est inutilisé pendant une période prolongée débranchez le de la source d alimentation 17 S il y a des problèmes mécaniques avec le proj...

Страница 88: ...Manual de Usuario PJ20 NexiGo 1080P LCD Projector Video de instalación Manual de Usuario ...

Страница 89: ...ma por favor contáctenos en cs nexigo com en cualquier momento para más ayuda Este producto está cubierto por nuestra generosa garantía de un año del fabricante por favor visite www nexigo com para más información sobre la garantía y regístrese en nexigo com warranty para obtener una garantía EXTRA DE UN AÑO De parte de todos nosotros aquí en NexiGo queremos darle la bienvenida de nuevo a la famil...

Страница 90: ...del enfoque 3 Connector de Audio de 3 5 mm 4 Puerto de entrada AV 5 Puerto de entrada USB 6 Puerto de entrada USB Monitor de pantalla 7 Puerto de entrada HDMI 8 Conector de entrada de alimentación 9 Receptor IR 10 Lente 11 Arriba 12 Abajo 13 Lzquierda 14 Derecha 15 OK 16 Volver 7 ES 02 1 2 3 4 5 6 9 8 7 ...

Страница 91: ...án incluidas en la caja 1 x Cable de energía 1 x Cable AV 1 x Manual de usuario 1 Dispositivo de audio 2 DVD y VCD 3 Disco duro móvil y disco flash USB 4 Disco duro móvil disco flash USB iPhone y iPad 5 Caja de TV Palo de TV y computadora INTRODUCCIÓN A LA CONEXIÓN ES 03 1 2 3 4 5 DVD VCD ...

Страница 92: ...ajo Mueve el cursor en la pantalla pantalla OK Selecciona la opción en la que se encuentra el cursor Volver Vuelve a la última pantalla Entrada Ppulsación Corta Muestra la barra de selección de la fuente Menú Pulsación Larga Muestra el menú Vol Aumenta el nivel de volumen Vol Disminuye el nivel de volumen Silencio Interruptor de encendido Foco Hacia Fuera Izquierda Abajo Volver Ppulsación Corta En...

Страница 93: ...cción Relación de aspecto Relación de proyección Corrección trapezoidal Entrada de energía Vatios integrados Uso Entrada Salida Altavoz TFT LCD 1920x1080 1920x1080 LED Funcionamiento manual 4 8 21 8 ft 40 200 inches 16 9 4 3 1 56 1 Corrección manual 15 100V 240V 50 60Hz 140W HDMIx2 USBx2 AVx1 Connector de Audio de 3 5 mmx1 auriculares o altavoces 5Wx1 ES 05 ...

Страница 94: ...ción El tamaño la forma y la posición de su pantalla La ubicación de una toma de corriente adecuada Asegúrese de que el proyector tiene suficiente espacio a su alrededor para el flujo de aire Puede colgar el proyector del techo mediante un soporte de montaje especial NO INCLUIDO o simplemente colocarlo sobre una superficie estable Es posible que tenga que cambiar el modo de proyección para que las...

Страница 95: ...onfigurar Configurar de Pantalla Modo de proyección Zoom de imagen Modo proporcional Modo de imagen Focusing Configurar de sistema Lengua Actualización de software Restaurar la configuración de fábrica Inactividad automática ES 07 ...

Страница 96: ...or del 3 de una unidad a otra Los datos anteriores son sólo de referencia Por favor utilice las medidas reales cuando instale el dispositivo Nota 1 Se requiere una pantalla de retroproyección específica para utilizar la función de retroproyección 2 Quite los 4 tapones de goma de las esquinas de la parte inferior del proyector para instalarlo en el techo ...

Страница 97: ... se refiere al ajuste de la imagen de un proyector que está mostrando una imagen angular Esto es un problema a menudo cuando se monta un proyector ya que a menudo se monta por encima o por debajo de la línea central horizontal de la pantalla Esto significa que la imagen se mostrará en la pantalla en un ángulo y esto cambiará la forma de la imagen a un trapezoide en lugar de un rectángulo Para corr...

Страница 98: ...en el control remoto hasta que la imagen sea clara Si la imagen no se aclara y en cambio se vuelve más borrosa mantenga presionado el otro botón de enfoque hasta que la imagen se aclare Opción1 Menú en pantalla en el menú vaya a la pestaña Configurar seleccione Focusing y luego presione y mantenga presionado el botón Lzquierda Derecha en el panel del proyector o el botón Lzquierda Derecha del cont...

Страница 99: ...IA Inserte una unidad USB en cualquiera de los puertos USB mostrados en el diagrama siguiente En el menú en pantalla seleccione la pestaña Multimedia A continuación elija el contenido que desea visualizar Película Música Imagen Documento Esta sección le guía sobre cómo conectar el proyector con otros equipos ES 11 ...

Страница 100: ...diagrama Abra el menú en pantalla y seleccione la fuente HDMI HDMI1 o HDMI2 en la pestaña Fuente de señal Esto le permitirá mostrar la pantalla de cualquier dispositivo que se haya conectado DIVX RM 3GP AVI MKV FLV MOV MP4 MPG VOB MPG RMVB RM MP3 AAC WAV LOAS PCM OGG FLAC AC3 Audio Formato Formato soportado por Multi media Imagen Formato Vídeo Formato Documento Formato JPEG BMP PNG TXT ES 12 ...

Страница 101: ...ación y luego conecte las clavijas RCA del dispositivo a los puertos RCA del adaptador También puedes utilizar un cable AV singular si esta es una opción para tu dispositivo Una vez conectado vaya al menú en pantalla y seleccione AV en Fuente de señal como se muestra a continuación 640 x 480 800 x 600 Resolución soportada 1024 x 768 1280 x 720 1280 x 800 1280 x 1024 1366 x 768 1440 x 900 1440 x 96...

Страница 102: ...Formato soportada NTSC PAL Multimedia Fuente de señal Configurar ES 14 ...

Страница 103: ...cas Asegúrate de que el proyector y tu dispositivo están conectados a la misma red Las instrucciones sobre cómo conectar el proyector a una red están disponibles en la sección Menús de Configurar en la página 103 Una vez que ambos dispositivos estén conectados a la misma red o en el caso de una conexión por cable una vez que el dispositivo haya sido enchufado al proyector en el menú en pantalla se...

Страница 104: ...su ordenador es Windows 10 o superior y tiene WiFi de doble banda incorporado En el proyector selecciona Windows Cast en las opciones En su ordenador introduzca la tecla Windows K para abrir la barra lateral de conexión para Miracast y luego seleccione NexiGo PJ20 en la lista de dispositivos La conexión se ha completado Multimedia Fuente de señal Configurar ES 16 ...

Страница 105: ...utadora con un proyector basado en basado en tecnología de pantalla WiFi 1 En su computadora abra el menú de configuración 2 Acceda a la configuración de pantalla o al duplicado de pantalla 3 Seleccione su receptor Miracast NexiGo PJ20 Waiting for connection Proyector ordenador ...

Страница 106: ...Phone y iPad Conecta tu iPhone o iPad al puerto USB Monitor de pantalla que se muestra en el siguiente diagrama En el proyector selecciona iOS Cable Cast en las opciones Toque Confiar cuando el teléfono tableta muestre un mensaje que diga confiar en este dispositivo y luego entra la contraseña del dispositivo para finalizar la conexión ES 18 ...

Страница 107: ...el NexiGo PJ20 de la lista La conexión se ha completado MIRACAST COMPARTE LA PANTALLA DESDE EL TELÉFONO TABLETA ANDROID DE FORMA INALÁMBRICA Nota Los dispositivos Android pueden tener una funcionalidad mixta con Miracast La mayoría de los dispositivos lo soportarán de alguna manera OnePlus Google Pixel Buscar cast Samsung Buscar Vista Inteligente Sony Buscar Pantalla Espejo Diferentes dispositivos...

Страница 108: ...n Pantalla Espejo En la lista de dispositivos de reflejo disponibles seleccione el dispositivo NexiGo PJ20 de la lista La conexión se ha completado Refleja tu iPhone iPad o iPod touch Asegúrese de que su dispositivo iOS esté conectado a la misma red que su proyector o conecte el dispositivo iOS con AP mediante el proyector 1 En su dispositivo iOS abra el Centro de control y toque Screen Mirroring ...

Страница 109: ...misma red En el proyector seleccione DLNA en las opciones En el dispositivo desde el que quieres realizar la transmisión abre una aplicación que admita la transmisión YouTube es un ejemplo y luego toca el botón de la aplicación que te permite transmitir Seleccione NexiGo PJ20 en la lista de opciones Pulse el botón de reproducción del vídeo y ahora mostrará el vídeo a través del proyector ES 21 ...

Страница 110: ...a actualización primaria del firmware del proyector que encontrará en los ajustes del proyector Este firmware se actualizará automáticamente por lo que esto sólo es necesario en caso de un error con el actualizador automático Restaurar los valores de fábrica Restablece el software del proyector a los valores de fábrica Borra la contraseña del WiFi y o las cachés Versión del software Muestra la ver...

Страница 111: ...lación de aspecto La relación de aspecto es una cifra que identifica el tamaño de una imagen por su anchura y altura Las relaciones de aspecto más comunes son 4 3 y 16 9 Modo de imagen Ajuste la configuración del proyector Ajuste el color el brillo el contraste y o la claridad Focusing Ajuste el enfoque del proyector ES 23 Multimedia Fuente de señal Configurar Configurar de Pantalla Modo de proyec...

Страница 112: ...royector 3 En el menú en pantalla seleccione Configurar Configurar de sistema Actualización de software 4 El software se actualizará automáticamente por favor no intente utilizar el proyector hasta que se complete la actualización Nota Todos los envíos actuales del mercado vienen con el último firmware no es necesario actualizarlo El proyector se reiniciará después de la actualización del software ...

Страница 113: ...ector se apague automáticamente AJUSTES DE LA CONEXIÓN DESPLÁCESE HACIA ABAJO EN LA PESTAÑA DE AJUSTES PARA LOCALIZAR ESTOS AJUSTES Conexión WiFi Conecte el proyector a la red WiFi 1 En el menú en pantalla seleccione Configurar y luego desplácese hacia abajo hasta que vea la opción denominada WiFi Setting Seleccione esa opción 2 Seleccione su red inalámbrica de la lista como se muestra a continuac...

Страница 114: ...etooth Seleccione esa opción 2 Encienda el Bluetooth para el proyector así como en el dispositivo que desea conectar y luego busque en la lista que se muestra a continuación el dispositivo de audio Bluetooth para conectar 3 Seleccione ese dispositivo y empareje los dos dispositivos La conexión Bluetooth se ha completado Conexión configuraciones WIFI Setting Bluetooth Multimedia Fuente de señal Con...

Страница 115: ...tos de alta tensión Un contacto involuntario puede provocar una grave descarga eléctrica y podría causar la muerte No intente reparar este producto usted mismo Póngase en contacto directamente con el fabricante si tiene algún problema para ejercer la garantía 4 No modifique este equipo 5 Evite que el proyector se caiga o se tire 6 No oriente la lente del proyector hacia el sol 7 Utilice únicamente...

Страница 116: ...eden causar daños a la unidad o crear un peligro de incendio 15 Esta unidad puede resultar dañada por los líquidos Mantenga los líquidos alejados de la unidad para evitar daños Los daños por líquidos no están cubiertos por la garantía 16 Si el proyector no se utiliza durante un periodo de tiempo prolongado desenchúfelo de la fuente de energía 17 Si hay algún problema mecánico con el proyector póng...

Страница 117: ...Manuale Utente PJ20 Proiettore LCD NexiGo 1080P Video sull installazione Manuale Utente ...

Страница 118: ...ntattateci in qualsiasi momento all indirizzo cs nexigo com per ricevere ulteriore assistenza Questo prodotto è coperto dalla nostra generosa garanzia del produttore di 1 anno si prega di visitare il sito www nexigo com per ulteriori informazioni sulla garanzia e di registrarsi su nexigo com warranty per una garanzia EXTRA ONE YEAR Da parte di tutti noi qui a NexiGo vogliamo darvi di nuovo il benv...

Страница 119: ...ntazione 2 Trapezio Regolazione 3 Jack Audio da 3 5 mm 4 Porta d Ingresso AV 5 Porta d ingresso USB 6 Porta d ingresso USB Monitoraggio dello schermo 7 Porta d ingresso HDMI 8 Ingresso per l alimentazione Jack 9 Ricevitore IR 10 Obiettivo 11 Su 12 Giù 13 Sinistra 14 Destra 15 OK 16 Ritornare 7 ...

Страница 120: ... Richiede 2 batterie AAA non incluse 1 x Cavo di Alimentazione 1 x Cavo AV 1 x Manuale d Utente 1 Dispositivo audio 2 DVD e VCD 3 Disco rigido mobile e disco flash USB 4 Disco rigido mobile disco flash USB iPhone e iPad 5 TV box TV stick e computer INTRODUZIONE ALLA CONNESSIONE ...

Страница 121: ...a Su Giù spostare il cursore nello schermo display OK Selezionare l opzione su cui si trova attualmente il cursore Ritornare Ritornare all ultima schermata Ingresso Pressione Breve Visualizzare la barra di selezione della sorgente Menu Pressione Prolungata Visualizzare il menu Vol Aumentare il livello del volume Vol Diminuire il livello del volume Muto Interruttore di Alimentazione Focus Out Sinis...

Страница 122: ...nsione della Proiezione Rapporto d Aspetto Rapporto di Proiezione Trapezio Potenza d Ingresso Utilizzo Watt Integrato Ingresso Uscita Altoparlante TFT LCD 1920x1080 1920x1080 LED Manuale di funzionamento 4 8 21 8 ft 40 200 inches 16 9 4 3 1 56 1 Manuale di correzione 15 100V 240V 50 60Hz 140W HDMIx2 USBx2 AVx1 Jack Audio da 3 5 mmx1 cuffie o gli altoparlanti 5Wx1 ...

Страница 123: ...zione dello schermo La posizione di una presa di corrente adatta Assicurarsi che il proiettore abbia spazio sufficiente intorno per il flusso d aria Il proiettore è progettato per essere installato in uno dei quattro layout È possibile appendere il proiettore al soffitto tramite una speciale staffa di montaggio NON INCLUSA o semplicemente posizionarlo su una superficie stabile Potrebbe essere nece...

Страница 124: ...mpostazione Impostazione dell immagine Modo di proiezione Riduzione immagine Modalità di proporzione Modalità immagine Focusing Impostazione del sistema Lingua Aggiornamento software Ripristina le impostazioni di fabbrica Autospeg nimento ...

Страница 125: ...irca il 3 da unità a unità I dati di cui sopra sono solo per riferimento Si prega di usare le misure reali quando si installa il dispositivo Nota 1 Per utilizzare la funzione di retroproiezione è necessario uno schermo di retroproiezione specifico 2 Rimuovere i 4 tappi in gomma agli angoli nella parte inferiore del proiettore per il montaggio al soffitto ...

Страница 126: ...olazione dell immagine di un proiettore che sta visualizzando un immagine angolata Questo è spesso un problema quando si monta un proiettore perché spesso sarà montato sopra o sotto la linea centrale orizzontale dello schermo Questo significa che l immagine sarà visualizzata sullo schermo con un angolo e questo cambierà la forma dell immagine in un trapezio invece di un rettangolo Per correggere q...

Страница 127: ...essa a fuoco sul telecomando finché l immagine non è nitida Se l immagine non è nitida e diventa invece più sfocata tieni premuto l altro pulsante di messa a fuoco finché l immagine non si schiarisce Opzione1 Menu su schermo nel menu vai alla scheda Impostazione seleziona Focusing quindi tieni premuto il pulsante Sinistra Destra sul pannello del proiettore o il pulsante Sinistra Destra sul telecom...

Страница 128: ...LTIMEDIALI Inserire un unità USB in una delle porte USB mostrate nel diagramma sottostante Nel menu sullo schermo selezionare la scheda Multimedia Poi scegliere il contenuto che volete visualizzare Film Musica Foto File Questa sezione vi guida su come collegare il proiettore con altre apparecchiature ...

Страница 129: ...ante Aprire il menu sullo schermo e selezionare la sorgente HDMI HDMI1 o HDMI2 nella scheda Fonte del segnale Questo vi permetterà di visualizzare lo schermo di qualsiasi dispositivo sia stato collegato DIVX RM 3GP AVI MKV FLV MOV MP4 MPG VOB MPG RMVB RM MP3 AAC WAV LOAS PCM OGG FLAC AC3 Audio Formato Formato Multimediale supportato Foto Formato Video Formato File Formato JPEG BMP PNG TXT ...

Страница 130: ... mostrato qui sotto e poi collegare le spine RCA dal dispositivo alle prese RCA sull adattatore Puoi anche usare un singolo cavo AV se questa è un opzione per il tuo dispositivo Una volta collegato andare nel menu sullo schermo e selezionare AV sotto Fonte del segnale come mostrato di seguito 640 x 480 800 x 600 Risoluzione Supportata 1024 x 768 1280 x 720 1280 x 800 1280 x 1024 1366 x 768 1440 x ...

Страница 131: ...IT 14 Formato di supporto NTSC PAL Multimedia Fonte del segnale Impostazione ...

Страница 132: ...nessioni senza fili Assicurarsi che il proiettore e il dispositivo siano collegati alla stessa rete Le istruzioni su come collegare il proiettore ad una rete sono disponibili nella sezione Menu delle Impostazione a pagina 129 Una volta che entrambi i dispositivi sono collegati alla stessa rete o nel caso di una connessione cablata una volta che il dispositivo è stato collegato al proiettore nel me...

Страница 133: ...ssa rete che il tuo computer sia Windows 10 o superiore e che abbia il WiFi dual band integrato Sul proiettore selezionare Windows Cast dalle opzioni Sul tuo computer inserire il tasto Windows K per aprire la barra laterale Connect per Miracast e poi selezionare NexiGo PJ20 nell elenco dei dispositivi La connessione è ora completa Multimedia Fonte del segnale Impostazione ...

Страница 134: ...proiettore basato su basato sulla tecnologia di visualizzazione WiFi 1 Sul tuo computer apri il menu delle impostazioni 2 Accedere alle impostazioni dello schermo o al mirroring dello schermo 3 Seleziona il tuo ricevitore Miracast NexiGo PJ20 Waiting for connection Proiettore computer ...

Страница 135: ...o su dispositivi iPhone e iPad Collegare il tuo iPhone o iPad alla porta USB Schermo Monitor mostrata nel diagramma qui sotto Sul proiettore selezionare iOS Cable Cast dalle opzioni Toccare Trust quando il telefono tablet mostra un messaggio che dice trust this device e poi inserire la password del dispositivo per finire la connessione ...

Страница 136: ...vi di mirroring disponibili e selezionare NexiGo PJ20 dall elenco La connessione è ora completa MIRACAST CONDIVIDERE LO SCHERMO DEL TELEFONO TABLET ANDROID IN MODALITÀ SENZA FILI Nota i dispositivi Android possono avere funzionalità miste con Miracast La maggior parte dei dispositivi lo supporterà in qualche modo OnePlus Google Pixel Search Cast Samsung Search Smart View Sony Search Screen Mirrori...

Страница 137: ...ring dello schermo Nell elenco dei dispositivi di mirroring disponibili selezionare il dispositivo NexiGo PJ20 dall elenco La connessione è ora completa Esegui il mirroring del tuo iPhone iPad o iPod touch Assicurati che il tuo dispositivo iOS sia connesso alla stessa rete del proiettore o collega il dispositivo iOS con AP tramite Projector 1 Sul tuo dispositivo iOS apri Control Center e tocca Scr...

Страница 138: ...llegati alla stessa rete Sul proiettore selezionare DLNA dalle opzioni Sul dispositivo da cui vuoi fare il cast aprire un app che supporta il casting YouTube è un esempio e poi toccare il pulsante sull app che ti permette di fare il cast Selezionare NexiGo PJ20 dall elenco delle opzioni Premere il pulsante di riproduzione sul video e ora verrà visualizzato il video tramite il proiettore ...

Страница 139: ...dall aggiornamento del firmware primario del proiettore che si trova nelle impostazioni del proiettore Questo firmware si aggiornerà automaticamente quindi questo è necessario solo in caso di un errore con il programma di aggiornamento automatico Ripristinare le impostazioni di fabbrica Ripristinare il software del cast alle impostazioni di fabbrica Cancellare la password WiFi e o la cache Version...

Страница 140: ...zioni in alto sono le Impostazioni dell Immagine Modalità di proiezione Per cambiare la modalità del proiettore Le opzioni sono standard specchiata capovolta e capovolta e specchiata Riduzione immagine Cambiare la dimensione degli oggetti mostrati sullo schermo Modalità di proporzione Le proporzioni sono una cifra che identifica la dimensione di un immagine in base alla sua larghezza e altezza Le ...

Страница 141: ...software Aggiornare la versione del software sul proiettore 1 Si prega di controllare nexigo com periodicamente per il download di nuovi firmware 2 Scaricare l ultimo firmware su una chiavetta USB poi inserire la chiavetta in una porta USB del proiettore 3 Nel menu sullo schermo selezionare Impostazione Impostazione del sistema Aggiornamento software 4 Il software verrà aggiornato automaticamente ...

Страница 142: ...aticamente il proiettore IMPOSTAZIONI DI CONNESSIONE SCORRERE VERSO IL BASSO NELLA SCHEDA DELLE IMPOSTAZIONI PER INDIVIDUARE QUESTE IMPOSTAZIONI Connessione WiFi Collegare il proiettore al WiFi 1 Nel menu sullo schermo selezionare Impostazioni e poi scorrere verso il basso fino a vedere l opzione etichettata WiFi Setting Selezionare questa opzione 2 Selezionare la rete senza fili dall elenco come ...

Страница 143: ...tooth Selezionare questa opzione 2 Accendere il Bluetooth per il proiettore così come sul dispositivo a cui si desidera connettersi e poi cercare nell elenco mostrato di seguito il dispositivo audio Bluetooth da collegare 3 Selezionare quel dispositivo e accoppiare i due dispositivi La connessione Bluetooth è ora completa Connessione impostazioni WIFI Setting Bluetooth Multimedia Fonte del segnale...

Страница 144: ...ntatto inavvertito può provocare una grave scossa elettrica e può causare la morte Non tentare di riparare questo prodotto da soli Si prega di contattare direttamente il produttore in caso di problemi per esercitare la garanzia 4 Non modificare questo apparecchio 5 Evitare di far cadere o lanciare il proiettore 6 Non rivolgere l obiettivo del proiettore verso il sole 7 Usare solo il cavo di alimen...

Страница 145: ... del proiettore in quanto ciò può causare danni all unità o creare un pericolo di incendio 15 Questa unità può essere danneggiata dai liquidi Tenere i liquidi lontani dall unità per evitare danni I danni da liquidi non sono coperti dalla garanzia 16 Se il proiettore rimane inutilizzato per un periodo di tempo prolungato scollegare dalla fonte di alimentazione 17 Se ci sono dei problemi meccanici c...

Страница 146: ...Register to get an EXTRA ONE year warranty Only valid in registering within 14 days of product delivery nexigo com warranty Get in touch with FREE online services facebook com letsnexigo ...

Отзывы: