background image

Copyright © 2015 NEXCOM International Co., Ltd. All Rights Reserved.

55

NSA 7130 User Manual 

Chapter 4: BIOS Setup

Save & Exit

Advanced

Security

Boot

Main

Version 2.17.1245. Copyright (C) 2015 American Megatrends, Inc.

Aptio Setup Utility - Copyright (C) 2015 American Megatrends, Inc.

→←: Select Screen
↑↓: Select Item
Enter: Select
+/-: Change Opt.
F1: General Help
F2: Previous Values
F3: Optimized Defaults
F4: Save & Reset
ESC: Exit

Selects PCIe port Bifurcation for 

selected slot(s)

IOU0 (IIO PCIe Port 2

IOU1 (IIO PCIe Port 3

No PCIe port active 

Socket 1 PcieD02F0 - Port 2A

Socket 1 PcieD02F2 - Port 2C

Socket 1 PcieD03F0 - Port 3A

Socket 1 PcieD03F1 - Port 3B

Socket 1 PcieD03F2 - Port 3C
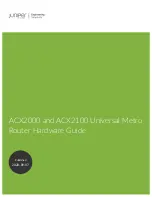
IIO1 Configuration

IntelRCSetup

[x8x8]

[x8x4x4]

[PCU Squelch exit ig. . .]

IOU0 (IIO PCIe Port 2)

Port Bifurcation settings for IOU 0.

IOU1 (IIO PCIe Port 3)

Port Bifurcation settings for IOU 1.

No PCIe Port Active

Configures the workaround solution for ECO when the PCIe ports are not 
active.

Save & Exit

Advanced

Security

Boot

Main

Version 2.17.1245. Copyright (C) 2015 American Megatrends, Inc.

Aptio Setup Utility - Copyright (C) 2015 American Megatrends, Inc.

→←: Select Screen
↑↓: Select Item
Enter: Select
+/-: Change Opt.
F1: General Help
F2: Previous Values
F3: Optimized Defaults
F4: Save & Reset
ESC: Exit

Control to enable/disable IOAT 

devices

Enable IOAT

IOAT Configuration

IntelRCSetup

[Disable]

Enable IOAT

Enables or disables the Intel

®

 I/O Acceleration Technology.

Содержание NSA 7130

Страница 1: ...NEXCOM International Co Ltd NEXCOM International Co Ltd Published January 2016 www nexcom com Network and Communication Solutions Network Security Appliance NSA 7130 User Manual ...

Страница 2: ...iv Chapter 1 Product Introduction Overview 1 Key Features 1 Hardware Specifications 2 Knowing Your NSA 7130 3 Front Panel 3 Rear Panel 4 Chapter 2 Jumpers and Connectors Before You Begin 5 Precautions 5 Jumper Settings 6 Locations of the Jumpers and Connectors 7 Jumpers 8 Console CTS Strap 8 TPM Select 8 RTC Clear 9 Password Clear 9 ME Firmware Update 10 PERST Strap 10 BMC Strap 11 Console UART Co...

Страница 3: ...Card Signals Connector 21 Riser Card Signals Connector 22 Block Diagram 23 Chapter 3 System Setup Removing the Chassis Cover 24 Installing an External SATA Hard Drive 25 Installing a LAN Module 27 Installing the Rackmount Rails 29 Chapter 4 BIOS Setup About BIOS Setup 31 When to Configure the BIOS 31 Default Configuration 32 Entering Setup 32 Legends 32 BIOS Setup Utility 34 Main 34 Advanced 35 In...

Страница 4: ...EXCOM International Co Ltd All other product names mentioned herein are registered trademarks of their respective owners Regulatory Compliance Statements This section provides the FCC compliance statement for Class A devices and describes how to keep the system CE compliant Declaration of Conformity FCC This equipment has been tested and verified to comply with the limits for a Class A digital dev...

Страница 5: ... Polybrominated diphenyl Ethers PBDE 0 1 or 1 000ppm In order to meet the RoHS compliant directives NEXCOM has established an engineering and manufacturing task force in to implement the introduction of green products The task force will ensure that we follow the standard NEXCOM development procedure and that all the new RoHS components and new manufacturing processes maintain the highest industry...

Страница 6: ...ective products making sure it is durable enough to be resistant against further damage and deterioration during transportation In case of damages occurred during transportation the repair is treated as Out of Warranty Any products returned by NEXCOM to other locations besides the customers site will bear an extra charge and will be billed to the customer Repair Service Charges for Out of Warranty...

Страница 7: ...nd power supply are inconsistent with these instructions or the instructions for accessory modules contact the supplier to find out how you can ensure that your computer meets safety and regulatory requirements Cautions Electrostatic discharge ESD can damage system components Do the described procedures only at an ESD workstation If no such station is available you can provide some ESD protection ...

Страница 8: ...e the soft metal or plastic parts of the connectors Safety Information Before installing and using the device note the following precautions Read all instructions carefully Do not place the unit on an unstable surface cart or stand Follow all warnings and cautions in this manual When replacing parts ensure that your service technician uses parts specified by the manufacturer Avoid using the system...

Страница 9: ...e voltage and current rating marked on the product 10 All cautions and warnings on the equipment should be noted 11 If the equipment is not used for a long time disconnect it from the power source to avoid damage by transient overvoltage 12 Never pour any liquid into an opening This may cause fire or electrical shock 13 Never open the equipment For safety reasons the equipment should be opened onl...

Страница 10: ...ion of the installed software operating system version application software etc A complete description of the problem The exact wordings of the error messages Warning 1 Handling the unit carry the unit with both hands and handle it with care 2 Maintenance to keep the unit clean use only approved cleaning products or clean with a dry cloth Conventions Used in this Manual Warning Information about c...

Страница 11: ...920 Chung Cheng Rd ZhongHe District New Taipei City 23586 Taiwan R O C Tel 886 2 8226 7796 Fax 886 2 8226 7792 Email sales nexcom com tw www nexcom com tw NEXCOM Intelligent Systems Taichung Office 16F No 250 Sec 2 Chongde Rd Beitun Dist Taichung City 406 R O C Tel 886 4 2249 1179 Fax 886 4 2249 1172 Email sales nexcom com tw www nexcom com tw Japan NEXCOM Japan 9F Tamachi Hara Bldg 4 11 5 Shiba M...

Страница 12: ...ww nexcomitalia it NEXCOM Shanghai Room 603 604 Huiyinmingzun Plaza Bldg 1 No 609 Yunlin East Rd Shanghai 200333 China Tel 86 21 5278 5868 Fax 86 21 3251 6358 Email sales nexcom cn www nexcom cn NEXCOM Surveillance Technology Room202 Building B the GuangMing Industrial Zone Zhonghua Rd Minzhi Street Longhua District Shenzhen 518000 China Tel 86 755 8364 7768 Fax 86 755 8364 7738 Email steveyang ne...

Страница 13: ...ng Fei F6 32Tx5 NYLOK NIGP F6 32Tx5 NI NYLOK 8 3 50311F0100X00 H Round Head Screw w Spring Flat Washer Long Fei P3x6L P3x6 iso SW6x0 5 NI 1 4 50311F0162X00 H Round Head Screw GW Washer Long Fei P4x8 iso w NI 1 5 5041110028X00 AL Handle for UTM625 VER A TENG JYE 105x64x10 5mm Color Sophos White 1 6 5044440031X00 Rubber Foot Kang Yang RF20 5 4P 19 8x18x5 0mm 4 7 6012200052X00 PE Zipper Bag 8 170x240...

Страница 14: ...egment Expansion Slot Location Slot NSK 5150R F8 10SK0515002X0 Intel i350 PCIe x8 8 SFP None None All Slot NSK 5199R F2 10SK0519909X0 Intel 82599 PCIe x8 2 SFP None None All Slot NSK CVCK 10SK0CVCK00X0 DH8920CC PCIe x8 4 Copper Dual Latch 2 None All Slot NSK CTCK 10SK0CTCK03X0 DH8925CL PCIe x8 None None None All Slot NSK 5199R F2 PCIe 10GbE module with 2 SFP ports based on Intel 82599EB chipset NS...

Страница 15: ...uction Chapter 1 Product Introduction Key Features Dual Intel Xeon E5 2600 V3 Processors Support DDR4 1866 2133 ECC REG up to 512GB On board 16G LAN Copper Fibre 4x 10G SFP Two LAN Module Slots Overview Support Two Swappable 3 5 SATA SAS HDDs Support CRPS 1 1 Redundant Power Supply 2U 450mm depth chassis design ...

Страница 16: ...erface Front 8x RJ45 8x SFP port 4x SFP ports Support 2x 20 Characters LCD module SIO interface Power status HDD status LAN status Bypass status LEDs 2x 3 5 HDD Swappable bays 2x LAN Module bays 2x USB 2 0 ports 1x RJ45 type Console port 1x Software button 2x Management LAN ports I O Interface Rear 3x Swappable System FANs 1x VGA Port 2x USB 2 0 ports Devices 1x onboard CFast socket Power Input 70...

Страница 17: ...Modules 2 LAN module bays Reset Button Press to restart the system USB Ports Used to connect USB 2 0 1 1 devices Console Port Used to connect RJ45 type console port Management LAN Ports 2 LAN ports used for managing the system 10G SFP and SFP Ports Used to connect SFP and SFP modules for connecting fiber optic network devices Copper LAN Ports Used to connect LAN network devices LED Indicators Indi...

Страница 18: ...ction Rear Panel VGA Power switch AC Power Sockets USB Ports USB Ports Used to connect USB 2 0 1 1 devices Power Switch Press to power on or power off the system VGA Used to connect an analog VGA monitor AC Power Sockets Dual redundant power supply sockets plug an AC power cord here before turning on the system ...

Страница 19: ...rself before touching any internal components by touching a metal object Static electricity can damage many of the electronic components Humid environments tend to have less static electricity than dry environments A grounding strap is warranted whenever danger of static electricity exists Precautions Computer components and electronic circuit boards can be damaged by discharges of static electric...

Страница 20: ... jumpers ensure that the jumper caps are placed on the correct pins When the jumper cap is placed on both pins the jumper is short If you remove the jumper cap or place the jumper cap on just one pin the jumper is open Refer to the illustrations below for examples of what the 2 pin and 3 pin jumpers look like when they are short on and open off Two Pin Jumpers Open Left and Short Right Three Pin J...

Страница 21: ...l Chapter 2 Jumpers and Connectors Locations of the Jumpers and Connectors The figure below shows the location of the jumpers and connectors CON1 FAN3 CN3 CON2 J7 J10 VGACONN1 J11 JP11 JTPMSEL1 JCLRM1 JP2 JP6 JP8 JMEUP1 JMEUP2 JP10 CN4 CN5 J8 J9 CON3 SW3 LAN1 CN6 JP12 CN2 FAN2 FAN1 CN1 ...

Страница 22: ...s Console CTS Strap Connector type 1x3 3 pin header 2 54mm pitch Connector location JP12 TPM Select Connector type 1x3 3 pin header 2 54mm pitch Connector location JTPMSEL1 1 3 1 3 Pin Function 1 2 RTS to CTS 2 3 CTS 2 3 On default Pin Function 1 2 Enable some special commands 2 3 Disable some special commands 2 3 On default ...

Страница 23: ...nectors RTC Clear Connector type 1x3 3 pin header 2 54mm pitch Connector location JCLRM1 1 3 Password Clear Connector type 1x3 3 pin header 2 54mm pitch Connector location JMEUP1 1 3 Pin Function 1 2 No Clear CMOS 2 3 Clear CMOS 1 2 On default Pin Function 1 2 No Clear Password 2 3 Clear Password 1 2 On default ...

Страница 24: ...onnector type 1x3 3 pin header 2 54mm pitch Connector location JMEUP2 1 3 Pin Function 1 2 Disable ME Force Update 2 3 ME Force Update 1 2 On default PERST Strap Connector type 1x2 2 pin header 2 54mm Connector location JP6 Pin Function NC PCIE Device RST signal refer PCH PLTRST 1 2 PCIE Device RST signal refer PCH PROCPWRGD NC default 1 2 ...

Страница 25: ...ectors BMC Strap Connector type 1x2 2 pin header 2 54mm Connector location JP10 Console UART Controller Strap Connector type 1x2 2 pin header 2 54mm Connector location JP11 Pin Function NC Enable BMC 1 2 Disable BMC NC default Pin Function NC System UART Controller 1 2 BMC Debug UART Controller NC default 1 2 1 2 ...

Страница 26: ...o Ltd All Rights Reserved 12 NSA 7130 User Manual Chapter 2 Jumpers and Connectors FM_PLD_DEBUG Connector type 1x2 2 pin header 2 54mm Connector location JP8 Pin Function NC Disable CPLD Debug Mode 1 2 Enable CPLD Debug Mode NC default 1 2 ...

Страница 27: ... and Connectors Connector Pin Definitions External Connectors System Reset Button Connector location SW3 Pin Definition 1 GND 2 RST_BTN_N RJ45 Console Port Connector location LAN1 8 1 Pin Definition Pin Definition 1 SP_RTS1_R 2 SP_DTR1_R 3 SP_TXD1_R 4 GND 5 SP_DCD1_R 6 SP_RXD1_R 7 SP_DSR1_R 8 SP_CTS1_CON ...

Страница 28: ...ector type 2x5 10 pin header Connector location CN5 2 1 10 9 Pin Definition Pin Definition 1 SP_DCD2 2 SP_RXD2 3 SP_TXD2 4 SP_DTR2 5 GND 6 SP_DSR2 7 SP_RTS2 8 SP_CTS2 9 SP_RI2 10 GND CPLD JTAG Pin Header Connector type 1x6 6 pin header 2 54mm Connector location JP2 Pin Definition Pin Definition 1 P3V3_AUX 2 GND 3 JTAG_ TCK 4 JTAG_TDO 5 JTAG_TDI 6 JTAG_TMS 1 6 ...

Страница 29: ...ctors USB 2 0 JST Connector Connector type 1x6 6 pin header 2 0mm Connector location J10 1 6 Pin Definition Pin Definition 1 P5V 2 USB2_L_DN2 3 USB2_L_DP2 4 USB2_L_DN2 5 USB2_L_DP2 6 GND Pin Definition Pin Definition 1 P12V 2 GND 3 GND 4 P5V CF Module Power Connector type 1x4 4 pin Wafer Connector location CN4 1 4 ...

Страница 30: ...l Chapter 2 Jumpers and Connectors SATA HDD Power Connector Connector type 1x4 4 pin header Connector location J7 1 4 Pin Definition Pin Definition 1 P12V 2 GND 3 GND 4 P5V SATA DOM Power Connector Connector type 1x2 JST 2 pin header Connector location J11 Pin Definition 1 P5V 2 GND 2 1 ...

Страница 31: ...d Connectors System Fan Connectors Connector type 2x2 4 pin header Connector location CN1 CN2 and FAN3 Pin Definition Pin Definition 1 GND 2 P12V 3 TACH 4 PWM 1 2 4 3 Pin Definition Pin Definition 1 GND 2 P12V 3 TACH 4 PWM CPU Fan Connectors Connector type 1x4 4 pin Wafer Connector location FAN1 and FAN2 1 4 ...

Страница 32: ...ctor location VGACONN1 I2C Debug Header Connector type 1x4 4 pin header Connector location CN6 Pin Definition Pin Definition 1 DACROA_B 2 DACGOA_B 3 DACBOA_B 4 NC 5 GND 6 GND 7 GND 8 GND 9 VGA_VCC 10 GND 11 NC 12 AVSYNCO_B 13 AHSYNCO_B 14 AVSYNCO_B 15 DDC_CLKO_B 16 NC Pin Definition Pin Definition 1 SMB_IPMB_STBY_C_DATA 2 GND 3 SMB_IPMB_STBY_C_CLK 4 P5V_AUX 1 2 15 16 1 4 ...

Страница 33: ...in header Connector location CON1 and CON2 Pin Definition Pin Definition A1 A9 GND B1 B9 GND A10 A18 P12V B10 B18 P12V A19 PSU_SMB_DATA B19 GND A20 PSU_SMB_CLK B20 PS_EN_PSU_N A21 GND B21 P12V_STBY A22 IRQ_SML1_PMBUS_ ALERT_N B22 RETURN_SENSE A23 PWRGD_PS_PWROK B23 PRESEND1 A24 AC_FAIL_PSU B24 12V_REMOTE_SENSE A25 P3V3_AUX B25 PRESEND2 Pin Definition Pin Definition 1 GND 2 GND 3 GND 4 GND 5 P12V 6...

Страница 34: ...nnector type 2x3 6 pin header Connector location CON3 Pin Definition Pin Definition A1 P3V3 D1 P3V3_AUX A2 P3V3 D2 P3V3_AUX A3 P3V3 D3 P3V3_AUX A4 P3V3 D4 P3V3_AUX B1 P5V E1 GND B2 P5V E2 GND B3 P5V E3 GND B4 P5V E4 GND C1 P12V F1 GND C2 P12V F2 GND C3 P12V F3 GND C4 P12V F4 GND A1 A2 A3 A4 B1 B2 B3 B4 C1 C2 C3 C4 D1 D2 D3 D4 E1 E2 E3 E4 F1 F2 F3 F4 ...

Страница 35: ...D G6 GND H1 CON2_TX_DN1 H2 CON2_TX_DN2 H3 CON2_TX_DN3 H4 CON2_TX_DN4 H5 CON2_TX_DN5 H6 CON2_TX_DP7 I1 CON2_TX_DP1 I2 CON2_TX_DP2 I3 CON2_TX_DP3 I4 CON2_TX_DP4 I5 CON2_TX_DP5 I6 CON2_TX_DN7 Pin Definition Pin Definition A1 LPC_LAD0 A2 LPC_LAD1 A3 LPC_LAD2 A4 LPC_LAD3 A5 LPC_FRAME_N A6 CK_33M_PCIE3 B1 GND B2 CON2_RX_DN7 B3 CON2_RX_DN6 B4 CON2_RX_DN5 B5 CON2_RX_DN4 B6 GND C1 PWRGD_PCH_PWROK C2 CON2_R...

Страница 36: ...5 GND G6 GND H1 CON1_TX_DN1 H2 CON1_TX_DN2 H3 CON1_TX_DN3 H4 CON1_TX_DN4 H5 CON1_TX_DN5 H6 CON1_TX_DP7 I1 CON1_TX_DP1 I2 CON1_TX_DP2 I3 CON1_TX_DP3 I4 CON1_TX_DP4 I5 CON1_TX_DP5 I6 CON1_TX_DN7 Pin Definition Pin Definition A1 CLK_33K_SUSCLK A2 SMB _CLK A3 SMB _DATA A4 NC A5 GND A6 GND B1 RISER_FAN_TAC B2 CON1_RX_DN7 B3 CON1_RX_DN6 B4 CON1_RX_DN5 B5 CON1_RX_DN4 B6 CLK_100M _DN C1 PWRGD C2 CON1_RX_D...

Страница 37: ...R 12 5 Channel 2 Channel 3 Channel 4 Internal Connector PCH Wellsburg CPU0 Haswell EP 2x UART SPI 8MB SPI Flash RGMII PHY RTL8211D BMC AST2300 1300 VIDEO RGB Rear 128MB DDR 3 AST2300 support only AST2300 support only Intel I211 MAC PHY QPI 9 6GT s CPU1 Haswell EP USB3 0 PCIe Gen2 x1 UART Intel I350 Intel I350 Intel I350 Intel I350 PCIe Gen3 x8 4x 10GbE SFP 8x GbE RJ45 SFP PCIe Gen3 x4 PCIe Gen3 x4...

Страница 38: ...ift up the cover to remove it Chapter 3 System Setup Removing the Chassis Cover 1 Remove the screws on the chassis cover then put them in a safe place for later use CAUTION CAUTION CAUTION Prior to removing the chassis cover make sure the unit s power is off and disconnected from the power sources to prevent electric shock or system damage Lift here ...

Страница 39: ...d with 2 external SATA 3 5 HDD drive bays To install a SATA HDD please follow the instructions below 1 Push the eject button on the desired HDD drive bay to release the latch Please correctly follow the below instructions and noted items to avoid making unnecessary damages 2 Grab on the latch and pull the drive tray out gently Eject button CAUTION CAUTION CAUTION Latch ...

Страница 40: ...e onto the tray and align the mounting holes on the drive with the mounting holes on the tray then use the provided mounting screws to secure the drive in place 5 Slide the tray back into the drive bay and push firmly until you hear a distinctive click sound 4 Repeat step 3 for securing the screws on the other side of the HDD tray ...

Страница 41: ... for later use Please correctly follow the below instructions and noted items to avoid making unnecessary damages Make sure the power supply is switched off and disconnected from the power sources before replacing or adding LAN modules to prevent electric shock or system damage CAUTION CAUTION CAUTION 2 Use the handle provided and insert the handle into the two holes on the LAN module Handle Inser...

Страница 42: ...tor side of the module is at the rear side of the tray Important Before using Optical fiber for transferring data make sure you have connected an approved Optical Transceiver Module User needs to install appropriate and UL approved Laser Class I Transceivers rated 3 3Vdc max 1W 5 Secure the module in place with screws and slide the tray back into the bay Connector side ...

Страница 43: ...anual Chapter 3 System Setup Installing the Rackmount Rails The system comes with rack ears installed on the front panel The rack ears are used to support the system in a rack cabinet 1 Extend the rackmount rail to its maximum length Rack ear Rack ear Slide here Fully extended rail ...

Страница 44: ... Tma specified by the manufacturer 2 Reduced Air Flow Installation of the equipment in a rack should be such that the amount of air flow required for safe operation of the equipment is not compromised 3 Mechanical Loading Mounting of the equipment in the rack should be such that a hazardous condition is not achieved due to uneven mechanical loading 4 Circuit Overloading Consideration should be giv...

Страница 45: ... is configured with the values found in CMOS With easy to use pull down menus you can configure such items as Hard drives diskette drives and peripherals Video display type and display options Password protection from unauthorized use Power management features The settings made in the setup program affect how the computer performs It is important therefore first to try to understand all the setup ...

Страница 46: ...ntered the error will be reported in one of two different ways If the error occurs before the display device is initialized a series of beeps will be transmitted If the error occurs after the display device is initialized the screen will display the error message Powering on the computer and immediately pressing allows you to enter Setup Legends Key Function Moves the highlight left or right to se...

Страница 47: ...up screen it indicates that there are more available fields not shown on the screen Use the up and down arrow keys to scroll through all the available fields Submenu When appears on the left of a particular field it indicates that a submenu which contains additional options are available for that field To display the submenu move the highlight to that field and press ...

Страница 48: ...ous Values F3 Optimized Defaults F4 Save Reset ESC Exit Set the Date Use Tab to switch between Date elements BIOS Information BIOS Vendor Core Version Compliancy Project Version Build Date and Time Memory Information Total Memory System Date System Time Access Level American Megatrends 5 009 UEFI 2 3 PI 1 2 G715 0 06 x64 04 14 2015 14 54 45 4096 MB Mon 05 12 2014 07 12 16 Administrator System Date...

Страница 49: ...s Inc Select Screen Select Item Enter Select Change Opt F1 General Help F2 Previous Values F3 Optimized Defaults F4 Save Reset ESC Exit System ACPI Parameters ACPI Settings AST2300 Super IO Configuration Serial Port Console Redirection PCI Subsystem Settings Network Stack Configuration CSM Configuration Trusted Computing USB Configuration ACPI Settings This section is used to configure ACPI settin...

Страница 50: ...elp F2 Previous Values F3 Optimized Defaults F4 Save Reset ESC Exit Set Parameters of Serial Port 1 COMA AST2300 Super IO Configuration Super IO Chip Serial Port 1 Configuration Serial Port 2 Configuration AST2300 Serial Port 1 Configuration This section is used to configure serial port 1 Serial PortGSIO200 Enables or disables the serial port Change SettingsGSIO60 Selects an optimal setting for th...

Страница 51: ...n Serial PortGSIO200 Device Settings Change SettingsGSIO60 Enabled IO 2F8h IRQ 3 Auto Serial Port Console Redirection This section is used to configure the serial port that will be used for console redirection Advanced Version 2 17 1245 Copyright C 2015 American Megatrends Inc Aptio Setup Utility Copyright C 2015 American Megatrends Inc Select Screen Select Item Enter Select Change Opt F1 General ...

Страница 52: ...or more bytes Data Bits The options are 7 and 8 Bits Per Second Selects the serial port transmission speed The speed must match the other side Long or noisy lines may require a lower speed Parity A parity bit can be sent with the data bits to detect some transmission errors Even Parity bit is 0 if the number of 1 s in the data bits is even Odd Parity bit is 0 if number of 1 s in the data bits is o...

Страница 53: ...ress space SR IOV Support Enables or disables SR IOV support PCI Express Settings Advanced Version 2 17 1245 Copyright C 2015 American Megatrends Inc Aptio Setup Utility Copyright C 2015 American Megatrends Inc Select Screen Select Item Enter Select Change Opt F1 General Help F2 Previous Values F3 Optimized Defaults F4 Save Reset ESC Exit Enables or Disables PCI Express Device Relaxed Ordering PCI...

Страница 54: ...n 2 17 1245 Copyright C 2015 American Megatrends Inc Aptio Setup Utility Copyright C 2015 American Megatrends Inc Select Screen Select Item Enter Select Change Opt F1 General Help F2 Previous Values F3 Optimized Defaults F4 Save Reset ESC Exit Enable Disable CSM Support Compatibility Support Module Configuration CSM Support CSM16 Module Version GateA20 Active Option ROM Messages Boot option filter...

Страница 55: ...egacy PCI devices Trusted Computing This section is used to configure trusted computing settings Advanced Version 2 17 1245 Copyright C 2015 American Megatrends Inc Aptio Setup Utility Copyright C 2015 American Megatrends Inc Select Screen Select Item Enter Select Change Opt F1 General Help F2 Previous Values F3 Optimized Defaults F4 Save Reset ESC Exit Enables or Disables BIOS support for securit...

Страница 56: ...sec Auto Auto Legacy USB Support Enable Enables Legacy USB Auto Disables support for Legacy when no USB devices are connected Disable Keeps USB devices available only for EFI applications XHCI Hand off This is a workaround for OSs that does not support XHCI hand off The XHCI ownership change should be claimed by the XHCI driver USB Configuration This section is used to configure the USB EHCI Hand ...

Страница 57: ...lity Copyright C 2015 American Megatrends Inc Select Screen Select Item Enter Select Change Opt F1 General Help F2 Previous Values F3 Optimized Defaults F4 Save Reset ESC Exit Change Per Socket Settings Processor Configuration Per Socket Configuration Processor Socket Socket 0 Socket 1 Processor ID 000306F2 000306F2 Processor Frequency 2 600GHz 2 600GHz Processor Max Ratio 1AH 1AH Processor Min Ra...

Страница 58: ...ues F3 Optimized Defaults F4 Save Reset ESC Exit Select Screen Select Item Enter Select Change Opt F1 General Help F2 Previous Values F3 Optimized Defaults F4 Save Reset ESC Exit Number of Cores to Enable 0 means all cores 12 Cores available CPU Socket 0 Configuration CPU Socket 1 Configuration CPU Socket 0 Configuration Cores Enabled IOT Cfg Cbo Bitmap 0 Processor Configuration CPU Socket 0 Confi...

Страница 59: ...Screen Select Item Enter Select Change Opt F1 General Help F2 Previous Values F3 Optimized Defaults F4 Save Reset ESC Exit Number of Cores to Enable 0 means all cores 12 Cores available Enable the power management features CPU Socket 1 Configuration Cores Enabled IOT Cfg Cbo Bitmap 0 Advanced Power Management Configuration Power Technology CPU P State Control CPU C State Control CPU T State Contro...

Страница 60: ...F4 Save Reset ESC Exit Provides hint to CPU for better performance or power savings Selects whether BIOS or Operating System chooses energy performance bias tunning CPU Advanced PM Tuning Energy Perf BIAS Energy Perf BIAS Energy Performance Tuning Energy Performance BIAS setting Power Performance Switch Workload Configuration Averaging Time Window P0 TotalTimeThreshold P0 TotalTimeThreshold CPU Ad...

Страница 61: ...Security Boot Main Version 2 17 1245 Copyright C 2015 American Megatrends Inc Aptio Setup Utility Copyright C 2015 American Megatrends Inc Select Screen Select Item Enter Select Change Opt F1 General Help F2 Previous Values F3 Optimized Defaults F4 Save Reset ESC Exit DRAM RAPL Baseline enabled and baseline mode DRAM RAPL Configuration DRAM RAPL Baseline Override BW_LIMIT_TF DRAM RAPL Extended DRA...

Страница 62: ... Copyright C 2015 American Megatrends Inc Aptio Setup Utility Copyright C 2015 American Megatrends Inc Select Screen Select Item Enter Select Change Opt F1 General Help F2 Previous Values F3 Optimized Defaults F4 Save Reset ESC Exit QPI Status Help QPI General Configuration QPI Status Degrade Precedence Link Speed Mode Link Frequency Select Link L0p Enable Link L1 Enable Legacy VGA Socket MMIO P2P...

Страница 63: ...s Early Snoop support QPI Debug Print Level Configures the QPI debug print level Save Exit Advanced Security Boot Main Version 2 17 1245 Copyright C 2015 American Megatrends Inc Aptio Setup Utility Copyright C 2015 American Megatrends Inc Select Screen Select Item Enter Select Change Opt F1 General Help F2 Previous Values F3 Optimized Defaults F4 Save Reset ESC Exit QPI Status Number of CPU Number...

Страница 64: ... CPU socket 0 CPU 1 QPI configuration for CPU socket 1 Save Exit Advanced Security Boot Main Version 2 17 1245 Copyright C 2015 American Megatrends Inc Aptio Setup Utility Copyright C 2015 American Megatrends Inc Select Screen Select Item Enter Select Change Opt F1 General Help F2 Previous Values F3 Optimized Defaults F4 Save Reset ESC Exit Bus resources allocation ratio range 0 to 8 CPU 0 Bus Res...

Страница 65: ... Security Boot Main Version 2 17 1245 Copyright C 2015 American Megatrends Inc Aptio Setup Utility Copyright C 2015 American Megatrends Inc Select Screen Select Item Enter Select Change Opt F1 General Help F2 Previous Values F3 Optimized Defaults F4 Save Reset ESC Exit Maximum Memory Frequency Selections in Mhz Do not select Reserved Integrated Memory Controller iMC Memory Frequency ECC Support Dr...

Страница 66: ...enance Refresh Enabling Enables or disables DRAM maintenance refresh Attempt Fast Boot Enables or disables fast boot to speed up the system boot time Save Exit Advanced Security Boot Main Version 2 17 1245 Copyright C 2015 American Megatrends Inc Aptio Setup Utility Copyright C 2015 American Megatrends Inc Select Screen Select Item Enter Select Change Opt F1 General Help F2 Previous Values F3 Opti...

Страница 67: ...emp Stat Phase Shedding Memory Power Savings Memory Power Savings Advanced Options MDLL Off MEMHOT Throttling Mode Mem Electrical Throttling Memory Thermal Set Throttling Mode Configures the thermal throttling mode The options are OLTT or CLTT mode OLTT Peak BW Configures the peak bandwidth for OLTT DIMM Temp Stat Configures the DIMM temp stat Phase Shedding Enables or disables Phase Shedding Inte...

Страница 68: ...on IntelRCSetup Save Exit Advanced Security Boot Main Version 2 17 1245 Copyright C 2015 American Megatrends Inc Aptio Setup Utility Copyright C 2015 American Megatrends Inc Select Screen Select Item Enter Select Change Opt F1 General Help F2 Previous Values F3 Optimized Defaults F4 Save Reset ESC Exit Selects PCIe port Bifurcation for selected slot s IOU1 IIO PCIe Port 3 No PCIe port active Socke...

Страница 69: ...rt 3A Socket 1 PcieD03F1 Port 3B Socket 1 PcieD03F2 Port 3C IIO1 Configuration IntelRCSetup x8x8 x8x4x4 PCU Squelch exit ig IOU0 IIO PCIe Port 2 Port Bifurcation settings for IOU 0 IOU1 IIO PCIe Port 3 Port Bifurcation settings for IOU 1 No PCIe Port Active Configures the workaround solution for ECO when the PCIe ports are not active Save Exit Advanced Security Boot Main Version 2 17 1245 Copyrigh...

Страница 70: ...hange Opt F1 General Help F2 Previous Values F3 Optimized Defaults F4 Save Reset ESC Exit Enable Disable Intel Virtualization Technology for Directed I O VT d by reporting the I O device assignment to VMM through DMAR ACPI Tables Intel VT for Directed I O VT d Intel VT for Directed I O Intel VT for Directed I O VT d IntelRCSetup Enable Intel VT for Directed I O Enables or disables Intel Virtualiza...

Страница 71: ... 17 1245 Copyright C 2015 American Megatrends Inc Aptio Setup Utility Copyright C 2015 American Megatrends Inc Select Screen Select Item Enter Select Change Opt F1 General Help F2 Previous Values F3 Optimized Defaults F4 Save Reset ESC Exit Board Capability SUS_PWR_DN_ACK Send Disabled to PCH DeepSx Show DeepSx Policies Board Capability DeepSx Power Policies GP27 Wake From DeepSx SMBUS Device PCH ...

Страница 72: ...es F3 Optimized Defaults F4 Save Reset ESC Exit This option enables disables the ASPM support for all downstream devices PCI E ASPM Support PCIE Clock Gating PCH DMI ASPM DMI Link Extended Synch Stop and Scream Expanded SPI TPM Tran Subtractive Decode LAN PCI Port used PCI Express Root Port 1 PCI Express Root Port 2 PCI Express Root Port 3 PCI Express Root Port 4 PCI Express Root Port 5 PCI Expres...

Страница 73: ...TA Spin Up Device SATA Device Type SATA Port 5 Software Preserve Port 5 Hot Plug Configured as eSATA Spin Up Device SATA Device Type PCH SATA Configuration IntelRCSetup IntelRCSetup Enabled AHCI Enabled Not Installed Unknown Enabled Disabled Hot Plug supported Disabled Hard Disk Drive Not Installed Unknown Enabled Disabled Disabled Hot Plug supported Disabled Hard Disk Drive Disabled Disabled Hot ...

Страница 74: ...CI Mode Trunk Clock Gating USB Ports Per Port XHCI Idle L1 USB XHCI s755 WA USB XHCI Interrupt USB Configuration IntelRCSetup Disabled Auto Enabled Disabled Enabled Enabled Enabled USB Precondition Enables or disables USB precondition on USB host controller and root ports for faster enumeration xHCI Mode Configures the XHCI mode Trunk Clock Gating Enables or disables Trunk Clock Gating USB Ports P...

Страница 75: ...O lockdown feature RTC Lock Enables or disables bytes 38h 3Fh in the upper and lower 128 byte bank of RTC RAM lockdown BIOS Lock Enables or disables the PCH BIOS lock feature Host Flash Lock Down Enable or disables Host Flash Lock Down GbE Flash Lock Down Enable or disables GbE Flash Lock Down Save Exit Advanced Security Boot Main Version 2 17 1245 Copyright C 2015 American Megatrends Inc Aptio Se...

Страница 76: ...ct Item Enter Select Change Opt F1 General Help F2 Previous Values F3 Optimized Defaults F4 Save Reset ESC Exit Switch all ByPass Mode to Enable Disable after power on Network Configuration Power_ON ByPass Mode Power_OFF ByPass Mode Network Configuration IntelRCSetup ALL Disabled ALL Disabled Power_ON ByPass Mode Enables or disables the LAN module bypass mode after the system powers on Power_OFF B...

Страница 77: ...stem Event Log BMC network configuration View System Event Log BMC User Settings BMC Warm Reset PASSED 32 1 0 77 2 0 Enabled Disabled Disabled Save Exit Advanced IntelRCSetup Server Mgmt Security Boot Main Version 2 17 1245 Copyright C 2015 American Megatrends Inc Aptio Setup Utility Copyright C 2015 American Megatrends Inc Select Screen Select Item Enter Select Change Opt F1 General Help F2 Previ...

Страница 78: ...Save Reset ESC Exit Select to configure LAN channel parameters statically or dynamically by BIOS or BMC Unspecified option will not modify any BMC network parameters during BIOS phase HEX 01 00 C0 5F 7D 70 53 20 00 04 C0 45 70 0A 00 00 Generator ID BMC LUN 0 Channel 0 Sensor Number 0x45 Reserved or Unknown Event Description BMC network configuration Lan channel 1 Configuration Address Current Conf...

Страница 79: ...ettings BMC User Settings Add User Option to add a user Delete User Option to delete a user Change User Settings Option to change user settings Security Administrator Password Select this to reconfigure the administrator s password Save Exit Advanced IntelRCSetup Server Mgmt Security Boot Main Version 2 17 1245 Copyright C 2015 American Megatrends Inc Aptio Setup Utility Copyright C 2015 American ...

Страница 80: ...Order Priorities Adjust the boot sequence of the system Boot Option 1 is the first boot device that the system will boot from next will be Boot Option 2 and so forth Save Exit Advanced IntelRCSetup Server Mgmt Security Boot Main Version 2 17 1245 Copyright C 2015 American Megatrends Inc Aptio Setup Utility Copyright C 2015 American Megatrends Inc Select Screen Select Item Enter Select Change Opt F...

Страница 81: ... dialog box will appear Confirm by selecting Yes Save Exit Advanced IntelRCSetup Server Mgmt Security Boot Main Version 2 17 1245 Copyright C 2015 American Megatrends Inc Aptio Setup Utility Copyright C 2015 American Megatrends Inc Select Screen Select Item Enter Select Change Opt F1 General Help F2 Previous Values F3 Optimized Defaults F4 Save Reset ESC Exit Reset the system after saving the chan...

Отзывы: