background image

31

NewTom GO 2D/3D

EN

 2D/3D OPT E.L. CALIBRATION MANUAL

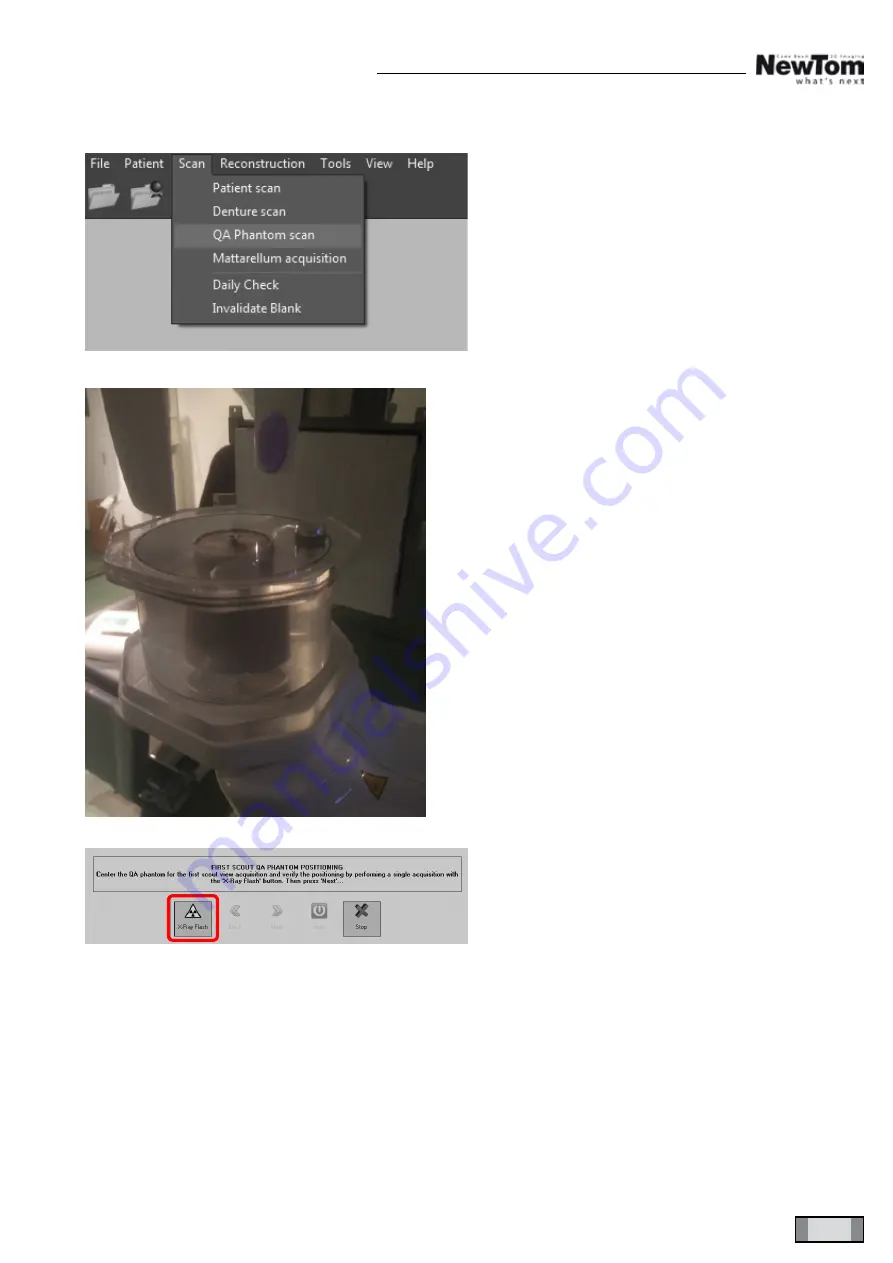
4.4  QA PHANTOM ACQUISITION (OPTIONAL)

From NNT main menu, select “scan” and “QA Phan-

tom scan”


Position phantom on the octagonal plate, as shown in 

the figure (positioning is not that important, as it has a 

central symmetry).


From scout acquisition window, click on “X-ray Flash” 

and press the rays button when prompted.

Содержание GO 2D OPT E.L.

Страница 1: ...1 NewTom GO 2D 3D EN 2D 3D OPT E L CALIBRATION MANUAL EN 2D 3D OPT E L CALIBRATION MANUAL Code Rev Date 97071221 01 10 2017 ...

Страница 2: ...2 NewTom GO 2D 3D EN 2D 3D OPT E L CALIBRATION MANUAL Page left intentionally blank ...

Страница 3: ...ALIBRATION 9 3 1 X RAY ALIGNMENT CHECK 9 3 2 SENSOR CALIBRATION CHECK 14 3 3 VERIFYING THE MECHANICAL CENTERING 15 3 4 LASER CALIBRATION 17 3 5 CALIBRATION DATA BACKUP 19 4 3D CALIBRATION 20 4 1 RAY BEAM CALIBRATION 20 4 2 DAILY CHECK AND BLANK ACQUISITION 26 4 3 TIN SCAN 28 4 4 QA PHANTOM ACQUISITION OPTIONAL 31 4 5 CALIBRATION DATA BACKUP 33 ...

Страница 4: ...4 NewTom GO 2D 3D EN 2D 3D OPT E L CALIBRATION MANUAL Page left intentionally blank ...

Страница 5: ... Support plate Dentition phantom Aluminium filter Laser reference sheet Allen wrench set Screwdriver set When you will be required to assemble the support plate and the dentition phantom remove the chinrest from the machi ne and insert the highlighted pins into the holes where the chinrest was assembled ...

Страница 6: ...6 NewTom GO 2D 3D EN 2D 3D OPT E L CALIBRATION MANUAL Insert the phantom making sure that the pins coincide with the holes highlighted in the following images ...

Страница 7: ...PRELIMINARY OPERATIONSPRELIMINARY OPERATIONS Open the acquisition server software click on Settings then on Change Mode and confirm when prompted Select Service mode and enter the password cefla Open the Acquisistion server software and click on Calibra tion ...

Страница 8: ...D 3D EN 2D 3D OPT E L CALIBRATION MANUAL Enter the serial number and the part number of the column in the suitable fields 96600231 in case of floor mounted co lumn 96600230 in case of wall mounted column Click on OK ...

Страница 9: ...9 NewTom GO 2D 3D EN 2D 3D OPT E L CALIBRATION MANUAL 3 2D CALIBRATION 3 1 X RAY ALIGNMENT CHECK The aim is to check that the X ray beam is inside the red demarcation lines click on Start procedure ...

Страница 10: ...tton when prompted Check that the entire length of the X ray beam is cen tred inside the red lines compare with the following images in particular concerning rotation horizontal alignment and vertical alignment If adjustments are necessary open the generator co ver and operate on the collimator as follows Upper part Lower part ...

Страница 11: ... Rotation If the X ray beam is turned open the monobloc cover and slightly loosen the following screws A B C Correct the rotation manually tighten the screws se lect Image not centred and press ok Repeat the procedure until a perfectly vertical image is obtained ...

Страница 12: ...IBRATION MANUAL Horizontal alignment Slightly loosen the following screws D E Correct the horizontal alignment manually tighten the screws select Image not centred and press ok Repeat the procedure until a horizontally centred ima ge is obtained ...

Страница 13: ...ghten the screws select Image not centred and press ok Repeat the procedure until a vertically centred image is obtained When the image is perfectly centred select Image centred and press OK the software will automatically check the proper alignment even for the Bitewing and Children panoramic positions At the end of the procedure press Ok to confirm and save the data ...

Страница 14: ...CALIBRATION MANUAL 3 2 SENSOR CALIBRATION CHECK Press Start procedure and make sure that any object between source and sensor has been removed The procedure is automatic just press the X ray but ton when required at the end save the data ...

Страница 15: ...n the calibration phantom as shown in the figure Click on Acquire The calibration tool will acquire a complete panora mic image and will display it make sure that the fo cus is centred with respect to the series of circles in the middle of the image i e the number of off focus circles must be the same both above and below the median horizontal line ...

Страница 16: ...essary to modify the position of the chinrest Vice versa if the image is similar to the following one adjust the right hand screw and grub screw At the end of each adjustment press Retry to acqui re a new image and assess it if necessary repeat the operation until an image similar to the following one is obtained To change the image focus position modify the value contained in the offset Y field c...

Страница 17: ...17 NewTom GO 2D 3D EN 2D 3D OPT E L CALIBRATION MANUAL 3 4 LASER CALIBRATION Position the laser reference template on the support as shown in the figure Press Start calibration ...

Страница 18: ...he three laser beams midsagittal canine and Frankfurt plane and the references on the template If one or more lasers are not aligned use a gripper to loosen the springs of the corresponding supports and adjust them manually the Frankfurt plane laser and the canine laser are inside the generator block The midsagittal laser is under the mirror At the end press Exit ...

Страница 19: ...Tom GO 2D 3D EN 2D 3D OPT E L CALIBRATION MANUAL 3 5 CALIBRATION DATA BACKUP Select Device data and Tubehead calibration data Select the folder where the calibration data copy is going to be saved and confirm ...

Страница 20: ...LIBRATION From NNT main menu press Ctrl Alt Shift End keys together to set software in service mode Service Le vel will be displayed at the bottom left under NNT From the Tools menu select Scanner tests press Reset to set device in 3D mode Then from the Tools menu select Beam limiter test ...

Страница 21: ...21 NewTom GO 2D 3D EN 2D 3D OPT E L CALIBRATION MANUAL tick Enable manual tuning During this procedure collimator horizontal position must be adjusted for the different available types of view ...

Страница 22: ...dow area at the edges must be within the red lines see next image Before continuing make sure that the scan area is free from any object Diameter 10 Select the 10x10 field enter the values 3 and 7 inside the Left and Right fields then press Move Enter the 8 and 10 values in the mA and time fields then press Acquisition to perform a ray acquisition If the resulting image is like the following one ...

Страница 23: ...d acquire a new image repeat this procedure until an image like the following oneis acquired where you can distinguish the black colour on the side edges Slightly open collimators to get a uniform grey image again Once finished press Save to save the new setting Then select and save also for the following view fields 10x7 10x6 10x10 HiRes 10x7 HiRes 10x6 HiRes ...

Страница 24: ...osition until obtaining an image like the fol lowing one Once finished press Save to save the new setting Then select and save also for the following view fields 7x7 8x6 8x10 HiRes 8x7 HiRes 8x6 HiRes Diameter 6 Select the 6x7 field enter the 31 and 28 values in the Left and Right fields and press move As soon as the machine is ready perform a new acquisition 8 mA and 20 ms Evaluate the image qual...

Страница 25: ...AL Once finished press Save to save the new setting Then select and save also for the following view fields 6x6 6x7 HiRes 6x6 HiRes After having calibrated all view fields press close The software will ask you whether you want to cancel blanks press yes ...

Страница 26: ...26 NewTom GO 2D 3D EN 2D 3D OPT E L CALIBRATION MANUAL 4 2 DAILY CHECK AND BLANK ACQUISITION From NNT main menu select Scan Daily Check then Start ...

Страница 27: ...g make sure that nobody is present in the room and that the scan area is free The procedure fully automatic lasts approx five mi nutes Once finished the blank acquisition window will be displayed In this case as well some automatic exposures will be performed once procedure is completed make sure that the final image is uniform Then press Close ...

Страница 28: ... lum acquisition Position Tin on octagonal plate as shown in the figu re then press XRay Flash Press rays button when prompted the system acqui res the first scout to check cylinder positioning Make sure that the image is similar to the next one and that there are no error messages about a wrong Tin posi tioning ...

Страница 29: ...29 NewTom GO 2D 3D EN 2D 3D OPT E L CALIBRATION MANUAL Press Next The device acquires the second evaluation scout ima ge make an evaluation like the previous one Press Next then press Start ...

Страница 30: ... rays button when prompted the system makes a complete tin acquisition then it will automati cally open the Tin Report with the results Make sure that none of the reported values has aste risks should this not be the case check tin position and repeat the procedure ...

Страница 31: ...ON OPTIONAL From NNT main menu select scan and QA Phan tom scan Position phantom on the octagonal plate as shown in the figure positioning is not that important as it has a central symmetry From scout acquisition window click on X ray Flash and press the rays button when prompted ...

Страница 32: ...th keys pressed Once the desired position has been reached release mou se button and wait for the Software to warn you to release also the CTRL button Once finished press the rays button when prompted the system acquires a new scout to evaluate the new position To confirm the correct position press Next then press X ray Flash The front scout is acquired no corrections are nee ded Press Next then p...

Страница 33: ...is press Yes The calculations are made automatically once fini shed a report like the one shown in the figure will be displayed If no value has asterisks close the window should this not be the case check QA phantom positioning and repeat the procedure 4 5 CALIBRATION DATA BACKUP From NNT main page select Setting Backup Select the folder for the Backup and press OK ...

Отзывы: