background image

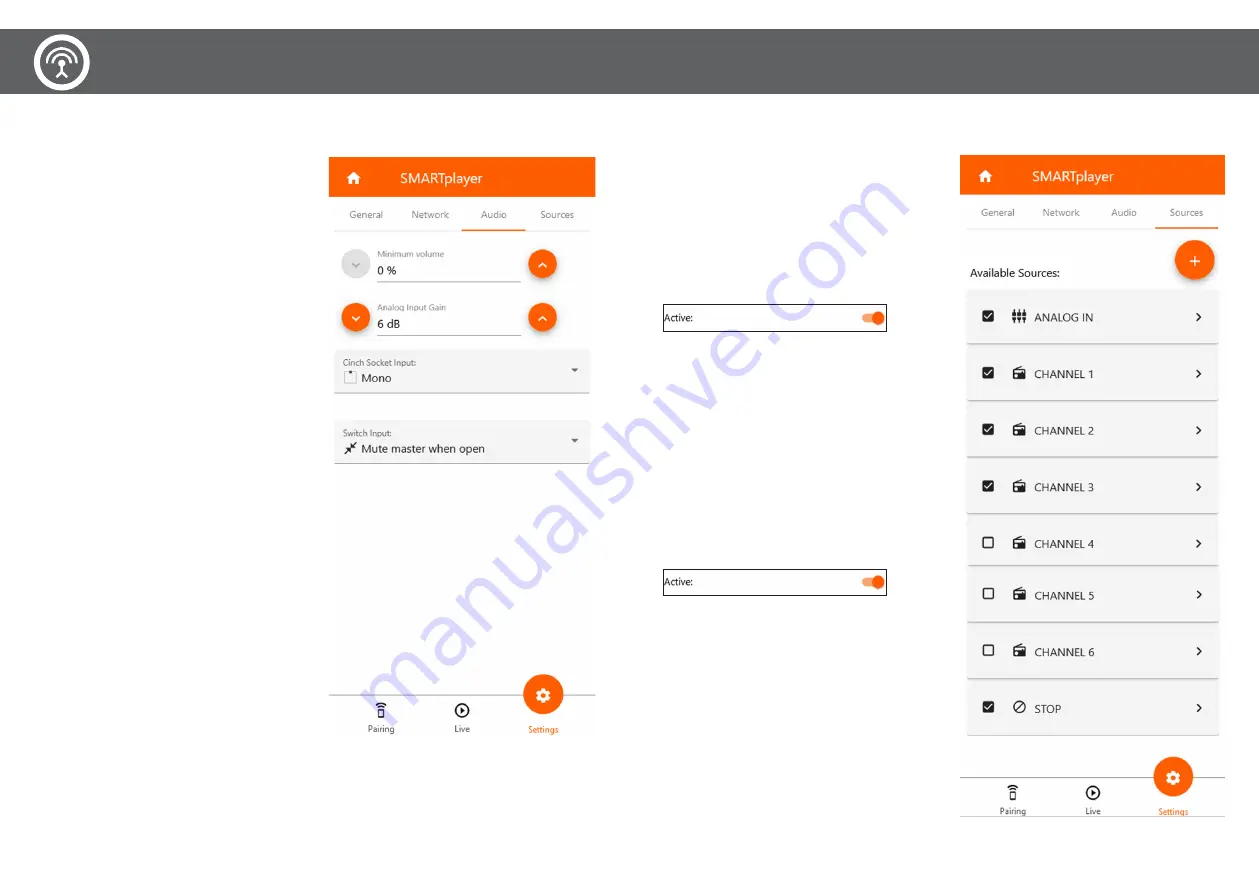
SETTINGS - Audio

1. Minimum Volume: Dient der Einstellung einer Mindestlautstärke. 

2. Gain input (nur bei ANALOG IN): hier kann das Eingangssignal 

von Audioquellen mit unzureichender Lautstärke kompensiert 

werden 

3. Cinch socket input (nur bei ANALOG IN): Auswahl des analogen 

Eingangssignals.

4. Switch Input (Evakuierung): Standardmäßig wird der SMARTplayer 

mit einer Klammer ausgeliefert, der die beiden Kontakte überbrückt. 

Entfernt man diese, wird der Player „Mute“ gestellt. Entsprechend 

dem EVAC Standard bedeutet ein geschlossener Kontakt, dass die 

Musik laufen soll. Im Brandfall wird dieser Kontakt geöffnet. Sollte 

die EVAC Anlage umgekehrt funktionieren, kann das hier geändert 

werden.

SETTINGS - Audio

1. Minimum Volume: Analog Input Gain is used to set a minimum 

volume. 

2. Gain input (only for ANALOG IN): the input signal from audio 

sources with insufficient volume can be compensated

3. Cinch socket input (nur bei ANALOG IN): Selection of the analog 

input signal.

4. Switch Input (Evacuation): The switch input is used to connect to 

existing EVAC systems. As standard, the SMARTplayer is delivered 

with a bracket that bridges the two contacts. If you remove this, the 

player is set to “Mute”. According to the EVAC standard, a closed 

contact means that the music should be playing. This contact is 

opened in the event of a fire. If the EVAC system works the other 

way around, this can be changed here.

WebApp

SETTINGS - Sources

In diesem Register finden Sie bereits vorkonfigurierte Audioquel

-

len. Durch aktivieren der einzelnen Quellen, werden diese beim 

SMARTplayer im Live Modus verfügbar. Bei Verwendung eines 

SMARTstreamers sendet dieser im Standard Modus auf CHANNEL 1 

und kann auf am SMARTplayer auf CHANNEL 1 empfangen werden. 

Es ist keine weitere Einstellung nötig. Dies gilt für CHANNEL 1 bis 

CHANNEL 6.

Zum Aktivieren einer vorkonfigurierten Quelle wählen Sie diese aus 

und aktivieren Sie diese, indem Sie im nächsten Tab den Schiebe

-

regler nach rechts schieben.

SETTINGS - Sources

In this tab you will find preconfigured audio sources. By activa

-

ting the individual sources, these appears for selection on the 

SMARTplayer LIVE mode. When using a SMARTstreamer, it sends 

in standard mode on CHANNEL 1 and can be received on the 

SMARTplayer on CHANNEL 1. No further adjustment is necessary. 

This applies to CHANNEL 1 to CHANNEL 6.

To activate an additional preconfigured source, select it and activate 

it in the next tab by checking the box to the right.

20

21

Содержание SMARTplayer

Страница 1: ...SMARTplayer Bedienungsanleitung Installation manual ...

Страница 2: ...ker erfolgen die mit den ein schlägigen Vorschriften vertraut ist Durch unsachgemäße Arbeiten an der Netzspannung gefährden Sie nicht nur sich selbst sondern auch andere Haben Sie keine Fachkenntnisse für die Montage so nehmen Sie die Montage nicht selbst vor sondern beauftragen Sie einen Fachmann Electrical installation and testing must be carried out with reference to local rules by a qualified ...

Страница 3: ... cloth Only use additional devices recommended by NewTec Design Audio GmbH Never repair the device or make changes to the device yourself In order to guarantee the optimal operating performance and service life of the device use them in an operating environment that is within the temperature range 0 40 C and humidity range 20 80 Do not place the remote control in places that are hot or humid Do no...

Страница 4: ...tenzialfreier Kontakt für MUTE Schaltung 1 x SD Karten Einschub Type Wireless Transmitter Dimensions 14 x 4 x 11 5 cm Weight 240 gr Material chassis ASA painted Protection class IP20 Color black Radio frequency 1 9 Ghz n Dect Transmission 48 000 Hz 16Bit 20 Hz 20kHz Connector Electric cable Power supply AC 100 240 V 50 60 Hz 0 5 A Power consumption Max 5W Connections 1 x LAN Ethernet Port RJ45 100...

Страница 5: ...auf 8mm in die Wand siehe Skizze 2 3 SCHRITT Hängen Sie den SMARTplayer mittels den zwei Montagekreuzen in die Schrauben ein You can either set up the SMARTplayer on a smooth surface or mount it on the wall The alignment on the wall can be done horizontally or vertically Please note the distance to the individual loudspeakers The SMARTplayer is a radio transmitter please position it within sight o...

Страница 6: ...o the SMARTplayer on Cinch socket 10 and 11 You can also start the audio source already which means that the music will be played once the speakers are paired Make sure the loudspeakers are connected to electricty 2 START PAIRING Make sure that the green LED 1 on the SMARTplayer is flashing and that the installed speakers play the recognition tone Now take the remote control aim it at the SMARTpla...

Страница 7: ...ird 4 Volumenregler Damit wird die Master Lautstärke für alle SMARTspeaker erhöht oder reduziert welche mit dem SMARTplayer verbunden wurden 5 Source Die Standard Einstellung des SMARTplayers ist Analog IN und gibt jene Musikquelle wieder welche mittels mitgeliefertem Audiokabel an das Gerät angeschlossen wird Cinch 6 Groups Wenn Sie Volumengruppen angelegt haben im Pairing Mode Groups dann werden...

Страница 8: ...so start the pairing process via web app by clicking on Start Pairing All loudspeakers found are then displayed under Speaker with the corresponding model name and signal strength of the radio signal WebApp Gruppen erstellen Die Groups bedeuten Volumengruppen Alle Lautsprecher einer Gruppe können mittels Volumenregler als gesamte Gruppe lauter oder leiser gestellt werden ohne dass dies die Lautstä...

Страница 9: ...nd is carried out until you click the command again 2 Mute The loudspeaker is muted by clicking on the mute icon This command is carried out until the command is clicked again or the loudspea ker is restarted when power supply is interrupted 3 Signal Status The strength of the received radio signal is displayed by means of waves and additional text 4 Name To name an individual speaker enter the na...

Страница 10: ... SMARTplayer has been running continuously Specifications are displayed in days hours minutes seconds ADVANCED Restart Restart the SMARTplayer All settings are retained Reset The SMARTplayer is reset to factory settings WebApp SETTINGS Network DHCP steht für Dynamic Host Configuration Protocol und be schreibt ein Verfahren das dem SMARTplayer in einem Netzwerk automatisiert Konfigurationsdaten zuw...

Страница 11: ...contacts If you remove this the player is set to Mute According to the EVAC standard a closed contact means that the music should be playing This contact is opened in the event of a fire If the EVAC system works the other way around this can be changed here WebApp SETTINGS Sources In diesem Register finden Sie bereits vorkonfigurierte Audioquel len Durch aktivieren der einzelnen Quellen werden die...

Страница 12: ...he Seite 7 Factory reset The device is not working Disconnect the SMARTplayer from the mains and reconnect it to see if the problem occurs again Check that the power supply unit is correctly plugged into the socket Check whether there is voltage at the socket ATTENTION The status LEDs on the loudspeaker switch off automa tically after 10 minutes The music continues to play anyway The device does n...

Страница 13: ...CONTACT NewTec Design Audio GmbH Negrellistr 13C 39100 BZ Italy 39 0471 058065 support newtec audio com www newtec audio com ...

Отзывы: