background image

INETVU® MOBILE SYSTEM QUICK START 

– NEWTEC MDM3X00 


C-COM Satellite Systems Inc. 

Page 9 


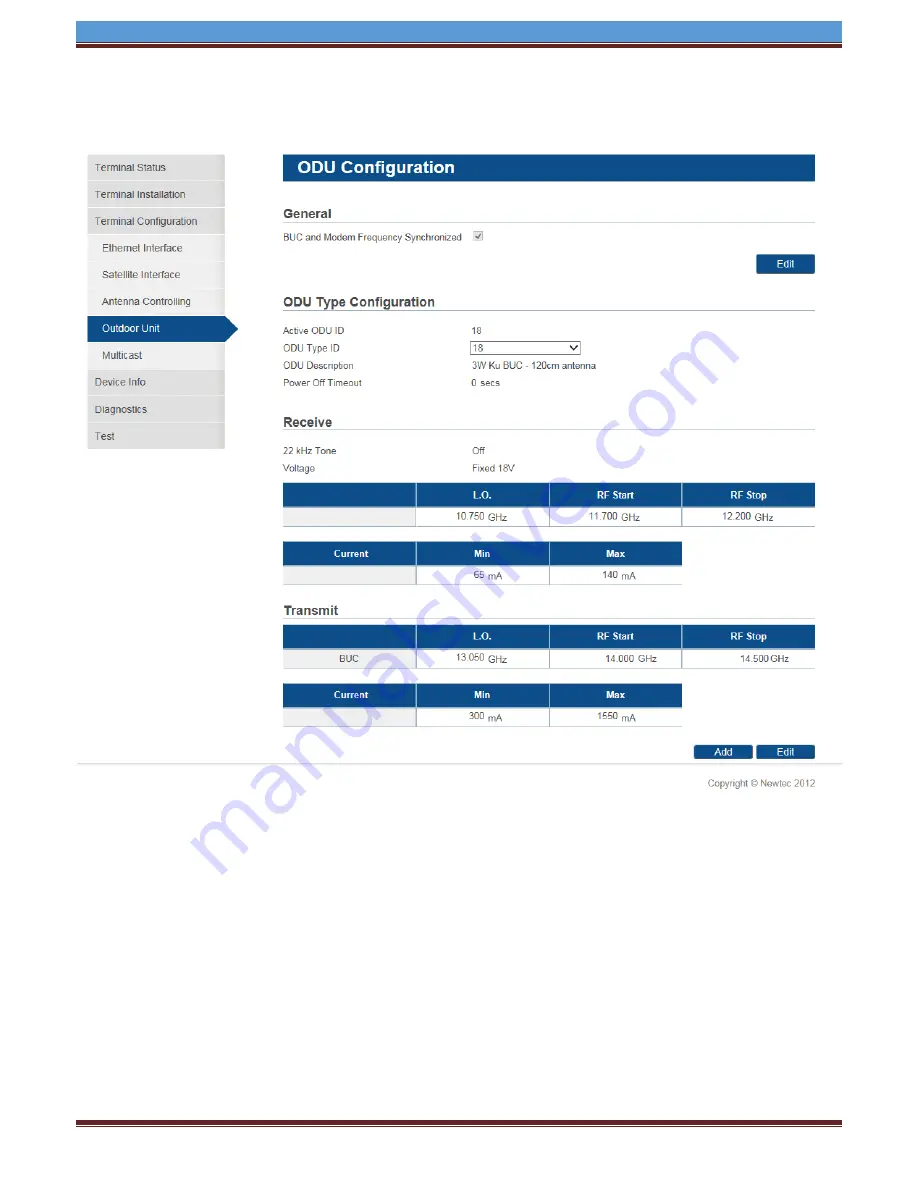
10. Verify ODU RX and TX parameters include your settings. If parameters are incorrect, edit or add 

the correct settings. 


11. Once the settings have been validated, the system is now ready to communicate with the iNetVu 

7000 Controller. You can proceed to configure the iNetVu 7000 Controller. 


Содержание iNetVu MDM3X00

Страница 1: ...Newtec MDM3X00 and the iNetVu 7000 Series Controller 1 877 iNetVu6 www c comsat com Revision 5 0 August 29 2018...

Страница 2: ...INETVU MOBILE SYSTEM QUICK START NEWTEC MDM3X00 C COM Satellite Systems Inc Page 2 This page is intentionally left blank...

Страница 3: ...observed during all phases of setup and operation of this equipment Failure to comply with these precautions or with specific warnings elsewhere in this documentation violates safety standards of des...

Страница 4: ...ernet at broadband speeds The iNetVu Mobile application consists of the iNetVu Mobile software 7000 software for the 7000 Series Controller iNetVu Mobile Application Key Features Automatic re peak on...

Страница 5: ...he pointing procedure has not been already executed contact your service provider or refer to the Newtec User Manual for pointing procedure Service Type Modem Type Modem F W InetVu F W iNetVu S W Inte...

Страница 6: ...ng instructions as antenna will need to be pointed before continuing with this section 1 Log into the Modem Web GUI IP address should have been provided by the service provider 2 Go to Terminal Instal...

Страница 7: ...ETVU MOBILE SYSTEM QUICK START NEWTEC MDM3X00 C COM Satellite Systems Inc Page 7 5 Select the correct ODU and click the confirm button 6 Select and Confirm Spot Beam as provided by your service provid...

Страница 8: ...onfigured for 2002 and the ACU IP is on the same subnet as the Terminal for successful ACU to Terminal OpenAMIP communication 8 Modem will validate the Installation this may take a few minutes If the...

Страница 9: ...0 Verify ODU RX and TX parameters include your settings If parameters are incorrect edit or add the correct settings 11 Once the settings have been validated the system is now ready to communicate wit...

Страница 10: ...oom mounted Radio Transmitter cables and the Transmission Receive coaxial cables have all pre wired There is no need to re calibrate the Mobile Platform unless directed by a C Com Support Technician I...

Страница 11: ...ontroller with Splitter Configuration Ensure Sensor and Motor cables are connected prior to powering on 7000 Series Controller POWER PASS RX GPS Antenna TX Motor Cable Sensor Cable USB Cable TX RX IN...

Страница 12: ...ction Configuration Ensure Sensor and Motor cables are connected prior to powering on 7000 Series Controller RX GPS Antenna TX Motor Cable Sensor Cable USB Cable TX RX IN RX RX OUT MDM3100 Motor Contr...

Страница 13: ...cation Parameters The 7000 Controller may be configured via the Software Application Web Interface LCD interface Only one method is necessary for complete configuration iNetVu Software Application com...

Страница 14: ...der data exists The controller will then peak on the modem signal when the satellite is found RF search should be used as a last resort after DVB and or DVB with reference satellite because search tim...

Страница 15: ...ou may skip this step and proceed to the Software Installation 2 Open Network and Sharing Center Network Connections right click your network card and select Properties 3 Select Internet Protocol Vers...

Страница 16: ...password password a Navigate to the IP menu and press the ENTER button b Press the button to allow for modification on the C_IP field and set the IP address of the controller For example if the Modem...

Страница 17: ...tion and Configuration Please Note Do not connect the Controller via USB until the drivers and software have been installed 1 If you are installing from the USB flash drive or have downloaded from the...

Страница 18: ...TEC MDM3X00 C COM Satellite Systems Inc Page 18 3 Install the FTDI USB Drivers and iNetVu USB Drivers Both are required Click Extract Click Next Click Finish 4 Continue through the USB Driver Installa...

Страница 19: ...your PC 6 Windows XP users will have to follow the new hardware wizard and let windows automatically install the drivers Select No not this time Select Install the software automatically Click Continu...

Страница 20: ...e using the wizard or click NO to proceed to the iNetVu Mobile 7000 software NOTE It is recommended that you continue to the iNetVu Setup Wizard and confirm all required information is correct Please...

Страница 21: ...on screen instructions to update the controller firmware Once complete the wizard will resume 4 You may wish to continue through the wizard to complete the controller configuration or verify the sett...

Страница 22: ...22 5 Configure the Platform Type Version and Serial No If no changes are needed press Next to continue Platform Type Antenna Model Version Antenna Version Serial No Antenna Serial Number It is importa...

Страница 23: ...Newtec as the Service Type After changes have been made please click Next to continue Service Information Type Newtec Interface AMIP Modem Configuration IP Address Enter the Modem IP Address should be...

Страница 24: ...CK START NEWTEC MDM3X00 C COM Satellite Systems Inc Page 24 7 The Satellite Parameters DVB Settings and Search Method will be auto configured based on modem parameters No changes are needed Click Fini...

Страница 25: ...selecting Yes or select No to return to the previous screen to make additional changes 9 Congratulations you have configured your iNetVu Controller 10 Click Find Satellite You should be locked on sate...

Отзывы: