Newmac WFA-85 Скачать руководство пользователя страница 5

-5-

Burning Wood Operating Instructions

When installation is complete, close the supply switch and turn the thermostat above room temperature.

Check to make sure the forced draft fan above the fire door is operating when the thermostat is set above room 

temperature. The draft fan should be off when thermostat is set below room temperature. The maximum draft is 

not to be more than - .05 as damage may result to the furnace when operated as a gravity unit.

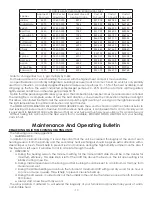
The circulating air blower speed is adjusted at the factory to give an adequate temperature rise under most 

conditions. However, because of various temperatures that can result from burning wood, the blower speed can 

be adjusted by the motor pulley. Under no circumstances should the temperature rise be more than 80°F (27°C).

To start the fire, turn up the thermostat to Maximum setting to turn ON Forced Draft Fan. Confirm the switch on 

the draft fan is in the ON position. Place some newspaper crumpled up in the bottom of the firebox on top of the 

minimum requirement of 2” of sand , ash or firebrick. Add kindling and light the fire.

When the fire starts add some larger pieces of kindling or wood until you have a good fire. The idea is to ultimately 

end up with a good bed of ash and coals which helps to maintain a good controllable fire.

When reloading the firebox there will be a build up of ash and coals from the previous fire. Rake the coals mixed 

with ash to the front of the firebox which places the coals at the front. Load in your wood and the fire should light 

in a few minutes.

RETURN THERMOSTAT IN MAIN LIVING SPACE TO REGULAR SETTING

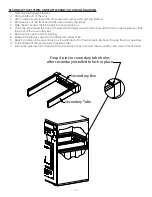
By means of slide plate A above the firedoor, you can control the amount of combustion air allowed into the 

fire box. The position of slide plate A will vary with heat requirement, as well as size and type of wood being burnt. 

Slide plate B should be open when burning wood. 

When the firebox gets full of ash (within two inches of door level), some morning, before loading the firebox, 

push or rake the coals to the rear of the firebox. Remove the ash from the front of the firebox using only the shovel 

supplied for this purpose. When the ashes only are removed from the front, rake the coals from the back to the 

front. Throw in your wood and the fire will again be burning in a few minutes. The fire burns best when the ashes 

are 3” to 4” below the fire door level.

When opening the firedoor, do it slowly so you don’t pull smoke into the building. It is recommended that a 

back up heating system be used during the mild  fall  and spring temperatures or else build  small,  hot “quick 

burning” fires from larger pieces of kindling. During the daily inspection, the firebox walls should be cleaned with 

the scraper to insure any deposits are removed. This will improve heat transfer and operating efficiency of the 

furnace. To assist with starting fires, a manual toggle switch is located on the Forced Draft Fan that can turn off 

the fan to prevent nuisance airflows when trying to light matches in the firebox. For safe operating procedure, 

refer to the “Notice” label on the furnace.

NOTE: Before loading the fire box, turn the thermostat up to insure that the draft fan is on. This provides an 

air curtain to avoid smoke roll out during loading and fans the coals to assist the ignition process of your 

new fuel. It also helps to promote draft when there is inadequate draft. After the fire is established, set the 

thermostat to desired temperature.

NOTES Do not load wood higher than the firebox liner.
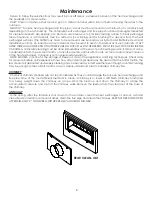
DRAFT CONTROL

COMMANDE DU REGISTRE

DRAFT SLIDE A

DRAFT SLIDE B

WARNING:

 Do not open 

damper when poser is on. 

It could create a fire hazard.

CLOSED

FERMÉ

OPEN

OUVERT

MISE EN GARDE:

 N’ouvrez

pas le régulateur de tirage lorsque

lélectricité circule. Cela pourrait crée

un danger d’incendie.

CLOSED

FERMÉ

MAXIMUM

MAXIMUM

MINIMUM

MINIMUM

Содержание WFA-85

Страница 1: ...WFA 85 WFA 85E All installations must be made in accordance with local and provincial or state codes which may differ from the manual FOR COMMERCIAL USE ONLY USA ONLY NOTICE READ THESE INSTRUCTIONS SA...

Страница 2: ...rect drive motor refer to the Motor Installation Guide A fan center is required to isolate motor leads and to control continuous low speed operation from the thermostat Select the motor heating speed...

Страница 3: ...mper with this furnace 3 Caution If this furnace is used as a replacement for an existing furnace observe the following a Make sure there is a minimum of 6 clearance above the warm air plenum as far a...

Страница 4: ...k drafts whether or not there is combustion present 5 Existing fuel fired equipment in the building such as fireplaces or other heating appliances smell and do not operate properly suffer smoke roll o...

Страница 5: ...of wood being burnt Slide plate B should be open when burning wood When the firebox gets full of ash within two inches of door level some morning before loading the firebox push or rake the coals to t...

Страница 6: ...red temperature It is very important to keep the secondary flames burning to maximize heat output and minimize air pollution so some experimentation will be necessary because each installation is diff...

Страница 7: ...box Do not use additional grates or andirons to support the fire as these may create excessive heat PREPARATION AND STORAGE OF FUEL Solid fuel should be cut and split prior to the heating season and s...

Страница 8: ...m the summer months or any other source will mix with the ash or creosote and cause corrosion of the heat exchanger Corrosion is not covered under warranty NOTE Establish a routine for the storage of...

Страница 9: ...clearances Do not use salt wood driftwood gathered from the seashore Return air ducts are to be metal not wooden TO PREVENT DAMAGE Do not set the flue draft above 05 W C as the fire could burn out of...

Страница 10: ...should hold brick lock up to correct height 4 Install brick by starting at front putting one 1 bottom brick in place then slide one 1 top brick in place Repeat this procedure going down both sides an...

Страница 11: ...at exchanger move the front towards the door opening and pull the tube out of the secondary box 7 Remove through the door opening 8 Repeat the previous steps for the other secondary tube 9 Reach in an...

Страница 12: ...102013 PRT SECONDARY AIR SLIDE PLATE SECONDARY AIR INLET FIREDOOR SLIDE PLATE DAMPER PRIMARY AIR INLET DRAFT CONTROL SLIDE PLATE FAN AND LIMIT CONTROL WIRING CONTROL CHANNEL EXHAUST GASES SMOKE PIPE A...

Страница 13: ...Blue Black wire is TEW 14 1 Yellow wire is TEW 18 7 Blower wire is SPT 3 From insert Blue wire to fan terminal White wire to N terminal Red line to terminal Without Insert White 120V supply to N term...

Страница 14: ...s used WHY THIS CONCERN ABOUT ALLOWING THE WOOD TO DRY Green or wet wood is undesirable for several reasons Green or wet wood tends to mildew and rot which causes a significant reduction in the therma...

Страница 15: ...eosote is to leave the air inlet moderately open after adding wood until the wood is mostly reduced to charcoal and then close the inlet as much as desired This will promote complete combustion during...

Страница 16: ...its air supply although both water and salt are sometimes suggested if a relatively airtight stove is the connected appliance This is easily done by closing the stove s air inlet dampers if all the st...

Страница 17: ...4 03 590 96 Yellow Birch 3000 26 200 000 709 2 496 44 531 90 567 36 Elm 2750 24 500 000 662 8 463 96 497 10 530 24 Soft Maple 2500 24 000 000 649 2 454 44 486 90 519 36 Tamarack 2500 24 000 000 649 2...

Страница 18: ...s furnace must be connected to a separate fused disconnect switch supplying power to the appliance The furnace must be suitably grounded 2 Install the BX cable containing three wires from the Electric...

Страница 19: ...31 18 Place electrical unit directly into supply air of furnace Screw adapter in place for WFA 70 Interlock wire into junction box or front channel CAUTION Only one source of electrical supply shall...

Страница 20: ...ectric thermostat to screw on 24V transformer Disconnect black wire on transformer from previous location Cut red between limit relay and connect black from transformer with red end For connection wit...

Страница 21: ...21 Notes...

Страница 22: ...ranty Brick Rack Top Frame 28160 1 F L Bracket Welded 610605 1 Baffle WAO D3090226 1 Firedoor Assembly 610649 1 Hinge Pin P626H 83485 4 Shovel Handle D3080161 1 Weld Scraper D4080112 1 Draft Control K...

Страница 23: ...void the warranty SA Face Plate D3160623 1 Sec Air Back Plate D4060275 1 Front Gasket D2080001 1 G12 Delhi Blower Fan D2040103 1 Weld Formed Frame D4060194 1 Sec Air Slide D4060276 1 Front Panel 61063...

Страница 24: ...D2020003 1 DRAFT FAN PACKAGE D4100105 1 PULLEY 3 1 4 X 1 2 VS MTR D2240001 1 Firedoor Spacer D2080003 1 Durolon Dovetail Gasket D2080002 1 Firedoor Liner D3160464 1 Firedoor Chute Weld D4060189 1 Inne...

Отзывы: