background image


10 

3. Click a menu item on the left pane and set the parameters as per your needs. When you finish making 
changes to the parameters in a box, click 

Apply settings

 to save the changes. For the details, see the 

following sections. 


Network Settings 

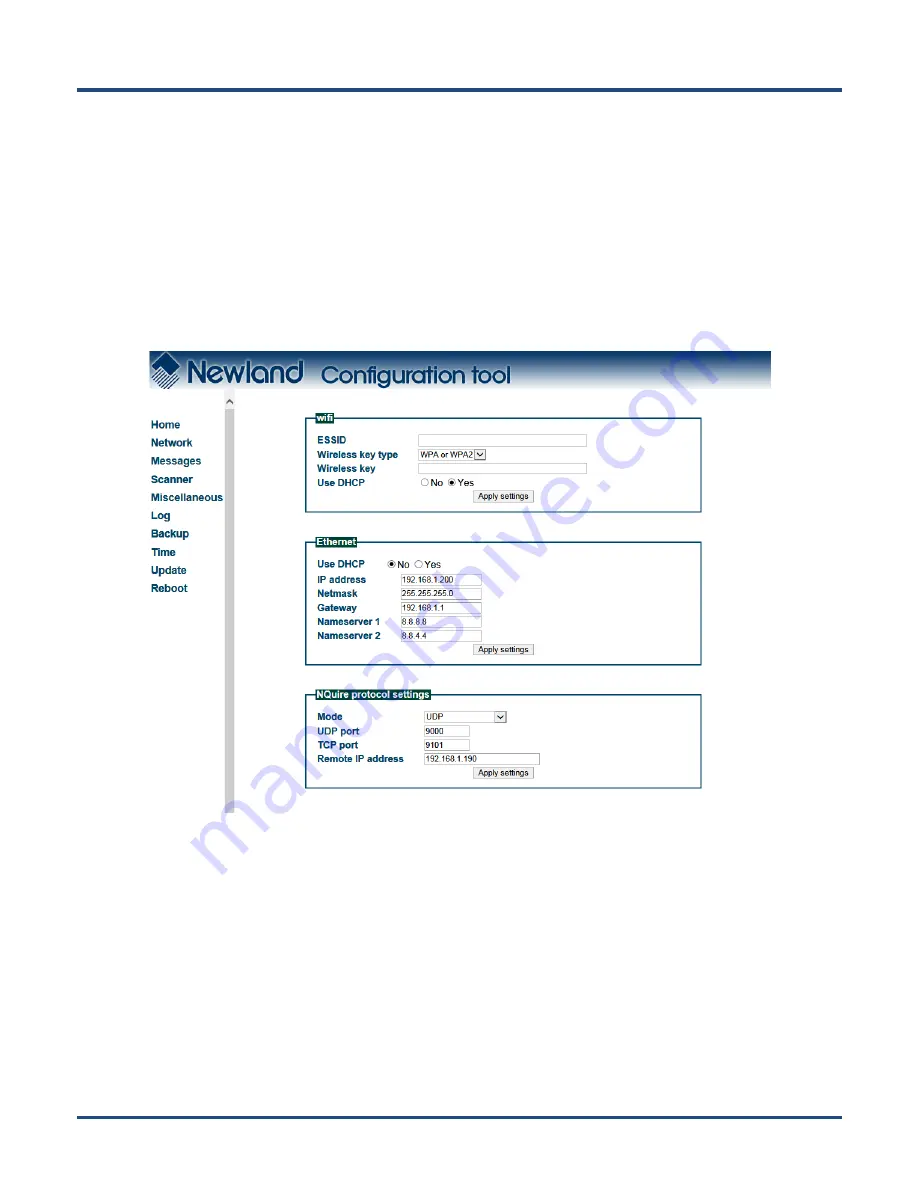
When  you  click 

Network

  in  the  menu,  the  following  page  opens.  You  can  specify  your  own  specific 

network settings here. 


Wifi:

 Set the SSID, wireless key, wireless key type and DHCP of the AP the NQuire is going to connect to. 


Wireless key type: You can choose between three security levels: 

None:  No  encryption  key  is  needed.  The  NQuire  is,  via  your  wireless  router,  available  to  all  Wifi 

enabled devices. 

WEP: Entry-level encryption with a wireless key to limit network access. 

WPA/WPA2: High-end encryption with a wireless key to limit network access. 


Wireless key: Enter the key which is going to be used to encrypt wireless data communication. 

Ethernet:

 Set the Ethernet port parameters. 

Содержание NQuire300 Series

Страница 1: ...NQuire300 Customer Information Terminal User Guide ...

Страница 2: ...ction or design at any time without notice The information contained herein is subject to change without prior notice The products depicted in this manual may include software copyrighted by Fujian Newland Auto ID Tech Co Ltd or third party The user corporation or individual shall not duplicate in whole or in part distribute modify decompile disassemble decode reverse engineer rent transfer or sub...

Страница 3: ...Revision History Version Description Date V1 0 0 Initial release March 31 2017 ...

Страница 4: ... WiringInstructions 6 Installing the Micro SD Card 8 Chapter 3 Configuring the NQuire 9 Introduction 9 Configuring the NQuire with the Web based Tool 9 Network Settings 10 Messages Settings 11 Scanner Settings 13 Miscellaneous Settings 15 Log Settings 18 Backup 19 Time 20 Update 21 Reboot 22 Configuring the NQuire with Programming Barcodes 23 Enter Exit the Setup Mode 23 Enable Disable DHCP 23 Scr...

Страница 5: ...C Commands 30 Introduction 30 Text Display 30 NQuire Command Set 31 Examples 32 Chapter 6 System Update 33 Introduction 33 Updating System with a USB Flash Drive 33 Updating System via FTP 34 Chapter 7 ADB Debug 39 Introduction 39 Using the ADB 39 Chapter 8 Maintenance Troubleshooting 43 Maintenance 43 Keeping the NQuire Dust free 43 Cleaning 43 Troubleshooting 44 Appendix 45 Sample Barcodes 45 Ba...

Страница 6: ...or the first time Chapter 3 Configuring the NQuire Describe how to program the NQuire with a web based tool and with barcodes Chapter 4 Using the NQuire Explains how to scan barcodes and read RFID tags Chapter 5ESC Commands Explains how to control the NQuire with ESC commands Chapter 6System Update Introduces two methods to update system Chapter 7ADB Debug Describes how to use the ADB tool Chapter...

Страница 7: ...ble to add USB or Bluetooth optional peripherals to expand this solution with a printer a handheld scanner for scanning large or bulky items a magnetic stripe card reader and more The NQuire supports 10 100Mbps Ethernet Wifi 802 11b g n optional and Bluetooth 4 0 LE optional and Power over Ethernet so it can be easily integrated into your existing wireless or wired LAN The NQuire can be used for v...

Страница 8: ...3 Power adapter x 1 plug x 5 VESA 75 mount x1 screwdriver x 1 port cover x 2 Plastic wall anchor x 4 GPIO connector x 4 small screw x 6 large screw x 4 Quick Start Guide x 1 ...

Страница 9: ...can Barcode Arrow 6 RFID Antenna 7 USB Host Slave Port 8 USB Host Port 9 Power Jack 10 Ethernet Port 11 GPIO Connectors 12 Cable Trough LEDs on the NQuire Network LED Blue LED on Wifi Ethernet Bluetooth is available Good Read LED Green LED flashes once A barcode has been scanned and decoded ...

Страница 10: ...nstructions below to mount the NQuire onto the VESA 75 mount Step 1 Select a mounting location that is convenient for operation Step 2 For wall mounting install the four plastic expansion anchors in a wall and then secure the bracket of VESA 75 mount to the wall using the four large screws For countertop shelf mounting secure the bracket of VESA 75 mount to a countertop shelf using the four large ...

Страница 11: ...wo in Each contains 2 pins two out Each contains 2 pins Wiring Instructions Select one of the following power supply solutions and make the cable connections accordingly Power adapter solution Step 1 Put the NQuire face down Remove the port cover on the right Step 2 Attach the appropriate plug type to the power adapter and plug it into the power jack on the NQuire Step 3 Lead the cable through the...

Страница 12: ...place the port cover and fasten it with the screw Step 5 Connect the other end of the Ethernet cable to a PoE power module or a PoE switch NOT supplied by Newland The NQuire supports both the Mid span and End span PoE protocol Step 6 Connect DC power to either the third party PoE power module or PoE switch if required Note Do not connect power adapter to the power jack on the NQuire when adopting ...

Страница 13: ... the back cover Slide the slot cover rightward and lift the left end of it Step 2 Insert the Micro SD card into the slot with its metal contacts facing down Step 3 Close the slot cover and slide it leftward until it clicks Step 4 Replace the back cover and fasten it with the screw removed in Step 1 ...

Страница 14: ...nfiguration tool by following the instructions below 1 Open a web browser on your PC IE11 is recommended 2 Enter the NQuire s default IP address 192 168 1 200 in the address bar and then press Enter to open the NQuire configuration tool homepage If an error page is displayed please try pinging the NQuire i Make sure your PC is in the same IP range as the NQuire e g 192 168 1 198 ii Type ping 192 1...

Страница 15: ...re Wifi Set the SSID wireless key wireless key type and DHCP of the AP the NQuire is going to connect to Wireless key type You can choose between three security levels None No encryption key is needed The NQuire is via your wireless router available to all Wifi enabled devices WEP Entry level encryption with a wireless key to limit network access WPA WPA2 High end encryption with a wireless key to...

Страница 16: ...re will listen to connections on the configured TCP port when in client mode the NQuire will try to make the connection using the configured remote IP address and TCP port When there are multiple connections server mode only scanned data will be sent to all connected servers and sent to the configured UDP server port Set UDP TCP port Set remote IP address Note 1 The NQuire ignores Wifi when Ethern...

Страница 17: ...age You can specify what message containing two lines of text to be displayed if the NQuire does not receive a response from the remote server within a preset period of time i e error message timeout after a scan See the Miscellaneous Settings section to learn how to set the error message timeout X Pos Y Pos Set the x and y positions x 0 239 y 0 127 of pixel Vert Align Hor Align Align the text to ...

Страница 18: ...utput via API Application acquires scanned data by receiving system broadcasts Simulate keystroke Output scanned data to keyboard buffer to simulate keyboard input Fill in EditText directly Output scanned data at the current cursor position in EditText Scan Mode Normal mode Presenting a barcode to the NQuire activates a decode session ...

Страница 19: ...racters ISO 8859 1 A common character encoding which covers Western European languages Add a line feed Choose whether to add a line feed after each barcode scanned Enable barcode ID Choose whether to add barcode ID before each barcode scanned See the Barcode ID Table in Appendix for more information Note When you finish making changes to the parameters in a box do not forget to click Apply setting...

Страница 20: ...15 Miscellaneous Settings When you click Miscellaneous in the menu the following page opens You can configure scanner parameters here ...

Страница 21: ...e the NQuire waits for a response from the remote server in seconds When the timeout expires the error message will be displayed for 5 seconds Font codepage Choose either UTF 8 a multi byte codepage universal fontset which supports most used language fonts or one of the following single byte codepages Codepage Description 851 DOS Greek 852 Multilingual West European Latin 1 866 Cyrillic DOS codepa...

Страница 22: ...nvironment GPIO Server message prefix Set the prefix that will be added before GPIO input data Append event counter Choose to append the count of signal level changes or not as per your actual needs Method Choose one of the following three methods to read data from GPIO port On read GPIO Read data using a read command On change Read data when signal level changes Poll Read data by polling the port...

Страница 23: ...hen you click Log in the menu the following page opens You can configure and manage log level settings here Note When you finish making changes to the parameters do not forget to click Apply settings to save the changes ...

Страница 24: ... click Backup in the menu the following page opens You can import export configuration data here Backup Export all settings from the configuration tool into a json file Restore Import a configuration file into the NQuire ...

Страница 25: ...NQuire is properly connected to the Internet before using this feature Timezone Automatic time zone Choose whether to automatically adjust the time zone of the NQuire or not Make sure the NQuire is equipped with a cellular module and a SIM card from your local carrier before using this feature Note When you finish making changes to the parameters in a box do not forget to click Apply settings to s...

Страница 26: ...Update in the menu the following page opens When you want to update system via FTP you can set the FTP server here Note When you finish making changes to the parameters do not forget to click Apply settings to save the changes ...

Страница 27: ... in the menu the following page opens You can reboot the NQuire and reset it to factory settings here Resetting the NQuire to factory settings will delete all data in user space including user defined settings and user installed apps ...

Страница 28: ...a number of programming barcodes to configure the NQuire To exit the setup mode scan the Exit Setup barcode Enter Setup Exit Setup Enable Disable DHCP If DHCP is disabled the NQuire will have a fixed IP address and it will use the most recently configured IP address The default IP address is 192 168 1 200 If DHCP is enabled the NQuire will function in DHCP mode and it is not necessary to put your ...

Страница 29: ...24 Screen Brightness Level 1 Low Level 2 Medium Level 3 High Level 4 Extra High Scanner Sensitivity Normal High Max ...

Страница 30: ...25 Beeper Beeper OFF Beeper ON Reboot Reboot Restore Factory Settings Reboot Return to Desktop Return to Desktop ...

Страница 31: ...ection in this chapter to learn how to export configuration files from the tool Note that the data of a customized configuration barcode should be a valid JSON object It is recommended that you export configuration file using the NQuire configuration tool and then edit it as per your needs The following is an example of a user defined configuration barcode Network Ethernet Gateway 192 168 28 254 N...

Страница 32: ...27 To put a user defined configuration barcode into use scan the following barcodes Use the example above Enter Setup Enable User Defined Configuration Barcode Batch Barcode Exit Setup ...

Страница 33: ...uire follow the instructions below You may scan a barcode in the Sample Barcodes section in Appendix to check if the NQuire reads barcode properly Scanning Barcodes with NQuire301 NQuire301 is only able to read 1D barcodes It emits a red strip shaped aiming beam to help the user to easily position the target barcode within the terminal s field of view to increase scan efficiency Optimal Scan Angle...

Страница 34: ... to easily position the target barcode within the terminal s field of view to increase scan efficiency Omnidirectional Scanning 360 Optimal Scan Distance Reading RFID Tags NQuire 301 302 304 is equipped with an RFID reader which is widely used for access control applications To read an RFID tag or card place it 0 5cm in front of the RFID antenna ...

Страница 35: ...ine some characters will not be shown on the screen Averagely speaking up to 20 characters can be display on a single line Note Every received ASCII value between 20 and 255 which is not part of a command is normally displayed on the screen The following commands control the position and control of text Carriage Return for going to the start position of the next line ESC 0x0D Line Feed for going t...

Страница 36: ...x position is a multiple of 8 pixels Every y position depends on the currently selected font set height of 24 or 32 pixels POS 0 15 0x30 0x3F LINE 0 4 0x30 0x34 2 This allows a text to be displayed anywhere on the screen Note that a character will be partly displayed when it does not fully fit on the screen POS 0 127 0x30 0xAF LINE 0 63 0x30 0x6F 3 Display a text using the currently selected font ...

Страница 37: ...layed 0x0d Carriage Return 500 gr Text to be displayed ESC 0x42 0x31 Large font ESC 0x2E 0x38 5 69 0x03 Align text to right bottom Example 2 COMMAND DESCRIPTION ESC 0x42 0x31 Large font ESC 0x24 Clear the screen move cursor to top left corner ESC 0x2E 0x31 Special offer 0x03 Align text to center top ESC 0x42 0x30 Small font ESC 0x2E 0x34 6 pack water 0 5L 0x03 Align text to center ESC 0x42 0x31 La...

Страница 38: ... website at www newlandaidc com and save it under the root directory of a USB flash drive Do not change the file name 2 De energize the NQuire plug the USB flash drive into the USB Host or USB Host Slave port on the back of the NQuire and re energize the NQuire Then the NQuire will automatically begin the update process 3 Wait for the update process to complete and for the NQuire to automatically ...

Страница 39: ... NQuire and that you can connect to the FTP server Open a web browser and access the NQuire Configuration Tool homepage Click Update and then configure the FTP server and click Apply settings to save the settings For more information see the Update section in Chapter 3 2 Create a directory called nquire300 under the FTP server s root directory ...

Страница 40: ...ee directories named ota config and res in the nquire300 directory 4 Download the NQuire OTA update zip file from the Newland website at www newlandaidc com and save it in the ota directory Do not change the file name ...

Страница 41: ...is text file will contain the md5 value of the NQuire OTA update zip file and the fliename of the zip file separated by a space character as shown below 6 If you want to import a configuration file into the NQuire place the configuration file in the config directory ...

Страница 42: ...ntain the md5 value and filename of each resource file separated by a space character Note that any existing resource files on the NQuire that are not listed in the md5 sumtext file will be deleted after the NQuire downloads resource files from the FTP server and that resource files to be downloaded should not exceed available user storage space on the NQuire 2G bytes in total ...

Страница 43: ...omatically download the resource files in the res directory that are currently unavailable on NQuire to mnt sdcard nquire300 res Your application program may access these files via the path or using Environment getExternalStorageDirectory nquire300 res and use them with remote commands such as display picture command iii The NQuire will automatically download the configuration file from the FTP se...

Страница 44: ...ped for the NQuire The following section describes how to use the ADB Using the ADB 1 Turn on the NQuire If it displays other screen other than the desktop scan the Enter Setup barcode then Return to Desktop barcode to return to the desktop Enter Setup Return to Desktop 2 Tap Settings on the desktop ...

Страница 45: ...40 3 Tap About tablet 4 Tap Build number 7 times to become a developer 5 Tap to return to the previous screen ...

Страница 46: ...41 6 Tap Developer options 7 Select Enable OTG 8 Connect the USB Host Slave port on the NQuire to PC with a USB cable USB Host Slave port ...

Страница 47: ...42 9 Tap OK ...

Страница 48: ...lint free cloth to keep it free of dust dirt and fingerprints Cleaning can be performed during operation When cleaning the housing and display screen please observe the following instructions Use a mild glass spray cleaner spray the cleaner on a soft lint free cloth wipe the NQuire clean The NQuire should NOT be cleaned with cleaners containing aromatic hydrocarbons chloride acids or oxidizing age...

Страница 49: ...s from the host computer No communication between the NQuire and the host computer 1 Check the cables to make sure they are securely connected to the NQuire 2 Ensure the NQuire s IP address is the address the host computer is pinging 3 Check communication parameters The NQuire does not send data to the host computer The NQuire is not connected to the host computer 1 Check the cables to make sure t...

Страница 50: ...45 Appendix Sample Barcodes Code 128 UCC EAN 128 UPC E UPC A Interleaved 2 of 5 Code 39 PDF 417 QR Code Micro QR Data Matrix Chinese Sensible Code ...

Страница 51: ...46 Barcode ID Table Barcode ID EAN 8 FF EAN 13 F Code 128 EAN128 P Interleaved 2 of 5 i Code 39 GS1 Codabar R Codabar Code 93 c PDF417 r QR Code s Data Matrix u RFID option MF ...

Страница 52: ...and Ibérica 34 0 93 303 74 66 info newland id es Newland France 31 0 345 87 00 33 france newland id com Newland Middle East 31 0 345 87 00 33 middleeast newland id com Newland South Africa 27 0 11 553 8010 info newland id co za Newland Italy 39 0 342 056 2227 italy newland id com Newland Russia 31 0 345 87 00 33 russia newland id com Newland Turkey Iran 90 0 544 538 40 49 turkey newland id com ira...

Отзывы: