Page 11
NewerTech MAXPower RAID eSATA 6G-4e
Array Information Window
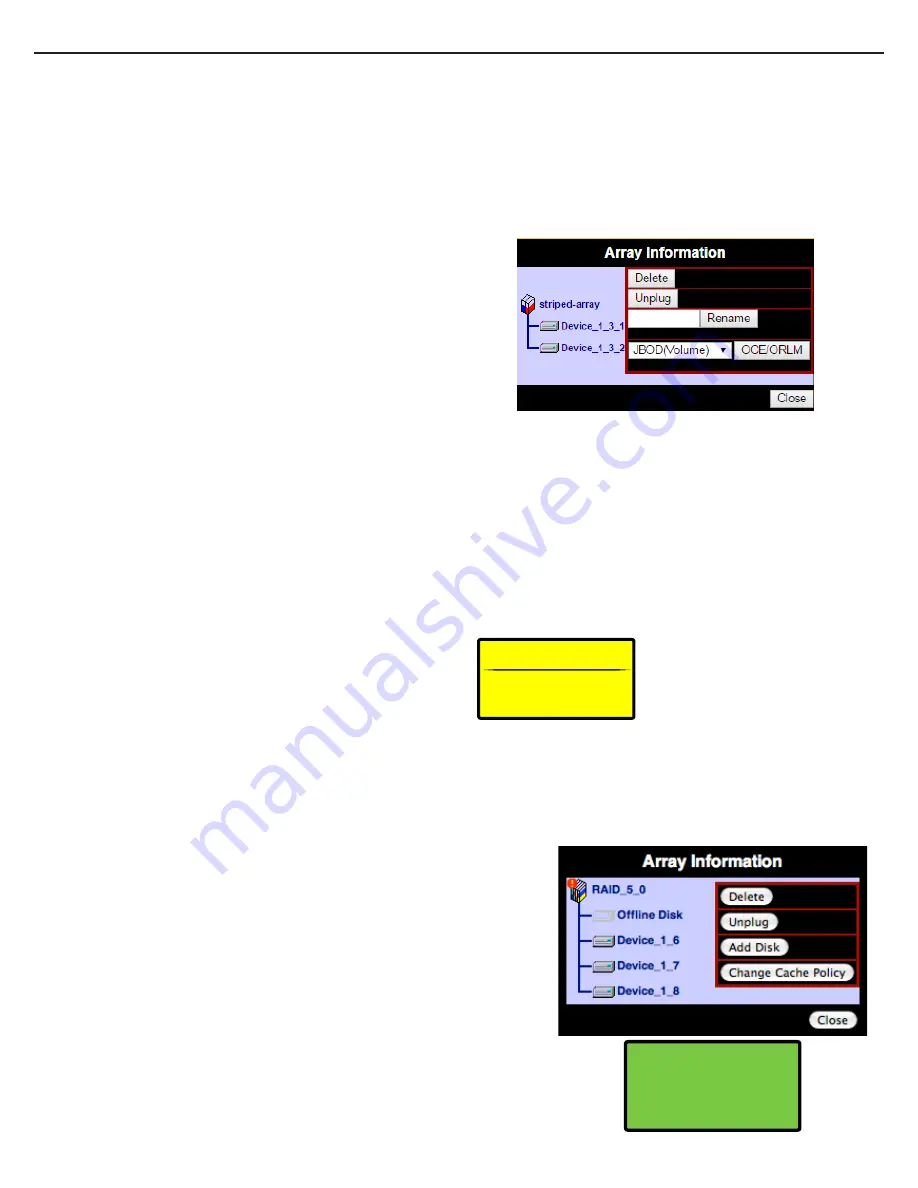
To manage a RAID array after it has been created, you need to access the Array Information window of
the array you wish to manage. From within the Array Information window you can unplug, verify, delete,
rename, rebuild, and expand/migrate an array.
Unplugging/Disconnecting an Array
To properly disconnect a RAID array from the controller card, you must
access the Array Information window and click “
Unplug
”.
If an array is physically disconnected without clicking “
Unplug
” an alarm
will sound if the audible alarm is enabled in the “
Settings
” section. The
alarm can be muted from the Array Management screen.
Verifying an Array
Verification can only be done on RAID arrays that have data redundancy
(data protection).
RAID 1 & RAID1/0
The verify process compares the data of one mirror with the other.
RAID 5
The verify process calculates RAID5 parity and compares it to the parity
data on the array.
In general, verification also checks each sector on a drive for any errors
or problems. Periodic verification of an array allows the drive firmware
to take corrective action on any problem areas of a drive to assist in
minimizing the occurrence of uncorrectable read and write errors.
For instruction on how to schedule periodic
verification, see page 11 on Tasks.
Deleting an Array
To delete an array, click the “
Delete
” button from within the “
Array
Information
” window. A pop-up window will ask you to confirm the
array deletion. Click “
OK
” to continue with the deletion or “
Cancel
” to
cancel the deletion. Deleting an array will delete all the data on that
array.
Renaming an Array
To change the name of an array, enter the desired name in the empty
field next to the “
Rename
” button and then click the “
Rename
” button.
Rebuilding an Array & Replacing a Failed Drive
When a redundant array becomes degraded and enters a “Critical” state, usually caused by a failed drive, it will need to be rebuilt.
If a spare drive has already been reserved via the Spare Pool Management section, it will automatically replace a failed drive and begin the rebuild
process. If there are no drives in the Spare Pool, follow these steps to replace a failed drive and begin the rebuild process:
Expanding/Migrating an Array
By utilizing Online Capacity Expansion (OCE) and Online RAID Level
Migration (ORLM) techniques, it is possible to migrate a RAID array from
one RAID level to another and also expand the capacity of the array
without taking the array offline or deleting the existing data.
Due to a limitation in Mac OS X which will
require the migrated and/or expanded
array to be reformatted, it is only
recommended to use the OCE/ORLM
feature with Windows systems.
Use on Mac OS X will
destroy existing data!
!! WARNING !!
To access the Array Information window, click on the “
Maintenance
” link for the array you wish to manage.
1. Physically replace the failed drive with a matching, unformatted drive. It is
strongly recommended with RAID arrays to use drives that are matching in
manufacturer, part number, size, speed, and firmware.
2. Before adding the drive to the RAID array, it is suggested to initialize the drive
via the Device Management section of the RAID Manager (see Page 8).
3. After the new drive has been initialized, navigate to the Array Management
screen. Click the “
Maintenance
” link on the array needing to be rebuilt to bring
up the Array Information window. Click the “
Add Disk
” button as pictured to the
right.
4. On the Add Disk to Array screen, select the drive that will be added to the RAID
array and click the “
Submit
” button.
5. A pop-up window confirming the action will appear and the rebuild process
will begin immediately. Rebuild time will vary depending on drive speed and
capacity.
!
For optimal performance, always
use matching drives in a RAID array.
- Matching manufacturer
- Matching part number
- Matching size
- Matching speed
- Matching firmware


