background image


- 22 - 


(B-3) Clock Adjustment 

1)  When [CLK] is displayed, press the [        AIR ADJ.] and [        POWER] buttons at 

the same time. 

--> [YEAR] (year) will be indicated. 


2)  To select [MON] (month), [DAY] (day), [HOUR] (hour) or [MIN] (minute), press the 

[    AIR ADJ.] button. 

--> Each time pressing the button, the current setting value of each item will be 

displayed. 


3)  Press both [    AIR ADJ.] and [    POWER] buttons to 

select at the same time. 

--> Selected item and setting value will be displayed. 

(Setting value will be blinking) 


4)  Press the [    AIR ADJ.] button to increase the value 

incrementally, or press and hold the button to quickly 

increase the value. 


5)  To save the setting, press both [   AIR ADJ.] and 

[    POWER] buttons at the same time. 


6)  Press the [    AIR ADJ.] and [    POWER] buttons at 

the same time for OK. 

--> Returns to the previous menu after two beep sounds 


7)  To continue the other setting, repeat the process from 2) to 6). 


8)  Press the [        AIR ADJ.] button to finish clock adjustment. 

--> It will return to [CLK] display. 


9)  To continue the each setting, press the [    AIR ADJ.] 

button and select next setting. 


10) To quit user mode, keep pressing the [    POWER] 

button until it returns to the <Gas Concentration Display>. 


WARNING 

MENU

MENU

(To change day 1)

Blinking 

MENU 

(Day is changed to 5) 

MENU

 Do not set a date which does not exist on 

the calendar. 

 Do not perform clock adjustment while data 

logging. The error may occur in the logging 

data. 

MENU

<Gas Concentration Display> 

<Month>

<Day> 

<Hour>

<Minute>

<Year> 


- 21 - 


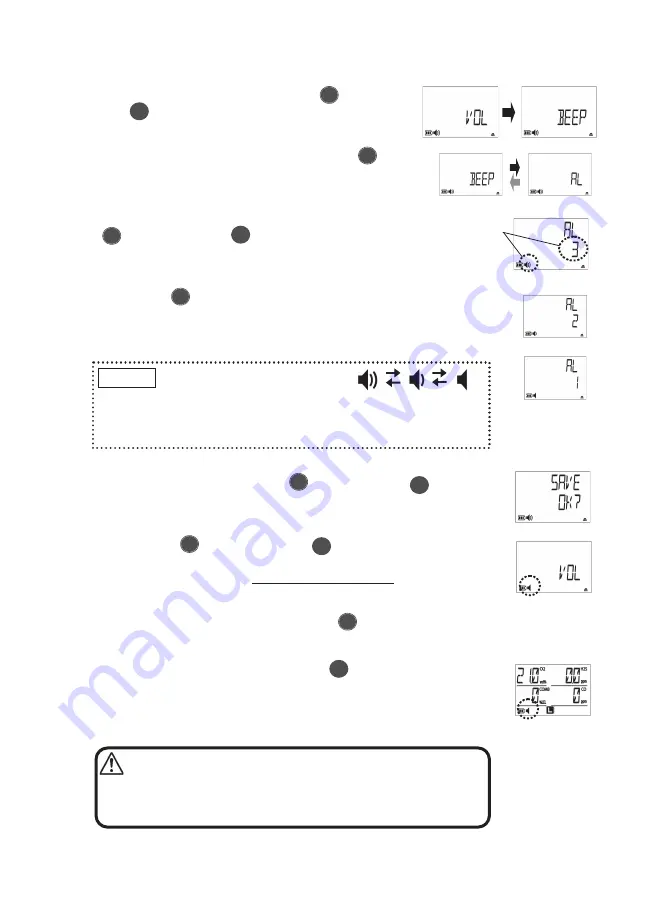
(B-2) Buzzer Volume 

1)  When [VOL] is displayed, press the [        AIR ADJ.] 

and [        POWER] buttons at the same time. 

--> [BEEP] (button operation tone) will be indicated. 


2)  To select [AL] (alarm volume), press the [    AIR 

ADJ.] button.   

--> [AL] (alarm volume) will be indicated. 


3)  Confirm the selected setting and press both 

[    AIR ADJ.] and [    POWER] buttons at the 

same time. 

--> The current volume level is displayed. (3, 2 or 1) 


4)  Press the [    AIR ADJ.] button to select volume 

level.  

--> Each time pressing the button, a beep will sound 

twice and the level changes. 


5)  To save the setting, press both [        AIR ADJ.] and [        POWER] 

buttons at the same time. 

--> “SAVE OK?” will be displayed. 


6)  Press both [    AIR ADJ.] and [    POWER] buttons at the 

same time for OK. 

--> A beep sounds twice when the buzzer is ON, and returns to 

[VOL] screen. 


7)  To continue the each setting, press the [        AIR ADJ.] button and 

select next setting. (See “

(B) Each Setting

” on page 20) 


8)  To quit user mode, keep pressing the [        POWER] button until it 

returns to the <Gas Concentration Display>. 

--> The alarm volume level on <Gas Concentration Display> will 

indicate the new setting when the alarm volume is changed. 


WARNING 

MENU 

<Button operation tone>

MENU

<Button operation tone> <Alarm volume> 

(Alarm volume is 3>

Volume Level

(Alarm volume level 2)

(Alarm volume level 1)

  Alarm volume indication will 

be changed according to the 

[AL] (alarm volume) setting. 

 The factory default of alarm volume is 3 and buzzer 

(button operation tone) is 1. 

NOTE 


3: Loud   2: Medium   1: Small

MENU

MENU

MENU

(Alarm volume level 1) 

(Alarm volume level 1) 

 Buzzer volume setting will remain effective 

even after the power is turned OFF. 

 Beep will not sound when the buzzer 

setting is OFF. 


Содержание XA-4200IIKC

Страница 1: ...bustible gas CO XA 4300IIHS O2 H2S XA 4300IICS O2 CO This instruction manual explains the use of eight models listed in the left Keep this instruction manual available for quick reference when needed Read this instruction manual and understand the information before using the product Document No XA 4400IIT XA 4400II XA 4300IIKHS XA 4300IIKCS XA 4200IIKS XA 4200IIKH XA 4200IIKC XA 4300IIHS XA 4300I...

Страница 2: ...Before Using 8 3 1 1 Installation of Battery 8 3 1 2 How to Attach the Safety Pin Band 8 3 2 Operating Procedure 9 1 Turn ON the Power 9 2 Detection 10 3 Turn OFF the Power 11 Gas Concentration Display 11 Gas Alarm Activation 12 TWA Alarm 13 STEL Alarm 13 3 3 Functions in Normal Operation 14 3 3 1 AIR Adjustment ZERO Adjustment 14 3 3 2 Peak Hold Function 14 3 3 3 Backlight 15 3 3 4 Buzzer Stop 15...

Страница 3: ...gging 24 C 1 Start Logging 24 C 2 Stop Logging 25 C 3 Delete Logging Data 25 C 4 Logging Cycle 26 4 Error Messages 27 5 Replacement of Consumables 28 Battery Replacement 28 Replacement of Filter Element 29 Replacement of Filter for Each Sensor 31 6 Maintenance Check 33 Daily Check 33 Periodic Inspection 34 Maintenance 34 Replacement Parts 34 7 Troubleshooting 35 8 Warranty 36 9 Specifications 37 M...

Страница 4: ...ct logged data to PC Multi gas Detector 1 BP 4000IIAL Battery Unit attached to the Multi gas Detector 1 Battery Cover See Battery Replacement on page 28 1 C 25 Safety Pin Band with 4 screws See How to Attach the Safety Pin Band on page 8 1 FE 128 Filter Element for replacement See Replacement of Filter Element on page 29 8 FE 129 Filter for Combustible Gas Sensor See Replacement of Filter for Each...

Страница 5: ... Do not use this Multi gas Detector for improper purposes Do not use the Multi gas Detector in undocumented way in this manual Waterproof Be sure to keep the gas sampling port dry This Multi gas Detector employs a water proof structure which meets our tests complying with JIS C 0902 2003 Ingress Protection code IPX7 at brand new condition to prevent malfunctions due to water from unavoidable circu...

Страница 6: ...on Protected Electrical Installations in General Industries Part 1 General Requirements Chapter 6 Intrinsically Safe Rating Refer to Intrinsically Safe Specification on page 38 Ambient temperature 20 to 50 degrees C Use conditions Replace a battery and battery unit in a safe place For comprehensive measures to prevent accidents due to electrostatic charges the user should desirably wear anti stati...

Страница 7: ...rm daily check before use see Daily Check on page 33 Do not close the sampling port or exhaust port The gas cannot be detected properly Do not block the buzzer port or the alarm will be hard to hear Use clean filter elements If the filter element is dirty or wet the gas cannot be detected properly The sensor unit is guaranteed for two years from the date of purchase It is highly recommended to rep...

Страница 8: ...i gas Detector completely and check the performance before use Use the Multi gas Detector in suitable environment to avoid detection of other interference gas or solvent vapor Do not use the Multi gas Detector in an atmosphere containing silicone gas or silicone products as it may affect the performance Detecting high concentration of sulfur dioxide or chlorine may decrease sensor life or increase...

Страница 9: ... filter element Gas inlet to the sensor prevent the entrance of dust or water from the inlet 9 Battery Cover For replacing a battery 10 Battery Unit The battery and associated circuit 11 Fixing Screws To attach the safety pin band 12 Serial No of BP 4000II Model serial number manufactured date 13 Intrinsically Safe of XA 4400II Intrinsically safe structure temperature specification No 14 Serial No...

Страница 10: ...lays the unit of concentration 6 Battery level indication Page 28 7 Alarm level indication Page 21 8 Buzzer silent mode indication Page 20 9 Peak hold value Page 14 10 Long life mode indication Page 23 11 Displays each setting 12 Temperature scale Page 15 13 Operating combustible gas sensor indication 2 3 4 5 1 6 7 8 9 10 12 13 11 ...

Страница 11: ...crews Pay attention to the direction of safety pin 2 Bend the Safety Pin Band upward and screw to the top of battery compartment with supplied two fixing screws WARNING Fixing Screws Safety Pin Band Let the direction of safety pin needle be the battery cover side Battery Cover Please note that the safety pin may leave a tiny hole in clothes NOTE Be careful not to block or cover the detection port ...

Страница 12: ...d the warm up operation is completed it switches into Gas Concentration Display after three beep sounds The warm up operation will take about a maximum of 2 minutes Only the power OFF button is available while the warm up operation In case of an error occurs see Error Messages on page 27 Make sure to turn ON the power in the clean air Since the air adjustment starts automatically the erroneous gas...

Страница 13: ... detection performance Careful not to block the buzzer port as the alarm volume may be too small to notice For button operation a press is less than one second and press and hold is about three seconds NOTE CAUTION A significant change in temperature or humidity at work environment may affect the concentration values of 21 0vol 0 LEL and 0ppm In this case press and hold the AIR ADJ button to start...

Страница 14: ...agrams describe for 4 gas type models When the gas concentration exceeds the service range see Specifications on page 37 OL will be blinking on the concentration display If the detection failure is caused by sensor error the error message E S will appear on the corresponding sensor display See Error Messages on page 27 MENU OFF Gas Concentration Display See the chart on page 12 for the details on ...

Страница 15: ...m 300ppm Buzzer Sound Slow intermittent sound Fast intermittent sound Same as 2nd alarm Same as 1st alarm Same as 1st alarm Alarm Lamp 3 point 3 lamps blink sequentially in 5sec period 3 lamps blink sequentially in 0 8sec period Same as 2nd alarm Same as 1st alarm Same as 1st alarm LCD AL1 appears on corresponding gas part AL1 AL2 appear on corresponding gas part OL appears on corresponding gas pa...

Страница 16: ...ours x 60 times 60 times hour 12 000ppm STEL Alarm When a 15 minute TWA exposure for hydrogen sulfide H2S and carbon monoxide CO exceeds the alarm set value the alarm will be activated and the indication will be blinking in the bottom right corner of the LCD as below DANGER Blinking for CO Blinking for CO and H2S Blinking for H2S Blinking for H2S for CO for CO and H2S Blinking Blinking TWA alarm w...

Страница 17: ...value minimum value for oxygen 2 To cancel the Peak Hold Function press both POWER and AIR ADJ buttons at the same time again A beep will sound once PEAK will be off the peak value will be reset and it will revert to the normal Gas Concentration Display instantaneous value Make sure to perform AIR Adjustment ZERO Adjustment in the clean air The erroneous gas concentration will be displayed in gas ...

Страница 18: ... be displayed on the LCD for 2 second and then will revert to Gas Concentration Display automatically 3 3 6 Time Temperature Display In normal operation press and hold both POWER and AIR ADJ buttons at the same time for 3 seconds Date time and temperature will be displayed on the LCD for 5 seconds and then will revert to Gas Concentration Display automatically MENU Gas Concentration Display Normal...

Страница 19: ...rm test SET UP each setting and LOG logging will be displayed sequentially Select the mode to change and press both POWER and AIR ADJ buttons at the same time The mode switches with a beep sound See the next page for the functions and setting of each mode If it is not operated for 1 minute in the user mode it will revert to the Gas Concentration Display automatically NOTE MENU Gas Concentration Di...

Страница 20: ...ence Alarm Test AL TEST Operation test of alarm lamps on 1 st sand 2 nd alarms buzzer and vibration Also the buzzer volume can be changed on gas alarm Page 18 Buzzer ON OFF Buzzer ON OFF during the alarm and button operation Page 20 Buzzer Volume Buzzer volume setting during the alarm and button operation Page 21 Clock Adjustment Setting of time and date Page 22 Each Setting SET UP Long life Mode ...

Страница 21: ...s at the same time AL1 1st alarm will be indicated selected 2 To select AL2 2 nd alarm press the AIR ADJ button AL2 2 nd alarm will be displayed selected 3 Press both AIR ADJ and POWER buttons at the same time Selected alarm test will be performed and current alarm volume level will be indicated MENU MENU MENU 1st stage alarm MENU 2nd stage alarm MENU 2nd stage alarm 1st stage alarm How to reverse...

Страница 22: ...ch time pressing the button AL TEST alarm test SET UP each setting and LOG logging will be displayed sequentially 10 To quit user mode keep pressing the POWER button until it returns to the Gas Concentration Display Volume Level The factory default of alarm volume level 3 will be changed to a new setting The change of alarm volume level should be performed by the safety manager If the volume level...

Страница 23: ...IR ADJ and POWER buttons at the same time SAVE OK will be displayed 4 Press both AIR ADJ and POWER buttons at the same time for OK A beep will sound twice when the buzzer is ON a buzzer OFF indication will blink when the buzzer is OFF and it returns to BUZZ screen 5 To continue the other setting press the AIR ADJ button and select next setting See B Each Setting on page 20 6 To quit user mode keep...

Страница 24: ...buzzer is ON and returns to VOL screen 7 To continue the each setting press the AIR ADJ button and select next setting See B Each Setting on page 20 8 To quit user mode keep pressing the POWER button until it returns to the Gas Concentration Display The alarm volume level on Gas Concentration Display will indicate the new setting when the alarm volume is changed WARNING MENU Button operation tone ...

Страница 25: ...setting press both AIR ADJ and POWER buttons at the same time 6 Press the AIR ADJ and POWER buttons at the same time for OK Returns to the previous menu after two beep sounds 7 To continue the other setting repeat the process from 2 to 6 8 Press the AIR ADJ button to finish clock adjustment It will return to CLK display 9 To continue the each setting press the AIR ADJ button and select next settin...

Страница 26: ...ss the AIR ADJ button The current status will be changed When OFF is selected L will go off When ON is selected L will appear in the center bottom of the LCD 3 To save the setting press both AIR ADJ and POWER buttons at the same time SAVE OK will be displayed 4 Press both AIR ADJ and POWER buttons at the same time for OK Returns to LONG screen after two beep sounds 5 To continue each setting press...

Страница 27: ... set ON start press both AIR ADJ and POWER buttons at the same time Returns to Gas Concentration Display after two beep sounds and LOG logging is ON will blink in the bottom right of the LCD Make sure to perform clock adjustment before starting data logging To read the logging data PC and XA 4000IIL Datalogger Kit sold separately are necessary Read the instruction manual of Datalogger Kit for how ...

Страница 28: ...ta 1 When LOG DEL is displayed press both AIR ADJ and POWER buttons at the same time DEL OK will be displayed 2 Press both AIR ADJ and POWER buttons at the same time for OK Delete is executed with two beep sounds and returns to LOG DEL screen 3 To continue logging mode press the AIR ADJ button and select next setting 4 To quit user mode keep pressing the POWER button until it returns to the Gas Co...

Страница 29: ...tinue each setting press the AIR ADJ button and select next setting 5 To quit the user mode keep pressing the POWER button until it returns to the Gas Concentration Display MENU Logging cycle is set to 60 seconds Blinking The factory default of logging cycle is 10 sec The logging period is about 40 hours when the logging cycle is 10 sec NOTE MENU MENU MENU How to reverse the display order of selec...

Страница 30: ...tative for repair Error Messages Error Condition Cause Action Sensor Error E S will blink on the corresponding gas display Sensor Malfunction If it occurs when the power is turned ON there is a possibility of presence of gas If it occurs when the power is turned ON turn OFF the power and ON again in the clean air If it still has a trouble ask for repair Adjustment Error in Oxygen Sensor E A will b...

Страница 31: ... sure to use a new battery Low temperature may shorten the battery life due to the battery property If the remaining battery level is low it is recommended to replace a battery before it dies NOTE Blinking Battery is dead Battery Level HIGH LOW Replace Replace a battery only in non hazardous locations Make sure to use a Panasonic alkaline battery LR03 AAA We cannot guarantee the intrinsically safe...

Страница 32: ... affect the waterproof performance NOTE Sensor Cover If the remaining battery level still stays low after replacing a battery remove a battery and insert it again NOTE Place the filter element and sensor cover correctly as it may affect the detection performance or waterproof performance Firmly tighten the screw as it may lead to water ingress into the Multi gas Detector Ask for repair if the wate...

Страница 33: ...nder each sensor is fitted properly inside the sensor packing Replace a filter for each sensor as needed page 31 Filter for carbon monoxide sensor Filter for combustible gas sensor NOTE When the screws are unevenly tightened it may affect the waterproof performance Tighten four screws evenly and alternately NOTE If a sensor comes off from the Multi gas Detector place the sensor in correct location...

Страница 34: ...mbustible gas sensor Filter for Combustible Gas Sensor Filter for Carbon Monoxide Sensor NOTE 0 5mm thick 2mm thick Place the filter for each sensor filter element and sensor cover correctly as it may affect the detection performance or waterproof performance Do not push or poke the filter for each sensor A broken filter may affect the detection performance Firmly tighten the screw as it may lead ...

Страница 35: ...commended tightening torque 19cN m CAUTION Size of Screwdriver Size No 2 Size No 1 NOTE φ6 φ5 When the screws are unevenly tightened it may affect the waterproof performance Tighten four screws evenly and alternately NOTE Make sure the filter for each sensor is fitted properly inside the sensor packing as it may affect the waterproof performance ...

Страница 36: ...briefing Daily Check Check Item Description LCD Check if LCD is not damaged see Turn ON the Power on page 9 Alarm Function Check the buzzer sound flashing alarm lamp and vibration alarm function see Alarm Test on page 18 Filter Element If the filter element is dirty or wet replace with a new filter see Replacement of Filter Element on page 29 Battery Level Check the remaining battery level in the ...

Страница 37: ...th O ring 59460000 Replace when the battery cover is deformed see Battery Replacement on page 28 FE 129 Filter for Combustible Gas Sensor 59160105 FE 130 Filter for Carbon Monoxide Sensor 59160106 Replace every six months see Replacement of Filter for Each Sensor on page 31 Sensor Packing 20596510 Replace when the sensor packing is damaged or deformed Recommended sensor replacement interval is eve...

Страница 38: ...pressing the POWER button Battery is dead Replace a battery Battery Replacement on page 28 Buzzer will not sound Buzzer is OFF Set the buzzer ON Buzzer ON OFF on page 20 Error message will appear See Error Messages on page 27 Gas concentration is blinking at 0 or 0 0 Gas concentration indicates negative value when the high concentration gas may have been detected or AIR Adjustment may have been pe...

Страница 39: ...s After examination of allegedly defective product return to New Cosmos with freight prepaid should the product fail to conform to this warranty customer s only remedy and New Cosmos s only obligation shall be at New Cosmos s sole option replacement or repair of such non conforming product or refund of the original purchase price of the non conforming product In no event will New Cosmos be liable ...

Страница 40: ...afe Ex ia IICT3X JAPAN Ingress Protection Equivalent to IP67 6 Functions Self diagnosis sensor trouble Automatic air adjustment Remaining battery level Peak hold LCD backlight Buzzer stop for gas alarm Time Temperature indication Alarm test Buzzer volume Silent mode Long life mode Data logging Dimensions 70 W x 73 H x 26 D mm excluding protrusions Mass Approx 130g excluding battery 1 Reference ind...

Страница 41: ... 1 65V Maximum input currents 0 9216A Maximum input powers 0 2399W CPU B circuit Maximum input voltages 5 73V Maximum input currents 0 0087A Maximum input powers 0 0124W Maximum output voltages 5 73V Maximum output currents 0 9398A Maximum output powers 0 2626W Buzzer circuit Maximum input voltages 1 65V Maximum input currents 0 9213A Maximum input powers 0 2399W Motor circuit Maximum input voltag...

Страница 42: ... voltages 1 65V Maximum output currents 0 4475A Maximum output powers 0 2399W CPU B circuit Maximum input voltages 5 73V Maximum input currents 0 9398A Maximum input powers 0 2626W Buzzer circuit Maximum output voltages 1 65V Maximum output currents 0 4473A Maximum output powers 0 2399W Motor circuit Maximum output voltages 1 65V Maximum output currents 0 1872A Maximum output powers 0 1164W Rating...

Страница 43: ...n which fire or explosion hazards are not expected to exist specifically due to the presence of flammable gases or vapors flammable liquids combustible dusts or ignitable fibers LEL Concentrations of combustible gas given in terms of percent of the lower explosion limit vol Gas concentrations given in terms of percent of cubic volume ppm Gas concentrations given in terms of millionth part of cubic...

Страница 44: ... naka Yodogawa ku Osaka 532 0036 Japan Tokyo Branch New Cosmos Electric Co Ltd 2 6 2 Hamamatsu cho Minato ku Tokyo 105 0013 Japan Phone 81 3 5403 2715 Fax 81 3 5403 2710 Email e info new cosmos co jp URL http www new cosmos co jp XA 4400IIET 00 1508 200 ...

Отзывы: