background image

27

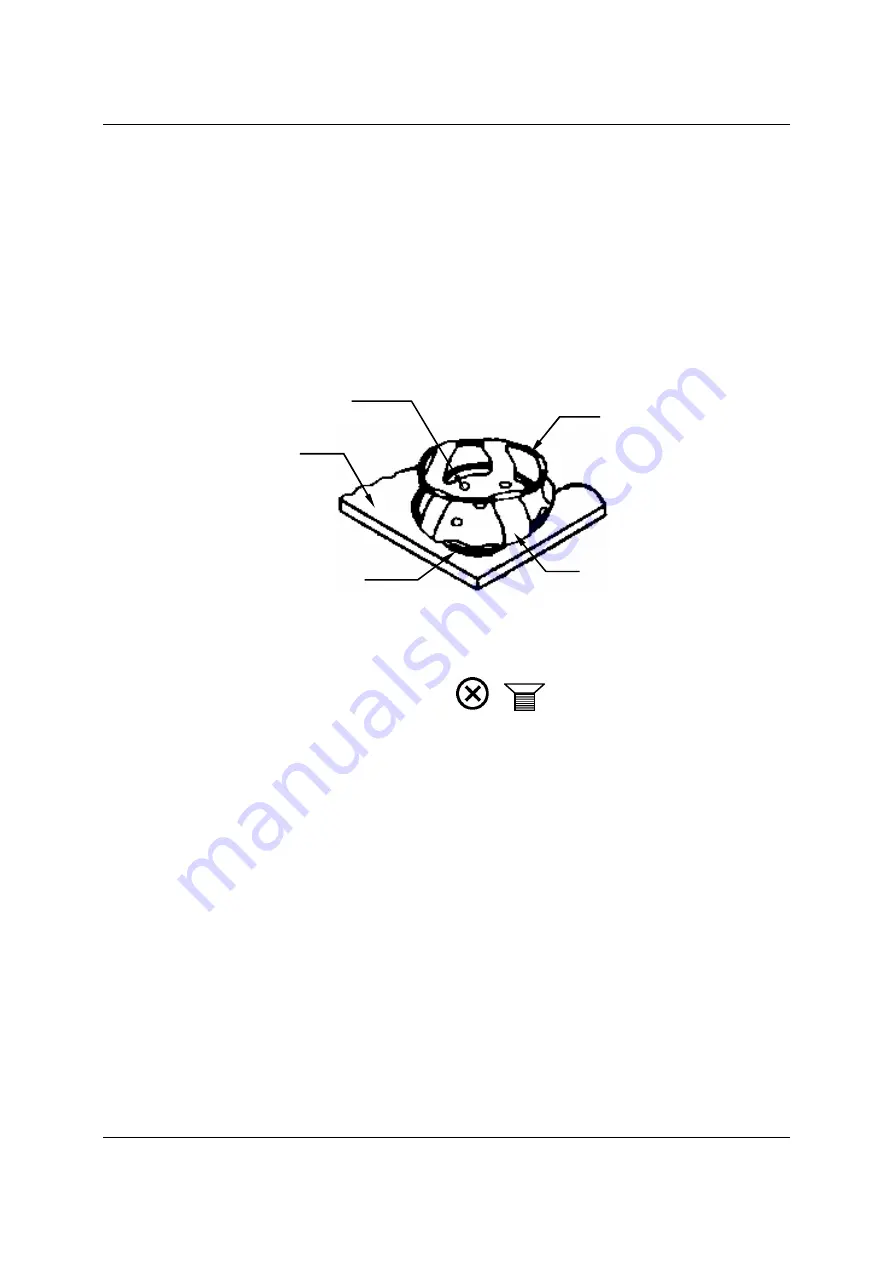
1. Place clamp on platform, secure in place with correct type of screws:  #S2116-3051, 

10-24 x 5/16-inch flat Phillips head, provided with the clamps (

see Figure 6a

). 

 
2. Place the loose girdle around the upper portion of clamp body so that it is held in 

place by the legs of the clamp. 


3. Insert the flask into the clamp, and push the girdle down so the rubber tubes are in 

contact with the platform and the flask. 


Figure 6:  Double Girdle Clamp Installation 


UPPER GIRDLE 
WITH GIRDLE 
TUBES


LOWER

GIRDLE WITH 

GIRDLE TUBES


PLATFORM


CLAMP

MOUNTING HOLES (5)


CLAMP BODY 
(LEGS AND BASE)

Figure 6a:  Clamp Fastener 


6.4 

Electrical Connections 

 
Before making electrical connections, verify that the power source voltage matches the 
voltage on the electrical specification plate and that the 

ON/OFF

switch is in the 

OFF


position.  The electrical specification plate is located on the rear panel of the unit near the 
power connector.   
Connect the power cord to the power connector, then connect the other end to a suitable, 
grounded receptacle.  Make sure there is enough clearance to disconnect the plug 
whenever necessary. 

New Brunswick Scientific Co., Inc. 


User’s Guide 

Содержание Innova 43

Страница 1: ...320 0050 Revision E May 28 2008 NEW BRUNSWICK SCIENTIFIC CO INC BOX 4005 44 TALMADGE ROAD EDISON NJ 08818 4005 Telephone 1 732 287 1200 1 800 631 5417 Fax 732 287 4222 Telex 4753012 NBSCO Internet http www nbsc com E mail bioinfo nbsc com ...

Страница 2: ...2 Innova 43 43R Incubator Shakers M1320 0050 User s Guide ...

Страница 3: ...484 5955 or 5966 Fax 86 21 6484 5933 E mail nbschc online sh cn THE NETHERLANDS New Brunswick Scientific BV Kerkenbos 1101 6546 BC Nijmegen P O Box 6826 6503 GH Nijmegen Nederland Tel 31 0 24 3717 600 Fax 31 0 24 3717 640 E mail sales nbsbv nl FRANCE New Brunswick Scientific SARL 12 14 Rond Point des Champs Elysées 75008 Paris France Tel 33 0 1 5353 1511 Fax 33 0 1 5353 1557 E mail sales nbssarl f...

Страница 4: ...e User s Guide before attempting to use this unit Do not use this equipment in a hazardous atmosphere or with hazardous materials for which the equipment was not designed New Brunswick Scientific Co Inc NBS is not responsible for any damage to this equipment that may result from the use of an accessory not manufactured by NBS Innova 43 43R Incubator Shakers M1320 0050 User s Guide ...

Страница 5: ...ential information that deserves special attention CAUTION Caution messages appear before procedures which if caution is not observed could result in damage to the equipment WARNING Warning messages alert you to specific procedures or practices which if not followed correctly could result in serious personal injury Bold Text in boldface type emphasizes key words or phrases This particular Warning ...

Страница 6: ...ument Our obligation under this warranty is limited to repairing or replacing the instrument or part thereof which shall within three 3 years after the date of shipment prove to be defective after our examination This warranty does not extend to any NBS products that have been subjected to misuse neglect accident or improper installation or application nor shall it extend to products that have bee...

Страница 7: ...19 5 1 CONTROLS 19 5 2 LCD DISPLAY 20 5 3 CHANGING SCREENS 20 5 4 DISPLAY ICONS 21 5 5 ALARMS 22 5 6 LID 23 5 7 SPILL PAN WATER RESERVOIR 23 5 8 SOFTWARE INTERFACES 24 5 9 INTERIOR LIGHT S 24 5 10 HEATER 24 5 11 REFRIGERATION 43R ONLY 24 5 12 SERVICE ACCESSIBILITY 25 6 GETTING STARTED 26 6 1 PLATFORM ASSEMBLIES 26 6 2 INSTALLATION OF PLATFORM 26 6 3 INSTALLATION OF CLAMPS 26 6 4 ELECTRICAL CONNECT...

Страница 8: ...FSET CALIBRATION 50 7 7 1 Calculating the Offset Value 51 7 7 2 Setting the Offset 51 7 8 USING CALSPEED 52 7 9 POWER INTERRUPTION 52 8 MAINTENANCE 54 8 1 ROUTINE MAINTENANCE 54 8 2 CLEANING EXTERNAL INTERNAL SURFACES 54 8 3 BIOHAZARD DECONTAMINATION 54 9 SERVICE ACCESSORIES 56 9 1 TROUBLESHOOTING 56 9 2 PRODUCT RETURNS 58 9 3 OPENING THE SERVICE COMPARTMENT 59 9 4 FUSE REPLACEMENT 59 9 5 REPLACIN...

Страница 9: ...EED GRAPHS 73 10 3 LIST OF DRAWINGS 75 10 4 LIST OF TABLES 76 11 SPECIFICATIONS 77 11 1 CERTIFICATIONS 78 11 1 1 CE Declaration of Conformity 79 12 APPENDIX REMOTE PROGRAMMING 80 12 1 SETTING UP WITH HYPERTERMINAL 80 12 2 OVERVIEW OF COMMAND SETS 81 12 3 INDEX TO COMMAND CODES 82 12 4 SET COMMANDS 83 12 5 PROFILE CONTROL COMMANDS 83 12 6 REPORT REQUEST COMMANDS 85 12 7 SET GET DATE TIME 85 13 APPE...

Страница 10: ...10 Innova 43 43R Incubator Shakers M1320 0050 User s Guide ...

Страница 11: ...ific shaker accessories described in Section 9 11 These are easily accessed on the platform To facilitate moving the unit each shaker is equipped with casters that roll freely when the feet are raised The Innova 43 43R may be operated in the following ways Continuously at a set speed and temperature until user intervention In a timed mode run at a set speed time and temperature for a period of up ...

Страница 12: ...supplied with flask clamps attached they are designed solely and expressly for this purpose Test tube racks microplate holders and test tube rack holders are also available a universal platform is needed for all test tube racks and holders For further information on these accessories see Section 9 11 We also recommend that you consult the load and speed graphs provided in Section 10 2 Innova 43 43...

Страница 13: ...mpt to lift the Innova 43 43R by hand Always use a lifter or other suitable equipment when raising or handling the unit To unpack your Innova 43 43R you will need the following tools Claw hammer Scissors to cut nylon strapping Tool to remove 3 inch 7 6 cm metal staples Save all packing materials and this user s guide operating manual 2 4 Out of Box Concerns If any part of your order was damaged du...

Страница 14: ...cross the floor make sure the feet are raised enough so that the casters can roll freely without scraping the floor with the feet At all other times make sure the feet are down to avoid any unintended rolling 3 2 Environment The shaker is designed to operate optimally in the following ambient conditions 10º to 35 C 20 to 80 Relative Humidity non condensing 3 3 Electrical Requirements The Innova 43...

Страница 15: ...ns WIDTH 45 5 inches 115 6 cm HEIGHT 40 6 inches 103 cm with feet NOTE Open lid adds 23 5 inches 59 7 cm PEDAL TO OPEN LID HANDLE TO OPEN LID NOTE Be sure to allow at least four inches 10 5 cm around shaker for ventilation access to power cord rear panel and access to power switch and RS 232 port right side 3 5 Narrow Doorways If you need to move the Innova 43 43R through a doorway that is less th...

Страница 16: ... or button slide the window cover upward to remove it from the spring clips on the front of the unit When the shaker is in the desired location reinstall the window cover by reversing the procedure Innova 43 43R Incubator Shakers M1320 0050 User s Guide ...

Страница 17: ...d rolling Make sure that the shaker is placed on a level surface in its intended location Lower all four adjustable feet as described below until they are solidly on the surface If the shaker is not level adjust the feet as needed to achieve leveling 1 Immobilize the top lock nut against the unit with one wrench whenever you adjust the foot to keep the threaded stud from falling out see Figure 2 F...

Страница 18: ...stments by repeating all steps until the unit is level 4 After installing a platform see Section 6 fully load the shaker and do a test run at normal speed see Section 7 Make additional leveling adjustments if necessary Innova 43 43R Incubator Shakers M1320 0050 User s Guide ...

Страница 19: ...NOB This knob is multifunctional It is used to change screens and to select and change operating conditions RS 232 PORT See Section 5 8 for details POWER SWITCH This rocker switch is a circuit breaker that turns power on and off to the entire Innova 43 43R NOTE In addition to the power switch the power cord is also used to conduct power or to break the power circuit to the shaker Whenever power to...

Страница 20: ...M RUNNING HEATER ON TEMPERATURE OFFSET For an explanation of the icons on the display screen see Section 5 4 Turning the Control Knob will highlight functions and or values that can be changed Whenever you turn the Control Knob the chamber light will go on for details see Section 5 9 For more information on working in the Display Screen see Section 7 4 1 5 3 Changing Screens You can change screens...

Страница 21: ...AVE PC controls shaker and logs data TALK Shaker sends setpoint and actual data to PC at one minute intervals CAL Calibration Allows user to enter a temperature offset Self calibrates the speed sensor PROG Program Allows user to set up 1 4 programs each with 1 15 steps see Table 2 Display Screen Parameters Optional Not installed Table 2 Display Screen Parameters Parameter Name Meaning RPM Shaking ...

Страница 22: ...pen This icon appears when the Heater is on See Section 5 10 This icon appears when a user defined Program is running See Section 7 5 5 This icon appears to the right of ºC if the Temperature Offset feature is being used See Section 7 7 5 5 Alarms If an alarm condition exists the field in the lower right corner will alternate the Day and Time with characters indicating the nature of the alarm cond...

Страница 23: ... top opening hinged lid To open the lid firmly press the pedal or lift up on the front handle see Figure 1 The lid stands on its hinges until you choose to close it When the lid opens the following will happen Heater turns off Shaker stops Interior light goes on and when it is in AUTO mode will remain on for 15 seconds after the lid is closed UV germicidal lamp if so equipped turns off 5 7 Spill P...

Страница 24: ...ons for refrigerated units only interior photosynthetic growth lamps see Section 6 7 and a germicidal UV lamp located outside the chamber but in the airflow path see Section 6 6 5 10 Heater The chamber temperature is sensed by a 1000 ohm platinum RTD A 650W heater is controlled using pulse width modulation on a 2 5 second duty cycle This cycle time is fast enough to prevent noticeable changes in a...

Страница 25: ... up 5 12 Service Accessibility In the unlikely event that your Innova 43 43R should need service all electronic boards refrigeration heating components are easily accessed by an authorized service technician behind the right side panel of the shaker New Brunswick Scientific Co Inc User s Guide ...

Страница 26: ...len head platform screws installed in the bearing housing see Figure 5 below which also shows the spill cover that you must install Figure 5 Installing Platform Spill Cover PLATFORM SCREWS SPILL COVER BEARING HOUSING PLATFORM 6 3 Installation of Clamps Flask clamps purchased for use with universal platforms see Section 9 11 2 require installation Clamps are installed by securing the base of the cl...

Страница 27: ...GIRDLE TUBES LOWER GIRDLE WITH GIRDLE TUBES PLATFORM CLAMP MOUNTING HOLES 5 CLAMP BODY LEGS AND BASE Figure 6a Clamp Fastener 6 4 Electrical Connections Before making electrical connections verify that the power source voltage matches the voltage on the electrical specification plate and that the ON OFF switch is in the OFF position The electrical specification plate is located on the rear panel o...

Страница 28: ...ff unused tubes You may elect to use splitters barbed Y connectors after the manifold to increase the number of flasks you can serve You determine the appropriate gas flow rate using a pressure regulator which you supply on the gas supply NOTE Gas supply should be regulated and it must never exceed 15 PSIG 50 feet of 1 16 inch ID sterilizable silicone tubing is supplied with the kit Filters may be...

Страница 29: ...ON 1 4 FNPT SAFETY PRECAUTIONS Never use the gas manifold with flammable gases Never exceed 15 PSIG inlet pressure to the manifold Make sure free lengths of tubing are secured by the hook and loop straps to keep them from contact with flasks or other moving parts New Brunswick Scientific Co Inc User s Guide ...

Страница 30: ...rated units only Operation instructions are provided with this option see Section 9 11 7 6 7 Optional Photosynthetic Lamps This factory installed option available on refrigerated units only provides nine photosynthetic growth lamps inside the chamber see Figure 11 on the following page They can be turned on and off manually by the easily set programmable timer or by computer These lamps are identi...

Страница 31: ...ity Monitor This optional factory installed accessory allows you to monitor relative humidity levels in the chamber throughout your run Figure 12a Humidity Monitor optional HUMIDITY MONITOR PHOTOSYNTHETIC LAMP ASSEMBLY New Brunswick Scientific Co Inc User s Guide ...

Страница 32: ...ph below Hysteresis 1 5 RH Recovery Time after Saturation 10 seconds Long Term Stability 0 5 RH per year Figure 12b RH Sensor Operating Range Error Graph Operating Range and Humidity Error 0 10 20 30 40 50 60 70 80 90 100 0 10 20 30 40 50 60 Temperature C 5 Error 3 Error 5 Error INTERMITTENT OPERATION Figure 12c RH Sensor Connection M1282 7002 M1282 7012 BOARD inside the Service C t t Innova 43 43...

Страница 33: ... water to splash or flow into the recessed middle of the pan where the bearing housing assembly is mounted Pour water very slowly into the shallow area beyond the edge of the spill cover to protect the bearing housing 3 Accessing the pan reservoir from the left the right or in front of the spill cover slowly fill the reservoir with no more than 3 liters of distilled water A long narrow watering ca...

Страница 34: ... quick connect drain fitting direct it to a container or drain and allow the water to gravity drain 2 When the reservoir is empty detach the fitting The spill pan water reservoir drain is located in the front on the left under the humidity tray Innova 43 43R Incubator Shakers M1320 0050 User s Guide ...

Страница 35: ...ied See Section 13 Product Returns It is the responsibility of the user to carry out appropriate decontamination procedures if hazardous material is spilled on or inside the equipment Before using any cleaning or decontamination method other than those suggested by the manufacturer users should check with New Brunswick Scientific that the proposed method would not damage the equipment This equipme...

Страница 36: ... lid is open This is indicated by the lid open symbol appearing in the bottom line of the display see Figure 4 or Table 3 7 4 Using the LCD Screens 7 4 1 Display Screen When you turn the power on this is the first screen to appear after the company title screen The default display parameters are temperature ºC and shaking speed RPM You can change the displayed parameters To replace a parameter 1 U...

Страница 37: ...P We 13 44 You can also use this screen to verify a setpoint even though the values displayed here are actual current values To view a setpoint 1 Use the Control Knob to highlight the value in this example we will view the temperature setpoint so we will highlight the current ºC which is 23 2 Click the Knob in to display the current setpoint which will flash At this point you can modify the setpoi...

Страница 38: ...f a degree Celsius 0 1ºC If you spin the Knob the value will change by larger increments 4 Click the Knob in to set and save this new setpoint NOTE If you highlight an item change it but do not save your selection after a few seconds the screen will revert to its previous setting 5 The display will automatically return to the actual value To move out of this screen and into the next 1 Use the Cont...

Страница 39: ...n are setpoints To change setpoints in this screen 1 Turn the Knob until the desired setpoint is highlighted then click the Knob in The setpoint will begin to flash 2 Turn the Knob to the right to increase the number or to the left to decrease it One click left or right will increase the setpoint by an increment of one one whole unit or one tenth unit depending on the parameter Move the Knob more ...

Страница 40: ...This screen also allows you to lock all of your settings from further changes and to mute or enable the audible alarm Figure 17 Setup Screen SETUP Day Thu Hour Min 16 19 Lock Off Mute Off SET Th 16 19 To change the day 1 Turn the knob to highlight the day Thu in the sample screen above then click inward once The day will flash 2 Turn the knob left or right to select the day of choice Sun Mon Tue W...

Страница 41: ...mute the audible alarm 1 Turn the knob to highlight Mute then click inward once The current status Off in the sample screen above will flash 2 Turn the knob in either direction the only other choice is On Click once inward to select and save On or continue turning to return to Off 3 When you set Mute to On the icon will appear at the bottom of the screen This icon will remain on display through al...

Страница 42: ...o UV Decont Off Growth Off LAMP Th 16 20 To change the mode setting for any of the lamps 1 Turn the Control Knob to highlight the setting for the lamp of choice then click the knob in The current setting will flash in the sample screen we will use the Chamber light as an example 2 Turn the Knob left or right until the desired mode setting appears Auto in this example 3 Click the Knob in to save th...

Страница 43: ...nd the Baud Rate appropriate to your PC Figure 19 RS232 Screen RS232 Mode Off Baud Rate 19200 F W Rev D H COMM Th 16 21 FirmWare Revison level this line is for information only In this sample screen the Display is at Revision D and the FirmWare Control Board at Revision H To change the Communication Mode 1 Turn the Control Knob to highlight the current setting Off in the sample screen above then c...

Страница 44: ...ll flash 2 Turn the control knob left or right until the desired setting appears 9600 19200 or 38400 The setting you choose should match the baud rate of your computer 3 Click the control knob inward once to save the new setting To move out of this screen and into the next 1 Use the Control Knob to highlight COMM then click the Knob in COMM begins to flash 2 Turn the Knob to the right until the ne...

Страница 45: ...aker Each program can have as many as 15 steps See Section 7 5 below for complete details Figure 21 Programs Screen PROGRAMS Program 1 Off Program 2 Off Program 3 Off Program 4 Off PROG Th 16 23 7 5 Programming the Shaker 7 5 1 Timer Only By setting an HRS setpoint in the DISP or SUMM screen the shaker may be set to automatically stop after a preset time period of 0 1 to 99 9 hours New Brunswick S...

Страница 46: ...en see Figure 21 repeated below At this point you can Run a program Edit a program generate a New program or turn a program Off Off is the default mode Figure 21 Programs Screen PROGRAMS Program 1 Off Program 2 Off Program 3 Off Program 4 Off PROG Th 16 23 7 5 3 Creating a Program To write a New program 1 Use the Control Knob to highlight the mode of Program 1 in our sample screen Figure 21 it is ...

Страница 47: ...Knob in to save the setting We will set Step 1 time to eight hours for this example see Figure 23 5 Turn the Knob to highlight the ºC temperature setting 20 0 in the sample screen above then click the Knob in The field will flash 6 To set the temperature desired ºC from 4 0 to 80 0 for the time period you have set turn the Knob left to decrease right to increase When the desired value appears clic...

Страница 48: ...NOTE DO NOT select Save yet 11 To program Step 2 see sample screen in Figure 23 use the Control Knob to highlight the arrows at the bottom left of the screen Click the Knob to make the arrows flash then turn the Knob to the right until Step 2 appears Click the Knob in to work in this screen and repeat Steps 3 10 Figure 23 Program 1 Step 2 PRG1 STEP 01 02 Time 08 00 03 00 ºC 37 0 40 0 RPM 150 225 U...

Страница 49: ...ing this period as the speed is set to 0 RPM Please note that temperature reductions even at temperatures above ambient going from 40º to 30ºC for example require refrigeration to be effective To save the entire program 1 Once all your steps are set use the Control Knob to highlight Save at the bottom of the screen then click the Knob in The field will flash 2 Click the Knob in again to save the p...

Страница 50: ...e SET screen is highlighted on the display Click the Knob in to work in this screen 2 Turn the Knob to highlight the Mute mode the default setting is Off which means the alarm is audible To mute the alarm click the Knob in The field will flash 3 Turn the Knob to change the setting to On then click the Knob to save this selection 4 To reactivate the audible alarm at any time repeat steps 1 3 revers...

Страница 51: ...ual Temperature Indicated Temperature Temperature Offset Value 4 To set the Temperature Calibration Offset follow the procedure outlined in Section 7 7 2 below 7 7 2 Setting the Offset To set the temperature calibration Offset 1 Use the Control Knob to enter the CAL screen see Figure 20 repeated below 2 Turn the Control Knob to highlight the current setting 0 0 in the sample screen above then clic...

Страница 52: ...ecured When the shaker is running the CAL screen shows the indicated RPM value If you wish to calibrate the speed set the speed to a value that can be measured a setpoint of 250 RPM works well The use of a strobe is recommended for accuracy If after measuring the actual speed you wish to adjust the indicated value 1 Click the Control Knob in 2 Set the new value 3 Click the Knob in again to save th...

Страница 53: ...r will begin to operate at its last entered setpoints The alarm POWER display will flash indicating that a power interruption has occurred Turn the Control Knob in any direction to acknowledge the visual alarm The flashing will stop New Brunswick Scientific Co Inc User s Guide ...

Страница 54: ...household or laboratory cleaner to wipe down its outer surfaces Do not use abrasive or corrosive compounds to clean this instrument as they may damage the unit and void the warranty If Biohazard decontamination is required see Section 8 3 below 8 3 Biohazard Decontamination It is the responsibility of the user to carry out appropriate decontamination procedures if hazardous material is spilled on ...

Страница 55: ...olving organic matter or occurring in areas warmer than room ambient temperature should be exposed to decontamination solution for at least one hour before cleanup WARNING Personnel involved in the cleanup of any spill should wear gloves safety glasses and a laboratory coat or gown during the cleanup process Respiratory protection should be considered for spills where aerosolization is suspected N...

Страница 56: ... working electric outlet and turn on power switch Lid is open look for Open Lid icon on display close the lid firmly Lid is closed but Open Lid icon is on display lid switch is broken call for service On Off switch is not working call for service Fuse s burned out check and replace as needed Shaking speed has been set to Zero by program running look for Run icon in display or by computer interface...

Страница 57: ...use blown replace Compressor over pressure switch activated call for service Chamber fans not working call for service Ambient temperature too high or too low cool or heat the room as needed Lid is not completely closed even though Open Lid icon may not be on display open it and reclose it firmly Line voltage is too low Frequency on line voltage if set incorrectly reset Defective heater call for s...

Страница 58: ...eck ballast voltage Check cable connections Check switch settings UV lamp mode has been changed by RS 232 command computer interface 9 2 Product Returns Should you need to return your Innova 43 43R to NBS for any reason first contact Customer Service to obtain a Returned Material Authorization RMA number This number must appear on the outside of the shipping container otherwise NBS Receiving will ...

Страница 59: ...er cord from the power supply There are four fuses that can be replaced by the user These are located inside the Service Compartment To access the fuses see Figure 26 1 Turn the power off and unplug the shaker 2 Remove the four screws and washers that hold the right side service panel grille in place Set them aside for reuse 3 Fuses are numbered 1 through 4 see Table 6 access the fuse you wish to ...

Страница 60: ...your hands just in case the bulb should break 3 Before removal make sure the bulb has fully cooled NOTE Cabinet lights are connected in series When one burns out both lights will be off It is therefore prudent to replace both bulbs at the same time Be sure to follow all the WARNINGS and the NOTE above as well as the procedure outlined below when you replace the cabinet bulbs with reference to Figu...

Страница 61: ... 4 Repeat step 3 for the second bulb 9 6 Replacing Optional Photosynthetic Lamps WARNING Before removing or installing the photosynthetic GRO lamp make sure power is disconnected from the unit To replace the photosynthetic GRO lamp bulbs with reference to Figure 28 1 Make sure power is disconnected from the shaker 2 Open the lid 3 Remove the two thumbscrews from the diffuser holder New Brunswick S...

Страница 62: ...lamp into the slots 7 Rotate the new lamp 90º The lamp should catch in the holders on both ends Make sure both ends are secure 8 Put the diffuser back in place reinstalling the diffuser holder with its two thumbscrews 9 7 Adjusting Lid Tension In the event the lid does not stay in the fully open position you may want to adjust the lid tension tighten the 5 16 inch nuts on the hinges to increase sp...

Страница 63: ...e power is disconnected from the shaker 2 Open the Service Compartment by removing the side panel 3 Free the heater cable harness and the temperature probe from their tie wraps and Permagum Figure 29 Germicidal UV Lamp Replacement NOTE that wires tie wraps and Permagum are not shown above 4 Remove the evaporator cover from the Service Compartment paying careful attention to the drain tubes 5 Weari...

Страница 64: ... technician will follow these steps with reference to Figures 30 31 below 1 Make sure that the power is switched off and the shaker is unplugged 2 Open the lid and remove the platform 3 Using a 7 32 inch Allen key hex wrench remove the four bolts that hold the subplatform in place and remove the subplatform 4 Disconnect the motor wire by unplugging its connector 5 With a wrench remove the nuts tha...

Страница 65: ...embly in place and remove the old belt 2 Guide the belt onto the two pulley grooves 3 Tighten the motor nuts 4 Check the belt adjustment by applying finger pressure to the belt midway between the two pulleys The belt should deflect approximately 3 8 inch 9 10 mm 5 If the deflection is not right loosen the nuts readjust the belt then retighten the motor nuts New Brunswick Scientific Co Inc User s G...

Страница 66: ...s tight 3 Tighten the hex nuts and recheck the belt tension by exerting pressure on the belt The belt should deflect approximately 3 8 inch 9 5 mm Reassembly 1 In reverse order reinstall the bearing housing Once it is securely in place remove the tie wraps cord 2 Secure the wiring to ensure no interference during rotation 3 Reinstall the subplatform and platform 0 4 Recalibrate speed see Section I...

Страница 67: ...quipped 1 P0300 0351 Photosynthetic Bulb if so equipped 1 P0300 0221 UV Germicidal Light Ballast if so equipped 1 P0420 5113 Photosynthetic Light Ballast if so equipped 1 P0420 5192 9 11 Accessories When ordering accessories you may be asked to provide the model number and serial number of your shaker This information is on the electrical specification plate located on the rear panel of the unit T...

Страница 68: ...rlenmeyer Flasks 92 108 125 ml Erlenmeyer Flasks 39 60 250 ml Erlenmeyer Flasks 30 40 500 ml Erlenmeyer Flasks 18 24 1 L Erlenmeyer Flasks 12 15 2 L Erlenmeyer Flasks 8 12 2 8 L Erlenmeyer Flasks 6 6 4 L Erlenmeyer Flasks 6 6 5 L Erlenmeyer Flasks 6 6 6 L Erlenmeyer Flasks 4 4 Clamps are sold separately 9 11 2 Flask Clamps for Platforms The following clamps are available for the matching Dedicated...

Страница 69: ... angle Test Tube Rack for tubes 15 18 mm diameter 24 tube capacity M1289 0003 9 30 tube capacity M1289 0400 7 23 tube capacity M1289 0040 9 Adjustable angle Test Tube Rack for tubes 18 21 mm diameter 18 tube capacity M1289 0004 9 22 tube capacity M1289 0500 7 16 tube capacity M1289 0050 9 Adjustable angle Test Tube Rack for tubes 22 26 mm diameter 13 tube capacity M1289 0005 9 20 tube capacity M12...

Страница 70: ...ps M1320 0300 9 11 7 Optional UV Germicidal Lamp Table 14 Germicidal Lamp Factory Installed Description NBS Part Number UV Germicidal Lamp Assembly M1320 0400 9 11 8 Optional Humidity Monitor Table 15 Humidity Monitor Factory Installed Description NBS Part Number Humidity Monitor for use with spill pan as water reservoir M1320 0600 9 11 9 Optional Utility Basket Table 16 Utility Basket Description...

Страница 71: ...can be equipped with a factory installed remote alarm component NBS part number M1320 8029 When it is hooked up to your relay and receiving requipment this device will send notification of an alarm condition to the remote location you choose New Brunswick Scientific Co Inc User s Guide ...

Страница 72: ...WHITE M1320 8013 M1320 8011 PNK BRN 100V 230V 120V 120V 100V 230V 100V 60HZ 50HZ M1335 8006 M1320 8016 RED WHITE M1320 8017 P0400 1911 ENCODER SWITCH ROTARY PUSH BUTTON SWITCH ASSY NOTE For a larger version of this drawing contact your sales or service representative Innova 43 43R Incubator Shakers M1320 0050 User s Guide ...

Страница 73: ... Load Speed Graphs The following graphs explain the maximum recommended shaking speed according to the load you put on your shaker s platform and the diameter of the shaker s orbit 1 inch or 2 inch New Brunswick Scientific Co Inc User s Guide ...

Страница 74: ...to 40 40 to 50 50 to 60 60 Platformand Load lb 50 125 250 500 mL 1L 2 8L 2L 4L 6L Figure 36 Load Speed for 2 Inch Orbit Shakers 20 Full 0 50 100 150 200 250 300 20 20 to 30 30 to 36 36 to 40 40 to 50 50 to 60 60 Platform and Load lb 50 125 250 500 mL 1L 2 8L 2L 4L 6L Innova 43 43R Incubator Shakers M1320 0050 User s Guide ...

Страница 75: ...or Mounting 33 13 Changing Display Parameter 37 14 Changed Display Parameter 37 15 Changing Setpoint 38 16 Summary Screen 39 17 Setup Screen 40 18 Lamps Screen 42 19 RS232 Screen 43 20 Calibrate Screen 45 52 21 Programs Screen 45 46 22 Program 1 Step 1 47 23 Program 1 Step 2 48 24 Program 1 Step 3 49 25 Programs Screen Running 50 26 Fuse Replacement 60 27 Replacing Cabinet Lights 61 28 Replacing P...

Страница 76: ...6 Fuses 59 7 Replacement Parts 67 8 Available Platforms 67 9 Platform Flask Capacities 68 10 Flask Clamps 68 11 Racks Trays 69 12 Gas Manifold Kit 70 13 Photosynthetic Growth Lamps 70 14 Germidical UV Lamp 70 15 Humidity Monitor 70 16 Utility Basket 70 17 COM Parameters for HyperTerminal 80 Innova 43 43R Incubator Shakers M1320 0050 User s Guide ...

Страница 77: ...ote data logging RS 232 All setpoints and operating status are retained in non volatile memory SETPOINT RETENTION Automatic restart after power is restored indicated by flashing display AUTOMATIC RESTART Triple eccentric counterbalanced drive with nine permanently lubricated ball bearings and poly V belt Self calibrating DRIVE Solid state brushless DC motor DRIVE MOTOR Drive Interrupt shuts off po...

Страница 78: ...ed for any shaker We may be able to improve this maximum speed by using an alternative motor pulley Contact your NBS representative for more information 11 1 Certifications The Innova 43 and 43R have been tested to ETL standards to comply with UL and CAN CSA electrical safety standards see ETL Regulatory Standards in the specifications table As attested in the CE Declaration of Conformity reproduc...

Страница 79: ...79 11 1 1 CE Declaration of Conformity New Brunswick Scientific Co Inc User s Guide ...

Страница 80: ... Enter the setting on your shaker see Step 2 above Baud Rate 8 Data Bits None Parity 1 Stop Bits None Flow Control 5 To be sure that you have established a connection with your shaker turn the shaker OFF open the HyperTerminal connection then turn the shaker back ON Once a connection has been made the shaker will send an OK to HyperTerminal 6 You may wish to send a trial command to the shaker see ...

Страница 81: ... shaker s serial port will reset itself In the following example the Master your computer will command the C in CS the shaker Slave to set its speed to 150 RPM Master sends Innova 43 43R responds CS Space 150 CR CS Space 150 CR In the next example the Master your computer will request that the shaker Slave report the R in RV the actual parameters Master sends Innova 43 43R responds RV CR First the...

Страница 82: ...ed is terminated with a carriage return line feed control character sequence Section 12 3 provides an Index to the 2 character command codes Sections 12 4 12 7 provide command sets for your use for Set Commands Profile Control Commands Report Request Commands and Set Get Date Time 12 3 Index to Command Codes Command Code Meaning CL Command Grow Lamp CS Command Speed CT Command Temperature CU Comma...

Страница 83: ... clears profile step PC Space Arg1 Space Arg2 CR where Arg1 Profile number range 1 to 4 and Arg2 Step number range 1 to 15 NOTE If Arg2 is not included all 15 steps of the selected profile will be cleared PM Profile Mode returns status of current profile run hold mode PM CR There are no parameters to this command Return data format Arg1 Space Arg2 Space Arg3 CR where Arg1 Run hold status 0 end 1 r...

Страница 84: ...rofile number range 1 to 4 and Arg2 Step number range 1 to 15 NOTE If Arg2 is not included the profile will start in Step 1 PW Write Profile step to memory PW Space Arg1 Space Arg2 Space Arg3 Space CR where Arg1 Profile number range 1 to 4 Arg2 Step number range 1 to 15 Arg3 Temperature setpoint Arg4 Agitation setpoint Arg5 Reserved Enter 0 0 Arg6 Step hours range 0 to 99 Arg7 Step minutes range 0...

Страница 85: ...alues RV CR RV RS CR Return data format Report Setpoint Values Arg1 Tab Arg2 Tab Arg3 Arg6 CR LF RS where Arg1 Shaker Speed Arg2 Temperature Arg3 Relative Humidity Arg4 Reserved reads 0 0 Arg5 Grow Lamp Status and Arg6 UV Lamp Status 12 7 Set Get Date Time Code Meaning Format Set Date Time D D Space Arg1 Space Arg2 Space Arg3 Space Arg7 CR Get Date Time D D CR Return data format Arg1 Tab Arg2 Tab ...

Страница 86: ...his D command D Space 01 Space 30 Space 00 Space 04 Space 07 Space 04 Space 07 CR will set the real date and time on your shaker to 1 30 00 am 2004 July 4 Sunday Innova 43 43R Incubator Shakers M1320 0050 User s Guide ...

Страница 87: ...hat the instrument being returned has been thoroughly cleaned and decontaminated A form for this purpose is provided on the following page you can photocopy it and fill it out by hand It can also be downloaded from our website www nbsc com if you prefer to fill it out electronically A copy of the completed Return Authorization and Decontamination Certificate must be attached to the outside of the ...

Страница 88: ... New Product Biohazards Never used Not used Used but decontaminated with _________________________ Hazardous Chemicals Radioactive Materials Not used Not used Used but decontaminated with Used but decontaminated with _________________________ _________________________ I certify that the equipment described above has been thoroughly cleaned and decontaminated of all chemical biological and radioact...

Страница 89: ...ertificate 87 B Decontamination Certificate 88 Dimensions Baud Rate Chamber 77 Setting the 43 Overall 77 Belt Replacement 64 Disclaimer Notice 5 Biohazards 54 Display Icons 21 Display Parameters 20 C Display Screen 36 Calibrate Screen 44 Changing Parameters 36 Calibrating RPM 52 Modifying Setpoints 37 Calspeed 52 Display Screens CAUTION Changing the 20 Symbol for 5 Door Chamber Light Opening the 3...

Страница 90: ...amps 70 N H Narrow Doorway 15 Heater 24 77 New Program 46 Heater On Icon 20 21 NOTE HRS Alarm 23 Symbol for 5 Humidity Monitor 23 70 HyperTerminal 80 O I Operation Modes 11 Overview 11 Icons 21 Incomplete Order 13 P Index of Drawings 75 Index of Tables 76 Packing List Indicated Temperature 51 Verification of 13 Inspection Padlock Icon 21 41 Of Boxes 13 Parameter Locked Icon 20 Installing Flask Cla...

Страница 91: ...51 Returned Material Safety Sheet 58 Temperature Offset Calibration 51 RMA 58 87 88 Temperature Offset Value 51 RS 232 24 77 81 Temperature Range 77 RS 232 Interface Test Tube Racks 69 Operation via 11 Time 41 RS232 Screen 43 Timed Functions 45 Run Icon 20 21 50 Timed Run 11 Troubleshooting 56 S U Safety 77 Safety Precautions 35 Unpacking Safety Switch 11 Tools for 13 Sample Program Screen 48 Util...

Страница 92: ...92 Filling the 33 Wavy Arrows Icon 21 Innova 43 43R Incubator Shakers M1320 0050 User s Guide ...

Отзывы: