6
www.neutonpower.com
60°
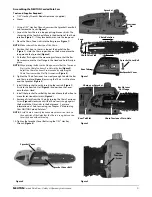
Figure 9
Rotating Head Knob
Chapter 3: Operating Your NEUTON Corded Pole Saw
Starting and Stopping the Saw
•
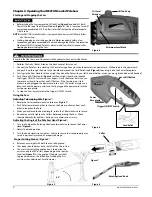
Before starting the Saw, remove the Oil Tank Cap (
Figure 5
) and add #32 Bar &
Chain Oil to the top of the Oil Level Window (
Figure 5
). One (1) minute of use will
consume approximately 0.15 fl. oz. (5ml) of oil. Refill when the oil level drops to
1/4 of a tank.
NOTE:
Your NEUTON Corded Pole Saw is equipped with an Automatic Oil Pump for Bar
and Chain oiling.
•
Starting, stopping, and restarting an electric Motor repeatedly within a few
seconds can generate a great deal of heat and damage the Motor. To protect the
life of your NEUTON Corded Pole Saw, always wait at least five (5) seconds after
stopping before restarting the Saw.
Be certain that the Chain is not in contact with any object when you start the Motor.
1. Perform the Daily Checks listed on the back cover of this manual.
2. Connect the Pole Saw to a working 120V outlet using a heavy-duty outdoor extension power cord. Make a loop in the power cord
and push it up through the hole in the Handle and around the Cord Relief Hook (
Figure 6
) then plug it into the Power Receptacle.
3. Firmly grip the Rear Handle with your right hand and the Pole with your left hand (whether or not you are right handed or left handed).
4. Push the Lock-Off Button IN (
Figure 6
) with your right thumb and squeeze
the Trigger ON/OFF Switch with your fingers. Once the Motor starts you can
remove your thumb from the Lock-Off Button. If the Saw does not start,
make sure you plugged the power cord into a live 120V outlet (simply use a
lamp to check the power outlet) and firmly plugged the power cord into the
Saw power receptacle.
5. To stop the Saw, simply release the Trigger ON/OFF Switch.
Using the Saw
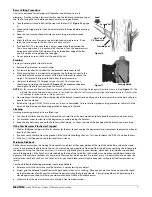
Adjusting Telescoping Pole
(
Figure 7
)
1. Rotate the Collar counterclockwise to loosen (
Figure 7
).
2. Push Poles towards each other to shorten the Pole or pull away from each
other to lengthen the Pole.
3. When you achieved the desired length, rotate the Collar clockwise to secure.
4. Be certain you fully tighten the Collars before operating the Saw. Check
them periodically for tightness during use to avoid serious injury.
Adjusting the Angle of the Pole Saw Head
(
Figure 8
)
1. Turn the Knob on the Rotating Head counterclockwise to loosen the Power
Head (
Figure8
).
2. Adjust to desired position.
3. Turn the Knob clockwise to tighten. Failure to secure the Head properly may
result in personal injury and or property damage.
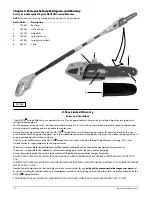
Proper Cutting Stance
(
Figure 9
)
•
Balance your weight with both feet on solid ground.
•
Your body should always be to the left of the Chain Line.
•
The most typical cutting application is to position the
unit at an angle of 60
°
or less depending on the specific
situation (
Figure 9
). As the angle of the pole saw shaft
to ground increases, the difficulty of making the first
cut (from the underside of limb) increases.
Collar
Figure 7
Figure 5
Oil Tank Cap
Oil Level
Window
Minimum Level Mark
Figure 6
Lock-Off Button
Trigger ON/OFF Switch
Figure 8
Cord Relief
Power
Receptacle

