background image

NEUTON 

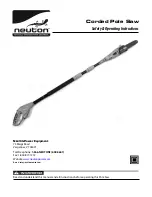
Corded Pole Saw

 - 

Safety & Operating Instructions  


5


Assembling the NEUTON Corded Pole Saw 

Tools and Supplies Required: 

• 

7/32" Hex Key Wrench/ Blade Screwdriver (supplied) 

• 

Gloves 


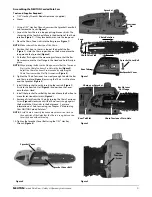
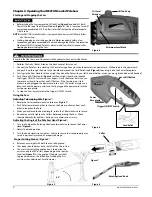
1.  Using a 7/32” Hex Key Wrench, unscrew the Sprocket Cover Bolt 

and remove the Cover (

Figure 1

).  

2.  Lay out the Saw Chain in a loop and straighten any kinks. The 

sharp side of the Teeth should face in the direction of the Chain 
rotation (

Figure 1

).  If they face backwards, turn the loop over. 

3.  Place the Chain Drive Links into the Bar groove (

Figure 1

). 

NOTE: 

 Make certain of the direction of the Chain. 

4.  Position the Chain so there is a loop at the back of the Bar 

(

Figure 1

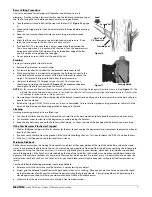
).  Hold the Chain in position on the Bar and place the 

loop around the Sprocket (

Figure 2

). 

5.  Fit the Bar flush against the mounting surface so that the Bar 

Slot mounts onto the Slot Flange in the Head and hold firmly in 
place. 

NOTE: 

 When placing the Bar on the Flange, ensure that the Tensioner 

Pin is in the Chain Tensioner Pin Hole in the Bar (

Figure 2

). 

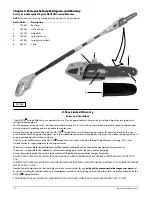
Adjust the Chain Tensioner Pin as needed by adjusting the 
Chain Tensioner with a Flat Tip Screwdriver (

Figure 3

). 

6.  Tighten the Chain Tensioner Screw only enough to hold the Bar 

and Chain in place (

Figure 3

) ensuring the Chain is still in place 

over the Sprocket (

Figure 2

). 

7.  Install the Sprocket Cover by inserting the rear tab (

Figure 1

first into the Rear Tab Slot (

Figure 2

) and position the Cover 

onto the Saw Head.  

8.  Install the Sprocket Cover Bolt by hand and leave the Bar free to 

move for tension adjustment (

Figure 4

). 

9.  Remove all slack from the Chain by turning the Chain Tensioner 

Screw (

Figure 3

) clockwise until the Chain seats snugly against 

the Bar with the Drive Links in the Bar groove.   For more 
information on Chain tensioning, see Chapter 4 “Maintaining 
Your NEUTON Corded Pole Saw”.


NOTE:

  A cold Chain is correctly tensioned when there is no slack on 

the underside of the Guide Bar, the Chain is snug, but you can 
turn it by hand without binding.


10. Tighten the Sprocket Cover Bolt using the 7/32” Hex Key 

Wrench (

Figure 4

). 

Figure 2

Figure 1

Chain Rotation 

Sprocket 

Loop

Tensioner 

Pin 

Chain Drive Link

 Chain Tensioner Pin in Hole

Chain over Sprocket

Bar Slot over 
  Slot Flange 

Rear Tab

Figure 3

Chain 

Tensioner 

Screw 

Figure 4 

Sprocket Cover Bolt

Sprocket Cover 

Sprocket Cover

Sprocket Cover Bolt

Rear Tab Slot

Содержание Corded Pole Saw

Страница 1: ...ON Power Equipment 75 Meigs Road Vergennes VT 05491 Toll Free phone 1 866 NEUTON1 638 8661 Fax 1 802 877 1213 Website www neutonpower com E MAIL INFO NEUTONPOWER COM Read and understand this manual an...

Страница 2: ...TE ThisinformationmaybehelpfultoyouinusingyourPoleSaw Neuton Power Equipment reserves the right to discontinue change and improve its products at any time without notice or obligation to the purchaser...

Страница 3: ...or CE Standards while operating the pole saw We recommend wearing long pants and non slip rubber gloves while using this Saw Be sure the gloves fit properly and do not have loose cuffs or drawstrings...

Страница 4: ...e the Saw when you are tired or under the influence of medication drugs or alcohol Never operate the Saw in the rain Never operate your unit on a slippery wet muddy or icy surface Exercise caution to...

Страница 5: ...in Tensioner with a Flat Tip Screwdriver Figure 3 6 Tighten the Chain Tensioner Screw only enough to hold the Bar and Chain in place Figure 3 ensuring the Chain is still in place over the Sprocket Fig...

Страница 6: ...tarts you can remove your thumb from the Lock Off Button If the Saw does not start make sure you plugged the power cord into a live 120V outlet simply use a lamp to check the power outlet and firmly p...

Страница 7: ...r cutting procedures will result in the Bar and Chain binding and becoming pinched or trapped in the limb Limbing Limbing is removing branches from a fallen tree You should cut limbs one at a time Rem...

Страница 8: ...ly 050 in 1 25mm out of the Bar Groove Figure 13 Be aware that a Chain tensioned while warm may be too tight upon cooling Check the cold tension before next use The Chain must be re tensioned whenever...

Страница 9: ...your Pole Saw Troubleshooting Table PROBLEM CORRECTIVE ACTION The Saw Motor fails to start Check that you installed the power cord properly into the Pole Saw power cord receptacle and you plugged the...

Страница 10: ...sidential household use The 2 Year Limited Warranty on the NEUTON Corded Pole Saw starts on the date the tool shipped from our factory The 2 Year Limited Warranty is applicable only to the original ow...

Страница 11: ...NEUTON Corded Pole Saw Safety Operating Instructions 11 NOTES...

Страница 12: ...d and allow the Saw to cool for at least five 5 minutes before servicing or storing If you drop the Saw carefully inspect it for damage If the Guide Bar is bent Housing cracked or Handles broken or if...

Отзывы: