NTI 250 FOOT USB AND DVI VIDEO EXTENDER
4
Connecting The Remote Unit
1.
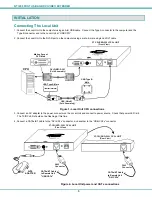
Connect an AC adapter to the power connector on the Remote Unit and connect to power source. Check that power LED is lit.
The TX/RX LED should not be flashing at this time.
2.
Connect the Remote Unit to a peripheral device using a USB A-B cable. The USB Type A connector will connect to any of the 4
USB Type A female ports on the Remote Unit. The USB Type B connector will connect the peripheral device.
3. Connect the Remote Unit to a DVI video display. The DVI cable from the display will connect to the DVI port on the Remote
Unit.
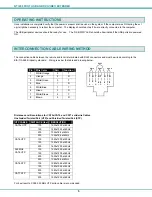
4. Connect the CAT5e/6/7 cables from the Local Unit to the same-named ports on the Remote Unit (“DVI CATx” to “DVI CATx”,
and “USB CATx” to “USB CATx” ). Once connected check that the Power LED on both receiver and transmitter is ON and
the “Tx/Rx” LEDs are both flashing, indicating that communication exists between the two units.
Figure 3- Remote Unit connections
Digital
Multi-Scan
Monitor
(Front View)
DVI-D Cable
Remote User Display
ST-C5USBD-250 Remote Unit
USB CAMERA
USB Keyboard
USB MOUSE
5VDC
ADAPTER
CAT5e/6/7 Cable
to Local Unit
"DVI CATx"
CAT5e/6/7 Cable
to Local Unit
"USB CATx"
RJ4
5
"<
USB>
"
RJ4
5
"<
USB>
"
(Rear View)
ST-C5USBD-250 Remote Unit
USB Type A Male
Mating Face of
DVI-I Male
RJ45
Connector

