


NTI 250 FOOT USB AND DVI VIDEO EXTENDER
3
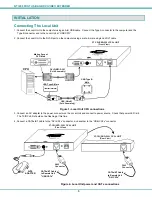
INSTALLATION
Connecting The Local Unit
1. Connect the Local Unit to the computer using an A-B USB cable. Connect the Type A connector to the computer and the
Type B connector end to the Local Unit at “USB CPU”.
2. Connect the Local Unit to the DVI-D port on the computer using a male-to-male single-link DVI cable.
Figure 1- Local Unit CPU connections
3. Connect an AC adapter to the power connector on the Local Unit and connect to power source. Check that power LED is lit.
The TX/RX LED should not be flashing at this time.
4. Connect a CAT5e/6/7 cable to the “DVI-CATx” connector, and another to the “USB-CATx” connector.
Figure 2- Local Unit power and CATx connections
CPU
RJ4
5
"<U
SB>
"
USB
TYPEB
USB Type A Male
USB Type B
Male
USB-AB-xM
(Sold Separately)
DVI-D-MM-S-2M
(Sold Separately)
Mating Face of
DVI-I Male
ST-C5USBD-250 LOCAL UNIT
(Front View)
RJ4
5
"<
USB>"
USB
TYPE
B
ST-C5USBD-250 LOCAL UNIT
(Front View)
5VDC
ADAPTER
RJ4
5
"<D
VI>
"
RJ4
5
"<US
B>
"
ST-C5USBD-250 LOCAL UNIT
(Rear View)
RJ45
Connector
CAT5e/6/7 Cable
to Remote Unit
"DVI CATx"
RJ45
Connector
CAT5e/6/7 Cable
to Remote Unit
"USB CATx"