6
5-3. Binding
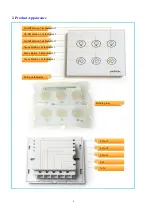
Z825J can be bound with the On/Off device such as Netvox Z501.
Step1. Press and hold the Binding Key for 3 seconds. The Network Indicator will flash
cyan
once
.
Step2. Release the Binding Key and then press the Binding Key
N times
(N=1 binding EP 1, N=2
binding EP 2, N=3 binding EP 3) within 5 seconds. For example, press the Binding Key 3 times
when you would like to bind On/Off Button 3.
Step3. Enable the binding feature of the On/Off device.
Step4. The Network Indicator flashes slowly
cyan
5 times
after the binding is completed; otherwise, it
will flash quickly
cyan
10 times
.
Note:
It supports 36 binding rules/ 36 groups/ 32 scenes
5-4. Control
A. Remote Control (Button 1~3)
Users are able to use the device which is bound with Z825J to control it.
While the switch is ON, the indicator shows
green
.
While the switch is OFF, the indicator shows
yellow
.
B. Scene Selector
i. Store Scene
After Z825J join a network, users can add the device, like ZC06, into a group/scene using the
following steps:
Step1. Identify the device which you would like to add.
Step2. Press and hold the button (4, 5, or 6) for 3 seconds. The Network Indicator will flash
cyan
once
.
Step3. Release the button and then press the
Binding Key
within 2 seconds.
Step4. The devices which are identifying will be added into a Group (Group address
0x0001-0xfff7) via addgroupifidentify command.
Step5. The Network Indicator flashes
cyan
5 times
after the setting is completed; otherwise, it
will flash
cyan
10 times
.
Via the steps above, one button can only be used for one group/scene.
One button can be used for multiple groups/scenes (up to 4 groups/scenes) via commands.
The indicator colors for 4 groups/scenes are
blue
→
red
→
cyan
→
pink
in sequence.
ii. Recall Scene
After store scene, users can press the button 4/ 5/ 6 to recall or switch scenes.
C. Mode Selector
One button can only be used for one mode.
One button can be used for multiple modes (up to 4 groups/scenes) via commands.


