


NA265A
External PCIe 3.0 to GPU Rackmount Enclosure
(A)
If the PCIe slot of host PC, workstation that works with
NA265A is PCIe 3.0 ×16,
set (this is the default setting)
JP2 at Gen3.
SW1-2 at ON.
(B)
For Mac Pro, host PC, or workstation whose PCIe slot is
PCIe 2.0 ×16 that is used to work with NA265A,
set
(D)
If the PCIe slot of host PC, workstation that works with
NA265A is PCIe 2.0 ×8,
set
After identifying the PCIe slot in computer that
links with NA265A and making the correct
setting as one of the four conditions listed
above, install the host card NP970A-H onto
the PCIe slot in host PC, workstation or
Mac Pro.
(C)
If the PCIe slot of host PC, workstation that works with NA265A
is PCIe 3.0 ×8,
set
6. Connect one end of two PCIe ×8 data cables to PCIe ×8
connectors on rear of NA265A.
7. Connect the other end of two PCIe ×8 data cables to the
two PCIe ×8 connectors on NP970A-H host card on host
PC, workstation, or Mac Pro.
5.
Fan Speed Adjustment
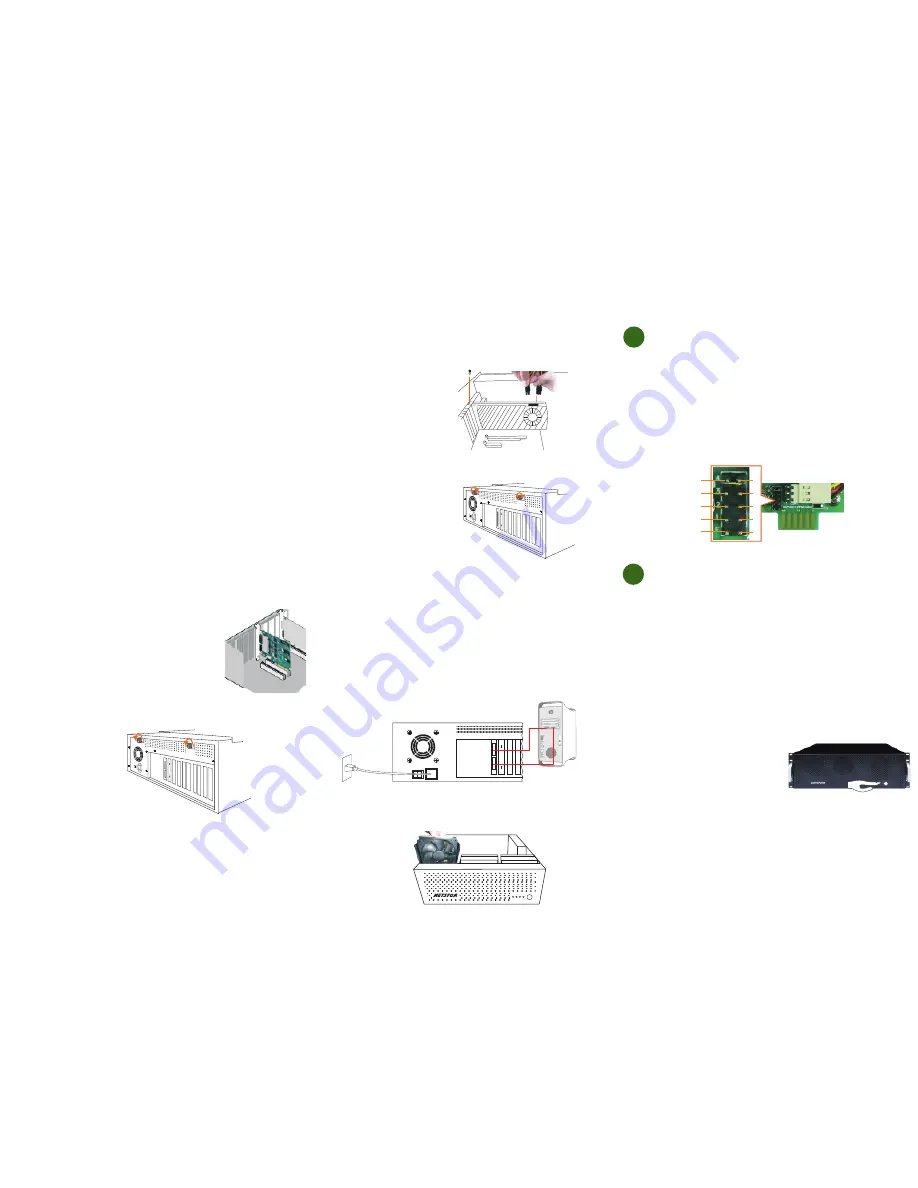
The fan speed of the front 90×90×25 mm cooling fan of
NA265A can be adjusted. Pull out the fan module, on the
connector of cooling fan, there are five sets of jumpers
labeled with 4, 3, 2, 1 and F from top to bottom on the fan
connector board. The default setting is the jumper being
placed over pin 9 and 10 for label 4 for slowest speed.
The speed increases from label 3 to label F. When jumper is
not placed over pins, the fan will not spin.
6.
Powering On/Off TurboBox NA265A
There are two ways to power on/off the NA265A. One is to
power on/off NA265A by host (the default setting); the other
is to power on/off NA265A by manual. Configure switch
SW1-1 near slot 5 on backplane for setting. For powering
on/off by host, switch SW1-1 to “ON” position. For powering
on/off by manual, switch SW1-1 to “OFF” position.
When NA265A is set for powering on/off by host, the NA265A
will be automatically powered on and off with the
host computer. When NA265A is set for powering on/off by
manual, the standard powering on/off procedure below must
be followed:
(1) Power on TurboBox NA265A by
pressing the power button for
two seconds until the button
shows blue light.
(2) In order to let the BIOS of host PC, workstation, or
Mac Pro identify and assign resources appropriately,
always power on NA265A first, and then power on
host PC, workstation, or Mac Pro.
(3) To remove TurboBox NA265A from host PC, workstation,
or Mac Pro, power off host PC, workstation, or Mac Pro
first, and then power off NA265A.
3. Remove the L shape metal bracket on rear of TurboBox
NA265A by unscrewing the screw of metal bracket for
installing the graphics or PCIe card on NA265A.
4. Install one graphics/PCIe card into one PCIe ×16 slot in
NA265A and tighten it with a screw.
5. Put the top cover back to TurboBox NA265A, and tighten
the two thumbscrews to fasten the top cover.
Each GPU card in NA265A is provided with two 6+2 pin PCIe
power cables for extra power resource. Up to 4 double-width,
full-length GPU cards can be installed in slot 2, slot 3, slot 4,
and slot 5 in enclosure.
2. Loosen the two thumbscrews and remove the top cover
from TurboBox NA265A.
8. Connect the end of power cord to power receptacle on
TurboBox NA265A and the other end of power cord to
grounded outlet or power strip.
There are three hot-swappable 90×90×25 mm cooling fans for
ventilation inside TurboBox NA265A. The cooling fan can be
taken out by unscrewing the thumbscrew on the fan module.
Note:
Make straight connection between host card and target
card with mark ×8 to ×8, and ×16 to ×16. DO NOT make
cross connection.
9
7
5
3
1
10
8
6
4
2
motherboard
x16
x8
x16 x8
JP2 at Gen2,
SW1-2 at ON.
JP2 at Gen3,
SW1-2 at OFF,
SW1 on host card and target card at ON.
JP2 at Gen2,
SW1-2 at OFF,
SW1 on host card and target card at ON.
Содержание TurboBox Xtreme NA265A
Страница 1: ......


