background image

20

4.  Select 

Wireless

The Security Options section of the page displays your WiFi 
password.

Share a USB Device on the WiFi Network

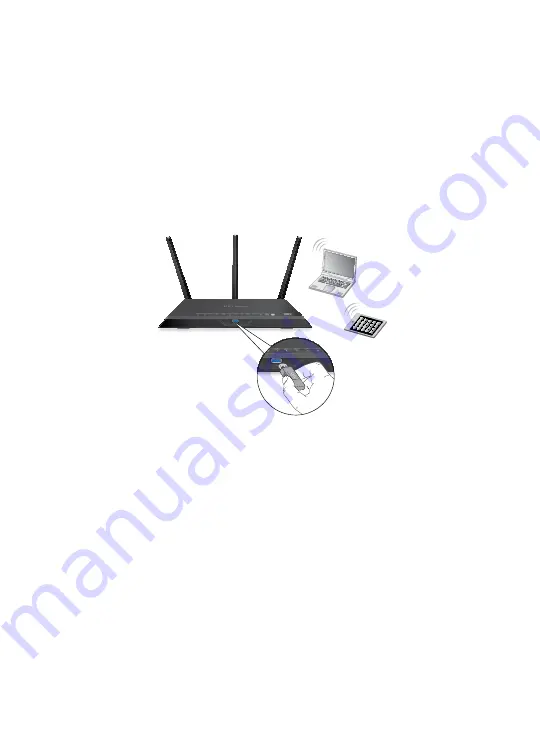
ReadySHARE lets you access and share a USB storage device 
connected to the DST router’s USB ports. (If your USB device uses 
special drivers, it is not compatible.)


¾

To access the USB storage device from a Windows 

computer: 

1.  Connect your USB storage device to a USB port on the 

DST router.
NETGEAR recommends that you use the blue USB 3.0 port on 
the DST router to get the best USB device access speed.
If your USB storage device uses a power supply, you must 
connect its power supply.
When you connect the USB storage device to the DST router’s 
USB port, it might take up to two minutes before it is ready for 
sharing. By default, the USB storage device is available to all 
computers on your local area network (LAN).

Содержание R7300DST

Страница 1: ...our product and use it to register your product at https my netgear com You must register your product before you can use NETGEAR telephone support NETGEAR recommends registering your product through the NETGEAR website For product updates and web support visit http support netgear com NETGEAR recommends that you use only the official NETGEAR support resources You can get the user manual online at...

Страница 2: ...adapter In the room where you want to improve WiFi coverage or add Ethernet plug the DST adapter into an electrical outlet Wait for the DST LED on the DST adapter to light solid green or amber and the DST LED on the DST router to light solid blue 6 Connect a device to the DST router You can use an Ethernet cable or use WiFi to connect a device to the DST router To connect with WiFi use the WiFi ne...

Страница 3: ...LEDs see DST Router LEDs on page 2 Rear Panel The rear panel connections and buttons are shown in the following figure LEDs USB 3 0 port Reset button Ethernet ports 1 4 WAN Internet port Power On Off switch Power connector WPS and DST Adapter Sync button with LED Geek Squad Setup and Support button with LED USB 2 0 port LED On Off button ...

Страница 4: ...tween the DST router and the modem 2 4 GHz WiFi LED Solid white The 2 4 GHz WiFi radio is operating Blinking white The DST router is sending or receiving WiFi traffic Off The 2 4 GHz WiFi radio is off 5 GHz WiFi LED Solid white The 5 GHz WiFi radio is operating Blinking white The DST router is sending or receiving WiFi traffic Off The 5 GHz WiFi radio is off USB 1 LED USB 2 LED The USB 1 LED is fo...

Страница 5: ...o connect your device to the DST router Solid white A device is connected to the DST router Blinking white The DST router is ready to sync with a device Off The WPS and DST adapter sync connection is off Geek Squad Setup and Support button with LED Geek Squad support is provided by phone and on the web Geek Squad agents use remote access to assist with setup and support The Geek Squad Setup and Su...

Страница 6: ...ns and Ethernet port are shown in the following figure For more information about the LEDs see DST Adapter LEDs on page 5 Power On Off switch WiFi LED DST LED Power LED Ethernet LED WPS and DST Router Sync button Factory Reset button Ethernet port ...

Страница 7: ...h the strongest link performance indicated by the color displayed by the LED Red Link rate 50 Mbps good Amber Link rate 50 and 80 Mbps better Green Link rate 80 Mbps best Off The DST adapter did not find any other compatible DST devices using the same encryption key Power LED Solid green The DST adapter is powered on Blinking green The DST adapter is pairing with another DST device Off The DST ada...

Страница 8: ...enna posts c Position the antennas for the best WiFi performance NETGEAR recommends that you position the center antenna vertically and that you position the others outward at 45 degree angles as shown 2 Prepare your modem a Unplug your modem s power b If the modem uses a battery backup remove its batteries c If your modem was already connected to another router disconnect the cable between your m...

Страница 9: ...onnect the power cord to the DST router and plug the power cord into an outlet Note Do not plug the power cord into a surge protector b Wait for the Power LED on the front panel to light amber and turn white If no LEDs are lit press the Power On Off switch on the rear panel of the DST router to the On position Cable or DSL Internet Ethernet cable Modem Ethernet cable Modem Internet Cable or DSL Po...

Страница 10: ...tion 7 Wait for the DST adapter to connect to the DST router Once the connection is made the DST LED on the DST adapter lights solid green or amber and the DST LED on the DST router lights solid blue This process takes between 5 and 80 seconds If the DST LED on the DST adapter is red the link performance is weak You might want to move the DST adapter to another electrical outlet with a faster conn...

Страница 11: ...he WiFi network name and password on the DST router s product label 10 Log in to the DST router The first time that you log in to your DST router NETGEAR genie displays If NETGEAR genie does not display try the following Close and reopen the browser Make sure that your computer is connected to one of the four Ethernet ports on the DST router or that you are connected to your DST router s WiFi netw...

Страница 12: ...your DST network 11 If the DST router detects one DST adapter on the DST network click the Update Now button to update the DST adapter s firmware WiFi settings and encryption key 12 If the DST router detects more than one DST adapter on the DST network click the Update All buttons to update the DST adapters firmware WiFi settings and encryption key 13 After the update is complete click the Next bu...

Страница 13: ...i Settings DST router SSID NETGEAR4 Password Coconut234 SSID NETGEAR4 5G Password Coconut234 DST adapter 1 SSID NETGEAR4_EXT Password Coconut234 SSID NETGEAR4 5G_EXT Password Coconut234 DST adapter 2 SSID NETGEAR41_EXT Password Coconut234 SSID NETGEAR4 5G1_EXT Password Coconut234 DST adapter 3 SSID NETGEAR42_EXT Password Coconut234 SSID NETGEAR4 5G2_EXT Password Coconut234 14 Connect devices to th...

Страница 14: ...hat you use the preset WiFi settings because you can check the product label if you forget them The DST router s web interface lets you change these settings If you do so write down the new WiFi settings and store them in a safe place You can write the WiFi settings from your product label in this space for easy reference WiFi network name SSID Network key password You can also write the Geek Squa...

Страница 15: ...T adapter Connect to the DST Adapter Using WPS To connect devices to the DST adapter using WPS 1 Press and hold the WPS and DST Router Sync button on the DST adapter The WiFi LED on the DST adapter blinks 2 Within two minutes press the WPS button on your WiFi device such as a computer tablet or smartphone When the WiFi LED stops blinking your WiFi device is automatically connected to the DST adapt...

Страница 16: ...T router s WiFi network name with _EXT added at the end of the name If more than one DST adapter is connected to the DST router for every additional DST adapter after the first a number is added before _EXT 3 Enter the DST adapter s password and click the Connect button The DST adapter s WiFi password is the same as the DST router s WiFi password For example Product 2 4 GHz WiFi Settings 5 GHz WiF...

Страница 17: ...IC Home page displays 4 Select Setup Wireless Settings The Wireless Settings page displays 5 Specify the settings for the 2 4 GHz band and for the 5 GHz band a If you want to change the DST adapter s WiFi network name in the Name SSID field enter a new network name SSID b Select a wireless channel and mode from the menus You can leave the default settings selected c In the Security Options section...

Страница 18: ...e DST router blinks white 2 Within two minutes on your computer or WiFi device press its WPS button or click its onscreen WPS button The WPS and DST Adapter Sync LED on the DST router lights solid white when the computer or WiFi device connects to your DST router To select your DST router WiFi network and enter its password 1 Open the software utility that manages your WiFi connections on the comp...

Страница 19: ...o connect using a wired connection use an Ethernet cable to connect an Ethernet port on your computer to an Ethernet port on the DST router To connect using a WiFi connection use the WiFi network name and password on the product label 2 Launch a web browser 3 Enter www routerlogin net in the address field of the browser A login window displays 4 Enter admin for the user name and password for the p...

Страница 20: ...e to recover the password select the Enable Password Recovery check box NETGEAR recommends that you enable password recovery 7 Select two security questions and provide answers to them 8 Click the Apply button Your changes are saved Recover a Forgotten DST Router admin Password The default password for the admin user name is password If you changed the password and enabled the password recovery fe...

Страница 21: ... A login window displays 9 With your recovered password log in to the DST router Find a Forgotten DST Router WiFi Password The preset WiFi password is on the DST router product label If you changed your WiFi password and forgot what it is log in to the DST router to view its current WiFi password To connect to the DST router and view its WiFi password 1 Launch a web browser 2 Enter www routerlogin...

Страница 22: ...device from a Windows computer 1 Connect your USB storage device to a USB port on the DST router NETGEAR recommends that you use the blue USB 3 0 port on the DST router to get the best USB device access speed If your USB storage device uses a power supply you must connect its power supply When you connect the USB storage device to the DST router s USB port it might take up to two minutes before it...

Страница 23: ... for sharing By default the USB storage device is available to all computers on your local area network LAN 2 On a Mac that is connected to the network launch Finder and select Go Connect to Server The Connect to server page displays 3 Enter the smb readyshare in the Server Address field and click the Connect button 4 When prompted select the Guest radio button If you set up access control on the ...

Страница 24: ... router and change its settings or diagnose and repair network issues Make a printer AirPrint compatible so that you can print from an iPad or iPhone Use MyMedia to find and play media files in your network Use Turbo Transfer to quickly send files from your computer or smartphone to another device on the network Set up parental controls Connect your smartphones and tablets to your home WiFi by sca...

Страница 25: ... each DST adapter for one second to return the DST adapter to its factory default settings DST LED is amber or red Something is interfering with the communication between the DST adapters or the DST router To resolve this issue Move the DST adapter to another outlet Unplug devices that might be causing interference such as surge suppressors and items with motors Ethernet LED is off Make sure that ...

Страница 26: ...24 ...

Страница 27: ...ions However there is no guarantee that interference will not occur in a particular installation If this equipment does cause harmful interference to radio or television reception which can be determined by turning the equipment off and on the user is encouraged to try to correct the interference by one of the following measures Reorient or relocate the receiving antenna Increase the separation be...

Страница 28: ...ential for harmful interference to co channel mobile satellite systems ii high power radars are allocated as primary users i e priority users of the bands 5250 5350 MHz and 5650 5850 MHz and that these radars could cause interference and or damage to LE LAN devices Avertissement les dispositifs fonctionnant dans la bande 5 150 5 250 MHz sont réservés uniquement pour une utilisation à l intérieur a...

Страница 29: ...ement doit être installé et utilisé avec un minimum de 20 cm de distance entre la source de rayonnement et votre corps 30 30 Cet équipement est conforme aux limites d exposition aux rayonnements IC établies pour un environnement non contrôlé Cet équipement doit être installé et utilisé avec un minimum de 30cm de distance entre la source de rayonnement et votre corps with minimum distance 20cm betw...

Отзывы: