background image

7

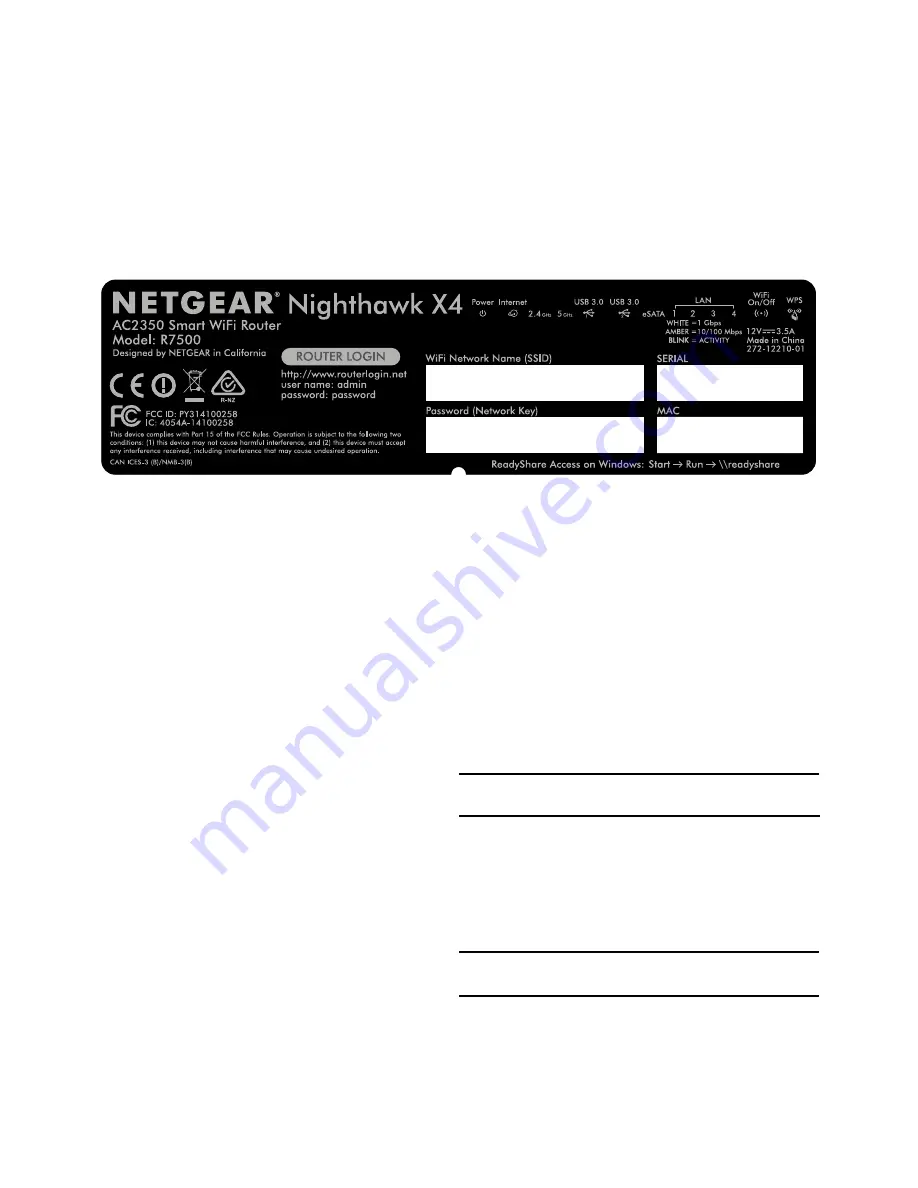
WiFi Network Name and Password

The preset WiFi network name (SSID) and password (network key) 
are unique to your router, like a serial number. Because the router 
automatically uses WiFi security, you don’t need to set it up. The 
WiFi settings are on the product label.

NETGEAR recommends that you use the preset WiFi settings 
because you can check the product label if you forget them. 
NETGEAR genie lets you change these settings. If you do so, write 
down the new WiFi settings and store them in a safe place. 

You can write the WiFi settings from your product label in this space 
for easy reference.

WiFi network name (SSID):
Network key (password):

If you change the WiFi settings, write the new settings here for 
easy reference and store this booklet in a safe place.

WiFi network name (SSID):
Network key (password):

Содержание Nighthawk X4 R7500

Страница 1: ...ormity visit http support netgear com app answers detail a_id 11621 For regulatory compliance information visit http www netgear com about regulatory See the regulatory compliance document before connecting the power supply Package Contents The box contains the following items In some regions a resource CD is included in the package Installation Video To view the Nighthawk installation video visit...

Страница 2: ...odem s power If it has a battery backup remove the battery 3 Connect your modem Plug in your modem Put the battery back in Then cable the modem to the yellow Internet port on the router 4 Power on the router The Power LED lights amber and then turns white when the router is ready 5 Connect a computer You can use an Ethernet cable or connect with WiFi To connect with WiFi use the WiFi network name ...

Страница 3: ...Name and Password 7 Join the WiFi Network 8 View or Change the Router Settings 9 Prioritize with Quality of Service 12 Share a USB Drive on the Network 14 ReadySHARE Vault Backup App 16 Share a USB Printer 17 More Premium Features 18 NETGEAR genie App 20 ...

Страница 4: ...a To determine where to attach the antennas match the labels on the antennas with the labels on the router b Align the antennas with the antenna posts on the router c Attach the antennas on the threaded antenna posts d Position the antennas for the best WiFi performance NETGEAR recommends that you position all of the antennas vertically as shown ...

Страница 5: ...hat router Make sure that your modem is turned off and is cabled only to the wall jack for your Internet service 3 Connect your modem a Plug in then turn on your modem a If you removed the batteries replace them b With the yellow Ethernet cable that came with the router connect your modem to the yellow Internet port on your router Modem DSL or cable Internet Router Ethernet cable Modem Internet DS...

Страница 6: ...n on the rear panel of the router 5 Connect a computer You can use an Ethernet cable or connect with WiFi For a wired connection use an Ethernet cable not included to connect your computer to a black Ethernet port on your router To connect with WiFi use the WiFi settings on the router label Power adapter Internet Internet DSL or cable Modem Router DSL or cable Modem Router Ethernet cable Ethernet ...

Страница 7: ...l power and that its Power LED is lit If your computer is set to a static or fixed IP address this is uncommon change it to obtain an IP address automatically from the router If you still do not see the genie screen log in to the router so that genie can detect your Internet connection To log in to the router 1 Launch a web browser 2 Enter www routerlogin net in the address field of the browser A ...

Страница 8: ...LEDs on the top of the router light to indicate router activity Power Internet 2 4 GHz WiFi 5 GHz WiFi USB 1 USB 3 0 port USB 2 USB 3 0 port eSATA Ethernet ports 1 4 WiFi On Off button with LED WPS button with LED ...

Страница 9: ...e preset WiFi settings because you can check the product label if you forget them NETGEAR genie lets you change these settings If you do so write down the new WiFi settings and store them in a safe place You can write the WiFi settings from your product label in this space for easy reference WiFi network name SSID Network key password If you change the WiFi settings write the new settings here for...

Страница 10: ...creen WPS button The WPS LED on the router lights solid white when the computer or WiFi device connects to your router 3 Repeat this process to add other computers or WiFi devices To select your network and enter its password 1 Open the soft ware utility that manages your WiFi connections on the computer or WiFi device that you want to connect to your router This utility scans for WiFi networks in...

Страница 11: ...thernet cable not included to connect your computer to a black Ethernet port on your router To connect with WiFi select and join your WiFi network 2 Launch a web browser 3 Enter www routerlogin net in the address field of the browser A login screen displays 4 Enter admin for the user name and password for the password The BASIC Home screen displays Change the admin Password To change the admin pas...

Страница 12: ...hanges are saved Recover a Forgotten admin Password The default password for the admin user name is password If you changed the password and enabled the password recovery feature you can retrieve this password To retrieve a forgotten admin password 1 Launch a web browser 2 Enter www routerlogin net in the address field of the browser A login screen displays 3 Click the Cancel button If password re...

Страница 13: ...sword and forgot what it is log in to the router to view its current WiFi password To connect to the router and view its WiFi password 1 Use an Ethernet cable to connect your computer to a black Ethernet port on the router 2 Launch a web browser 3 Enter www routerlogin net in the address field A login screen displays 4 Enter the router user name and password The default user name is admin and the ...

Страница 14: ...on To enable QoS 1 Launch a web browser 2 Enter www routerlogin net in the address field of the browser A login screen displays 3 Enter the router user name and password The default user name is admin and the default password is password You can use the default credentials if you did not change them The BASIC Home screen displays 4 Select Quality of Service The Quality of Service screen displays 5...

Страница 15: ...rmines your Internet download and upload speed If you want to define your Internet bandwidth yourself select the I want to define my Internet bandwidth radio button and type the download and upload speeds in the corresponding fields 7 Click the Apply button The router prioritizes the bandwidth to the devices connected to the network and the Click here to see bandwidth utilization by device and app...

Страница 16: ...r USB storage drive into a blue USB 3 0 port on the router 2 If your USB drive has a power supply you must use it when you connect the USB drive to the router When you connect the USB drive to the router USB port it might take up to two minutes before it is ready for sharing By default the USB drive is available to all computers on your local area network LAN 3 Select Start Run 4 Enter readyshare ...

Страница 17: ... use it when you connect the USB drive to the router When you connect the USB drive to the router USB port it might take up to two minutes before it is ready for sharing By default the USB drive is available to all computers on your local area network LAN 3 Select Go Connect to Server 4 Enter smb readyshare as the server address 5 Click the Connect button ...

Страница 18: ...omatic backup To back up your Windows computer 1 Connect a USB HDD to a USB port on the router For best performance connect a USB 3 0 HDD to a blue USB 3 0 port on the router 2 Install the genie app on each Windows computer 3 Download ReadySHARE Vault from www netgear com readyshare and install it on each Windows computer 4 Launch ReadySHARE Vault 5 To set up and run your backup click the Dashboar...

Страница 19: ... do the following a Install the current USB printer driver software available from the printer manufacturer b Download the NETGEAR USB Control Center utility from www netgear com readyshare c Select the language 3 If prompted select the printer and click the Connect button for each computer 4 When the first computer connects the status changes to Manually connected by xxx For each computer when yo...

Страница 20: ...nd iPad to play music on any AirPlay devices such as Apple TV or AirPlay supported receivers To specify iTunes server settings 1 On your iPhone or iPad find and connect to the WiFi network 2 Launch the Remote App 3 Click the Add a Device button A passcode displays 4 Specify the passcode in the router a Launch a web browser b Enter www routerlogin net in the address field of the browser A login scr...

Страница 21: ...t up VPN service you can use VPN to access the router s USB drive and media and to access your Internet service at home To set up VPN service follow these high level steps 1 Specify the VPN service 2 Install OpenVPN software on your computer 3 Use a VPN tunnel These steps are explained in detail in the user manual which is available online at http downloadcenter netgear com or through a link in th...

Страница 22: ...ter tablet or smartphone You can share and stream music or videos diagnose and repair network issues set up parental controls and more Access your router and change its settings or diagnose and repair network issues Make a printer AirPrint compatible so that you can print from an iPad or iPhone Use MyMedia to find and play media files in your network Use Turbo Transfer to quickly send files from y...

Отзывы: