background image

Security

65

 N300 Wireless Router WNR2000v4

3.

Do one of the following:

Click the 

Edit

 button to edit the application or service:

a.

Edit the application or service as described in the previous procedure.

b.

When you are done, click the 

Accept

 button.

Click the 

Delete

 button.

The application or service is removed from the table.

Schedule Blocking

If you have set up keyword blocking, service blocking, or both, you can specify the days and 
time that you want blocking to occur.

To schedule blocking:

1.

Select 

Advanced > Security > Schedule

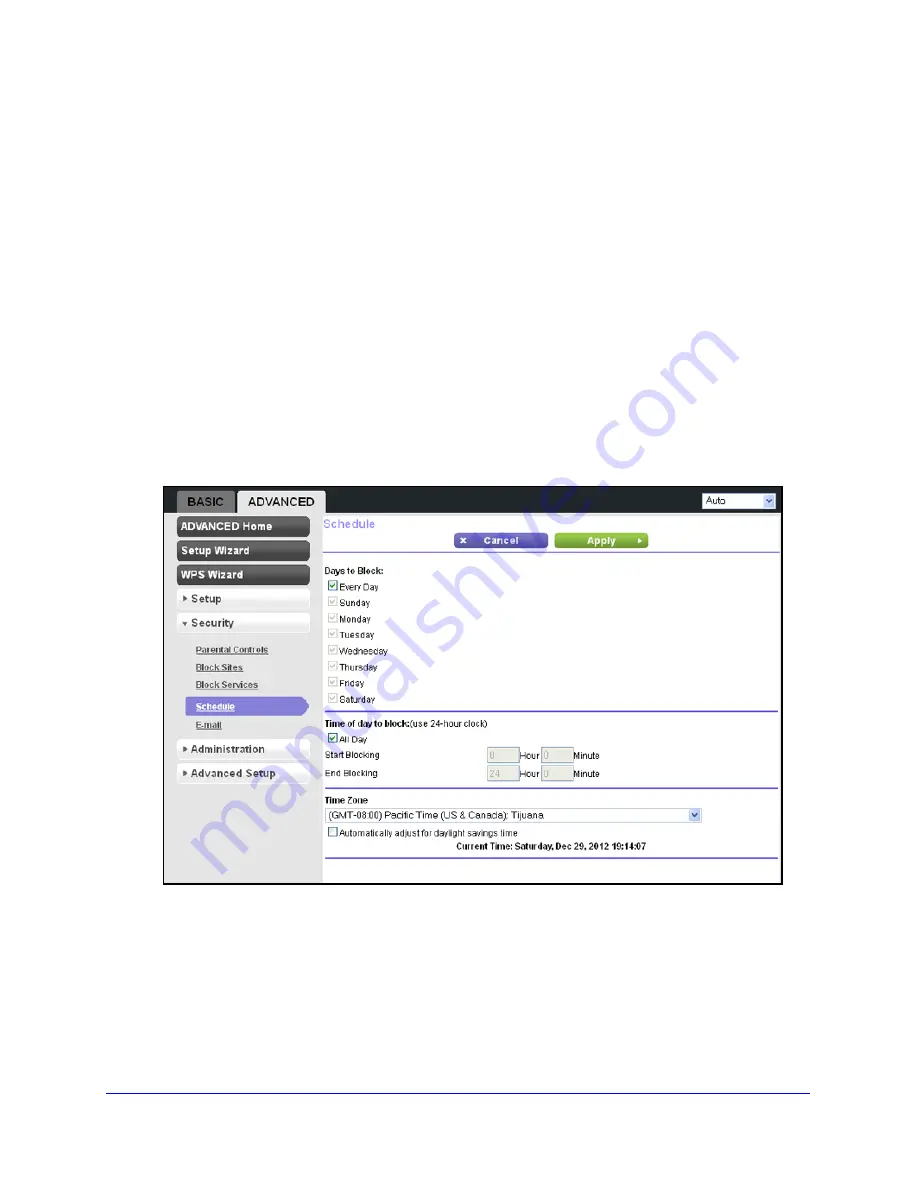
The Schedule screen displays:

2.

Set up the schedule for blocking keywords and services:

Days to Block

. Select days on which you want to apply blocking by selecting one or 

more individual check boxes, or select 

Every Day

 to select the check boxes for all 

days. 

Time of Day to Block

. Select a start and end time in 24-hour format, or select 

All 

Day

 for 24-hour blocking. 

3.

Select your time zone from the list.

Содержание N300

Страница 1: ...350 East Plumeria Drive San Jose CA 95134 USA February 2013 202 11229 01 v1 0 N300 Wireless Router WNR2000v4 User Manual ...

Страница 2: ...tgear com Phone US Canada only 1 888 NETGEAR Phone Other Countries Check the list of phone numbers at http support netgear com general contact default aspx NETGEAR recommends that you use only the official NETGEAR support resources Trademarks NETGEAR the NETGEAR logo and Connect with Innovation are trademarks and or registered trademarks of NETGEAR Inc and or its subsidiaries in the United States ...

Страница 3: ...ins and Access 16 NETGEAR genie Setup 17 Use NETGEAR genie after Installation 17 Upgrade Router Firmware 18 Router Dashboard Basic Home Screen 19 Change the Password 20 Password Recovery 21 Add Wireless Devices or Computers to Your Network 21 Manual Method 21 Wi Fi Protected Setup WPS Method 22 Chapter 3 genie Basic Settings Internet Setup 24 Internet Setup Screen Fields 25 Basic Wireless Settings...

Страница 4: ...cking and Logging 62 Block Services Port Filtering 62 Schedule Blocking 65 Security Event Email Notifications 66 Chapter 6 Administration Upgrade the Router Firmware 69 View and Configure Logs 70 Manage the Configuration File 71 Back Up Settings 71 Restore Configuration Settings 72 Erase 72 Chapter 7 Advanced Settings Advanced Wireless Settings 75 Advanced Settings for Your Wireless Network 75 Set...

Страница 5: ...6 Fixed 108 IPv6 DHCP 110 IPv6 PPPoE 111 Traffic Meter 112 Chapter 8 Monitoring Router Status and Usage Information Screen 116 Router Information Pane 117 Internet Port Pane 117 Statistics 118 Connection Status 119 Wireless Settings Pane 120 Guest Network Pane 121 Chapter 9 Troubleshooting Quick Tips 123 Sequence to Restart Your Network 123 Check Ethernet Cable Connections 123 Wireless Settings 12...

Страница 6: ...ctivity 129 Wireless Signal Strength 129 Troubleshoot Your Network Using the Ping Utility 129 Test the LAN Path to Your Router 129 Test the Path from Your Computer to a Remote Device 130 Appendix A Supplemental Information Factory Settings 133 Technical Specifications 134 Appendix B Notification of Compliance Index ...

Страница 7: ...are Features Position Your Router Cable Your Router Verify the Cabling For more information about the topics covered in this manual visit the support website at http support netgear com Firmware updates with new features and bug fixes are made available from time to time on downloadcenter netgear com Some products can regularly check the site and download new firmware or you can check for and down...

Страница 8: ...region Category 5e Cat 5E Ethernet cable Installation guide If any parts are incorrect missing or damaged contact your NETGEAR dealer Keep the carton and original packing materials in case you need to return the product for repair Hardware Features Before you cable your router take a moment to become familiar with the label and the front and back panels Pay particular attention to the LEDs on the ...

Страница 9: ...corrupt Off Power is not supplied to the router Internet Solid amber The IP address has not been acquired Solid green An IP address has been received ready to transmit data Off No Ethernet cable is connected between the router and the modem Wireless Solid blue The wireless radio is operating Off The wireless radio is off LAN ports 1 4 Solid green The LAN port has detected a 100 Mbps link with an a...

Страница 10: ...tup locked state For more information see The WPS Push N Connect Button Blinks Amber on page 125 Off No WPS connection exists Table 2 Back panel button port and connector descriptions Port or Button Description WiFi On Off button Turns the wireless radio in the router on or off Restore Factory Settings button Press and hold this button for about 7 seconds to reset the router to its factory default...

Страница 11: ...ate and preferably within line of sight to your wireless devices So it is accessible to an AC power outlet and near Ethernet cables for wired computers In an elevated location such as a high shelf keeping the number of walls and ceilings between the router and your other devices to a minimum Away from electrical devices that are potential sources of interference such as ceiling fans home security ...

Страница 12: ...n 1 Carefully peel off the protective film covering both sides of your router 2 Remove the protective film covering the front panel of the router 3 Place your router in a suitable area for installation near an AC power outlet and accessible to the Ethernet cables for your wired computers ...

Страница 13: ...nd provides detailed illustrations 1 Turn off and unplug the cable or DSL broadband modem If your modem has a backup battery remove it as well 2 Locate the Ethernet cable 1 that connects your computer to the modem 3 Disconnect the cable from the modem 2 You will connect it to the router later 4 Locate the Ethernet cable that came with the NETGEAR product Securely insert the Ethernet cable into you...

Страница 14: ...em finishes starting up power on the router Turn on the router by pressing the Power On Off button on the back Verify the Cabling Verify that your router is cabled correctly by checking the router LEDs The Power LED is solid green when the router is turned on The Wireless LED is solid blue The Internet LED is solid green If it is not make sure that the Ethernet cable is securely attached to the ro...

Страница 15: ...bed in the installation guide and in the previous chapter in this book This chapter contains the following sections Router Setup Preparation Types of Logins and Access NETGEAR genie Setup Use NETGEAR genie after Installation Upgrade Router Firmware Router Dashboard Basic Home Screen Change the Password Password Recovery Add Wireless Devices or Computers to Your Network ...

Страница 16: ...ss the Internet When you start an Internet application your router automatically logs you in The ISP configuration information for your DSL account ISP login name and password Fixed or static IP address settings special deployment by ISP this is rare Wireless Devices and Security Settings Make sure that the wireless device or computer that you are using supports WPA or WPA2 wireless security which...

Страница 17: ...en instructions to complete the NETGEAR genie setup NETGEAR genie guides you through connecting the router to the Internet If the browser cannot display the web page Make sure that the computer is connected to one of the four LAN Ethernet ports or wirelessly to the router Make sure that the router is fully up and running Its Wireless LED should be lit Close and reopen the browser to make sure that...

Страница 18: ...you set up your router and are connected to the Internet the router automatically checks for you to see if newer firmware is available If it is a message is displayed on the top of the screen The message might be A router firmware upgrade is available or a similar message To upgrade the firmware after the router has detected newer firmware and displays a message 1 Click the message The Firmware Up...

Страница 19: ... in to the router Internet Set update and check the ISP settings of your router Wireless View or change the wireless settings for your router Attached Devices View the devices that are connected to your network Parental Controls Download and set up parental controls to prevent objectionable content from reaching your computers Guest Network Set up a guest network to allow visitors to use your rout...

Страница 20: ...he password for wireless access The label on the back panel of your router shows your unique wireless network name SSID and the passphrase also referred to as the wireless network password or network key for wireless access see Label on page 11 To change the default password that you use to log in to the router 1 Select Advanced Administration Set Password The Set Password screen displays 2 Type t...

Страница 21: ... answers to the security questions to recover the password Add Wireless Devices or Computers to Your Network Choose either the manual or the WPS method to add wireless devices and other equipment to your wireless network For information about how to set up a guest network see Guest Network on page 36 Manual Method To connect manually 1 Open the software that manages your wireless connections on th...

Страница 22: ...from the router so that every device in the network has the same security settings Some older WiFi equipment is not compatible with WPS WPS works only with WPA2or WPA wireless security To use WPS to join the wireless network 1 Press the WPS button on the router front panel The WPS LED on the button starts to blink green 2 Within 2 minutes press the WPS button on your wireless device or follow the ...

Страница 23: ...etwork This chapter describes the features that are available from the genie Basic Home screen Figure 6 genie Basic Home screen This chapter contains the following sections Internet Setup Basic Wireless Settings Attached Devices Parental Controls Guest Network ...

Страница 24: ... the Internet Setup screen depend on whether your Internet connection requires a login Yes Select the tunneling protocol and enter the login name and password for your ISP If you want to change the login time out enter a new value in minutes No Enter the account and domain names only if needed 2 Enter the settings for the IP address and DNS server The default settings usually work fine If you have...

Страница 25: ...ce name provided by your ISP If your ISP did not give you a service name leave this field blank Connection Mode Select the one of the following connection modes Always On The connection automatically starts when you turn on the router and does not time out If the connection is terminated for some reason the router attempts to bring up the connection Dial on Demand The connection automatically star...

Страница 26: ...fic only from the MAC address of that computer This feature allows your router to use your computer s MAC address this is also called spoofing or cloning Use Default Address Use the default MAC address Use Computer MAC Address The router captures and uses the MAC address of the computer that you are now using to configure the router To configure the router make sure that you use the computer that ...

Страница 27: ...explained in the following sections 2 Make any changes that are needed 3 Click the Apply button 4 Set up and test your wireless devices and computers to make sure that they can connect wirelessly If they do not check the following Is your wireless device or computer connected to your network or another wireless network in your area Some wireless devices automatically connect to the first open netw...

Страница 28: ... United States the region is fixed to United States and is not changeable Channel This setting is the wireless channel used by the gateway Enter a value from 1 through 13 For products in the North America market only Channels 1 through 11 can be operated Do not change the channel unless you experience interference shown by lost connections or slow data transfers If this happens experiment with dif...

Страница 29: ...ed Encryption Standard AES encryption This is the preset wireless security that is enabled by default WPA2 provides the most reliable security This option supports speeds of up to 300 Mbps If not all clients in your network support WPA2 select WPA PSK WPA2 PSK mixed mode WPA PSK TKIP WPA2 PSK AES WPA PSK WPA2 PSK is referred to as mixed mode which supports a combination of TKIP and AES encryption ...

Страница 30: ... combination of TKIP and AES encryption for both WPA and WPA2 clients WPA clients are supported at speeds of up to 54 Mbps only WPA2 clients are supported at speeds of up 300 Mbps WPA WPA2 Enterprise supports five Extensible Authentication Protocol EAP authentication methods EAP TLS EAP TTLS MSCHAPv2 PEAPv0 EAP MSCHAPv2 PEAPv1 EAP GTC and EAP SIM To configure WPA WPA2 Enterprise security 1 In the ...

Страница 31: ...if you select Up to 54 Mbps from the Mode menu To configure WEP security 1 In the Security Options sections of the Wireless Settings screen select the WEP radio button 2 In the Authentication Type list select one of the following types Automatic If you enter a passphrase in the Passphrase field and click the Generate button the four keys are automatically generated Shared Key If you select this op...

Страница 32: ... the Key 1 Key 2 Key 3 or Key 4 radio button Only one key can be the active key b Enter the value for the key manually For 64 bit WEP enter 10 hexadecimal digits any combination of 0 9 A F The key values are not case sensitive For 128 bit WEP enter 26 hexadecimal digits any combination of 0 9 A F The key values are not case sensitive 5 Click the Apply button Attached Devices To view all computers ...

Страница 33: ...ins the network MAC Address The unique MAC address for each device does not change The MAC address is typically shown on the product label Device Name If the device name is known it is shown here Click the Refresh button to update the information onscreen Parental Controls The first time that you select Parental Controls from the Basic Home screen you are automatically directed to the NETGEAR webs...

Страница 34: ...Controls Management Utility After installation Live Parental Controls automatically starts 3 Click Next read the note and click Next again to proceed You are prompted to log in or create a free account 4 Select the radio button that applies to you and click Next If you already have an OpenDNS account leave the Yes radio button selected If you do not have an OpenDNS account select the No radio butt...

Страница 35: ...evel that you want and click Next 6 Click the Take me to the status screen button Parental controls are now set up for the router The dashboard shows Parental Controls as enabled The next time that you select Parental Controls on the Basic Home screen you can sign in to your free OpenDNS account and manage the parental controls Figure 8 Sign in to your OpenDNS account screen ...

Страница 36: ...is check box is selected the router broadcasts its SSID to all wireless devices By default this check box is selected Allow guest to access My Local Network If this check box is selected any user who connects to this SSID has access to your local network not just Internet access By default this check box is selected Enable Wireless Isolation If this check box is selected wireless devices that join...

Страница 37: ...network are the same options that are available for the regular wireless network see WPA PSK WPA2 PSK and WPA PSK WPA2 PSK Mixed Mode on page 29 WPA WPA2 Enterprise on page 30 and WEP on page 31 By default the wireless guest network has no security no authentication or encryption However NETGEAR recommends that you do select a security option 6 Click the Apply button ...

Страница 38: ...y custom settings This chapter describes the features that are available from the genie Advanced Home screen Figure 9 genie Advanced Home screen This chapter contains the following sections Setup Wizard WPS Wizard Setup Menu WAN Setup ...

Страница 39: ...ollowing menu selections that you can access from the Advanced Home screen are described in separate chapters Security For information see Chapter 5 Security Administration For information see Chapter 6 Administration Advanced Setup For information see Chapter 7 Advanced Settings ...

Страница 40: ...ie installation process no longer launches automatically but you can launch the Setup Wizard manually To launch the Setup Wizard 1 Select Advanced Setup Wizard The Setup Wizard screen displays 2 Select Yes and click the Next button The next screen displays If you select the No I want to configure the router myself radio button the Internet Setup screen displays The Internet Setup screen is describ...

Страница 41: ...o either press its WPS button or locate its WPS PIN To use the WPS Wizard 1 Select Advanced WPS Wizard The Add WPS Client displays 2 Click the Next button The screen that displays lets you select the method for adding the client 3 Select one of the following options Push Button To use the push button method do the following a Either click the WPS radio button on this screen or press the WPS button...

Страница 42: ...etwork Setup Menu Select Advanced Setup to display the Setup menu The following selections are available Internet Setup This is a shortcut to the same Internet Setup screen that you can access from the dashboard on the Basic Home screen For information see Internet Setup on page 24 Wireless Setup This is a shortcut to the same Wireless Settings screen that you can access from the dashboard on the ...

Страница 43: ...gs are available on this screen Disable Port Scan and DoS Protection DoS protection protects your LAN against denial of service attacks such as Syn flood Smurf Attack Ping of Death Teardrop Attack UDP Flood ARP Attack Spoofing ICMP Null Scan and many others By default this check box is cleared Default DMZ Server A demilitarized zone DMZ server can be helpful when you play online games and use vide...

Страница 44: ...vent some Internet games point to point applications or multimedia applications from functioning By default the Secured radio button is selected Open NAT provides a much less secured firewall but allows almost all Internet applications to function Disable SIP ALG Some Voice over IP VoIP applications do not function well with the Session Initiation Protocol SIP Application Layer Gateway ALG Selecti...

Страница 45: ...l through many devices along the way If any device in the data path has a lower MTU setting than the other devices the data packets have to be split or fragmented to accommodate the device with the smallest MTU The best MTU setting for NETGEAR equipment is often just the default value and changing the value might fix one problem but cause another WARNING An incorrect MTU setting can cause Internet...

Страница 46: ...nction as a DHCP server The router s default LAN IP configuration is LAN IP address 192 168 1 1 Subnet mask 255 255 255 0 These addresses are part of the designated private address range for use in private networks and should be suitable for most applications If your network has a requirement to use a different IP addressing scheme you can make those changes on the LAN Setup screen Table 3 Common ...

Страница 47: ...k the Apply button LAN Setup Screen Settings The following settings are available on this screen LAN TCP IP Setup IP Address The LAN IP address of the router by default 192 168 1 1 IP Subnet Mask The LAN subnet mask of the router by default 255 255 255 0 Combined with the IP address the IP subnet mask allows a device to know which other addresses are local to it and which have to be reached throug...

Страница 48: ...n see Manage the DHCP Server on the Router on page 48 Address Reservation When you specify a reserved IP address for a computer on the LAN that computer receives the same IP address each time it accesses the router s DHCP server Assign reserved IP addresses to servers that require permanent IP settings For more information see Set Up Address Reservation on page 49 Manage the DHCP Server on the Rou...

Страница 49: ...ices 1 Select Advanced Setup LAN Setup The LAN Setup screen displays 2 Clear the Use Router as DHCP Server check box 3 Click the Apply button If the DHCP service is not enabled on the router and no other DHCP server is available on your network you need to set your computers IP addresses manually or your computers are not able to access the router Set Up Address Reservation When you specify a rese...

Страница 50: ...ress MAC Address and Device Name fields 4 Type the MAC address of the computer or server 5 Type a name for the computer or server 6 Click the Add button to add the address to the Address Reservation table on the LAN Setup screen The reserved address is not assigned until the next time the computer contacts the router s DHCP server Reboot the computer or access its IP configuration and force a DHCP...

Страница 51: ...und For an application to receive the benefits of WMM QoS both it and the client running that application need to have WMM enabled Legacy applications that do not support WMM and applications that do not require QoS are assigned to the best effort category which receives a lower priority than voice and video WMM QoS is enabled by default and the Enable WMM Wi Fi multimedia settings check box is se...

Страница 52: ...tup screen displays 2 Select the Turn Internet Access QoS On check button 3 Click the Apply button The following sections describe how to manage and create QoS rules which are also referred to as QoS policies Manage QoS Rules The following procedure refers to preconfigured and custom QoS rules For information about how to create custom QoS rules see the sections following this section To view chan...

Страница 53: ... the following Click the Delete button to remove the QoS policy from the table Click the Edit button to edit the QoS policy The QoS Priority Rules screen displays a Follow the instructions in the following sections to change the policy settings b When you are done click the Apply button on the QoS Priority Rules screen Your changes are saved in the table on the QoS Setup screen WARNING If you clic...

Страница 54: ...n The existing QoS rules display 3 Click the Add Priority Rule button The QoS Priority Rules screen displays 4 In the Priority Category list select either Applications or Online Gaming Applications The Applications list lets you select existing applications but scroll down to the bottom to select Add a new application The screen adjusts Online Gaming The Online Gaming list lets you select existing...

Страница 55: ...g Port and Ending Port fields specify the port number or range of port numbers that is used by the application or game 9 Click the Apply button on the QoS Priority Rules screen The rule is saved in the QoS policy table on the QoS Setup screen Create a QoS Rule for a Router LAN Port To create a QoS policy for a device connected to one of the router s LAN ports 1 Select Advanced Setup QoS Setup The ...

Страница 56: ...he Internet Select Highest High Normal or Low 7 Click the Apply button on the QoS Priority Rules screen The rule is saved in the QoS policy table on the QoS Setup screen Create a QoS Rule for a MAC Address To create a QoS policy for traffic from a specific MAC address 1 Select Advanced Setup QoS Setup The QoS Setup screen displays 2 Click the Setup QoS rule button The existing QoS rules display 3 ...

Страница 57: ...lly 7 From the Priority list select the priority that this traffic should receive relative to other applications and traffic when accessing the Internet Select Highest High Normal or Low 8 Click the Apply button on the QoS Priority Rules screen The rule is saved in the QoS policy table on the QoS Setup screen To edit or delete a MAC address on the MAC Device List 1 Select Advanced Setup QoS Setup ...

Страница 58: ...ation is saved or removed from the MAC Device List Bandwidth Control Bandwidth control lets you set a limit to the bandwidth that is available for traffic from the router to the Internet To set the maximum uplink bandwidth 1 Select Advanced Setup QoS Setup The QoS Setup screen displays 2 Select the Turn Bandwidth Control On check box 3 Select the Automatically check Internet Uplink bandwidth radio...

Страница 59: ...genie Advanced Home 59 N300 Wireless Router WNR2000v4 6 Enter the maximum bandwidth that you want to allow and select either Kbps or Mbps 7 Click the Apply button ...

Страница 60: ...revent objectionable content from reaching the computers and other devices connected to your network This chapter includes the following sections Keyword Blocking of HTTP Traffic Block Services Port Filtering Schedule Blocking Security Event Email Notifications Note For information about parental controls see Parental Controls on page 33 ...

Страница 61: ... see Schedule Blocking on page 65 Always Turn on keyword blocking all the time independent of the settings on the Schedule screen 3 In the Type keyword or domain name here field enter a keyword or domain and click the Add Keyword button Repeat this step to add more keywords or domains The Keyword list supports up to 32 entries Here are some sample entries If the keyword xxx is specified the URL ww...

Страница 62: ...In the Trusted IP Address field type the last octet of the IP address The first three octets of the IP address depend on the IP address that is assigned to the router on the LAN Setup screen 4 Click the Apply button Block Services Port Filtering Services are functions performed by server computers at the request of client computers For example web servers serve web pages time servers serve time an...

Страница 63: ...omputers on your network This is called service blocking or port filtering To add a service for blocking first determine which port number or range of numbers is used by the application To block services 1 Select Advanced Security Block Services The Block Services screen displays 2 Select one of the service blocking options by default Never is selected Per Schedule Turn on service blocking accordi...

Страница 64: ...umbers If the application uses a single port number enter that number in both fields c Type a descriptive name in the Service Type User Defined field 7 Select the radio button for the IP address configuration that you want to block and enter the IP addresses You can block the specified service for a single computer a range of computers with consecutive IP addresses or all computers on your network...

Страница 65: ...yword blocking service blocking or both you can specify the days and time that you want blocking to occur To schedule blocking 1 Select Advanced Security Schedule The Schedule screen displays 2 Set up the schedule for blocking keywords and services Days to Block Select days on which you want to apply blocking by selecting one or more individual check boxes or select Every Day to select the check b...

Страница 66: ... screen displays 2 To receive email logs and alerts from the router select the Turn Email Notification On check box 3 In the Your Outgoing Mail Server field enter the name of your ISP s outgoing SMTP mail server such as mail myISP com You might be able to find this information in the configuration screen of your email program If you leave this field blank log and alert messages are not sent by ema...

Страница 67: ...Send Alert Immediately 7 Specify when the logs are sent If you select the Weekly Daily or Hourly option and the log fills up before the specified period the log is automatically emailed to the specified email address You can also select the log to be sent when the log is full Note Whatever option you select after the log is sent the log is cleared from the router s memory If the router cannot emai...

Страница 68: ...irmware View and Configure Logs Manage the Configuration File For information about changing the password of your router see Change the Password on page 20 For information about upgrading or checking the status of your router over the Internet see Remote Management on page 100 For information about monitoring the volume of Internet traffic passing through your router s Internet port see Traffic Me...

Страница 69: ...nd update your router 1 Select Advanced Administration Firmware Upgrade The Firmware Upgrade screen displays 2 Click the Check button The router detects new firmware if any is available If new firmware is available the Firmware Upgrade Assistant screen displays 3 Click Yes to update the router to the new firmware 4 Optional If you have manually downloaded new firmware from the NETGEAR support webs...

Страница 70: ... process can take up to 3 minutes and the upgrade process typically takes about 1 minute Read the new firmware release notes to determine whether you need to reconfigure the router after upgrading View and Configure Logs The log is a detailed record of websites that users have accessed or attempted to access router operation DoS attacks and port scans wireless access and other information Up to 25...

Страница 71: ... allowed Attempted access to blocked sites and services Log attempts to access websites and services that are blocked Connections to the Web based interface of this Router Log access to the router user interface Router operation startup get time etc Log router operation events such as startup Internet connection firmware initialization and time synchronization Known DoS attacks and Port Scans Log ...

Страница 72: ...creen displays 2 Click the Browse button to navigate to the backup file that is the cfg file 3 Click the Restore button to upload the file to the router Upon completion the router reboots WARNING Do not interrupt the reboot process Erase Under some circumstances for example if you move the router to a different network you might want to erase the configuration and restore the factory default setti...

Страница 73: ...anced Administration Backup Settings The Backup Settings screen displays 2 Click the Erase button 3 Click Yes to confirm the action The router reboots WARNING Do not interrupt the reboot process Erasing sets the user name to admin the password to password and the LAN IP address to 192 168 1 1 and enables the router s DHCP server ...

Страница 74: ...ch as when remote access from the Internet by IP address or domain name is needed This chapter includes the following sections Advanced Wireless Settings Wireless Access Point AP Wireless Distribution System WDS Port Forwarding and Port Triggering Configuration Concepts Set Up Port Forwarding to Local Servers Set Up Port Triggering Dynamic DNS Static Routes Remote Management Universal Plug and Pla...

Страница 75: ...Select Advanced Advanced Setup Wireless Settings The Advanced Wireless Settings screen displays 2 Optional Clear the Enable Wireless Router Radio check box to completely turn off the wireless radio of the router When the wireless radio is disabled you can still use the router by connecting computers to the router with an Ethernet cable By default the wireless radio is enabled 3 Optional Clear the ...

Страница 76: ...tion only Do not change these settings 4 Click the Apply button Set Up a Wireless Schedule You can use this feature to turn off the wireless signal from your router at times when you do not need a wireless connection For instance you could turn it off for the weekend if you leave town To configure and enable the wireless schedule 1 Select Advanced Advanced Setup Wireless Settings The Advanced Wire...

Страница 77: ...gs on page 26 You can do the following with the router s PIN Disable the PIN entirely Change the number of times that a PIN connection is allowed to fail before the PIN is automatically disabled By default the PIN is automatically disabled after three failed connection attempts If the PIN is automatically disabled it remains so until you restart the router While the PIN is disabled the WPS LED bli...

Страница 78: ...D and passphrase also referred to as the wireless network password or network key 6 Click the Apply button Set Up a Wireless Card Access List By default any wireless device that is configured with the correct SSID is allowed access to your wireless network For increased security you can restrict access to the wireless network to allow only specific wireless devices based on their MAC addresses Not...

Страница 79: ...Advanced Settings 79 N300 Wireless Router WNR2000v4 The Wireless Card Access List screen displays 3 Click the Add button The Wireless Card Access Setup screen displays ...

Страница 80: ... the radio button next to the wireless device that you want to edit or delete 3 Do one of the following Click the Edit button The Edit Wireless Card screen displays a Edit the address information b Click the Accept button Click the Delete button The address is removed from the table Wireless Access Point AP The router can function in access point AP mode instead of regular router mode In AP mode t...

Страница 81: ...he Use fixed IP Address radio button to set up static IP address settings NETGEAR does not recommend this setting Note If the other router or gateway in your network also has wireless capability NETGEAR recommends that you use wireless settings on your router that are different from those on the other router or gateway to avoid interference You could also disable the wireless radio on the other ro...

Страница 82: ...ients but connects to the Internet through the wireless base station The following figure shows a wireless repeating scenario Figure 10 Wireless repeating scenario The router can function either as a base station or as a repeater Wireless base station The router acts as the parent access point bridging traffic to and from the child repeater access point as well as handling wireless and wired local...

Страница 83: ...ts cannot be Auto see Basic Wireless Settings on page 26 The security option needs to be WEP or no security The WEP option displays only if you select Up to 54 Mbps from the Mode menu on the Wireless Settings screen see Basic Wireless Settings on page 26 Set Up the Base Station The wireless repeating function works only in hub and spoke mode The units cannot be daisy chained You need to know the w...

Страница 84: ...rough 4 fields enter the MAC addresses for the access points that should function as repeaters If your router is the base station it can function as the parent for up to 4 other access points 6 Click the Apply button Set Up a Repeater Use a wired Ethernet connection to set up the repeater to avoid conflicts with the wireless connection to the base station Note If you set up the your router as a ba...

Страница 85: ...ess Client Association check box to prevent wireless clients from associating with the repeater and allowing LAN client associations only You can leave the check box cleared if you prefer wireless clients to be able to associate with the repeater 6 In the Base Station MAC Address field enter the MAC addresses for the access point that should function as the base station 7 Click the Apply button 8 ...

Страница 86: ...le of normal outbound traffic and the resulting inbound responses 1 You open a browser and your operating system assigns port number 5678 to this browser session 2 You type http www example com into the URL field and your computer creates a web page request message with the following address and port information The request message is sent to your router Source address Your computer s IP address S...

Страница 87: ...ter s IP address Destination port number 5678 which is the browser session that made the initial request 6 When you finish your browser session your router eventually detects a period of inactivity in the communications Your router then removes the session information from its session table and incoming traffic is no longer accepted on port number 33333 Port Triggering to Open Incoming Ports In th...

Страница 88: ...formation replaced by NAT and sends this reply message to your computer 7 Upon receiving the incoming message to destination port 113 your router checks its session table and learns that there is an active session for port 113 associated with your computer The router replaces the message s destination IP address with your computer s IP address and forwards the message to your computer 8 When you f...

Страница 89: ...123 Therefore your router modifies the destination information in the request message The destination address is replaced with 192 168 1 123 Your router then sends this request message to your local network 3 Your web server at 192 168 1 123 receives the request and composes a return message with the requested web page data Your web server then sends this reply message to your router 4 Your router...

Страница 90: ... to configure the router to forward specific incoming protocols to computers on your local network In addition to servers for specific applications you can also specify a default DMZ server to which all other incoming protocols are forwarded Before starting you need to determine which type of service application or game you want to provide and the local IP address of the computer that should provi...

Страница 91: ...to the table onscreen Add a Custom Service To define a service game or application that does not appear in the Service Name list you have to first determine which port number or range of numbers is used by the application You can usually determine this information by contacting the publisher of the application or user groups or newsgroups To add a custom service 1 Select Advanced Setup Port Forwar...

Страница 92: ...You can also select a radio button for one of the devices in the list of attached devices to automatically place the IP address of the selected device in the Internal IP Address field 8 Click the Apply button The service is added to the table on the Port Forwarding Port Triggering screen Edit or Delete a Port Forwarding Entry To edit or delete a port forwarding entry 1 Select Advanced Advanced Set...

Страница 93: ...sly An application needs to open incoming ports that are different from the outgoing port When port triggering is enabled the router monitors outbound traffic looking for a specified outbound trigger port When the router detects outbound traffic on that port it remembers the IP address of the local computer that sent the data The router then temporarily opens the specified incoming port or ports a...

Страница 94: ...If the Disable Port Triggering check box is selected after you configure port triggering port triggering is disabled However any port triggering configuration information you added to the router is retained even though it is not used 4 In the Port Triggering Time out field enter a value up to 9999 minutes The default value is 20 minutes This value controls the inactivity timer for the designated i...

Страница 95: ...t that should cause the inbound ports to be opened 10 Enter the inbound connection port information in the Connection Type Starting Port and Ending Port fields 11 Click the Apply button The service is added to the Port Triggering Portmap table on the Port Forwarding Port Triggering screen By default the service is enabled that is the Enable check box is selected To edit or delete a port triggering...

Страница 96: ... their IP address and forwards traffic directed at your domain to your frequently changing IP address If your ISP assigns a private WAN IP address such as 192 168 x x or 10 x x x the Dynamic DNS service does not work because private addresses are not routed on the Internet Your router contains a client that can connect to the Dynamic DNS service provided by DynDNS org First visit their website at ...

Страница 97: ...t the URL of your Dynamic DNS service provider 4 Type the host name or domain name that your Dynamic DNS service provider gave you 5 Type the user name for your Dynamic DNS account This is the name that you use to log in to your account not your host name 6 Type the password or key for your Dynamic DNS account 7 Click the Apply button 8 Optional To verify the Dynamic DNS status click the Show Stat...

Страница 98: ...ated with your ISP as the gateway and a second static route was created to your local network for all 192 168 1 x addresses With this configuration if you attempt to access a device on the 134 177 0 0 network your router forwards your request to the ISP The ISP forwards your request to the company where you are employed and the request is likely to be denied by the company s firewall In this case ...

Страница 99: ...s destination If the destination is a single host type 255 255 255 255 8 Type the gateway IP address which has to be a router on the same LAN segment as the N300 Wireless Router 9 Type a number between 1 and 15 as the metric value This value represents the number of routers between your network and the destination Usually a setting of 2 or 3 works but if this is a direct connection set it to 1 10 ...

Страница 100: ... The remote management feature lets you upgrade or check the status of your router over the Internet Note Before you enable remote management be sure to change the router s default login password to a very secure password The ideal password should contain no dictionary words from any language and contain uppercase and lowercase letters numbers and symbols It can be up to 30 characters To set up re...

Страница 101: ...enter a custom port number for the remote router user interface Choose a number between 1024 and 65535 but do not use the number of any common service port The default is 8080 which is a common alternate for HTTP 5 Click the Apply button When you access your router from the Internet type your router s WAN IP address in your browser s address or location field followed by a colon and the custom por...

Страница 102: ...f additional network traffic Longer durations can compromise the freshness of the device status but can significantly reduce network traffic 4 Type the advertisement time to live in hops The time to live for the advertisement is measured in hops steps for each UPnP packet sent The time to live hop count is the number of steps a broadcast packet is allowed to propagate for each UPnP advertisement b...

Страница 103: ...ct it automatically To set up an IPv6 Internet connection type 1 Select Advanced Advanced Setup IPv6 The IPv6 screen displays 2 Select the IPv6 connection type from the list Your Internet service provider ISP can provide this information If your ISP did not provide details you can select 6to4 Tunnel If you are not sure what type of IPv6 connection the router uses select Auto Detect so that the rou...

Страница 104: ...s that are separated by colons Any four digit group of zeroes within an IPv6 address can be reduced to a single zero or altogether omitted The following errors invalidate an IPv6 address More than eight groups of hexadecimal quartets More than four hexadecimal characters in a quartet More than two colons in a row IPv6 Auto Detect To set up an IPv6 Internet connection through auto detection 1 Selec...

Страница 105: ...ght not support the DHCv6 client function Auto Config This is the default setting 4 Optional Select the Use This Interface ID check box and specify the interface ID that you want to be used for the IPv6 address of the router s LAN interface If you do not specify an ID here the router generates one automatically from its MAC address 5 Specify IPv6 filtering When the connection type is not IPv6 Pass...

Страница 106: ...address is acquired the field displays Not Available 3 Optional In the DHCP User Class If Required field enter a host name Most people do not need to fill in this field but if your ISP has given you a specific host name enter it here 4 Optional In the Domain Name If Required field enter a domain name You can type the domain name of your IPv6 ISP Do not enter the domain name for the IPv4 ISP here F...

Страница 107: ... Router s IPv6 Address on LAN This field shows the IPv6 address that is acquired for the router s LAN interface The number after the slash is the length of the prefix which is also indicated by the underline _ under the IPv6 address If no address is acquired the field displays Not Available 3 Configure the remote 6to4 relay router settings by selecting one of the following radio buttons Auto Your ...

Страница 108: ...ks as a Layer 2 Ethernet switch with two ports LAN and WAN Ethernet ports for IPv6 packets The router does not process any IPv6 header packets To set up a pass through IPv6 Internet connection 1 Select Advanced Advanced Setup IPv6 The IPv6 screen displays 2 Select Pass Through from the menu The screen adjusts but no additional fields display 3 Click the Apply button IPv6 Fixed To set up an IPv6 In...

Страница 109: ...cify the DNS servers the router uses the DNS servers that are configured for the IPv4 Internet connection on the Internet Setup screen see Internet Setup on page 24 4 Specify how the router assigns IPv6 addresses to the devices on your home network the LAN by selecting one of the following radio buttons Use DHCP Server This method passes more information to LAN devices but some IPv6 systems might ...

Страница 110: ...adio buttons Secured In the secured mode which is the default mode the router inspects both TCP and UDP packets Open In the open mode the router inspects UDP packets only 7 Click the Apply button IPv6 DHCP To set up an IPv6 Internet connection with a DHCP server 1 Select Advanced Advanced Setup IPv6 The IPv6 screen displays 2 Select DHCP from the menu The screen adjusts The information in the foll...

Страница 111: ...nter a domain name You can type the domain name of your IPv6 ISP Do not enter the domain name for the IPv4 ISP here For example if your ISP s mail server is mail xxx yyy zzz you would type xxx yyy zzz as the domain name If your ISP provided a domain name type it in this field For example Earthlink Cable might require a host name of home and Comcast sometimes supplies a domain name 5 Configure the ...

Страница 112: ...our full email address when you log in If your ISP requires your full email address type it in this field 4 In the Password field enter the password for the ISP connection 5 In the Service Name name field enter a service name If your ISP did not provide a service name leave this field blank Note The default setting of the Connection Mode field is Always on to provide a steady IPv6 connection The r...

Страница 113: ... traffic only Both Directions The restriction is applied to both incoming and outgoing traffic 4 In the Monthly Limit field enter how many MBytes MB per month are allowed Instead of MB you can also specify how many hours of traffic are allowed by selecting the Connection time control radio button and entering the allowed hours in the Monthly limit field 5 Optional If your ISP charges an amount of ...

Страница 114: ...0 and no warning message is issued You can select one of the following to occur when the traffic limit is reached The Internet LED flashes green or amber The Internet connection is disconnected and disabled 8 Click the Apply button The Internet Traffic Statistics section helps you to monitor the data traffic Click the Refresh button to update the Traffic Statistics section Click the Traffic Status...

Страница 115: ...raffic This chapter describes how to monitor your the router and network traffic This chapter includes the following sections Router Status and Usage Information Screen Router Information Pane Internet Port Pane Wireless Settings Pane Guest Network Pane ...

Страница 116: ...ormation Select Advanced The screen that displays shows information about the router the Internet port the wireless settings and the guest network this screen is referred to as the Router Status screen Note The Router Status screen also displays when you select Advanced Advanced Home or Advanced Administration Router Status ...

Страница 117: ...f the router IP Address The IP address that is used by the Ethernet LAN port of the router The default is 192 168 1 1 DHCP Server Identifies whether the router s built in DHCP server is active for the LAN attached devices Internet Port Pane To display the Internet Port pane Select the Advanced tab The Router Status screen displays The Internet Port pane is located in the upper right of the screen ...

Страница 118: ...estarted Port The statistics for the WAN Internet port the four LAN Ethernet ports combined and the wireless LAN WLAN port Status The link status of the port TxPkts The number of packets transmitted on this port since reset or manual clear RxPkts The number of packets received on this port since reset or manual clear Collisions The number of collisions on this port since reset or manual clear Tx B...

Страница 119: ...d on the Connection Status pop up screen DHCP Connection The content of the Connection Status pop up screen depends on the type of connection The following settings are displayed for a DHCP connection IP Address The IP address that is assigned to the router Subnet Mask The subnet mask that is assigned to the router Default Gateway The IP address for the default gateway that the router communicates...

Страница 120: ...ubnet mask that is assigned to the router Click the Connect button to establish the PPPoE connection manually Click the Disconnect button to terminate the PPPoE connection manually Click the Close Window button to close the Connection Status screen PPTP Connection The content of the Connection Status pop up screen depends on the type of connection The following settings are displayed for a PPTP co...

Страница 121: ...computers or wireless devices that join the network can use the Internet but cannot access each other or access Ethernet devices on the network Wi Fi Protected Setup Indicates whether Wi Fi Protected Setup is configured for this network Guest Network Pane To display the Guest Network pane Select the Advanced tab The Router Status screen displays The Guest Network pane is located in the lower right...

Страница 122: ... find the solution here check the NETGEAR support site at http support netgear com for product and contact information This chapter contains the following sections Quick Tips Troubleshoot with the LEDs Cannot Log In to the Router Cannot Access the Internet Changes Not Saved Wireless Connectivity Troubleshoot Your Network Using the Ping Utility ...

Страница 123: ... the corresponding numbered router LAN port LED is lit Wireless Settings Make sure that the wireless settings in the computer and router match exactly For a wirelessly connected computer the wireless network name SSID and wireless security settings of the router and wireless computer need to match exactly If you set up an access list in the Advanced Wireless Settings screen you have to add each wi...

Страница 124: ...roduct If the Power LED blinks slowly and continuously the router firmware is corrupted This can happen if a firmware upgrade is interrupted or if the router detects a problem with the firmware If the error persists you have a hardware problem For recovery instructions or help with a hardware problem contact technical support at www netgear com support Power LED Stays Amber When the router is turn...

Страница 125: ...tandard straight through Ethernet cable or an Ethernet crossover cable Wireless LED Is Off If the Wireless LED stays off check to see if the WiFi On Off button on the router has been pressed This button turns the wireless radio in the router on and off The Wireless LED is lit when the wireless radio is turned on The WPS Push N Connect Button Blinks Amber If after you use the WPS function the WPS L...

Страница 126: ...rer click the Refresh button to be sure that the Java applet is loaded Try quitting the browser and launching it again Make sure that you are using the correct login information The factory default login name is admin and the password is password Make sure that Caps Lock is off when you enter this information If you are attempting to set up your NETGEAR router as an additional router behind an exi...

Страница 127: ...ount as the account name in the Internet Setup screen Your ISP allows only one Ethernet MAC address to connect to Internet and might check for your computer s MAC address In this case do one of the following Inform your ISP that you have bought a new network device and ask them to use the router s MAC address Configure your router to clone your computer s MAC address Troubleshoot Internet Browsing...

Страница 128: ... If the fields show valid information including valid IP addresses your PPPoE connection is up and working If any of the fields show incomplete information or no valid IP address you can attempt to reconnect by clicking the Connect button The router continues to attempt to connect indefinitely If you cannot connect after several minutes you might be using an incorrect service name user name or pas...

Страница 129: ...26 Wireless Signal Strength If your wireless device finds your network but the signal strength is weak check these conditions Is your router too far from your computer or too close Place your computer near the router but at least 6 feet away and see whether the signal strength improves Is your wireless signal blocked by objects between the router and your computer Troubleshoot Your Network Using t...

Страница 130: ...ur computer Verify that the IP address for your router and your computer are correct and that the addresses are on the same subnet Test the Path from Your Computer to a Remote Device After verifying that the LAN path works correctly test the path from your computer to a remote device 1 From the Windows toolbar click the Start button and then select Run 2 In the Windows Run window type ping n 10 IP...

Страница 131: ...ernet Settings screen Your ISP could be rejecting the Ethernet MAC addresses of all but one of your computers Many broadband ISPs restrict access by allowing traffic only from the MAC address of your broadband modem but some ISPs additionally restrict access to the MAC address of a single computer connected to that modem If this is the case configure your router to clone or spoof the MAC address f...

Страница 132: ...132 A A Supplemental Information This appendix provides factory default settings and technical specifications for the N300 Wireless Router WNR2000v4 Factory Settings Technical Specifications ...

Страница 133: ...hardware address WAN MTU size 1500 Port speed Autosensing Local area network LAN LAN IP 192 168 1 1 Subnet mask 255 255 255 0 DHCP server Enabled DHCP range 192 168 1 2 to 192 168 1 254 Time zone United States is Pacific time otherwise varies by region Time zone daylight saving time Disabled Wireless Wireless communication Enabled SSID name Preset For information see the router label For a descrip...

Страница 134: ...condensing Electromagnetic Emissions FCC Part 15 Class B VCCI Class B EN 55 022 CISPR 22 Class B C Tick N10947 LAN 10BASE T or 100BASE Tx RJ 45 WAN 10BASE T or 100BASE Tx RJ 45 Wireless Maximum wireless signal rate complies with the IEEE 802 11 standard See the footnote for the previous table Radio data rates Auto Rate Sensing Data encoding standards IEEE 802 11n version 2 0 IEEE 802 11n IEEE 802 ...

Страница 135: ...ates and Switzerland This device may not be used for setting up outdoor radio links in France and in some areas the RF output power may be limited to 10 mW EIRP in the frequency range of 2454 2483 5 MHz For detailed information the end user should contact the national spectrum authority in France FCC Requirements for Operation in the United States FCC Information to User This product does not cont...

Страница 136: ...r channels is not possible This device and its antenna s must not be co located or operation in conjunction with any other antenna or transmitter TV Tuner on Selected Models Note to CATV System Installer This reminder is provided to call the CATV system installer s attention to Section 820 93 of the National Electrical Code which provides guidelines for proper grounding and in particular specifies...

Страница 137: ...source de rayonnement et votre corps Interference Reduction Table The table below shows the Recommended Minimum Distance between NETGEAR equipment and household appliances to reduce interference in feet and meters Household Appliance Recommended Minimum Distance in feet and meters Microwave ovens 30 feet 9 meters Baby Monitor Analog 20 feet 6 meters Baby Monitor Digital 40 feet 12 meters Cordless ...

Страница 138: ...ts 78 box contents 8 browsing troubleshooting 127 C cables checking 123 changes not saved router 128 channel wireless 28 coexistence 20 40 MHz disabling 75 compliance 135 configuration file managing 71 connecting wirelessly operating range 11 connection status 119 contents box 8 crossover cable 125 CTS RTS threshold 76 custom service port forwarding 91 D dashboard described 19 data packets fragmen...

Страница 139: ...ing 134 I IGMP proxy 44 inbound bandwidth 118 inbound traffic allowing or blocking 86 interference 75 Internet connection setting up 24 status 119 troubleshooting 17 126 Internet LED described 9 troubleshooting 125 Internet port manually setting up 24 Setup Wizard using to connect 17 41 viewing setting 117 Internet Relay Chat IRC 87 Internet service provider ISP account information 16 setting up a...

Страница 140: ...bel 11 pass through IPv6 Internet connection 108 password recovery administrative 21 password default 18 permanent IP address 26 PIN method WPS 42 PIN viewing and configuring 77 ping responding 43 plug and play 101 Point to Point Tunneling Protocol PPTP Internet connection 25 viewing connection status 120 policies QoS 52 port filtering 63 port forwarding concepts 86 configuring 90 port numbers ser...

Страница 141: ...otocol Application Layer Gateway SIP ALG 44 settings default list of 133 restoring 72 Setup Wizard 40 shared key WEP 31 signal strength troubleshooting 129 SIP ALG Session Initiation Protocol Application Layer Gateway 44 sites blocking 61 SMTP server 66 software upgrading 18 69 version 117 specifications technical 134 SSID described 28 product label 11 stateful packet inspection SPI firewall 105 s...

Страница 142: ...ricting access 78 wireless connections operating range 11 troubleshooting 129 wireless devices adding to network 21 wireless distribution system WDS 82 wireless isolation 28 36 Wireless LED described 9 troubleshooting 125 wireless mode 28 wireless network name SSID broadcasting 28 described 28 product label 11 wireless network settings 28 wireless radio disabling 75 wireless repeating 82 wireless ...

Отзывы: