background image

202-10039-01

vi

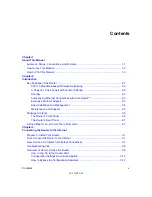
Contents

How to Manually Configure Your Internet Connection ..................................................3-13

Using the Smart Setup Wizard  .....................................................................................3-15

NETGEAR product registration, support, and documentation  ......................................3-16

Chapter 4 


Wireless Configuration

Observe Performance, Placement, and Range Guidelines ............................................4-1

Implement Appropriate Wireless Security  ......................................................................4-2

Understanding Wireless Settings ...................................................................................4-3

Default Factory Settings ...........................................................................................4-3

Basic Wireless Settings ............................................................................................4-3

Advanced Wireless Settings  ....................................................................................4-6

Information to Gather Before Changing Basic Wireless Settings .............................4-7

How to Set Up and Test Basic Wireless Connectivity ..............................................4-8

How to Configure WEP  ..........................................................................................4-10

How to Configure WPA-PSK Wireless Security ............................................................ 4-11

How to Restrict Wireless Access by MAC Address ...............................................4-12

Chapter 5 


Content Filtering

Content Filtering Overview  .............................................................................................5-1

Blocking Access to Internet Sites ...................................................................................5-2

Blocking Access to Internet Services .............................................................................5-3

Configuring a User Defined Service .........................................................................5-4

Configuring Services Blocking by IP Address Range  ..............................................5-5

Scheduling When Blocking Will Be Enforced  .................................................................5-5

Viewing Logs of Web Access or Attempted Web Access ...............................................5-6

Configuring E-Mail Alert and Web Access Log Notifications  ..........................................5-7

Chapter 6 


Maintenance

Viewing Router Status Information  .................................................................................6-1

Viewing a List of Attached Devices .................................................................................6-5

Configuration File Management  .....................................................................................6-5

Restoring and Backing Up the Configuration  ...........................................................6-6

Erasing the Configuration .........................................................................................6-7

Upgrading the Router Software ......................................................................................6-7

Changing the Administrator Password ...........................................................................6-8

Содержание MR814 v3

Страница 1: ...202 10039 01 202 10039 01 Version 1 0 June 2004 NETGEAR Inc 4500 Great America Parkway Santa Clara CA 95054 USA Reference Manual for the MR814 v3 Cable DSL Wireless Router ...

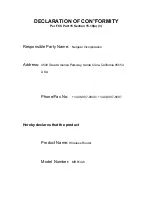
Страница 2: ...n 15 19 a 3 Responsible Party Name Netgear Incorporation Address 4500 Great America Parkway Santa Clara California 95054 USA Phone Fax No 1 408 907 8000 1 408 907 8097 Hereby declares that the product Product Name Wireless Router Model Number MR814v3 ...

Страница 3: ... equipment does cause harmful interference to radio or television reception which can be determined by turning the equipment off and on the user is encouraged to try to correct the interference by one or more of the following measures Reorient or relocate the receiving antenna Increase the separation between the equipment and receiver Connect the equipment into an outlet on a circuit different fro...

Страница 4: ...rtain restrictions Please refer to the notes in the operating instructions Federal Office for Telecommunications Approvals has been notified of the placing of this equipment on the market and has been granted the right to test the series for compliance with the regulations Voluntary Control Council for Interference VCCI Statement This equipment is in the second category information equipment to be...

Страница 5: ...sive Protocol Support 2 3 Easy Installation and Management 2 4 Maintenance and Support 2 5 Package Contents 2 5 The Router s Front Panel 2 6 The Router s Rear Panel 2 7 A Road Map for How to Get There From Here 2 7 Chapter 3 Connecting the Router to the Internet Prepare to Install Your Router 3 1 First Connect the Router to the Internet 3 1 Now Set Up a Computer for Wireless Connectivity 3 7 Troub...

Страница 6: ... How to Configure WPA PSK Wireless Security 4 11 How to Restrict Wireless Access by MAC Address 4 12 Chapter 5 Content Filtering Content Filtering Overview 5 1 Blocking Access to Internet Sites 5 2 Blocking Access to Internet Services 5 3 Configuring a User Defined Service 5 4 Configuring Services Blocking by IP Address Range 5 5 Scheduling When Blocking Will Be Enforced 5 5 Viewing Logs of Web Ac...

Страница 7: ... IP Setup Parameters 7 6 Using the Router as a DHCP server 7 8 Using Address Reservation 7 8 Using a Dynamic DNS Service 7 9 Configuring Static Routes 7 10 Enabling Remote Management Access 7 12 Using Universal Plug and Play UPnP 7 13 Chapter 8 Troubleshooting Basic Functioning 8 1 Power Light Not On 8 1 Lights Never Turn Off 8 2 LAN or WAN Port Lights Not On 8 2 Troubleshooting the Web Configurat...

Страница 8: ...Security and Firewalls B 10 What is a Firewall B 10 Stateful Packet Inspection B 11 Denial of Service Attack B 11 Ethernet Cabling B 11 Category 5 Cable Quality B 12 Inside Twisted Pair Cables B 13 Uplink Switches Crossover Cables and MDI MDIX Switching B 14 Appendix C Preparing Your Network What You Need To Use a Router with a Broadband Modem C 1 Cabling and Computer Hardware C 1 Computer Network...

Страница 9: ... the Macintosh for TCP IP Networking C 18 MacOS 8 6 or 9 x C 18 MacOS X C 18 Verifying TCP IP Properties for Macintosh Computers C 19 Verifying the Readiness of Your Internet Account C 20 Are Login Protocols Used C 20 What Is Your Configuration Information C 20 Obtaining ISP Configuration Information for Windows Computers C 21 Obtaining ISP Configuration Information for Macintosh Computers C 22 Re...

Страница 10: ... WPA Authentication Enterprise level User Authentication via 802 1x EAP and RADIUS D 12 WPA Data Encryption Key Management D 14 Is WPA Perfect D 16 Product Support for WPA D 16 Supporting a Mixture of WPA and WEP Wireless Clients D 16 Changes to Wireless Access Points D 16 Changes to Wireless Network Adapters D 17 Changes to Wireless Client Programs D 18 Glossary Index ...

Страница 11: ...the following typographical conventions This guide uses the following formats to highlight special messages This manual is written for the MR814 v3 router according to these specifications Table 1 1 Typographical Conventions italics Emphasis books CDs URL names bold User input SMALL CAPS Screen text file and server names extensions commands IP addresses Note This format is used to highlight inform...

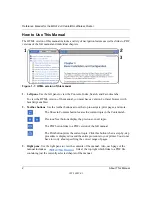
Страница 12: ...buttons Use the toolbar buttons across the top to navigate print pages and more The Show in Contents button locates the current topic in the Contents tab Previous Next buttons display the previous or next topic The PDF button links to a PDF version of the full manual The Print button prints the current topic Click this button when a step by step procedure is displayed to send the entire procedure ...

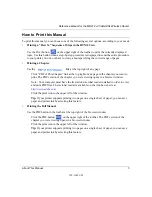
Страница 13: ... want to print The PDF version of the chapter you were viewing opens in a browser window Note Your computer must have the free Adobe Acrobat reader installed in order to view and print PDF files The Acrobat reader is available on the Adobe web site at http www adobe com Click the print icon in the upper left of the window Tip If your printer supports printing two pages on a single sheet of paper y...

Страница 14: ...Reference Manual for the MR814 v3 Cable DSL Wireless Router 4 About This Manual 202 10039 01 ...

Страница 15: ...of day Web site addresses and address keywords and share high speed cable DSL Internet access for up to 253 personal computers In addition to the Network Address Translation NAT feature the built in firewall protects you from hackers With minimum setup you can install and use the router within minutes The MR814 v3 router provides the following features 802 11b Standards based wireless networking W...

Страница 16: ...outers the MR814 v3 is a true firewall using stateful packet inspection to defend against hacker attacks Its firewall features include Denial of Service DoS protection Automatically detects and thwarts DoS attacks such as Ping of Death SYN Flood LAND Attack and IP Spoofing Blocks unwanted traffic from the Internet to your LAN Blocks access from your LAN to Internet locations or services that you s...

Страница 17: ...etwork or a 100 Mbps Fast Ethernet network Both the LAN and WAN interfaces are autosensing and capable of full duplex or half duplex operation The router incorporates Auto UplinkTM technology Each Ethernet port will automatically sense whether the Ethernet cable plugged into the port should have a normal connection such as to a PC or an uplink connection such as to a switch or hub That port will t...

Страница 18: ...m such as Entersys or WinPOET on your PC Easy Installation and Management You can install configure and operate the MR814 v3 Cable DSL Wireless Router within minutes after connecting it to the network The following features simplify installation and management tasks Smart Wizard Configuration Assistant A user friendly Smart Wizard configuration assistant that automatically connects you to the rout...

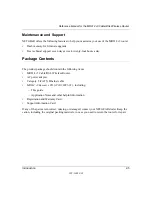
Страница 19: ...y Package Contents The product package should contain the following items MR814 v3 Cable DSL Wireless Router AC power adapter Category 5 CAT5 Ethernet cable MR814 v3 Resource CD 2230 10095 01 including This guide Application Notes and other helpful information Registration and Warranty Card Support Information Card If any of the parts are incorrect missing or damaged contact your NETGEAR dealer Ke...

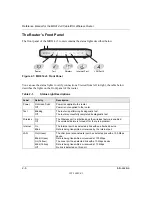
Страница 20: ...linking Off The router is performing its diagnostic test The router successfully completed its diagnostic test Wireless On Off The Wireless port is initialized and the wireless feature is enabled The wireless feature is turned off or there is a problem Internet On Blink The Internet port has detected a link with an attached device Data is being transmitted or received by the Internet port LAN On G...

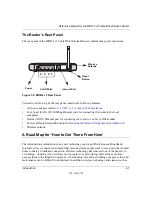
Страница 21: ...set push button for Restoring the Default Configuration and Password Wireless antenna A Road Map for How to Get There From Here The introduction and adoption of any new technology can be a difficult process Broadband Internet service is considered so useful that more and more people want to set up networks in their home to share a broadband connection Wireless technology has removed one of the bar...

Страница 22: ... the wireless network For guidelines about the range of wireless networks see Observe Performance Placement and Range Guidelines To set up the MR814 v3 see Chapter 3 Connecting the Router to the Internet and follow the instructions provided To learn about wireless networking technology see Appendix D Wireless Networking Basics for a general introduction Protect my wireless connection from snooping...

Страница 23: ... am using to connect to the network need to be configured with the same Windows Workgroup or Domain settings as the other Windows computers in the combined wireless and wired network Any Windows networking security access rights such as login user name password that have been assigned in the Windows network must be provided when Windows prompts for such information If so called Windows peer networ...

Страница 24: ...Reference Manual for the MR814 v3 Cable DSL Wireless Router 2 10 Introduction 202 10039 01 ...

Страница 25: ...ement and range guidelines in the Reference Manual For Cable Modem Service When you perform the router setup steps be sure to use the computer you first registered with your cable ISP For DSL Service You may need information such as the DSL login name e mail address and password in order to complete the router setup Before proceeding with the router installation familiarize yourself with the conte...

Страница 26: ...t cable from the computer d Disconnect the cable at the computer end only point A in the diagram e Look at the label on the bottom of the router Locate the Internet port Securely insert the Ethernet cable from your modem cable 1 in the diagram below into the Internet port of the router as shown in point B of the diagram Figure 3 2 Connect the router to the modem PRGHP DEOH QWHUQHW FRPSXWHU A PRGHP...

Страница 27: ...nto the Ethernet port of your computer point D in the diagram Figure 3 3 Connect the computer to the router Your network cables are connected and you are ready to restart your network 2 RESTART YOUR NETWORK IN THE CORRECT SEQUENCE Warning Failure to restart your network in the correct sequence could prevent you from connecting to the Internet a First turn on the broadband modem and wait 2 minutes ...

Страница 28: ...light should be lit If not make sure the Ethernet cable is securely attached to the router Internet port and the modem and the modem is powered on Wireless The Wireless light should be lit If the Wireless light is not lit see Troubleshooting Tips on page 3 8 LAN A LAN light should be lit Green indicates your computer is communicating at 100 Mbps yellow indicates 10 Mbps If LAN light is not lit che...

Страница 29: ...s check box and clicking Ok If you still do not connect type http www routerlogin net in the browser address bar and click Enter Otherwise to bypass this screen see How to Bypass the Configuration Assistant on page 3 12 and the How to Manually Configure Your Internet Connection on page 3 13 topics in this chapter If you cannot connect to the router verify your computer networking setup It should b...

Страница 30: ... on page 3 8 to correct basic problems Note The Smart Wizard configuration assistant only appears when the router is in its factory default state After you configure the router it will not appear again You can always connect to the router to change its settings To do so open a browser such as Internet Explorer and go to http www routerlogin net Then when prompted enter admin as the user name and p...

Страница 31: ...ETGEAR wireless adapter configure it to match your settings exactly If you changed the default Network Name SSID be sure to use the correct Network Name SSID you set in the router Warning The Network Name SSID is case sensitive Entering nETgear will not work 2 VERIFY WIRELESS CONNECTIVITY Verify wireless connectivity Connect to the Internet or log in to the router from a computer with a wireless a...

Страница 32: ...eless computer must match exactly Make sure the network settings of the computer are correct LAN and wirelessly connected computers must be configured to obtain an IP address automatically via DHCP Please see Appendix C Preparing Your Network or the animated tutorials on the CD for help with this Some cable modem ISPs require you to use the MAC address of the computer registered on the account If ...

Страница 33: ... feature by typing http www routerlogin net basicsetting htm in the browser address bar and clicking Enter You will not be prompted for a user name or password This will enable you to manually configure the router even when it is in the factory default state When manually configuring the router you must complete the configuration by clicking Apply when finished entering your settings If you do not...

Страница 34: ... name and password When prompted enter admin for the router user name and password for the router password both in lower case letters To change the password see Changing the Administrator Password on page 6 8 Note The router user name and password are not the same as any user name or password you may use to log in to your Internet connection A login window like the one shown below opens Figure 3 8...

Страница 35: ...rowser will then display the MR814 v3 settings home page When the router is connected to the Internet click the Knowledge Base or the Documentation link under the Web Support menu to view support information or the documentation for the router If you do not click Logout the router will wait 5 minutes after there is no activity before it automatically logs you out ...

Страница 36: ...www routerlogin net basicsetting htm in the address field of your browser then click Enter When the router is in the factory default state a user name and password are not required 2 The browser will then display the MR814 v3 settings home page shown in Login result MR814 v3 home page on page 3 11 If you do not click Logout the router will wait 5 minutes after there is no activity before it automa...

Страница 37: ... you can allow the Setup Wizard to determine your configuration as described in the previous section Figure 3 10 Browser based configuration Basic Settings menus You can manually configure the router using the Basic Settings menu shown in Figure 3 10 using these steps 1 Connect to the router by typing http www routerlogin net in the address field of your browser then click Enter ISP Does Not Requi...

Страница 38: ...w that your ISP does not automatically transmit DNS addresses to the router during login select Use these DNS servers and enter the IP address of your ISP s Primary DNS Server If a Secondary DNS Server address is available enter it also Note If you enter an address here restart the computers on your network so that these settings take effect d Gateway s MAC Address This section determines the Ethe...

Страница 39: ...select c Fill in the parameters for your Internet service provider d Click Apply to save your settings Click the Test button to verify you have Internet access Using the Smart Setup Wizard You can use the Smart Setup Wizard to assist with manual configuration or to verify the Internet connection The Smart Setup Wizard is not the same as the Smart Wizard configuration assistant as illustrated in Fi...

Страница 40: ...s as needed 5 At the end of the Setup Wizard click the Test button to verify your Internet connection If you have trouble connecting to the Internet use the Troubleshooting Tips Troubleshooting Tips on page 3 8 to correct basic problems or refer to Chapter 8 Troubleshooting The topics below describe each of the various options the Smart Wizard can detect Use this information to assist you with fil...

Страница 41: ...book power consumption also vary depending on your configuration choices For best results place your firewall Near the center of the area in which your PCs will operate In an elevated location such as a high shelf where the wirelessly connected PCs have line of sight access even if through walls Away from sources of interference such as PCs microwaves and 2 4 GHz cordless phones Away from large me...

Страница 42: ...ters cannot wirelessly connect to the MR814 v3 MAC address filtering adds an obstacle against unwanted access to your network but the data broadcast over the wireless link is fully exposed WEP Wired Equivalent Privacy WEP data encryption provides data security WEP Shared Key authentication and WEP data encryption will block all but the most determined eavesdropper WPA PSK Wi Fi Protected Access WP...

Страница 43: ...s Understanding Wireless Settings This section identifies the default factory settings and introduces each wireless option Default Factory Settings When you first receive your MR814 v3 the default factory settings are shown below You can restore these defaults with the Factory Default Restore button on the rear panel After you install the MR814 v3 router use the procedures below to customize any o...

Страница 44: ...This field identifies the region where the MR814 v3 can be used It may not be legal to operate the wireless features of the router in a region other than one of those identified in this field Channel This field determines which operating frequency will be used It should not be necessary to change the wireless channel unless you notice interference problems with another nearby access point For more...

Страница 45: ...values or enter a word or group of printable characters in the Passphrase box Manually entered keys are case sensitive but passphrase characters are not case sensitive Note Not all wireless adapter configuration utilities support WEP passphrase key generation WPA PSK WPA Pre shared Key performs authentication uses 128 bit data encryption and dynamically changes the encryption keys making it nearly...

Страница 46: ...ngs menu Allow Broadcast of Name SSID If you disable broadcast of the SSID only devices that have the correct SSID can connect Disabling SSID broadcast nullifies the wireless network discovery feature of some products such as Windows XP Enable Wireless Access Point If you disable the wireless access point wireless devices cannot connect to the MR814 v3 Wireless Card Access List When the Trusted PC...

Страница 47: ...er devices in the network will not connect unless they are set to Shared Key as well and are configured with the correct key WEP Encryption key size Choose one 64 bit or 128 bit Again the encryption key size must be the same for the wireless adapters and the router Data Encryption WEP Keys There are two methods for creating WEP data encryption keys Whichever method you use record the key values in...

Страница 48: ... Test Basic Wireless Connectivity Follow the instructions below to set up and test basic wireless connectivity Once you have established basic wireless connectivity you can enable security settings appropriate to your needs 1 Log in to the MR814 v3 firewall at http www routerlogin net with its default user name of admin and default password of password or using whatever LAN address and password yo...

Страница 49: ...ositions from the others in use For more information on the wireless channel frequencies please refer to Wireless Channels on page D 2 6 For initial configuration and test leave the Wireless Card Access List set to Everyone and the Encryption Strength set to Disabled 7 Click Apply to save your changes 8 Configure and test your computers for wireless connectivity Program the wireless adapter of you...

Страница 50: ... or using whatever LAN address and password you have set up 2 Click Wireless Settings in the main menu of the MR814 v3 firewall 3 From the Security Options menu select WEP The WEP options display Figure 4 5 Wireless Settings encryption menu Note If you use a wireless computer configure WEP settings you will be disconnected when you click on Apply You must then either configure your wireless adapte...

Страница 51: ...These entries are not case sensitive AA is the same as aa Select which of the four keys will be active Please refer to Overview of WEP Parameters on page D 6 for a full explanation of each of these options as defined by the IEEE 802 11 wireless communication standard 6 Click Apply to save your settings How to Configure WPA PSK Wireless Security Note Not all wireless adapters support WPA Furthermor...

Страница 52: ...fault user name of admin and default password of password or using whatever LAN address and password you have set up 2 Click Wireless Settings in the Advanced section of the main menu of the MR814 v3 3 Click Setup Access List to display the Wireless Station Access List menu Note When configuring the firewall from a wireless computer whose MAC address is not in the Trusted PC list if you select Tur...

Страница 53: ... usually find the MAC address printed on the wireless adapter Note You can copy and paste the MAC addresses from the firewall s Attached Devices menu into the MAC Address box of this menu To do this configure each wireless computer to obtain a wireless link to the firewall The computer should then appear in the Attached Devices menu 7 Click Add to add this wireless device to the Wireless Card Acce...

Страница 54: ...Reference Manual for the MR814 v3 Cable DSL Wireless Router 4 14 Wireless Configuration 202 10039 01 ...

Страница 55: ...4 v3 Cable DSL Wireless Router provides you with Web content filtering options plus browsing activity reporting and instant alerts via e mail Parents and network administrators can establish restricted access policies based on time of day web addresses and web address keywords You can also block Internet access by applications and services such as chat or games To configure these features of your ...
Страница 56: ... Figure 5 1 below Figure 5 1 Block Sites menu To enable keyword blocking select either Per Schedule or Always then click Apply If you want to block by schedule be sure that a time period is specified in the Schedule menu To add a keyword or domain type it in the Keyword box click Add Keyword then click Apply To delete a keyword or domain select it from the list click Delete Keyword then click Appl...

Страница 57: ...e use of certain Internet services by PCs on your network This is called services blocking or port filtering The Block Services menu is shown below Figure 5 2 Block Services menu Services are functions performed by server computers at the request of client computers For example Web servers serve web pages time servers serve time and date information and game hosts serve data about other players mo...

Страница 58: ...a service first you must determine which port number or range of numbers is used by the application The service numbers for many common protocols are defined by the Internet Engineering Task Force IETF and published in RFC1700 Assigned Numbers Service numbers for other applications are typically chosen from the range 1024 to 65535 by the authors of the application This information can usually be d...

Страница 59: ...e MR814 v3 router allows you to specify when blocking will be enforced The Schedule menu is shown below Figure 5 4 Schedule menu Use this schedule for blocking content Check this box if you wish to enable a schedule for Content Filtering Click Apply Days to Block Select days to block by checking the appropriate boxes Select Everyday to check the boxes for all days Click Apply Time of Day to Block ...

Страница 60: ...d User An example is shown below Figure 5 5 Logs menu Log entries are described in Table 5 1 Table 5 1 Log entry descriptions Field Description Number The index number of the content filter log entries 128 entries are available numbered from 0 to 127 The log will keep the record of the latest 128 entries Date and Time The date and time the log entry was recorded Source IP The IP address of the ini...

Страница 61: ...b Access Log Notifications In order to receive logs and alerts by E mail you must provide your E mail information in the E Mail menu shown below Figure 5 6 Email menu Table 5 2 Log action buttons Field Description Refresh Click this button to refresh the log screen Clear Log Click this button to clear the log entries Send Log Click this button to email the log immediately ...

Страница 62: ...ing to this schedule Specifies how often to send the logs Hourly Daily Weekly or When Full Day for sending log Specifies which day of the week to send the log Relevant when the log is sent weekly or daily Time for sending log Specifies the time of day to send the log Relevant when the log is sent daily or weekly If the Weekly Daily or Hourly option is selected and the log fills up before the speci...

Страница 63: ... be found by clicking on the Maintenance heading in the Main Menu of the browser interface Viewing Router Status Information The Router Status menu provides a limited amount of status and usage information From the Main Menu of the browser interface click on Maintenance then select System Status to view the System Status screen shown below Figure 6 1 Router Status screen ...

Страница 64: ...the ISP LAN Port These parameters apply to the Local WAN port of the router MAC Address This field displays the Media Access Control address being used by the LAN port of the router IP Address This field displays the IP address being used by the Local LAN port of the router The default is 192 168 0 1 IP Subnet Mask This field displays the IP Subnet Mask being used by the Local LAN port of the rout...

Страница 65: ...ned to the router Subnet Mask The WAN Internet Subnet Mask assigned to the router Default Gateway The WAN Internet default gateway the router communicates with DHCP Server The IP address of the DHCP server which provided the IP configuration addresses DNS Server The IP address of the DNS server which provides network name to IP address translation Lease Obtained When the DHCP lease was obtained Le...

Отзывы: