Neteyes
NexusWay 800 Series
User Manual
Firmware version: 3.0
Revised Edition (June 2005)
Printed In Taiwan
RECYCLABLE
Страница 1: ...Neteyes NexusWay 800 Series UserManual Firmware version 3 0 Revised Edition June 2005 Printed In Taiwan RECYCLABLE ...
Страница 2: ...been tested and found to comply with the limits for a Class A digital device pursuant to Part 15 of the FCC Rules These limits are designed to provide reasonable protection against harmful interference when the equipment is operated in a commercial environment This equipment generates uses and can radiate radio frequency energy and if not installed and used in accordance with this user s guide may...
Страница 3: ...de causar interferencias de radio en cuyo case puede requerirse al usuario para que adopte las medidas adecuadas Attention Ceci est un produit de classe A Dans un environnement domestique ce produit pourrait causer des interférences radio auquel cas l utilisateur devrait prendre les mesures adéquates Attenzione Il presente prodotto appartiene alla classe A Se utilizzato in ambiente domestico il pr...
Страница 4: ...unction instructions 21 3 1 Basic Setup 21 3 2 Advance Settings 24 3 3 VPN Setup Not applicable in NexusWay 800 27 3 4 Network Info 28 3 5 Help 30 3 6 Pull Down Language List 30 3 7 Save 30 3 8 Logout 31 Chap 4 Configuration 32 4 1 Basic Setup 33 4 1 1 Port setting 33 4 1 2 WAN Setup 34 4 1 3 LAN Setup 41 4 1 4 DHCP Server 43 4 1 6 DHCP MAC IP 45 4 1 7 Routing 47 4 1 9 Outbound Policy 50 4 1 10 Al...
Страница 5: ... 3 VPN Setup 89 4 3 1 IKE Policy Not applicable in NexusWay 800 89 4 3 2 VPN Policy Not applicable in the NexusWay 800 92 4 3 3 PPTP Server Not applicable in NexusWay 800 99 4 3 4 Certificate Authority N A in the NexusWay 800 100 4 4 Network Info 102 4 4 1 System Status 102 4 4 2 WAN Status 104 4 4 3 LAN Status 107 4 4 4 Firewall Status 108 4 4 5 QoS Status 108 4 4 6 Quota Status 108 4 4 7 Diagnos...
Страница 6: ...Multi Service Border Gateway User Manual for NexusWay 800 Series Pages 5 119 ...
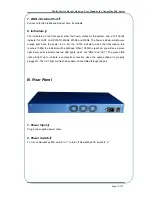
Страница 7: ...dering of surplus network resources and bypassing component problems In addition the NexusWay 800 can also integrate the bandwidth of multiple linked WAN connections to greatly improve the usage efficiency for enterprise networks This manual provides necessary information for the NexusWay 800 hardware device software instruction settings and configuration parameters 1 2 What s inside the Product V...
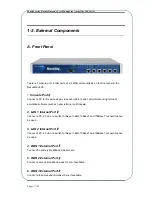
Страница 8: ... emulation software such as hyper terminal on Windows 2 LAN 1 Internal Port Connect a PC a hub or a switch to this port Both 10BaseT and 100BaseT connections can be used 3 LAN 2 Internal Port Connect a PC a hub or a switch to this port Both 10BaseT and 100BaseT connections can be used 4 WAN 1 External Port Connect the primary broadband modem here 5 WAN 2 External Port Connect a second broadband mo...
Страница 9: ...For the 10 100 indicators when the transmission rate reaches 10 MB the indicator will be lightless When 100 MB is reached you will see a green light Every ports indicator has two LED lights which are LINK and ACT The green LINK light will light up to indicate a successful connection when the cable endpoint is properly plugged in The ACT light will flash when data is transmitted through the port B ...
Страница 10: ...ecification System Intel X86 Series CF 16 MB Chipset Intel LAN Chip WAN 4 x shield RJ 45 for 10 100 MB Ethernet Auto LAN 2 x shield RJ 45 for 10 100 MB Ethernet Auto Console Port 1 COM Port RS 232 DB 9 Connector Dimensions 24x 4 5x 42 6 CM Certification CE FCC Pages 9 119 ...
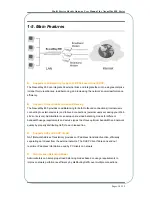
Страница 11: ... accessing your Web site s or servers Administrators can setup various load balancing modes for different bandwidth usage requirements and service types to achieve optimum bandwidth and network quality by properly distributing traffic to each leased line Supports NAT and DHCP of LAN NAT Network Address Translation provides an IP address translation function efficiently separating an intranet from ...
Страница 12: ... xDSL or Cable modems requires Proxy ARP features to be deactivated High Availability The NexusWay 800 supports a backup mechanism for high availability If one NexusWay 800 system fails unexpectedly the backup will become active instantaneously to continuing load balancing operations ensuring continual smooth network traffic Supports Web Management Interface A simple and easy to use Web management...
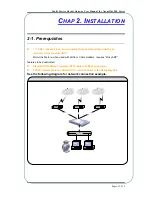
Страница 13: ...unt provided by an internet service provider ISP Multi Link Feature when used with xDSL or Cable modems requires Proxy ARP features to be deactivated Standard 10 100Base T network UTP cable with RJ45 connectors TCP IP network protocol installed PC s which connect to the NexusWay 800 See the following diagram for network connection example Pages 12 119 ...
Страница 14: ...ease locate the NexusWay 800 between the WAN and the firewall or router by connecting the NexusWay 800 s LAN port to the devices 3 LAN port connection Connect to a switch or hub with a 10BaseT 100BaseT cable before connecting to a PC If you connect PC to NexusWay 800 directly please use a cross over cable NOTE Do not connect the NexusWay 800 s LAN ports to an uplink port on a switch router or hub ...
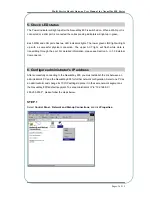
Страница 15: ...data is transmitting through the port For detailed information please see Section A in 1 3 External Components 6 Configure administrator s IP address After successfully connecting to the NexusWay 800 you must establish the link between an administrator s PC and the NexusWay 800 for further network configuration Select one PC as an administrator and change its TCP IP settings to place it in the sam...
Страница 16: ... Please do not use 192 168 0 1 which is the default IP address of the NexusWay 800 Note What is Administrator An Administrator is the user with the authority to install the NexusWay 800 in the Local Area Network environment and to configure the NexusWay 800 Administrator can not only configure the LAN WAN Server and DHCP settings on the WEB management interface but can modify the Load Balancing mo...
Страница 17: ...rve LAN IP address for Host PC s or servers see information about DHCP in section 4 1 4 4 1 5 and 4 1 6 in this documentation 2 3 1 Check TCP IP Setup Pc s can use either Static or Dynamic IP address however PC s requiring either type should be initially set to Obtain an IP address automatically If a dynamic address is acceptable unless behaving as a server this should have no detrimental effect f...
Страница 18: ...Gateway User Manual for NexusWay 800 Series 2 3 1 a Windows 98 1 Select Control Panel Network and Dial up Connections and click Properties 2 Select TCP IP protocol for your network adapter and click Properties Pages 17 119 ...
Страница 19: ...Service Border Gateway User Manual for NexusWay 800 Series 3 Select Obtain an IP address automatically NOTE Windows 98 users are strongly recommended to reboot PCs after changing the TCP IP Setup Pages 18 119 ...
Страница 20: ...ies 2 4 1 b Windows 2000 1 Select Start Menu Setup Control Panel Network and Dial up Connections Local Area Connection 2 Select Properties 3 Select TCP IP protocol for your network adapter click Properties 4 Select Obtain an IP address automatically Pages 19 119 ...
Страница 21: ...s 2 4 1 c Windows XP 1 Select Start Menu Control Panel Network Connections 2 Right click the Local Area Connection icon and select Properties 3 Select TCP IP protocol for your network adapter click Properties 4 Select Obtain an IP address automatically Pages 20 119 ...
Страница 22: ...before starting any setup procedures for the NexusWay 800 Port setting There are 6 ports 2 for LAN and 4 for WAN on the front panel of the NexusWay 800 This option is designed for you to configure general settings for all the ports you want to use including media type maximum transmission unit MTU and MAC address You can modify detailed settings in WAN and LAN options after completing the basic se...
Страница 23: ...can then provide a fixed IP address to other people and applications For more setting information see section 4 1 6 Routing Routing is the action of moving information across a network from source to destination You can set the route for the transmission from each IP address Netmask to a designated server For more information about static dynamic route and setup see section 4 1 7 Outbound Policy Y...
Страница 24: ... will be denied For more setting information see section 4 1 14 IP Control You can specify real time traffic volume limitations for any IP address with this function Traffic beyond this limit will be denied or throttled For more setting information see section 4 1 15 IP Alias The NexusWay 800 added this function for you to designate an alias name for an IP address allowing quicker setting in other...
Страница 25: ...t Mapping You can customize the virtual server by setting an internal virtual IP and port to correspond to an external IP and port Mapping the virtual IP address and ports with external IP address and ports accomplishes NAT Network Address Translation functions if certain internal PCs serve as a server for network services NAT functions can separate an internal network from the external network an...
Страница 26: ...n see section 4 2 5 QoS Quality of Service The NexusWay 800 s QoS feature provides traffic shaping and maximal bandwidth to specific services by specifying throughput levels for applications For more setting information see section 4 2 6 Firewall Along with the QoS the Firewall is also to improve Internet service quality However the firewall is designed to increase security by denying unexpected a...
Страница 27: ...ing For more setting information see section 4 2 11 Cache You can enable a built in Web Proxy server and a Transparent Proxy in this option Proxy servers are used to improve performance and filter requests while a transparent proxy allows client to not change any network settings before having traffic flow through the proxy For more information about the Web proxy server and the transparent proxy ...
Страница 28: ...en a network and a remote host over the public Internet VPNs allow the establishment of an encrypted tunnel that protects the network traffic flow from eavesdroppers It enables a specific group of users to access private network data and resources securely over the Internet or other networks Please note that settings in this option must match with remote VPN settings For more setting information s...
Страница 29: ...ormation You can also view the statistic graphics of current status for CPU Free Memory and Loading For more information see section 4 4 1 WAN Status WAN Status shows Real time information about all of the Internet connections The Percentage data is updated every few seconds to present the ratio of current figure and specified maximum You can also view the details information of NAT and the statis...
Страница 30: ...re information see section 4 4 7 Admin Password This option allows you add and remove administrators for your NexusWay 800 You can also restrict the administrator to login only from a specified IP address Each administrator may have either both read and write access or read only access For more setting information see section 4 4 8 Syslog This option allows the administrator to export syslog messa...
Страница 31: ... to Help button you will see a pull down language list You can choose to view the web interface in your language Currently the only option available in NexusWay 800 Web interface is English 3 7 Save After entering all the data required on an page please click Save button to save configurations and make your modifications effective Please note that all the settings and information will be lost when...
Страница 32: ...Series 3 8 Logout Click the Logout button next to the Save button to logout before closing the Web interface of the NexusWay 800 to prevent others from using your account after you leave remember to close your browser to ensure your are logged off Pages 31 119 ...
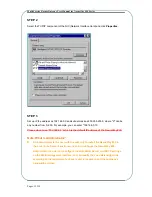
Страница 33: ...800 STEP 1 Open the secure administrative Web interface by entering the NexusWay 800 s IP address by default this is https 192 168 0 1 in the Address Bar on the browser to login NexusWay 800 STEP 2 The dialogue box below will be displayed Enter admin as User Name and 123456 as Password which is the default administrator user ID and password NOTE Recommended screen resolution at least 800X600 You m...
Страница 34: ... for each port Media Type There are three modes for Media type Auto Select 100BaseTX and 10BaseT UTP Select the proper mode If you are not sure about the media type leave it as Auto Select MTU This field is for you to define the Maximum Transmission Unit the largest physical package size in bytes from 72 to 1500 Enter proper numeric value based on actual usage and your requirements The default val...
Страница 35: ...g to the connection type being used 4 WAN Ports which provide external connection are available in the NexusWay 800 To setup one or more connections complete all the settings in this page for one WAN connection interface whose corresponding port in the rear side of the product has external connection and click the Add button then you can continue to input another connection Repeat the process unti...
Страница 36: ...Dynamic IP and PPTP Contact your ISP provider for more information about Web connection type IP address DNS or other information before completing the following configurations based on various connection modes A change applied to this field will result in a change of the following field to the selected connection type NAT This function allows a choice of deactivating Network Address Translation fo...
Страница 37: ...subnet gateway and primary secondary DNS servers All the fields are required except the secondary DNS field The Transparent function only applies to Static IP IP address 163 200 200 250 as provided by ISP Subnet Mask 255 255 255 0 as provided by ISP Gateway 163 200 200 254 as provided by ISP Primary DNS 168 95 1 1 as provided by ISP Secondary DNS 168 95 1 2 as provided by ISP Pages 36 119 ...
Страница 38: ...e If this is the type of connection provided enter the User Name and the Password in the corresponding field 4 1 2 d Dynamic IP For Dynamic IP mode you only need to fill in the Hostname You can either enter a name or leave it blank 4 1 2 e PPTP Fill out each field with the information provided to you by your ISP PPTP is only available from ISPs in the Europe and US region Pages 37 119 ...
Страница 39: ...tem will give priority to WAN 1 for traffic flow If your link cost is not charged by data flow amount you can ignore this field Weight Set the load ratio of traffic in this column For example if the ratio of bandwidth between WAN 1 and WAN 2 is 1 3 enter 1 in the Weight column for WAN 1 and 3 for WAN 2 Traffic will then be distributed to the leased lines according to this radio Upload Download Ban...
Страница 40: ...lure Ping Host IP You can also determine if the network is working normally by Pinging an IP address Ensure the host you want to ping to test for network connection detection is open and enter its IP addresses in the Host IP column Connect Host IP port If pinging is not supported by the remote computer system enter IP address and port number of the host you want to connect Retry Times Enter the nu...
Страница 41: ... top corner of the panel after you finish entering all the data on this page otherwise you will immediately lose all the settings when exiting the page Click Add to add the settings into the Connection List or click Reset to clear the settings and enter them again 4 1 2 h Connection List All WAN connection settings will be listed in this To delete a setting right click on it and select Delete You ...
Страница 42: ...is already in use or your LAN is using a different IP address range In this case you can enter an unused IP address from the range used by your LAN Subnet Mask The Subnet Mask is a mask used to determine what subnet an IP address belongs to A subnet is a portion of a network that shares a common address component For example the address 255 255 255 0 is a standard value for small class C network I...
Страница 43: ...data on this page otherwise you will immediately lose all the settings when exiting the page Click Add to add the settings into the LAN IP List or click Reset to clear the settings and enter them again 4 1 3 b LAN IP List All LAN connection settings will be listed in this table To delete a LAN connection right click it and select Delete You can also move edit enable or disable the LAN connection b...
Страница 44: ...l PCs DHCP clients or other devices on the network by default with Windows Systems DHCP clients can get the IP address automatically from the server If you have already a DHCP server in your internal network do not configure this feature for LAN Ports Offered IP Range Enter an IP Address Range to be assigned by the NexusWay 800 s DHCP server with the first IP in the left column and last one in the...
Страница 45: ...not allowed in this column Max Lease Time This is the maximum IP lease time in seconds with recommended default value 86400 24 hours The maximum time in seconds you want the system to hold the DHCP address Please note that zero 0 is not allowed in this column Interface Select the LAN port you want to configure this DHCP server for NOTE Click the Save button on right top corner of the panel after y...
Страница 46: ...ess you can specify an IP address to map with a specific MAC address of particular PC This MAC IP Mapping function will reserve particular IP addresses for the PCs you set so that they can dynamically receive the same IP address every time In other words fixed IP address will be assigned to fixed MAC address i e PC The PC user can then provide a fixed IP address to other people and applications Pa...
Страница 47: ... f Hostname Give a name to the combination MAC virtual IP address you just set NOTE Click the Save button on right top corner of the panel after you finish entering all the data on this page otherwise you will immediately lose all the settings when exiting the page Click Add to add the settings into the following MAC IP Mapped List or click Reset to clear the settings and enter them again 4 1 6 b ...
Страница 48: ... after you finish entering all the data on this page otherwise you will immediately lose all the settings when exiting the page Click Add to add the settings into the list or click Reset to clear the settings and enter them again After adding new routes a list will be displayed You will see the routes in this table To delete a route right click on it and select Delete You can also move edit enable...
Страница 49: ...r you finish entering all the data on this page otherwise you will immediately lose all the settings when exiting the page Click Add to add the settings into the list or click Reset to clear the settings and enter them again Netmask Notes 10 1 1 1 32 indicates that ONLY 10 1 1 1 will match 10 1 1 1 32 would be identical to 10 1 1 1 and 255 255 255 255 10 1 2 1 24 indicates that any IP From 10 1 2 ...
Страница 50: ...e information between each other You can enable these settings to allow the NexusWay 800 to receive these routing table updates To view the routing table click Network Info button on top of the main page and click Diagnostics RIP 1 RIP 2 To enable NexusWay 800 s RIP function and receive routing table updates click Enable to disable reception of routing updates click Disable Enabled Interface You c...
Страница 51: ...rovides many load balancing modes see the following table for details for LAN users to connect external server from internal users Outbound You can set the load balance mode according to ISP bandwidth and user requirements to distribute network traffic and avoid overloading a single connection Pages 50 119 ...
Страница 52: ...ction 4 1 2 f to configure the maximum number of sessions Link Cost Links with the lowest cost as configured in section 4 1 2 f Wan Setup ISP If you don t desire any Load Balancing to be active you can select a single configured WAN connection or not configure any policies NOTE If a connection fails other modes will be chosen automatically to complete the transfer If the system is set to the Total...
Страница 53: ...e load balancing the start point of the outgoing traffic flow such as 192 168 0 1 An asterisk can be placed here to match any value Subnet Mask Enter the internal IP subnet mask that you want to provide the load balancing to such as 255 255 255 0 which represents whole Class C or 255 255 255 255 which represents one IP Internal Port Enter the internal port range to be set The range must be numbers...
Страница 54: ...elect the load balancing mode to be used by this Policy according to your requirement or usage situation If you do not select a specific load Balancing Mode the system will automatically perform Round Robin Even Distribution outbound load balancing for this rule ISP This function allows you to select several ISPs for inclusion in this Balance Mode You can select multiple ISPs by clicking Add IPs A...
Страница 55: ...ng policies you set will be listed in this table To delete a policy right click on it and select Delete You can also move edit enable or disable a policy by right clicking NOTE The asterisk in this list means ALL For example the asterisk in Internal IP Address column means ALL internal IP addresses Pages 54 119 ...
Страница 56: ...he notifications to be sent NOTE Click Add to add the address into the following Alarm List or click Reset to clear the address and enter it again 4 1 10 b Alarm List All the email addresses you set will be listed in this table To delete an address right click on it and select Delete You can also move edit enable or disable the address by right clicking NOTE Click the Save button on right top corn...
Страница 57: ...at present Enter New Time If the system time is incorrect change the date and time in the format Month Day Year Hour Min and click Set Time button The new set system time will be displayed in Current System Time column NOTE Click the Save button on right top corner of the panel after you finish entering all the data on this page otherwise you will immediately lose all the settings when exiting the...
Страница 58: ...cally receive the time information from the server and set the system clock accurately 4 1 12 Misc Settings This option allows you to specify timeout values in seconds for TCP UDP and all other protocols 4 1 12 a NAT Timeout Configuration Timeout values specify how long the NexusWay 800 will keep trying to send a packet The maximum duration is 99999 seconds If the timeout value is exceeded without...
Страница 59: ...nterface unless you want to freeze the setting and let nobody including yourself change any settings via the web When disabling the web or SSH interface export the settings first You can also modify the necessary parameters to connect to via the web And while it is strongly discouraged you can also disable the console connection ability For how to export the settings see section 4 2 5 Pages 58 119...
Страница 60: ... address but a different IP the connection will be denied Connections will be allowed if both of the IP and MAC address match a single entry or neither match a single entry Every connection matching exactly one condition of one rule will be dropped You can also enter a in the IP field and enter a MAC address This will deny all connections using any IP from this MAC address Any machines not matchin...
Страница 61: ...traffic to or from the target will be denied The traffic volume will be recalculated from 0 at midnight If you wish to allow traffic to or from a computer that has exceeded its daily quota you can disable the quota rule for that computer To reset a quota you must edit the rule to add the additional traffic allowance Disabling and enabling a rule will not clear the daily traffic amount used by that...
Страница 62: ...ntering the IP Address information you can specify Upload Download Total traffic and connection limitations in kilobytes per second This is a feature designed to maintain a speed limit for the selected IP address and Netmask NOTE Click Add to add the settings into the following Quota IP Address List or click Reset to clear the settings and enter them again Pages 61 119 ...
Страница 63: ...cking the IP Alias button located by the columns that need an IP Address entered Alias Name Enter an alias name for an IP address IP Address Enter an IP address to which you want to designate with the alias Alias List All the alias will be listed in this table To delete an alias right click on it and select Delete You can also move edit enable or disable the alias by right clicking NOTE Click Add ...
Страница 64: ... frames primarily encompassing weeks months or years The check marks labeled with the days of the week allow you to choose which days are included in this schedule The Work Time field indicates how long the policy will be considered active after the start date and time This field can be configured in minutes hours or days The Interval Time is a length of time that the policy will be inactive after...
Страница 65: ...lows you to map external IP addresses to the internal virtual IP addresses of PCs inside your LAN Everything required for the external IP address and network services will be transmitted to the virtual internal IP address NOTE It is recommended to use this function ONLY when you have the firewall enabled Pages 64 119 ...
Страница 66: ...P mapping or port mapping to a single WAN IP address simultaneously otherwise you can become confused about which function is being used Click the Save button on right top corner of the panel after you finish entering all the data in this page If you do not your changes will be lost when you exit the page Click Add to add the settings into the following Connection List or click Reset to clear the ...
Страница 67: ...tion functions When specific internal PCs provide network services NAT functions can separate an internal network from the external network and ensure the security of the internal network NOTE The IP address of WAN link should NEVER be used as a mapped IP address UNLESS it is Static IP address Do not attempt to apply more than one function outbound policies IP mapping or port mapping to a single W...
Страница 68: ...ave the right field blank Type Select the data packet type TCP or UDP External IP Address Enter an external IP address for mapping External Ports Enter an external Port number or range which will be used for internal network services The number of ports mapped from the external IP must match the number of ports mapped to the internal IP If only one port is used for this service enter that port num...
Страница 69: ... also move edit enable or disable the Mapping by right clicking 4 2 3 Server Cluster Server clustering allows several internal servers to map to a single external IP for data transmission speed enhancement The transmission reliability can be increased since each server application can failover to other servers It enables high availability additional scalability and easier network management Pages ...
Страница 70: ...after the port such as 192 168 0 2 80 20 otherwise it will be functionally equivalent to Round Robin Keep Persistent Connection After a connection has been established with one machine in the server cluster this function will keep the traffic from the external source on the same machine in the cluster For the remainder of the session the traffic between this source and server cluster will not be h...
Страница 71: ...se all the settings when exiting the page Click Add to add the settings into the Server Cluster List or click Reset to clear the settings and enter them again 4 2 3 b Server Cluster List All server cluster settings will be listed in this table To delete a server cluster setting right click on it and select Delete You can also move edit enable or disable a server cluster setting by right clicking P...
Страница 72: ...on Bases MIB and when requested return the data to the SNMP requesters SNMP Enable Disable Select Enable or Disable to start or stop the SNMP function Read Only Community This option will only be displayed when you have selected the SNMP Enable option You can Define a name for SNMP requesters to prevent unknown users from accessing the information NOTE Click the Save button on right top corner of ...
Страница 73: ...s For m 12 Misc Setting can restore all your configurations after ions and firmware versions ore information see Enable Web Management Interface option in section 4 1 s 4 2 5 a Operation Configuration Reboot Click the Done button to reboot the NexusWay 800 when necessary 4 2 5 b System Configuration Config Management Click the Copy Running Config to Startup Config button to save active configurati...
Страница 74: ...d an ex button to modify the configuration for the NexusWay 800 automatically 4 2 5 c Software Update tartup Loader Version Number is should be the same as the current loader e to Backup Firmware button will copy the firmware S The startup loader version is shown here th version The Copy Startup Loader to Backup Loader button will copy the loader used when starting the NexusWay into the backup slo...
Страница 75: ... Version Number The current loader version is shown here Current Firmware Version Number T Automatic Update The system will check with Neteyes for new firmware version once per day when Automatic Update is enabled When a new version is detected th th when you log into this screen The system this action must be initiated be an administrator Software Update Click the Browse button to find the latest...
Страница 76: ...nopolize bandwidth To apply QoS policy to all available ports place an asterisk in the left column of Source Port for external to internal traffic or Destination Port for internal to external traffic If you enter an asterisk in both Source and Destination Port options then the QoS policy will apply to all the traffic in both directions 4 2 6 a QoS Policy Configuration Enter the source and destinat...
Страница 77: ...be active To set the schedule see 4 1 17 Schedule Setting Select the data packet type such as TCP or UDP NOTE The QoS policy can only be set by IP address and Netmask not by RANGE Click the Save button after you finish entering all the data on this page Click Add to add the settings into the QoS Policy List or click Reset to reenter them 4 2 6 b QoS Policy List All policies you set will be listed ...
Страница 78: ...ncrease security and limit access by d unexpected access types and known undesirable connections All the traffic enterin ng the intranet will be examined by the firewall which will block data meeting none of t sp 4 2 7 a Firewall Policy Configuration Enter the source and destination IP address Netmask and ports in the corresponding columns Connection Limit Connection Limit is the maximum number of...
Страница 79: ...1 17 Schedule Setting NOTE The Firewall policies can only be set by IP address and Netmask not by Select the data packet type RANGE Click Save button on right top corner of the panel after you finish entering all the data in this page Click Add to add the new policy into the Firewall Policy List or click Reset to enter it again 4 2 7 b Firewall Policy List All firewall policies you set will be lis...
Страница 80: ...Type There are NS Name Server Host MX Mail eXchanger Alias and SOA Start Of Authority modes available in this pull down list Where Host means any machine on the network MX is to find servers that can deliver mail Alias presents a host name SOA contains some ISP Hold CTRL to select multiple ISPs This is a multiple selection list To make a multiple selection hold the Ctrl key and select several ISPs...
Страница 81: ... to a WAN IP If the WAN IP is not available in the list external user will never be able to access internal IP through the WAN IP Click the Save button on right top corner of the panel after you finish entering all the data on this page otherwise you will immediately lose all the settings when exiting the page Enter the internal IP address for this DNS Mapping if primary systems are unreachable Th...
Страница 82: ...ave already signed up for Dynamic DNS service from one of rganizations ww D following o w dyndns org w ez ip net ww w dhs org ww www tzo com www easydns com www dyns cx www hn org www ods org gnudip cheapnet net w dyn ca ww www zonenet com ost nter the host name you registered to associate with your current IP address This is a fixed n signing up for whichever third party service you use ISP Enter...
Страница 83: ...er you finish entering all the data in this page Click Add to add the settings into the Dynamic DNS List or click Reset to enter the information again After clicking the Add button the Dynamic DNS settings will be listed in Dynamic DNS List To delete a setting right click on it and select Delete You can also move edit enable or disable a Enter the username a Dynamic DNS setting by right clicking P...
Страница 84: ...the algorithm you selected 4 2 10 a Inbound Policy Configuration External IP Address Enter an external IP address the source of the incoming traffic that applies to the Load Balancing mode For example 168 95 1 1 Subnet Mask Enter the Subnet Mask of the external IP address For example 255 255 255 0 DNS Select an internal DNS IP address This is the destination of the incoming traffic that the Load B...
Страница 85: ...lancing select a single ISP drawn from the list of configured ISP s Session Based Select whether the load balancing mode includes session based management When enabled Balancing will be applied in the selected manner to separate sessions Click the Save button on the top right corner of the panel after you finish entering all the data to avoid data loss when exit the page Select a schedule to speci...
Страница 86: ...ng a NetFlow application will then collect this etFlow data for processing NetFlow To enable NetFlow simply click the Enable button IP Address Enter an IP address with port number where you wish the NetFlow data to be exported Port Select the Port whose flow data you want to transfer via NetFlow Version Select the NetFlow version to be exported billing exusWay 800 can export network traffic inform...
Страница 87: ...detects that the requests can not be fulfilled by itself after intercepted all the requests to the real server Proxy A transparent proxy functions as same as a proxy The only difference between them is that a arent proxy allows clients to not change any network settings before traffic starts flowing servers can be used to improve performance or filter requests transp through the proxy After enabli...
Страница 88: ...nction allows you to prohibit internal users from viewing certain URLs URL to Filter Enter the URL you wish to block It is acceptable to enter wildcards Schedule Select a schedule to specify when you would like the policy to be active To set the schedule see 4 1 17 Schedule Setting Pages 87 119 ...
Страница 89: ... the shared gateway address used by LAN machines This virtual address ensures that if one devices physically fails the other can effectively take over without reconfiguring devices on the LAN Alternate IP Address The Alternate IP Address is the physical address of the other NexusWay allow you to manage all High Availibility options High Availability This radio button allows the This radio button c...
Страница 90: ... this function is only available in the NexusWay 805 815 25 and 835 can configure settings to exchange keys that will be used when establishing d key generation as well as key exchange Policy Name Enter an unique name for the IKE policy 8 In this option you a VPN such as host authentication negotiation of security parameters for an encrypted connection an ...
Страница 91: ...ion copy and paste the signed public key of the desired endpoint as provided by a Certification Authority For more information about Certificate Authorities please see 4 3 4 Certificate Authority Diffie Hellman DH Group DH is an algorithm for developing a shared secret between endpoints by separately integrating endpoints public key combination result with private key Essentially this is a method ...
Страница 92: ...et up more quickly after the first one If you have no idea what is a good lifetime it is suggested to enter the default value of 28 800 seconds 8 hours NOTE Click Save button on right top corner of the panel after you finish entering all the data on this page Click Add to add the settings into the IKE Policy List or cy click Reset to enter them again After clicking the Add button the settings will...
Страница 93: ...i Service Border Gateway User Manual for NexusWay 800 Series 4 3 2 VPN Policy Not applicable in the NexusWay 800 Please note that this function is only available in NexusWay 805 815 825 and 835 Pages 92 119 ...
Страница 94: ... supports VPN A Virtual Private Network VPN is used to provide secure encrypted communication across 4 3 2 a VPN Policy Configuration Type There are two types available which are Manual Policy and Auto Policy The most common configuration Auto Policy automatically manages the authentication and encryption keys with an IKE policy IKE protocols perform negotiations between two VPN Endpoints to autom...
Страница 95: ...ecure your IKE negotiations will be However with longer lifetimes Security Associations can be set up more quickly afterward If you don t know what a good lifetime length is we suggest entering a default value of 28 800 seconds 8 hours Enable AH Authentication Enable this to verify that the contents of a packet have not been changed and to validate the identity of the sender An Authentication Head...
Страница 96: ... with remote VPN Endpoint settings e used to derive dditional keys and seeds used to create data transmission keys will also not be reused In s if a key becomes compromised no other keys can be derived using that u will see a Diffie Hellman roup pull down list similar to the one used for IKE however this one is used for PFS only You oups Enable IPSec PFS Perfect Forward Secrecy To enable IPSec PFS...
Страница 97: ... Manual Policy please fill in the following columns for exchanging keys These settings must also match the settings on the remote 4 3 2 d AH Configuration SPI Incoming SPI Outgoing Enter a Hex value 3 8 characters which matches the settings of remote VPN endpoint in both SPI Incoming and Outgoing columns Authentication Algorithm There are MD5 and SHA 1 available for this option where MD5 is the de...
Страница 98: ...cters for SHA 1 NOTE Click the Save button in top right corner of the panel after you finish entering all the data in this page Click Add to add the settings into the IKE Policy List or click Reset to enter them again Enter a Hex value 3 8 characters which matches the settings of remote VPN endpoint in both SPI Incoming and Outgoing columns Encryp Enter a key with 8 characters for DES or the one w...
Страница 99: ...or NexusWay 800 Series 4 3 2 e VPN Policy List ck on it and elect Delete You can also move edit enable or disable a VPN policy by right clicking All the VPN policies will be listed in VPN Policy List To delete a policy right cli s Pages 98 119 ...
Страница 100: ...bnet The maximum number of IP addresses in this range for the NexusWay series is 15 Access Control Enter the users that can access your VPN It is necessary to provide a name password and IP address for each user The NexusWay will accept users according to the IP address with optional Netmask ranges such as 1 2 3 4 or 1 2 3 4 32 If you leave the column blank the system will accept all the users wit...
Страница 101: ...ity authentication is ertificate from the CA Using CA certificates reduces the amount of data entry quired by each VPN endpoint you want the NexusWay to serve as CA Server push the Create CA button and you will see d o typically used in large organizations with internal CA server This requires each VPN gateway to have a c re If the following panel displaye Click Delete CA or Sign Certificate based...
Страница 102: ...r utton and paste the contents into the new window The new signed key it returns hould also be copied into your computers buffer This key needs to be pasted in to two places paste the key into the text box in the new window After the ey is saved on the Client machine the key can be displayed by clicking View Host Certificate utton Load Certificate buttons and since it is serving as the CA server t...
Страница 103: ...rrent status and settings of the system and each Internet connection in detail including WAN Information LAN Information and Device Information with current loader version and firmware version information Click the Show History Data button for graphics of the current status relating to CPU Free Memory and Loading Pages 102 119 ...
Страница 104: ...Multi Service Border Gateway User Manual for NexusWay 800 Series Pages 103 119 ...
Страница 105: ... this document After clicking the Show History Data button you will see graphics of traffic and packet analysis for each port See the Figure 1 for a sample of the graphics for Port 1 Port 2 and Port 3 If you click Display Client Info or Display Connection Info you will see detailed information about the current NAT functions including protocol ISP alias IP source and destination transmission amoun...
Страница 106: ...e Border Gateway User Manual for NexusWay 800 Series Multi Service Border Gateway User Manual for NexusWay 800 Series Pages 105 119 Figure 1 Graphics showed after clicking the Show History Data button Pages 105 119 ...
Страница 107: ...Gateway User Manual for NexusWay 800 Series Pages 106 119 Figure 2 The graphics showed after clicking the Display Client Statistics Connection Info Figure 3 The graphics shown after clicking the Display Health Check button ...
Страница 108: ...uration The DHCP Server section lists settings related to the DHCP addresses offered to clients the DHCP address range gateway subnet mask DNS default lease time max lease time and interface The Mac IP Mapped List shows the reserved IP addresses and the MAC addresses they correspond with ore detailed information of these settings see 4 1 4 DHCP Server and 4 1 6 DHCP For m Mac IP in this documentat...
Страница 109: ...on of these settings see 4 2 7 Firewall in this documentation 4 4 5 QoS Status This option shows the current QoS settings For more detailed information of these settings see 4 2 6 QoS in this documentation 4 4 6 Quota Status This option shows the current Quota settings For more detailed information of these settings see 4 1 14 Quota in this documentation Pages 108 119 ...
Страница 110: ...s physical hardware address This feature allows you to Display Routing Table This will show the table which the NexusWay 800 uses when determining which gateway to use while forwarding data Display Interface Info This option shows the information relating to all the interfaces of NexusWay 800 4 WAN and 2 LAN Display NAT Info This shows the information about the current NAT connections and their pr...
Страница 111: ...n help determining where the longest delays are occurring And traceroute works by sending packets with low time to live TTL fields The TTL value specifies allowed before it is returned When a packet can t reach its destination due to an excessively low TTL value the last host returns the packet and identifies itself By sending a series of packets and incrementing the TTL value with each successive...
Страница 112: ...ogin By keeping this column empty EVERY IP is allowed to login ring all the data on this page otherwise you will immediately lose all the settings when exiting the page After entering a username and password you can also enter an IP in the Allow IP Address column to restrict the administrator so that they may only login from this specific IP address Each administrator can have either read and writ...
Страница 113: ...to properly receive the syslog messages RFC 3164 describes the protocol used There is a Show syslog in a New Window button which will display an extended syslog in a new window In the Syslog Server List you can see some logs concerning changes and events in the NexusWay 800 These syslog events are generated by administrators and some internal functions of NexusWay 800 You can see more detailed sys...
Страница 114: ...Service Border Gateway User Manual for NexusWay 800 Series CHAP 5 HELP the subject which you have problems with while operating or configuring for more onlin ction or information Click e instru Pages 113 119 ...
Страница 115: ...k segment If your PC uses a Static Fixed IP address ensure it is using an IP address inside the range tor s IP address 1 Is the NexusWay is properly installed with successful LAN connections and powered ON 2 Ensure that your PC and the NexusWay are on the same network segment If you don t have a 3 Is your PC is set to Obtain an IP address automatically DHCP client Did you restart it 4 of 192 168 0...
Страница 116: ...dress check the Network Mask Default gateway and DNS as well as the IP address you have configured Ensure these settings fall within the correct settings for the NexusWay s current configuration 2 If other PCs fail to operate properly with the correct configurations check the NexusWay s connections power WAN and LAN If you also cant connect to the NexusWay check the power and LAN connections 3 If ...
Страница 117: ...es eu com General info neteyes eu com Southern Asia Address la Lumpur City Centre Kuala Lumpur 50088 Malaysia AX 603 2164 5157 Menara Maxis 36th Floor Kua Telephone 603 2615 7213 F Web http www neteyes biz E mail Sales sales my neteyes biz Support support my neteyes biz General info my neteyes biz 台灣 全球總部 Headquarters 地址 台北市內湖區內湖路一段 120 巷 13 號 6 樓之一 電話 886 2 2657 2813 傳真 886 2 2657 2814 網址 http tw...
Страница 118: ...er Manual for NexusWay 800 Series 中国大陆 地址 北京市朝阳区光华路丙 12 号数码 01 大厦 22 层 04A 电话 86 10 6500 7618 传真 86 10 6500 7617 网址 http cn neteyes biz 电子邮件 业务方面 sales cn neteyes com 技术支持 support cn neteyes com 一般信息 info cn neteyes com Pages 117 119 ...