background image

| W

ireless 

M2M

10

d) 

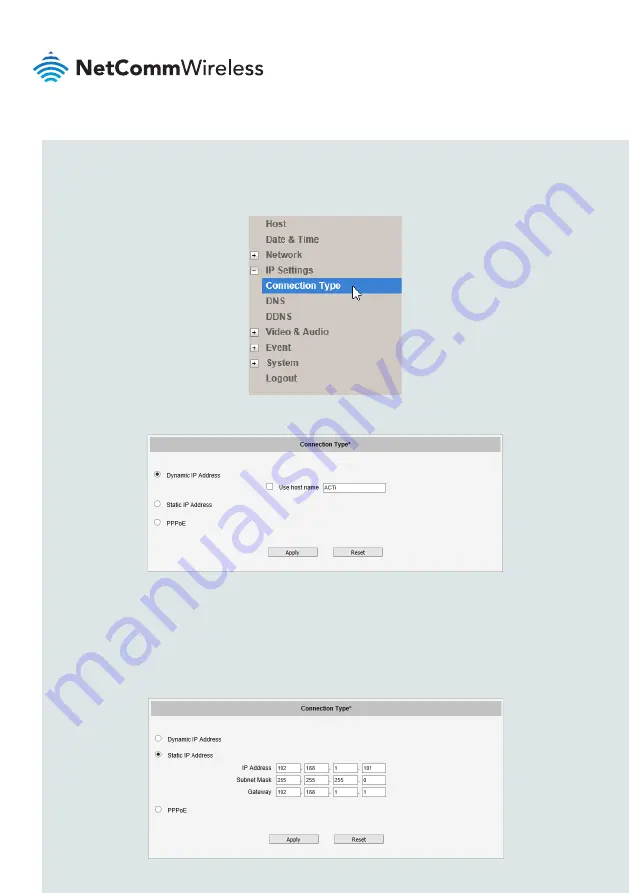
Using the menu on the left of the screen, navigate to 

IP Settings -> 

Connection Type.

The Connection Type page is displayed.

e) 

Select the Static IP Address option then enter a static IP address for the camera 

within the router’s IP address range. Since the NetComm Wireless router uses the 
DHCP range of 192.168.1.X, configure the camera’s address to something in this 
range that is not in use, for example 192.168.1.101. Set the Gateway address to 

192.168.1.1. An example screenshot is shown below.

Содержание NTC-140W

Страница 1: ...4G Camera Solution 4G WiFi M2M Router NTC 140W Security Camera ACTi B97...

Страница 2: ...ntly Applications include construction companies who want to visually track the progress of a project and share it with investors retailers of all sizes who want a camera in their store to improve sec...

Страница 3: ...s 4G WiFi M2M Router an ACTi B97 IP Security Camera and all other accessories to make the solution work first time Although this document guides you through an example setup we at NetComm Wireless hop...

Страница 4: ...cted to the local area network An additional Ethernet cable for configuration from a laptop Depending on your chosen location for the Router the Power over Ethernet Injector and the Camera you may req...

Страница 5: ...please refer to the Quick Start Guide included in the 4G M2M WiFi Router package When you have installed the router as described in the Quick Start Guide continue to the next section of this guide to...

Страница 6: ...use with the camera involves the following steps 1 Determining the camera s DHCP IP address 2 Configuring the camera with a static IP address 3 Forwarding the required ports to the camera 4 Configuri...

Страница 7: ...n the camera is connected to the router it is assigned an address dynamically In order to connect to the camera for the initial setup you need to find out its address a Connect the IP security camera...

Страница 8: ...g menu item then the LAN menu on the left and finally select the DHCP item d Scroll to the bottom of the page to the Dynamic DHCP client list The camera and your connected computer appear in the DHCP...

Страница 9: ...that doesn t change a Open a new tab in your browser and navigate to the camera s dynamically assigned IP address The screenshot below shows a browser accessing an ACTi camera via its dynamically ass...

Страница 10: ...atic IP Address option then enter a static IP address for the camera within the router s IP address range Since the NetComm Wireless router uses the DHCP range of 192 168 1 X configure the camera s ad...

Страница 11: ...effect after you perform the Save Reboot function of the camera Select the OK button on the message window g From the menu on the left side of the screen select the System menu then select the Save Re...

Страница 12: ...e g http 192 168 1 101 Log in again using the same credentials as before b From the menu on the left side of the screen select the Network menu then select the Port Mapping item The port mapping page...

Страница 13: ...ter the details as follows The Original IP address setting of 0 0 0 0 means that the router forwards traffic from any source address You can add a range of ports by entering the first port in the rang...

Страница 14: ...addresses dynamically and you want to access the camera remotely it is best to use a Dynamic DNS service so that you can use a single hostname to access the camera even when the IP address changes a...

Страница 15: ...C 140W 4G WiFi M2M Router ACTi B97 Security Camera The setup is complete You can access the camera remotely using the Dynamic DNS host name After logging in to the camera a live view of the camera s v...

Страница 16: ...r your devices Safety and product care Please refer to the user guide for safety and product care information NETCOMM WIRELESS LIMITED ABN 85 002 490 486 Head Office 18 20 Orion Road Lane Cove Sydney...

Отзывы: