NetApp DE460C Скачать руководство пользователя страница 19

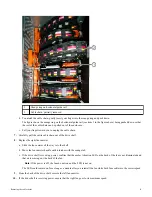
d.  Raise the handle on the drive to vertical.

e.  Align the two raised buttons on each side of the drive with the notches on the drawer.

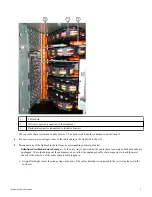
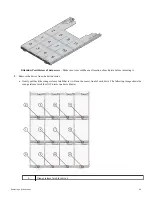
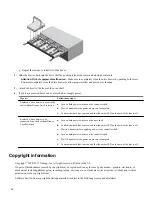
The figure shows the right side view of a drive, showing the location of the raised buttons.

1

Raised button on the right side of the drive.

f.  Lower the drive straight down, making sure the drive is pressed all the way down into the bay, and then rotate the drive

handle down until the drive snaps into place.


Reinstalling the drives

19

Содержание DE460C

Страница 1: ...at have Drawer Loss Protection you can perform this procedure online Otherwise you must stop all host I O activity and power off the shelf before replacing the drive drawer This procedure applies to t...

Страница 2: ...r 11 40 Installing and Configuring for Linux Express Guide SANtricity System Manager 11 40 Installing and Configuring for VMware Express Guide SANtricity System Manager 11 40 Installing and Configurin...

Страница 3: ...Type this command on the command line and press Enter SMcli ctlr_IP1 p array_password c set tray trayID drawer drawerID serviceAllowedIndicator on Command Description ctlr_IP1 The identifier of the c...

Страница 4: ...t Attention Possible data loss If you continue this procedure while I O operations are occurring the host application might lose data because the storage array will not be accessible 5 If the storage...

Страница 5: ...Antistatic protection Attention Possible hardware damage To prevent electrostatic discharge damage to the shelf use proper antistatic protection when handling shelf components Flashlight About this t...

Страница 6: ...t might overheat 3 Determine which cable chain to disconnect If the power is on the amber Attention LED on the front of the drawer indicates the cable chain you need to disconnect If the power is off...

Страница 7: ...the right cable chains from its corresponding vertical guide rail Attention Possible hardware damage If the drive tray is powered on the cable chain is energized until both ends are unplugged To avoi...

Страница 8: ...able chain connector within the vertical guide rail Attention Possible hardware damage If the drive tray is powered on do not allow the cable chain connector to touch the metal chassis 6 Disconnect th...

Страница 9: ...ight fan canister a Slide the fan canister all the way into the shelf b Move the fan canister handle until it latches with the orange tab c If the drive shelf is receiving power confirm that the amber...

Страница 10: ...e the left fan canister If the drive shelf is receiving power confirm that the amber LED on the back of the fan is not illuminated and that air is coming out the back of the fan The LED could remain o...

Страница 11: ...removing it 5 Remove the drives from the drive drawer a Gently pull back the orange release latch that is visible on the center front of each drive The following image shows the orange release latch...

Страница 12: ...0 11 Orange release latch for drive 11 b Raise the drive handle to vertical c Use the handle to lift the drive from the drive drawer d Place the drive on a flat static free surface and away from magne...

Страница 13: ...drawer into the empty slot installing the drives and replacing the front bezel Before you begin You know where to install each drive You have obtained the following items Replacement drive drawer Flas...

Страница 14: ...when pushing the drawer closed for the first time Attention Risk of equipment damage Stop pushing the drive drawer if you feel binding Use the release levers at the front of the drawer to slide the d...

Страница 15: ...Callout Cable chain Connector Connects to 1 Left Vertical Midplane 2 Horizontal Drive drawer Attaching the cable chains 15...

Страница 16: ...ot remove both fans at the same time Otherwise the equipment might overheat 3 Attach the right cable chain a Locate the horizontal and vertical connectors on the right cable chain and the correspondin...

Страница 17: ...are latched Attention Risk of equipment malfunction If the connectors are not latched the cable chain might come loose during drawer operation 4 Reinstall the right fan canister If the drive shelf is...

Страница 18: ...ction If the connectors are not latched the cable chain might come loose during drawer operation 8 Reinstall the left fan canister If the drive shelf is receiving power confirm that the amber LED on t...

Страница 19: ...The figure shows the right side view of a drive showing the location of the raised buttons 1 Raised button on the right side of the drive f Lower the drive straight down making sure the drive is pres...

Страница 20: ...ns is off Replaced a drive drawer in an expansion drive shelf without Drawer Loss Protection a Turn on both power switches on the drive shelf b Confirm that both fans come on and that the amber LED on...

Страница 21: ...Flash Accel Flash Cache Flash Pool FlexArray FlexCache FlexClone FlexPod FlexScale FlexShare FlexVol FPolicy Fueled by SolidFire GetSuccessful Helix Design LockVault Manage ONTAP MetroCluster MultiSto...

Страница 22: ...Fax 1 408 822 4501 Support telephone 1 888 463 8277 22...

Отзывы: