background image

SNMP credentials are required to communicate
with the SNMP agents on your interconnect
devices, such as switches and routers. The
Discovery Settings allow you to enter the SNMP
community strings and credential sets the
EtherScope uses to communicate with those
devices.

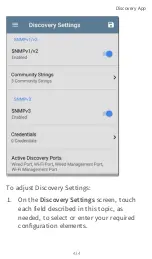
SNMPv1/v2

Touch the toggle button to enable or disable
SNMPv1 and v2 queries. This setting is enabled
by default and uses the Community Strings
configured in the next setting.

Community Strings

Touch this field to open the Community
Strings list screen and add, edit, or remove
community strings.

Discovery App

437

Содержание ETHERSCOPE nXG

Страница 1: ...r Search this PDF for a specific term or phrase Scroll down to view the full list of Contents NetAlly Network Testing Apps AutoTest Ping TCP Capture Discovery Wi Fi Path Analysis AirMapper Performance...

Страница 2: ...7 Safety and Maintenance 29 Legal Notification 32 Home and Android Interface 33 Home Screen 34 Navigating the Android System 36 Android Status Bar and Notifications 40 Notification Panel 40 Apps Scree...

Страница 3: ...est and Management Ports 67 Configuring the Ports 68 Test Ports 69 Management Ports 71 Test and Port Status Notifications 72 Test Port Notifications 73 Management Port Notifications 75 Discovery Notif...

Страница 4: ...plication 101 How to Move or Copy a File 104 Using a Micro SD Card 105 Using a USB Drive 106 Ejecting Storage Media 107 Using a USB Type C to USB Cable 108 Updating Software 110 Remote Access 116 Usin...

Страница 5: ...d Profile Groups 144 Factory Default Profiles 144 Adding New Profiles 146 Profile Groups 152 Creating New Profile Groups 157 Main AutoTest Screen 161 Periodic AutoTest 163 Periodic AutoTest Settings 1...

Страница 6: ...Profiles 212 Wi Fi Profile Test Results 216 Wi Fi Link Test Results 219 Connect Log 229 Channel Test Results 230 AP Access Point Test 234 Wi Fi Profile FAB 237 Wi Fi Profile Settings 241 Wi Fi Connec...

Страница 7: ...Test 294 AutoTest TCP Connect Test 300 HTTP Test 304 FTP Test 317 Air Quality AutoTest Profiles 327 Air Quality Profile Results 329 Air Quality Profile Settings 333 Ping TCP Test App 338 Ping TCP Set...

Страница 8: ...Filtering the Discovery List 373 Sorting the Discovery List 376 Refreshing Discovery 379 Uploading Discovery Results to Link Live 380 Discovery Details Screens 382 Top Details Card 384 Lower Cards in...

Страница 9: ...421 Virtual Machines 422 Wi Fi Controllers 424 Access Points APs 425 Wi Fi Clients 426 VoIP Phones 427 Printers 428 SNMP Agents 429 NetAlly Tools 430 Hosts Clients 431 Discovery Settings 433 SNMP Conf...

Страница 10: ...s 475 Wi Fi App List Screens 476 Filtering in the Wi Fi App 480 Sorting in the Wi Fi App 485 Uploading Wi Fi Results to Link Live 487 Wi Fi Details Screens 489 Wi Fi Problems Screen 492 RF and Traffic...

Страница 11: ...from Another App 570 Configuring Path Analysis Manually 570 Running Path Analysis 574 Path Analysis Results and Source EtherScope Cards 576 Layer 3 Hops 580 Layer 2 Devices 585 Uploading Path Analysis...

Страница 12: ...EtherScope nXG 617 Configuring Performance Endpoints 634 OneTouch 10G Performance Peer 635 LinkRunner G2 Reflector 637 LinkRunner AT Reflector 639 NPT Reflector Software 641 Running a Performance Tes...

Страница 13: ...etting Started in Link Live Cloud Service 677 Quick Claiming on the Unit 677 Claiming Manually 680 After Claiming 682 Unclaiming 683 Link Live App Features 685 Saving Locally Only 688 Job Comment 690...

Страница 14: ...ting 706 Toning Function 708 Uploading Cable Test Results to Link Live 709 Specifications and Compliance 710 Specifications 711 General 711 Wireless 712 Environmental Specifications 718 Certifications...

Страница 15: ...For additional product resources visit NetAlly com Products EtherScopenXG For customer support visit NetAlly com Support Register your EtherScope nXG Registering your product with NetAlly gives you a...

Страница 16: ...hich are available from the Home and Apps screens All NetAlly hand held testers include access to Link Live Cloud Service at Link Live com Link Live is an online system for collecting organizing analy...

Страница 17: ...be referred to as just EtherScope or the unit in this guide The PDF Reader App A PDF reader application is pre installed on your EtherScope to allow easy navigation of this guide l Tap blue links to g...

Страница 18: ...d right arrows to search forwards and backwards in the guide for the term In the image below the user has searched problems l To scroll quickly up or down in the guide touch and drag the page number t...

Страница 19: ...allows you to return to the previous page you were viewing NOTE Touching the back buttons or will not take you back to your previous place in a PDF l To browse the PDF Contents or Bookmarks touch the...

Страница 20: ...Select Contents to view the list of chapters and choose a section to read Introduction 20...

Страница 21: ...r hide the app toolbars at the top of the Adobe Reader screen and the floating action button FAB at the bottom right l Tap the screen twice to zoom in or out To download this guide onto another device...

Страница 22: ...1G 10G Fiber Port RJ 45 Cable Test and Management Port USB Type A Port External Antenna Port Micro SD Card Slot USB Type C and Power Port Touchscreen Microphone Power Button and LED Volume Buttons Sp...

Страница 23: ...reen LED lit Linked Yellow LED flashing Activity USB Type A Port Connects to any USB device RJ 45 Cable Test and Management Port Connects to an Ethernet cable for patch cable testing and unit manageme...

Страница 24: ...decrease the audio volume Speaker Produces audio See Test and Management Ports for detailed explanations of the port functions Refer to the product Specifications if needed Inserting a Micro SD Card A...

Страница 25: ...eed a paperclip or thumbnail to carefully push the SD card in far enough to engage the spring mechanism for insertion and removal Using a Kensington Lock The Kensington Lock slot is the right front ve...

Страница 26: ...red when the unit is in charging mode and turns off at full charge The unit will fully charge in 2 4 hours via AC power When in charging mode meaning the unit is off but plugged into an AC power sourc...

Страница 27: ...st be powered on or in display sleep mode l The Charge Battery via PoE setting must be enabled in General Settings l The EtherScope must also run an AutoTest Wired Profile with a passing PoE test to d...

Страница 28: ...he display goes into Sleep mode the power LED remains on Touch the power button briefly to wake up the display Set the timing for display sleep and auto power off in the Device Settings l To shut down...

Страница 29: ...ow these guidelines l Do not use the product if it is damaged Before using the product inspect the case and look for cracked or missing plastic l Do not operate the product around explosive gas vapor...

Страница 30: ...equipment or software X Warning Risk of electrical shock j Not for connection to a public telephone system Class 1 Laser Product Do not look into the laser Cleaning To clean the display use a lens cl...

Страница 31: ...toothpaste to water onto the affected surface with a bristled brush WCAUTION Do not use solvents or abrasive materials that may damage the product Introduction 31...

Страница 32: ...and between NetAlly and the purchaser of this product Open Source Software Acknowledgment This product may incorporate open source components NetAlly will make available open source code components o...

Страница 33: ...EtherScope nXG interface supports many of the operations typical of any Android device Use dragging and swiping motions on the touchscreen to navigate through apps open side menus drag down the Notif...

Страница 34: ...Home Screen Home and Android Interface 34...

Страница 35: ...on but you can add remove and reorganize app icons and widgets to serve your purposes You can also create more Home pages by touching holding and dragging an app icon to the right from the main Home s...

Страница 36: ...touch screen The back icon returns to the previous screen The circle icon opens the Home screen The square icon displays your recently used applications for easily switching between then This is also...

Страница 37: ...panels Long Pressing Touch and hold or long press files or application icons to reveal additional operations For example you can long press a file name in the Files Application to reveal the top tool...

Страница 38: ...screens to open options for copying and sharing the text Left Side Navigation Drawer Touch the Menu icon or swipe right in the Files app to open the navigation drawer It displays the folders in your f...

Страница 39: ...s app you may need to tap the action overflow icon at the top right and select Show Internal Storage to navigate to the EtherScope nXG folder and sub folders as shown above See the Navigation Drawer t...

Страница 40: ...etails about the icons and notifications related to EtherScope nXG network connections testing and management Touch and swipe down on the Status Bar to open the Notification Panel Notification Panel T...

Страница 41: ...Swipe touch and drag downwards on the Status Bar at very top of the screen to slide down the Notification Panel Home and Android Interface 41...

Страница 42: ...ge or device settings or to perform other related actions l Swipe left on a notification to dismiss it NOTE Because they are essential to the EtherScope testing functions you cannot dismiss the test a...

Страница 43: ...Apps Screen and Store To access the apps that are not shown on the Home screen swipe up on the Home screen or touch the up arrow icon Home and Android Interface 43...

Страница 44: ...Home screens l Touch and hold long press an icon to view App Info or access widgets you can add to the Home screen and other actions you can perform App Store From the Home Screen or Apps Screen open...

Страница 45: ...ch icon to search for an App To request that an App be added to the App Store visit the Apps page at Link Live com and select the floating action button FAB at the lower right corner to Request or Upl...

Страница 46: ...Device Settings To access the Android system device settings touch the Settings icon at the bottom of the Home screen Home and Android Interface 46...

Страница 47: ...connect to Wi Fi or reset to factory defaults Quick Settings Panel You can also access some of the most common device settings like Wi Fi from the Quick Settings Panel by swiping down from the Status...

Страница 48: ...panel to adjust the screen s bright ness l Tap an icon in the panel to enable or disable the corresponding feature For example you can turn the unit s Wi Fi or screen Auto rotate functions on or off...

Страница 49: ...nel to configure the icon controls that appear in the panel Auto Power Off Activating the Auto Power Off function helps to extend the battery run time 1 From the Device Settings select Display 2 On th...

Страница 50: ...Back to Title and Contents Similarly you can adjust the setting that controls when the display goes into Sleep mode from the Display settings screen Home and Android Interface 50...

Страница 51: ...Fi Test Port connections do not perform the functions of the main device Wi Fi access To connect your EtherScope to a Wi Fi network access the Android Wi Fi Device Settings using either method below l...

Страница 52: ...Status Bar and touching and holding long pressing the Wi Fi icon Either path opens the Wi Fi settings screen 1 Ensure the Wi Fi feature is On Home and Android Interface 52...

Страница 53: ...g on the security settings some may also require a company username EAP type authentication type certificate or other credentials 4 After entering credentials touch CONNECT The network you selected mo...

Страница 54: ...t this Android noti fication icon appears in the top Status Bar Drag down from the top of the screen to open the notification Touch the notification to open a web browser window where you can enter th...

Страница 55: ...ou are trying to connect to a network with a captive portal but the Android notification is not appearing check that the Captive Portal Detection setting is enabled in Device Settings Network Internet...

Страница 56: ...it to view your configured sharing options For example the image below shows an expanded Screenshot notification from the top notification panel Touch SHARE to open the Share with pop up dialog where...

Страница 57: ...the Link Live option to share upload a file to Link Live Cloud Service at Link Live com Files can be attached to a test result or uploaded individually to the Uploaded Files page on Link Live The exa...

Страница 58: ...The SAVE TO LAST TEST RESULT option attaches the image to your most recently run AutoTest Performance iPerf or Cable Test result on Link Live com Home and Android Interface 58...

Страница 59: ...Files app For most file types you can only upload one selected file at a time but multiple image files can be shared at once 1 With the Files app opened navigate to the folder containing the files yo...

Страница 60: ...3 Touch the share icon in the top toolbar 4 If needed touch the Link Live option Home and Android Interface 60...

Страница 61: ...g a Screenshot On the EtherScope nXG unit press and hold the Power button and the Volume Down button at the same time for one second to save a screenshot of the current screen See Buttons and Ports fo...

Страница 62: ...s chapter covers settings icons and notifications specific to EtherScope nXG See the Device Settings topic for information on the Android system settings Access common settings and informational scree...

Страница 63: ...and information in a navigation drawer that slides out from the left side of the screen To open the navigation drawer l Touch the menu icon at the top left of the testing application screens l Touch...

Страница 64: ...vigation drawer above provides access to the enabled AutoTest profiles AutoTest Settings General Settings and the About screen Settings for each specific app are described in the chapter for the app G...

Страница 65: ...al number MAC addresses software versions and SFP details for your EtherScope nXG If a User Defined MAC is enabled in the NetAlly apps General Settings User defined appears next to the MAC address on...

Страница 66: ...your unit s logs for analysis by NetAlly s technical support team Touch the EXPORT LOGS link on the About screen to download a tgz file to the Downloads folder on your unit Open the Files app to trans...

Страница 67: ...anagement functions described in this section Either the top copper port or fiber port can act as the Wired Test Port so in total the EtherScope has four network interfaces 1 Wired Test 2 Wi Fi Test 3...

Страница 68: ...Settings are accessible from the left side navigation drawer in NetAlly s testing apps such as AutoTest Capture and iPerf The app specific settings for many of the individual NetAlly testing apps like...

Страница 69: ...are described below next to their corresponding status icons Test Ports EtherScope runs Wired and Wi Fi AutoTests Captures Discovery and comprehensive network analyses over the test ports General Sett...

Страница 70: ...est app NOTE If both the top fiber and copper ports are connected to an active network the EtherScope uses the fiber link as the Wired Test Port connection Wired Copper Test Port The copper test port...

Страница 71: ...rts as the Test Ports may frequently drop link and reconnect or resume scanning Wi Fi Management Port The internal Wi Fi management port runs on the main Android system s 1x1 Dual band 802 11ac Blueto...

Страница 72: ...iew the notifications On each notification you can touch the title and down arrow to expand the box and view more details or options The following EtherScope icons may appear in your Status Bar with t...

Страница 73: ...he top Fiber port NOTE If both the fiber and top copper ports are connected to an active network the EtherScope uses the fiber link as the Wired Port for testing The Wi Fi Test Port status displays wi...

Страница 74: ...channel is currently being scanned When the EtherScope unit is connected to an AP on a Wi Fi channel the channel number is static and the Link icon displays above it Periodic AutoTest is running or ha...

Страница 75: ...ction is established through the left side RJ 45 Management port and or the main Android Wi Fi adapter A Wired Management Port connection is established through the left side RJ 45 Management port Its...

Страница 76: ...Discovery Notifications The Discovery notifications show the progress of the discovery process See the Discovery app chapter for more information The active discovery process is running and has progr...

Страница 77: ...access to Power over Ethernet PoE Class 4 or above for power and charging VNC Link Live Remote A remote VNC connection is active through a standalone VNC client and or the Remote function in Link Live...

Страница 78: ...ultiple test apps Access the General Settings from the left side navigation drawer in the NetAlly testing apps such as AutoTest Discovery Capture iPerf etc See also Test and Management Ports and Test...

Страница 79: ...rol functions of the Wi Fi Test Port functions Use Wi Fi test port Enable or disable Wi Fi tests connections and measurements in the testing apps including AutoTest Wi Fi Profiles and the Wi Fi analys...

Страница 80: ...ettings to disable the Android Wi Fi Country Set the unit for legal operation in your country This setting affects the Wi Fi bands and channels on which the unit transmits Wi Fi Bands and Channels Sel...

Страница 81: ...ell Time field to adjust this setting Combine Utilization Enable this setting to combine 802 11 and non 802 11 channel utilization into one total utilization measurement In environments with 802 11ax...

Страница 82: ...n additional User Defined MAC field appears under the toggle setting Touch the lower field to enter your desired MAC address for the EtherScope When a User Defined MAC is enabled User defined appears...

Страница 83: ...te the PoE test before the Link test Enabling this setting forces PoE negotiation to be completed before establishing link improving com patibility with some switches Charge Battery via PoE This setti...

Страница 84: ...t Stop After setting to Switch Otherwise when Receive Only is enabled the Wired DHCP Static IP test shows a Result Code of Interface is configured to only receive packets and the subsequent tests do n...

Страница 85: ...management related functions on the EtherScope including remote access VNC Touch VNC to open the VNC settings screen and configure your unit s VNC connections for remote operation See Remote Access fo...

Страница 86: ...ble or disable remote connections from VNC clients Port number Touch to enter a port number other than the default Password Touch to enter a password which a VNC user must enter to access the EtherSco...

Страница 87: ...Live Remote This setting enables or disables the Ether Scope s remote control function in Link Live Cloud Service at Link Live com NOTE The Link Live Remote feature is only available to customers wit...

Страница 88: ...field and tap the toggle button to disable DHCP and enter static IP information Preferences Distance Unit This is the unit EtherScope uses for distance measurements in the testing apps specifically A...

Страница 89: ...ps feature time based line graphs of recorded meas urements which you can pan and zoom to view different time intervals For example the image below shows the Signal and Utilization graphs from the Aut...

Страница 90: ...ata for up to 24 hours depending on test type and or link status Under each graph a legend table indicates the measurements that correspond to each plotted color For another example the image below sh...

Страница 91: ...l displayed drag the slider or tap the slider bar below the graphs The smallest time interval maximum zoom in on the slider is 10 seconds and the largest time interval maximum zoom out is the total ti...

Страница 92: ...l AutoTest Wi Fi Profiles Link and Channel l Ping TCP Ping Test l Capture l Discovery Interface Statistics l Wi Fi RF and Traffic Statistics l Performance l iPerf General Settings and Tools 92...

Страница 93: ...uration options for the current app Save Icon saves settings or files or loads saved configurations Floating Action Button FAB opens the Floating Action Menu which contains additional actions Action O...

Страница 94: ...enu Many Android applications including NetAlly s AutoTest and Discovery apps feature a Floating Action Button or FAB that opens a floating action menu with more options for analysis The FAB on the ma...

Страница 95: ...testing of the selected device Floating action menus that appear in the testing applications are described more spe cifically in the relevant chapters For example General Settings and Tools 95...

Страница 96: ...see Discovery App Floating Action Menu in the Discovery app chapter for a more detailed illus tration General Settings and Tools 96...

Страница 97: ...h the AutoTest and Discovery apps provide options to start a Telnet or SSH session using the current device address Selecting these options opens JuiceSSH and starts a session You can also open JuiceS...

Страница 98: ...erflow button at the top right of the JuiceSSH app screen and select View our FAQ Camera and Flashlight The camera lens and flash are located on the back of the unit See Buttons and Ports The Camera a...

Страница 99: ...reless AutoTest Profile has completed the floating action button appears and provides the option of opening the camera application to take and attach a picture to the AutoTest result uploaded to Link...

Страница 100: ...pp and device defaults update your software and remotely access your EtherScope nXG Tap a link below to skip to your desired topic Managing Files Updating Software Remote Access Resetting App Defaults...

Страница 101: ...vigating EtherScope nXG Files Application The Files app allows you to access the files saved on your EtherScope Touch the icon at the bottom of the Home Screen or from the Apps screen to manage your f...

Страница 102: ...view additional file man agement operations in the top toolbar including the Share and Delete buttons l Tap the action overflow icon to see even more actions such as to create a new folder move a file...

Страница 103: ...l Open the left side navigation drawer to easily navigate through the top level folders and attached storage devices Software Management 103...

Страница 104: ...How to Move or Copy a File 1 Long press on a file to select it You can then select more files as needed by tapping them Software Management 104...

Страница 105: ...le 5 Touch the Move or Copy button at the bottom of the screen Using a Micro SD Card To use a Micro SD card for storage insert it into the Micro SD card slot on the left side of your EtherScope nXG Se...

Страница 106: ...g your Micro SD card from the USB port to avoid potential corruption of your storage device s file system Using a USB Drive Insert a USB flash drive into the USB port on the top of the EtherScope A US...

Страница 107: ...hysically removing your USB drive from the USB port to avoid potential corruption of your storage device s file system Ejecting Storage Media You can eject storage media from the expanded Android noti...

Страница 108: ...connect to a PC or tablet 2 On the EtherScope Unit open the Android device settings by tapping the Settings icon at the bottom of the Home screen 3 Select Connected devices 4 On the Connected devices...

Страница 109: ...ot pop up auto matically From there you can move copy and paste files to and from the EtherScope nXG s file system WCAUTION As with any Android device use the EJECT function before physically dis conn...

Страница 110: ...the Air Updates NOTE You must create an account and claim your EtherScope nXG unit to the Link Live Cloud Service for the EtherScope to find and download software updates See Getting Started in Link L...

Страница 111: ...touch the menu icon or swipe right to open the left side Nav igation Drawer 3 Touch Software Update The Software Update screen opens and displays the version number of any available updates You can to...

Страница 112: ...e install the Android update first 5 Touch Download Install to update the Android operating system or the NetAlly Applications Each update must be installed separately The files download and install W...

Страница 113: ...the software update files from the Link Live com website open the left side navigation drawer by clicking the menu icon and select Support Software Downloads 1 Download the update files for the Andro...

Страница 114: ...se the volume buttons to highlight apply update from SD card and press the power button to confirm the selection 5 Use the volume buttons to highlight the correct update file on the Micro SD card and...

Страница 115: ...rawer and select Software Update 3 On the Software Update screen touch the action overflow icon at the top right and select Manual Update 4 Navigate to the USB drive or Micro SD card where you saved t...

Страница 116: ...e subscription See NetAlly com Support for more information While you can establish remote connections using the Wired or Wi Fi Test Ports on the EtherScope the Management Ports provide more stable li...

Страница 117: ...gged into the left side RJ 45 Management Port l For a Wi Fi Management Port connection you must have the main Android Wi Fi settings configured to connect to a wireless network When a remote session i...

Страница 118: ...ably a management port by swiping down from the Status Bar at the top of the screen to view the notification panel 2 Provide the wired or Wi Fi Test or Man agement Port s IP address to your chosen VNC...

Страница 119: ...com to access the Link Live Remote feature Your EtherScope must be claimed 2 Navigate to the Units page at Link Live com 3 Select the EtherScope you want to remote control from the list of claimed un...

Страница 120: ...Back to Title and Contents To use the Link Live website while your remote session is active you will need to open a new Link Live tab or window Software Management 120...

Страница 121: ...cope unit see Restoring EtherScope nXG Factory Defaults Resetting Testing App Defaults Once you have adjusted settings in the NetAlly apps at some point you may need to reset an app s settings to the...

Страница 122: ...1 Access the App Info screen by long pressing touch and hold on a app s icon on the Home or Apps screen 2 Touch App info Software Management 122...

Страница 123: ...screen select Storage You can also access the App Storage screen from Device Settings Storage Internal shared storage Other apps 4 On the Storage screen for the app you selected touch CLEAR DATA Softw...

Страница 124: ...5 When the Delete app data dialog appears tap OK All of the app s settings are reset to factory defaults Software Management 124...

Страница 125: ...e save button that appears at the top right within the app s main screen The following apps enable you to save and load settings configurations l AutoTest Settings including Profile Groups l Discovery...

Страница 126: ...The following options display in a drop down menu l Load Open a previously saved and named settings configuration Software Management 126...

Страница 127: ...a new custom name l Import Import a previously exported settings file l Export Create an export file of the current settings and save it to internal or connected external storage See Exporting and Imp...

Страница 128: ...can be most useful for Discovery Settings and Problem Settings 1 Go to an app s settings screen 2 With all settings set to the defaults tap the save button and Save As 3 Save a default configuration w...

Страница 129: ...ettings including Profile Groups l Discovery Settings l Discovery Problem Settings l Performance Settings l iPerf Settings The AutoTest Settings are shown as an example in the images below l Touch the...

Страница 130: ...t Settings image above the Air Quality Profile will not be exported Likewise any unchecked items in submenus like AutoTest s Test Targets or Community Strings in Discovery Settings will not be exporte...

Страница 131: ...figurations are auto named with the app name and custom settings name l You can rename the export file as needed l Settings can be saved to any connected external or internal storage See Managing Soft...

Страница 132: ...saved with the o file extension l Selecting Import from an app opens the Files app where you can navigate to and select the o file you want to import l Imported settings configurations will overwrite...

Страница 133: ...to the factory default state Make sure to back up any files you desire to keep 1 To access the Android Device Settings touch the Settings icon at the bottom of the Home Screen 2 On the Settings screen...

Страница 134: ...e option 5 Touch RESET to initiate your chosen reset type 6 The unit may ask you to confirm a final time before resetting Touch the final con firmation button to reset your Ether Scope s defaults The...

Страница 135: ...n 2 On the Settings screen scroll down and select the System section and then Languages input 3 On the Languages input screen touch Languages 4 On the Language preferences screen select Add a language...

Страница 136: ...top 1 spot on the list The EtherScope displays the chosen languages as available in the priority order shown on the Language preferences screen Software Management 136...

Страница 137: ...Guide describes the NetAlly developed network testing apps Each app is specially designed for fast analysis and intuitive operation to enhance and simplify your network tasks Open the testing apps by...

Страница 138: ...need them The app is fully customizable with test Profiles for Wired and Wi Fi network connections wireless Air Quality and individual Test Targets AutoTest establishes the Wired and Wi Fi Test Port c...

Страница 139: ...nd test results AutoTest Overview Managing Profiles and Profile Groups Main AutoTest Screen Periodic AutoTest Wired AutoTest Profiles Wi Fi AutoTest Profiles DHCP DNS and Gateway Test for Wired and Wi...

Страница 140: ...dual Test Targets that connect to network services such as a web app or FTP site A Test Target defines parameters including type target URL IP address port number and Pass Fail thresholds More complex...

Страница 141: ...your wireless environment Profiles provide an automated and consistent way to verify a network from layer 1 through layer 7 A Profile can be added to and used in any number of Profile Groups A Profile...

Страница 142: ...g both wired and Wi Fi access from a conference room The graphic below illustrates each of these scenarios Note how Test Targets can be included in any number of Profiles and Profiles can be included...

Страница 143: ...Back to Title and Contents You can create as many Profile Groups Profiles and Test Targets as you want AutoTest App and Profiles 143...

Страница 144: ...of test profiles Wired Profiles test copper and fiber connections Wi Fi Profiles test wireless connections Air Quality Profiles measure channel utilization and interference Factory Default Profiles Th...

Страница 145: ...creen shown above opens the AutoTest Settings and Profile Group screen not the individual Profile settings l The default Wired Profile runs automatically and establishes a wired link as soon as your u...

Страница 146: ...Air Quality screen l For the default Wi Fi Profile to run suc cessfully you must select an SSID and enter security credentials before the EtherScope can connect to a network See Wi Fi Profile Connecti...

Страница 147: ...the profile s settings tap the back button at the bottom of the screen to open and run the new test profile Creating a Wi Fi Profile from the Wi Fi Analysis App You can also create an AutoTest Wi Fi...

Страница 148: ...e screen 2 Tap the menu button to select the SSIDs or BSSIDs list screen 3 Touch an SSID or BSSID s card to open its Details screen 4 Touch the FAB floating action button to open the floating action m...

Страница 149: ...5 In the floating action menu touch Connect A Wi Fi Profile called Connect to SSID BSSID is created in AutoTest AutoTest App and Profiles 149...

Страница 150: ...f applicable and Authentication Type are auto populated in the Wi Fi Connection settings for the new profile 6 Tap YES in the pop up dialog to review and configure additional credentials AutoTest App...

Страница 151: ...7 Enter any additional credentials like the network Password 8 After configuring touch the back button to return to and run the new Profile AutoTest App and Profiles 151...

Страница 152: ...run when you start an AutoTest See AutoTest Overview for more explanation of Profile Groups You can configure and select Profiles and Profile Groups for different locations jobs networks or other purp...

Страница 153: ...AutoTest Settings Screen The AutoTest Settings screen contains the Periodic AutoTest and Profile Group settings AutoTest App and Profiles 153...

Страница 154: ...Profile Group l Touch the action overflow icon to Duplicate or Delete a Profile CAUTION When you delete a Profile it is deleted from all Profile Groups To remove a Profile from the current group simp...

Страница 155: ...ternal or connected external storage See Exporting and Importing App Settings for more details Each Profile Group can run one or many of the three Profiles types Your saved Profiles are available acro...

Страница 156: ...and in the AutoTest Settings screen header In the example below the user saves a custom AutoTest configuration named Springs Campus The main AutoTest app screen now displays the custom name in the he...

Страница 157: ...the AutoTest Settings and Profile Group screen by touching on the main AutoTest screen 2 Uncheck the boxes for any Profiles you do not want included in the new Profile Group 3 Touch the FAB to add new...

Страница 158: ...ly move to the bottom of the list once you leave and revisit this screen 5 Tap and select Save As A dialog box opens where you can enter the new name 6 Enter a new Profile Group name and touch SAVE Th...

Страница 159: ...r Campus con figuration shown above AutoTest will first run the Wired Profile over the Ethernet connection next scan the wireless channels for Air Quality results and then connect to The Office AutoTe...

Страница 160: ...Back to Title and Contents Network 1 and remain connected to that network This Profile Group will not connect to or test the Nighthawk or LRC networks AutoTest App and Profiles 160...

Страница 161: ...TART button on the main AutoTest screen to run all the Profiles in the currently active Profile Group The AutoTest screens display icons that correspond to the type of profile test or measurement Afte...

Страница 162: ...lored circle to the right of each profile card 2 Warnings 1 Failure The thresholds that control the colored test gradings are adjustable in the settings screens for each profile and test type The gree...

Страница 163: ...y run AutoTests for a specified amount of time Periodic AutoTest Settings To enable and configure Periodic AutoTest open the AutoTest Settings and Profile Group screen and tap Periodic AutoTest The Pe...

Страница 164: ...Periodic AutoTest field to enable and adjust the settings below as needed Interval Amount of time between each AutoTest run Duration Total length of time Periodic AutoTests run AutoTest App and Profi...

Страница 165: ...Enter the label you want to be attached to the uploaded Periodic AutoTest result on Link Live The default is Periodic AutoTest Append Date Time This field appears if the Add Comment setting is enabled...

Страница 166: ...summarized at the bottom of the AutoTest screens Passes and failures are reported for each run of the entire Profile Group rather than individual Profiles Periodic AutoTests are skipped if the previou...

Страница 167: ...on appears in the top Status Bar when Periodic AutoTest is running or has completed Drag down on the Status Bar to view the corresponding noti fication NOTE AutoTest has priority control of the Test P...

Страница 168: ...Wired AutoTest Profiles A Wired Profile runs a series of tests over your copper or fiber network connection AutoTest App and Profiles 168...

Страница 169: ...green to indicate success When Wired Profiles Run Automatically l A single Wired AutoTest Profile runs auto matically when the unit is powered on and EtherScope detects an active Ethernet con nection...

Страница 170: ...ofile runs a wired network link is maintained for further testing Wired Test Port linkage is indicated in the top Status Bar with this notification icon Wired Profile Specific Tests The tests that are...

Страница 171: ...ing is enabled for the Wired Profile The VLAN test card appears if the VLAN setting is enabled or if VLAN tagged traffic is detected during the AutoTest PoE Wired Link 802 1X VLAN and Switch Results a...

Страница 172: ...Back to Title and Contents l Skip to Wired Profile Settings l Skip to DHCP DNS and Gateway Tests l Skip to Test Targets AutoTest App and Profiles 172...

Страница 173: ...Wired Profile Results The image below shows a completed AutoTest Wired Profile AutoTest App and Profiles 173...

Страница 174: ...ned links to open a Discovery app Details screen showing the selected device or ID NOTE You may need to Configure SNMP settings in the Discovery app to see all the available information about a networ...

Страница 175: ...nd enable additional actions PoE Test Results The card for the Power over Ethernet PoE test displays the measured Voltage Class and Wattage Refer to PoE Settings if needed Touch the card to open the P...

Страница 176: ...E Test Results Screen In addition to the information from the PoE card the PoE test screen shows these results Class Requested Class Class selected in the PoE test settings AutoTest App and Profiles 1...

Страница 177: ...age without load TruePower Voltage Measured voltage with load Positive Positive PoE cable pair IDs Negative Negative PoE cable pair IDs PSE Type Switch s advertised Power Sourcing Equipment PSE type R...

Страница 178: ...r Ethernet connection displays the advertised speed and duplex capabilities in grey text and the detected speed and duplex in black text EtherScope can test and display information for link speeds up...

Страница 179: ...wer than the maximum advertised speed l The link is using half duplex l For links faster than 1G EtherScope has detected a minimum SNR value below the set threshold Touch the card to open the Link tes...

Страница 180: ...Wired Link Test Screen The Wired Link test screen shows the following AutoTest App and Profiles 180...

Страница 181: ...etected by EtherScope RJ 45 Details Copper Rx Pair Link receive pair Multi Gigabit Details Copper This table appears only when the Wired Profile is linked at speeds higher than 1G Each twisted pair ch...

Страница 182: ...ence for the other channel meas urements SNR Current signal to noise ratio on each channel Min SNR Lowest SNR measurement since link was established Threshold Multi Gigabit SNR Threshold from the Wire...

Страница 183: ...sults The 802 1X test card only displays if the 802 1X setting is enabled in the Wired Profile Settings The card shows the EAP type selected in the Wired Connection settings and the username or certif...

Страница 184: ...Screen The 802 1X screen also shows the time it took for the authentication process to complete along with Result Codes Tap the blue CONNECT LOG link to view the 802 1X Connect Log AutoTest App and P...

Страница 185: ...Test Results The VLAN card only displays if the VLAN setting is enabled in the Wired Profile Settings or if AutoTest detects VLAN tagged traffic The top line on the VLAN test card shows the configure...

Страница 186: ...The second line on the VLAN card displays the top VLANs with the most detected traffic Touch the card to open the full VLAN screen VLAN Test Screen AutoTest App and Profiles 186...

Страница 187: ...the Switch Test are based on Discovery Protocol advertisements and SNMP system group information SNMP forwarding table data is used to determine the Nearest Switch See Discovery Settings for SNMP conf...

Страница 188: ...itch Nearest Switch Not Found displays on the Switch card The EtherScope continues to search for the nearest switch even after the AutoTest completes Touch the Switch card to open the full switch resu...

Страница 189: ...received either via Discovery Protocol advert isements or SNMP AutoTest App and Profiles 189...

Страница 190: ...h Nearest Switch Name of the switch determined to be closest to the EtherScope Port Detected Port name Description Configured description reported by the switch VLAN ID VLAN ID number if present Voice...

Страница 191: ...st Seen displays next to the protocol type first seen by the Ether Scope Last Seen For non SNMP discovery protocols CDP LLDP EDP or FDP the time the advertisement was last received by the EtherScope L...

Страница 192: ...es seen via advertisements or SNMP At the bottom of the switch test screen touch the blue links or the action overflow icon to open other apps or tools with the target in this case the Nearest Switch...

Страница 193: ...Details action link only appears in the Switch results if EtherScope has current Discovery data and AutoTest was able to identify the nearest switch and connected interface The Ping TCP Connect and Ca...

Страница 194: ...Gateway Tests for Wired and Wi Fi Target Tests See the Test Targets topic for information on target test results Wired Profile FAB The floating action button FAB on AutoTest Profile screens allows you...

Страница 195: ...creen where you can add Ping TCP Connect HTTP and FTP target tests to the current profile l Add Connection Log opens a Link Live sharing screen that allows you to custom name the log file before savin...

Страница 196: ...Touch the field to enter your desired log name and tap SAVE TO TEST RESULT to upload l Add Comments also opens a Link Live sharing screen where you can enter comments AutoTest App and Profiles 196...

Страница 197: ...VE TO LAST TEST RESULT to upload them l The Add Picture function lets you open the Gallery or Camera app to select or take a photo that is then uploaded and attached to your test result See the Link L...

Страница 198: ...d test port connection PoE test the thresholds for Pass Warning Fail results and any user added test targets Touch the settings icon on the Wired profile screen or add a new Wired profile to configure...

Страница 199: ...n you finish configuring tap the back button to return to the profile Name Touch the Name field to enter a custom name for the profile This name appears on the main AutoTest screen profile card and th...

Страница 200: ...ses l 802 3af Classes 0 3 l 802 3at PoE Class 4 l Cisco s UPOE which can provide up to 51 W l 802 3bt Classes 5 8 Select the PoE Injector option if you are using a non IEEE injector NOTE EtherScope ma...

Страница 201: ...enabled on the switch for AutoTest to detect it successfully If the LLDP setting is enabled but your switch does not support LLDP negotiation will fail Requested Power W This setting appears if UPOE o...

Страница 202: ...to the selected class to mimic a Powered Device PD Tap the toggle button to enable the TruePower feature General Settings that Affect PoE See the Wired section in General Settings for descriptions of...

Страница 203: ...test your network against The default is Auto negotiation When speed is set to Auto EtherScope auto negotiates to the highest possible speed duplex supported by the link partner You can select a fixe...

Страница 204: ...he toggle field to enable wired 802 1X authentication in the current Profile Enabling this setting also enables an 802 1X test card on the Wired AutoTest results screen The following settings appear w...

Страница 205: ...type if needed The default is PEAP MSCHAP V2 Certificate This setting appears if one of the following EAP types is selected in the setting above EAP TLS PEAP TLS or TTLS EAP TLS See How to Import a C...

Страница 206: ...Alternate ID Enter an Alternate ID if necessary This is an Advanced Authentication setting Multi gigabit SNR Threshold When a Wired Profile links at speeds higher than 1 Gbps a table appears on the Li...

Страница 207: ...VLAN testing Enabling this setting also enables a VLAN test card on the Wired AutoTest results screen Once enabled VLAN ID and VLAN Priority fields appear Touch these fields to open a pop up number p...

Страница 208: ...DHCP DNS and Gateway Settings Settings for these tests operate the same in both Wired and Wi Fi profiles AutoTest App and Profiles 208...

Страница 209: ...d Wi Fi Test Targets Touch the Test Targets field to open the Test Targets screen and add custom Ping TCP Connect HTTP or FTP Tests to your AutoTest profile See Test Targets for Wired and Wi Fi Profil...

Страница 210: ...s you specify a proxy server through which the EtherScope establishes a network connection In AutoTest these settings are used when HTTP Proxy is enabled in an HTTP or FTP Test Target To use the proxy...

Страница 211: ...Back to Title and Contents Touch each field to open a pop up keyboard and enter the appropriate Address Port Username and Password Touch OK to save your entries AutoTest App and Profiles 211...

Страница 212: ...Wi Fi AutoTest Profiles A Wi Fi Profile runs a series of tests by connecting to a selected wireless network AutoTest App and Profiles 212...

Страница 213: ...est is not graded so the icon stays black Wi Fi Profiles do not run automatically Unlike the Wired Profile the factory default Wi Fi Profile cannot run until you have configured an SSID with the prope...

Страница 214: ...e top Status Bar Open and select the notification to open a web browser window where you can enter the required information for the captive portal Wi Fi Profile Specific AutoTests The tests that are s...

Страница 215: ...as EtherScope remains connected to the wireless network Link Connection Channel and AP Results are described next Skip to Wi Fi Profile Settings Skip to DHCP DNS and Gateway Tests Skip to Test Target...

Страница 216: ...Wi Fi Profile Test Results The image below shows a completed AutoTest Wi Fi Profile AutoTest App and Profiles 216...

Страница 217: ...tap the settings icon to go directly to the settings for the current test l On individual test screens touch blue under lined links to open a Wi Fi app Details screen showing the selected device or ID...

Страница 218: ...The rest of this topic describes the individual test cards and screens using the Wi Fi Profile results for the LRG SSID shown below AutoTest App and Profiles 218...

Страница 219: ...nnect to the configured network at your current location The Wi Fi Link card displays the SSID current signal strength dBm link speed Mbps and number of roams Refer to Wi Fi Connection Settings if nee...

Страница 220: ...Wi Fi Link Test Screen The Wi Fi Link test screen shows these results AutoTest App and Profiles 220...

Страница 221: ...AC address of the AP to which the Tester is connected depending on the information EtherScope can see about the AP This field shows the custom User Name if one has been entered See Assigning a Name an...

Страница 222: ...supporting the same SSID Multiple triggers may cause EtherScope to scan for another AP such as low signal strength or high retry rate Wi Fi Link Trending Graphs EtherScope s trending graphs operate s...

Страница 223: ...r up to 24 hours in the past if the unit stays linked The default time interval shown is 30 seconds Under each graph a legend table displays the Current Minimum Maximum and Average measurements The Cu...

Страница 224: ...tive meas urements When the EtherScope roams to a new AP each graph shows a red vertical line at the time the tester connected to the new AP as shown in the image above Signal dBm graph Plots the sign...

Страница 225: ...sured in decibels dB Utilization graph Plots percentage of the connected channel s capacity being used by 802 11 devices and by non 802 11 interference If the Combine Utilization setting is enabled in...

Страница 226: ...ckets that are retry packets l Retry Rate The AP s signal strength in dBm l Retry Pkts The number of retry packets seen in the current sample cycle l Total Pkts The total number of packets transmitted...

Страница 227: ...Plots the physical transmission rate The green horizontal dotted line indicates the AP s maximum TX rate Ping or TCP Connect Response Time graph This graph appears on the Link test screen if AutoTest...

Страница 228: ...reen The Ping TCP app opens with the Interface set to Wi Fi Port and Protocol set to Ping 2 Access and adjust the Ping TCP settings as desired 3 START the Ping or TCP Connect test 4 Touch back to go b...

Страница 229: ...CT LOG or run a Wi Fi packet CAPTURE on the connected channel and AP Connect Log The Connect Log shows the connection log including driver activity supplicant and the DHCP process The Connect Log can...

Страница 230: ...creen See Wi Fi Profile FAB below Channel Test Results The Channel card shows the channel on which the AP is operating and the current 802 11 and Non 802 11 utilization If the Combine Utilization sett...

Страница 231: ...ts screen indicates the Center Frequency and Frequency Range of the connected channel along with a real time Utilization graph Results The channel Utilization graph updates in real time for as long as...

Страница 232: ...ed by 802 11 devices and by non 802 11 interference l 802 11 Percentage of channel capacity being used by 802 11 devices l Non 802 11 Percentage of channel capacity being used by non 802 11 inter fere...

Страница 233: ...ntents Tap the blue links at the bottom of the channel test results to open the Wi Fi app s CHANNEL DETAILS or CHANNELS MAP screens or to run a Wi Fi packet CAPTURE on the connected channel AutoTest A...

Страница 234: ...is supporting The AP name or address shown is based on what the EtherScope is able to gather from the device and network If the AP has a custom user name that name is shown on the card and test scree...

Страница 235: ...e and SSID the AP test screen shows the following Device Name AP s name or address IP Address The AP s assigned IP address If none could be determined the field displays dashes MAC Address The AP s MA...

Страница 236: ...umber indicates the primary channel Type 802 11 type in use on the current link Supported Types 802 11 types that the BSSID supports If none could be determ ined the field displays dashes Client Assoc...

Страница 237: ...P address DHCP DNS and Gateway Results Results for these tests operate the same in both Wired and Wi Fi profiles See DHCP DNS and Gateway Tests for Wired and Wi Fi Target Tests See the Test Targets to...

Страница 238: ...creen where you can add Ping TCP Connect HTTP and FTP target tests to the current profile l Add Connection Log opens a Link Live sharing screen that allows you to custom name the log file before savin...

Страница 239: ...Touch the field to enter your desired log name and tap SAVE TO TEST RESULT to upload l Add Comments also opens a Link Live sharing screen where you can enter comments AutoTest App and Profiles 239...

Страница 240: ...VE TO LAST TEST RESULT to upload them l The Add Picture function lets you open the Gallery or Camera app to select or take a photo that is then uploaded and attached to your test result See the Link L...

Страница 241: ...any user added test targets To configure the profile settings touch the settings icon on the Wi Fi Profile screen or add a new Wi Fi Profile to AutoTest Touch the links below to skip to later section...

Страница 242: ...On the Wi Fi Profile settings screen touch each field described below as needed to configure the profile Changed settings are automatically applied AutoTest App and Profiles 242...

Страница 243: ...back button to return to the profile Name Touch the Name field to enter a custom name for the profile This name appears on the main AutoTest screen profile card and the Wi Fi profile screen header Wi...

Страница 244: ...discovered SSIDs If you do not enter a custom Name for the Profile the SSID is displayed as the Wi Fi Profile s name Authentication If you selected an SSID from the drop down list of discovered SSIDs...

Страница 245: ...ings depend on the Authentic ation type Enter all necessary credentials for the network security type such as Encryption Keys EAP type username certificate and or password WEP Key This setting appears...

Страница 246: ...EAP Type This setting appears if the Authentication type is WPA Enterprise or WPA2 Enterprise The default is PEAP MSCHAP V2 Touch to select a different EAP type if needed AutoTest App and Profiles 246...

Страница 247: ...P types is selected in the setting above EAP TLS PEAP TLS or TTLS EAP TLS Touch to open the Certificates screen This screen displays all the certificates that have been imported to AutoTest via the Wi...

Страница 248: ...FAB to import a new certificate file EtherScope nXG supports these certificate file extensions l pem l p12 l cer l crt The imported certificate feature is meant for client authentication and must inc...

Страница 249: ...ake the certificate file available on your EtherScope unit by saving it to a USB drive or Micro SD card inserted into your unit or by transferring to the file system using a USB C cable or email See M...

Страница 250: ...ertificate authentication set up the profile with the following 802 1X test settings a 802 1X Enabled b EAP Type EAP TLS PEAP TLS or TTLS EAP TLS 3 In AutoTest Wi Fi Connection or Wired Connection set...

Страница 251: ...4 Touch the floating action button FAB to open the Import Certificate dialog box AutoTest App and Profiles 251...

Страница 252: ...5 Touch Click to select beneath the Cer tificate field to open the Files app AutoTest App and Profiles 252...

Страница 253: ...ificate file is saved Touch the menu button to open the left side navigation drawer and access the storage devices In the image above the user is navigating to a USB flash drive 7 Navigate to the requ...

Страница 254: ...Import Certificate dialog displays the chosen certificate file 8 Enter the certificate s password if it is password protected 9 Touch IMPORT 10 If desired touch the fields to edit the Name and Descrip...

Страница 255: ...settings After running the AutoTest you can review the Connect Log from the Wi Fi Link Test screen or Wired 802 1X Test screen to verify or troubleshoot certificate authentication Username This field...

Страница 256: ...Advanced Wi Fi Connection Settings BSSID Enter or select a specific BSSID for the Wi Fi Profile to prevent the EtherScope from roaming to a new AP while linked AutoTest App and Profiles 256...

Страница 257: ...bands in General Settings Roam Threshold This threshold controls the Signal Strength in dBm at which EtherScope disconnects from the linked AP and attempts to connect to another AP on the network wit...

Страница 258: ...Touch each field to select a new value or enter a custom one Each threshold also has a toggle button that allows you to disable grading based on that measurement entirely AutoTest App and Profiles 258...

Страница 259: ...ercentage of total transmitted frames Transmit Rate TX Thresholds Measured rate as a percentage of the AP s maximum throughput rate Alternate ID Enter an Alternate ID if necessary This is an Advanced...

Страница 260: ...setting is enabled in General Settings only a single combined Utilization Threshold setting appears 802 11 Utilization Threshold This threshold controls the Success Warning Fail gradings for the Auto...

Страница 261: ...Threshold This threshold controls the Success Warning Fail gradings for the percentage of the connected channel s capacity being used by non 802 11 interference l Touch the toggle button to enable or...

Страница 262: ...EtherScope establishes a network connection In AutoTest these settings are used when HTTP Proxy is enabled in an HTTP or FTP Test Target To use the proxy settings with a web browser run the Profile a...

Страница 263: ...Back to Title and Contents Touch each field to open a pop up keyboard and enter the appropriate Address Port Username and Password Touch OK to save your entries AutoTest App and Profiles 263...

Страница 264: ...lds are the same for each Profile type Access AutoTest s DHCP DNS and Gateway settings from either the Wired or Wi Fi Profile settings screens or by touching the settings button from the full results...

Страница 265: ...ion Access the DHCP test settings from the Wired or Wi Fi Profile settings or by tapping the settings button on the DHCP test results screen By default DHCP is enabled Open IP Con figuration to adjust...

Страница 266: ...Threshold This field only appears if DHCP is enabled The Response Time Threshold controls how long the EtherScope waits for a DHCP server response before failing the Link and DHCP tests Static IP Addr...

Страница 267: ...ter the static addresses as needed Touch OK to save your entries DHCP Test Results When DHCP is enabled the DHCP test card and results screen are displayed in the Profile The DHCP Test card displays t...

Страница 268: ...P Test Results Screen Device Name The discovered name of the Switch Wired or AP Wi Fi or if no name could be discovered the IP address IPv4 Address IP address of the server AutoTest App and Profiles 2...

Страница 269: ...on the DHCP or Static IP cards Results Offered IP address offered by the DHCP server Accepted IP address accepted by the Ether Scope Subnet Mask IP address of the subnet where EtherScope is testing Su...

Страница 270: ...shows its IP address The relay agent relays DHCP messages between DHCP clients and DHCP servers on different IP networks End User Response Time table and chart Breakdown of the times for the process...

Страница 271: ...time consumed by the DHCP process Threshold The DHCP Response Time Threshold from the DHCP test settings which controls how long the EtherScope waits for a DHCP server response before failing the DHCP...

Страница 272: ...the DHCP server address browsing to the IPv4 address in the web browser starting a Telnet or SSH session or viewing the Connect Log Static IP Test Results If DHCP is disabled the DHCP test becomes a S...

Страница 273: ...e Static IP card displays the configured IP and Subnet addresses Touch the card to open the test results screen The Static IP test screen displays the configured addresses AutoTest App and Profiles 27...

Страница 274: ...NS 1 and 2 Names and IP addresses of Primary and Secondary DNS servers IPv6 Addresses Addresses obtained via router advertisement Results Codes Final status of the test Success or Failure Duplicate IP...

Страница 275: ...By Shows the name of the device currently using the configured static IP address Touch the blue underlined link to open a Discovery Details screen for the device MAC Address MAC of the device using t...

Страница 276: ...Gateway Tests The DNS Domain Name System server test checks the performance of DNS servers resolving the specified URL The EtherScope obtains DNS addresses through DHCP or static address configuratio...

Страница 277: ...gs are hidden Lookup Name This is the URL the DNS server s will attempt to resolve Touch the field to enter a URL other than the default www google com IP Protocol Version Touch the field to switch be...

Страница 278: ...DNS Test Results The server name and lookup time for DNS 1 are shown on the DNS test card Touch the card to open the DNS test results screen DNS Test Results Screen AutoTest App and Profiles 278...

Страница 279: ...ld from the DNS test settings DNS Name of the listed DNS server Lookup IP Resolved IP address Lookup Time Time to receive the IP address after the lookup request sent Results Codes Final status of the...

Страница 280: ...he blue action overflow icon at the bottom of the test results screens to run the DNS Test Again open another app populated with the name and IP address of DNS 1 or Browse to the Primary DNS server in...

Страница 281: ...f the current IPv4 and IPv6 routers Gateway Test Settings Gateway Test If desired you can tap the top field on the Gateway Test screen and switch the toggle to disable the Gateway test in your current...

Страница 282: ...he value options or enter a custom value Gateway Test Results EtherScope gets the Gateway s IP address from DHCP or the static IP configuration and uses SNMP to acquire system group information and st...

Страница 283: ...est Results Screen IPv4 Gateway Name Resolved hostname of the Gateway server or IP address if no name could be discovered IPv4 Address Internal IPv4 address of the Gateway server AutoTest App and Prof...

Страница 284: ...sed by the IPv6 router if available Protocols Routing protocols the EtherScope used to obtain the Gateway data Ping Results l Response Times from the three Pings sent to the gateway l Threshold Gatewa...

Страница 285: ...nks or the blue action overflow icon at the bottom of the test results screens to run the Gateway TEST AGAIN open another app Browse to the Gateway s IPv4 Address or start a Telnet or SSH session to t...

Страница 286: ...ts to which EtherScope nXG attempts to connect each time the AutoTest profile runs These tests ensure availability of internal or external websites servers and devices to users of your network Tap a l...

Страница 287: ...Fi Profile Settings or by touching the FAB on the Wired or Wi Fi Profile results screens The Test Targets screen lists all of the defined and saved Test Targets Checked boxes indicate the Test Target...

Страница 288: ...ou can perform these actions l Select the checkboxes for each Target you want to include in the current Wired or Wi Fi profile l Tap the up and down arrows to reorder the saved Test Targets on this Au...

Страница 289: ...o Duplicate or Delete a target test CAUTION When you delete a Test Target you delete it from all Profiles To remove a Test Target from the current profile simply uncheck it l Touch the FAB icon to add...

Страница 290: ...l Touch any target s name or add a new target to open the test s settings where you can enter a custom test name target address and thresholds AutoTest App and Profiles 290...

Страница 291: ...portions Success Warning Fail As an example in the Ping test image below the entire Ping test is graded with a Warning because the third Ping was not returned within the Timeout Threshold configured...

Страница 292: ...additional actions including opening other testing apps l Touch the blue linked Device Name to open a Discovery Details app screen for the selected device From there you can open other apps and run a...

Страница 293: ...re populated for example Open the Ping TCP app with the current target address Run a packet Capture on traffic from the test target Browse to the target URL on the internet with your web browser app A...

Страница 294: ...determine whether the server or client can be reached and how long it takes to respond The AutoTest Target Ping Test sends three Pings to the target and reports the response times The target can be an...

Страница 295: ...field allows you to assign a custom name to the test The name appears on the target test card in the profile Device Name Enter the IP address or URL of the server you want to ping If you enter an IP A...

Страница 296: ...header sent Valid sizes are 64 bytes to 1518 bytes To test the Maximum Transmission Unit MTU along a route to a target select the MTU frame size you want to test and set Do Not Fragment to Enabled Do...

Страница 297: ...ings and the three Ping response times from the target Touch the card to open the Ping results screen AutoTest Ping Results Screen Device Name Hostname or address of the target device l IPv4 or IPv6 A...

Страница 298: ...k to resolve the URL into an IP address l Response Times How long it took for the EtherScope to receive a response from the target after sending each of the three Pings l Threshold The Timeout Thresho...

Страница 299: ...ction overflow icon at the bottom of the test results screens to run the Ping TEST AGAIN open another testing app Browse to the Ping target address in your web browser or start a Telnet or SSH session...

Страница 300: ...onnection with the selected target to test for port avail ability using a 3 way handshake SYN SYN ACK ACK The AutoTest Target TCP Connect test runs three connection tests and reports the response time...

Страница 301: ...ion IPv4 is used by default Touch the field to switch between IPv4 and IPv6 Port Specify the TCP port number EtherScope will use to connect to the target Timeout Threshold This threshold controls how...

Страница 302: ...e Name DNS name of the device tested IPv4 or IPv6 Address IP address of the target device MAC Address Device s MAC address The two dashes indicate that no MAC address was provided Port Port number tes...

Страница 303: ...sponse Times How long it took for the EtherScope to receive a response from the server for each of the three connect tests Threshold The Timeout Threshold indicated in the test s settings Results Code...

Страница 304: ...EURT measurement when downloading the specified web page The target can be an IPv4 address IPv6 address or URL HTTP Test Settings HTTP settings allow test grading criteria based on responses and retu...

Страница 305: ...Name This field allows you to assign a custom name to the test The name appears on the target test card in the profile AutoTest App and Profiles 305...

Страница 306: ...le button to permit web redirects when trying to connect to the target Response Time Threshold This threshold controls how long the EtherScope waits for a response from the URL before failing the test...

Страница 307: ...ver or URL To construct a text string enter a word or several words with exact spacing When specifying several words they must appear consecutively at the source The test passes if the text string is...

Страница 308: ...de set here functions as pass fail test criteria The default is OK HTTP 200 Touch the field to select a different Return Code from the list If your selected Return Code value matches the actual return...

Страница 309: ...HTTP Test Results The HTTP card shows the test name entered in the test settings and response time from the target AutoTest App and Profiles 309...

Страница 310: ...HTTP Test Results Screen Device Name DNS name of the server tested IPv4 or IPv6 Address IP address of the server AutoTest App and Profiles 310...

Страница 311: ...played for the ping test results Ping results do not affect the Pass Fail status of the test DNS Lookup Amount of time it took to resolve the URL to an IP address If you enter an IP address DNS lookup...

Страница 312: ...test will fail If the Response Time Threshold is exceeded during a step in the test the current phase of the test DNS Lookup TCP Connect Data Start or Data Transfer is denoted with a red dot and the r...

Страница 313: ...times for each phase of the test DNS Lookup TCP Connect Data Start and Data Transfer Results Codes Final status of the test Success or Failure The HTTP test also shows the Return Code from the websit...

Страница 314: ...GAIN open another testing app or Browse to the target address in your web browser Captive Portal Connections The HTTP test supports connections through a network with a captive portal requirement When...

Страница 315: ...ass you must select the notification and enter the required credentials on the portal website Otherwise the HTTP test will fail with a Result Code of Captive portal detected 25 See the Captive Portal...

Страница 316: ...Back to Title and Contents When finished in the captive portal browser window hit the back button to return to the HTTP test and touch TEST AGAIN to receive valid results AutoTest App and Profiles 316...

Страница 317: ...ver and network performance The target can be an IPv4 address IPv6 address or URL The results provide a complete breakdown of the overall file transfer time into its component parts FTP Test Settings...

Страница 318: ...Name This field allows you to assign a custom name to the test The name appears on the target test card in the profile AutoTest App and Profiles 318...

Страница 319: ...ame of the file that is downloaded from Get or uploaded to Put the server based on the Direction setting below Touch the field to enter the file path and name File Transfer Size This setting lets you...

Страница 320: ...switch between a Get download the File from the server or Put upload the File to the server test l If Direction is set to Get the file is retrieved and the size and data rate are cal culated This dat...

Страница 321: ...se from the FTP server before failing the test Touch the field to change the value Username and Password Enter these credentials to access the target server you specified Enter anonymous as the userna...

Страница 322: ...the server address and port specified in the main profile settings See Wired Profile Settings or Wi Fi Profile Settings FTP Test Results The FTP card shows the test name entered in the test settings a...

Страница 323: ...FTP Test Results Screen Device Name Hostname of the server tested IPv4 or IPv6 Address IP address of the server AutoTest App and Profiles 323...

Страница 324: ...FTP test finishes before the ICMP echo reply packet arrives dashes are displayed for the ping test results Ping results do not affect the Pass Fail status of the test DNS Lookup Amount of time it took...

Страница 325: ...me Threshold in the settings the test will fail If the Response Time Threshold is exceeded during a step in the test the current phase of the test DNS Lookup TCP Connect Data Start or Data Transfer is...

Страница 326: ...Transfer Results Codes Final status of the test Success or Failure The FTP test also shows the Return Code from the server Touch blue links or the blue action overflow icon at the bottom of the test r...

Страница 327: ...ation and interference Each table on the Air Quality results screen shows the top four channels in each band with the highest utilization or co channel inter ference along with the number of APs opera...

Страница 328: ...EtherScope scans the 2 4 GHz band and displays results and then does the same for the 5 GHz band Channel usage depends on the number of clients connected to the network and the AutoTest App and Profil...

Страница 329: ...gh utilization or interference can affect network performance Air Quality Profile Results The image below shows a completed Air Quality Profile test with two Warnings and two Failures indicated by the...

Страница 330: ...s are based on the Thresholds configured in the Profile s settings In the case shown here the Warnings and Failures occurred because of high Utilization and Co channel Interference caused by the AutoT...

Страница 331: ...Non 802 11 Utilization Percentage of the displayed channel s capacity being used by non 802 11 interferers which may be non WLAN sources If the Combine Utilization setting is enabled in General Settin...

Страница 332: ...Two dashes indicate that no Utilization was detected on the Channels shown Co channel Interference Interference caused by multiple APs operating on the same channel AutoTest App and Profiles 332...

Страница 333: ...ults Codes Final status of the test Success or Failure Tap the blue link at the bottom of the Air Quality Profile screen to open the Wi Fi app s CHANNELS MAP which provides real time visual results of...

Страница 334: ...The settings for Air Quality are thresholds for grading the channel utilization and inter ference AutoTest App and Profiles 334...

Страница 335: ...the Air Quality profile screen header Thresholds Use the threshold controls to adjust the values that determine Warning Fail results for the cor responding utilization and co channel inter ference mea...

Страница 336: ...percentages of a channel s capacity Co channel interference measurements and thresholds are the number of APs operating on the same channel Co channel Interference AP Signal Level This setting designa...

Страница 337: ...urements Touch the field to select a new value or enter a custom one AutoTest App and Profiles 337...

Страница 338: ...server or client can be reached and how long it takes to respond A TCP Connect test opens a TCP connection with the selected target to test for port availability using a 3 way handshake SYN SYN ACK A...

Страница 339: ...P Connect from another testing app s device screen Populating Ping TCP from Another App When you open the Ping TCP app from another app the address is pre populated as the Ping or TCP target device Fo...

Страница 340: ...If the Ping TCP app is opened from this screen the IPv4 address from the Discovery app is already configured as the Ping TCP target Ping TCP Test App 340...

Страница 341: ...Ping TCP Test App 341...

Страница 342: ...Configuring Ping TCP Settings Manually To configure the target and settings manually open the app s settings Ping TCP Test App 342...

Страница 343: ...r explan ations of the different ports Number of Tests Touch to select the number of Ping or TCP connect tests you want to run The default setting of Continuous keeps running tests until you touch the...

Страница 344: ...are sent once every second 1 s Tap a radio button to select a different interval or enter a Custom Value between 100 and 10 000 milliseconds Port This setting only appears if the TCP Connect Protocol...

Страница 345: ...ack to Title and Contents Do Not Fragment This setting only appears if the Ping Protocol is selected Touch the toggle button to enable See the Frame Size setting description above Ping TCP Test App 34...

Страница 346: ...connected See Connection Noti fications for descriptions of the connection status icons and select the appropriate Interface or Any Port from the Ping TCP settings The default target is google com Ope...

Страница 347: ...Device Name Hostname or address of the target device IPv4 or IPv6 Address IP address of the target device Ping TCP Test App 347...

Страница 348: ...running Results l Started Time the test started l Status Most recent test status l Sent Number of Pings or TCP SYN packets sent to the target l Received Number of Ping or TCP SYN ACK packets returned...

Страница 349: ...ove the slider See the Trending Graphs topic for an overview of the graph controls Response Table display of the Current Minimum Maximum and Average response time measurements Limit The Timeout Thresh...

Страница 350: ...problems debug client server communications track applications and content ensure that users are adhering to administration policies and verify network security On EtherScope the capture process uses...

Страница 351: ...e only packets to and from a particular AP or client When you open Capture from Home and do not configure any filters all packets from the switch or channel are captured The default Wired capture save...

Страница 352: ...For example the floating action menu on the Wi Fi app s BSSID Details screen below contains the option to start a Wi Fi Capture Capture App 352...

Страница 353: ...with the BSSID Channel and Channel Width from the Wi Fi app The Capture settings are saved until you clear the filters or open the app with new filters applied Touch the settings icon in the Capture s...

Страница 354: ...for the capture file The default size is 1 MB and largest size allowed is 1000 MB The capture stops when the captured file reaches this size When capture is running the capture screen displays the cur...

Страница 355: ...to select either the Wired or Wi Fi test port Wired Filters All filters are disabled by default unless you open Capture from another app Touch the fields below to enable and enter filter values MAC En...

Страница 356: ...10 250 0 70 on Port 80 and you enable NOT all traffic will be captured except traffic to and from 10 250 0 70 on port 80 Wi Fi Filters Channel Tap the channel button to set the channel on which packe...

Страница 357: ...Back to Title and Contents default Tap the toggle button for each frame type to disable its capture Capture App 357...

Страница 358: ...r Wi Fi The image above indicates that the app will only capture traffic for IP 10 200 72 19 View the real time status of the capture as it is running If you navigate away from the Capture app the cap...

Страница 359: ...which initiates scanning or connect to a Wi Fi network using AutoTest Tap STOP to stop the running capture before it reaches the File Size Limit Capture App 359...

Страница 360: ...g By default wired captures include Unicast Broadcast and Multicast packet types To pan and zoom on the graphs you can swipe double tap and move the slider See the Trending Graphs topic for an overvie...

Страница 361: ...In this image the app has captured all three Wi Fi Frame Types on channel 6 with the BSSID shown The Total measurements in the table below the graph represent all frames seen Capture App 361...

Страница 362: ...ile the Captured frames are those that fall within the filter parameters Once a capture is completed the Save Capture dialog appears automatically Tap the Save icon to reopen this dialog Capture App 3...

Страница 363: ...vice or chose a different folder by touching the Save to field See also Managing Files Save to Link Live You can also upload capture files to Link Live and then download them for analysis on a PC Capt...

Страница 364: ...ou to identify and analyze network devices and acts as a jumping off point for further analysis using other apps such as Wi Fi Path Analysis and connection tests Devices are discovered in the local br...

Страница 365: ...process and app screens work shows examples of Discovery data and details the Discovery settings Introduction to Discovery Main Discovery List Screen Discovery Details Screens Device Types Discovery...

Страница 366: ...NMP Data l Network Problems l Interface Details and Statistics Devices are discovered via ARP and Ping sweeps SNMP DNS mDNS and netBIOS queries and passive traffic monitoring Discovery classifies each...

Страница 367: ...s Discovery notification icons indicate the progress of active discovery This icon indicates that no links are currently available for active discovery either because none of the ports enabled for dis...

Страница 368: ...Main Discovery List Screen The main Discovery screen lists all the devices the EtherScope has discovered Discovery App 368...

Страница 369: ...a warning or failure and Green to indicate that a previous Problem has been resolved See the Problem Settings to adjust enabled Problems and thresholds The Discovery screen and other app screens with...

Страница 370: ...navigation drawer to configure settings and touch a device s card to view its details Discovery App 370...

Страница 371: ...to discover The lower left field displays the characteristic by which the Discovery list is currently sorted In the image above the list is sorted by MAC address See Discovery Sorts in this topic for...

Страница 372: ...the screen to search discovered devices Discovery App 372...

Страница 373: ...ear the top left of the main Discovery screen to set filters that control which devices are displayed in the list The Filters screen displays the number of devices or domains discovered for each categ...

Страница 374: ...oxes The main Discovery screen will show only those devices or IDs that fall under your chosen filter parameters When filters are selected those active filters are displayed at the top of the Filters...

Страница 375: ...screen is also filtered for that characteristic For example in the image above the user has selected the Network Tools device type As a result only those subnets addresses Wi Fi bands etc with a disc...

Страница 376: ...152 filtered devices out of 1308 total The number of active filters displays to the left of the filter icon 3 active filters in the image above Sorting the Discovery List Tap the Sort bar or down arro...

Страница 377: ...Select a Sort option to order the devices based on your selected characteristic Discovery App 377...

Страница 378: ...SSID are sorted together Individual devices on the same SSID are sorted numerically and alpha betically Tap the sort order icon to switch the sort order between normal and reverse order Devices are so...

Страница 379: ...the top right of the main Discovery screen and select Refresh Discovery to refresh the active Discovery process REFRESH DISCOVERY restarts the active discovery process without clearing the already dis...

Страница 380: ...esults to Link Live Touch the action overflow icon at the top right of the main Discovery screen and select Upload to Link Live to send the current Discovery results to the Analysis page on Link Live...

Страница 381: ...Back to Title and Contents See the Link Live chapter for more information Discovery App 381...

Страница 382: ...elow calls out a Router card and its Details screen The available data and actions on the Details screens vary significantly depending on the device type connections and data the EtherScope was able t...

Страница 383: ...For the Switch screen shown above Discovery was able to find an IP address but not a name for the switch Discovery App 383...

Страница 384: ...by the EtherScope and counts for other connected or corresponding network elements See Device Types for specifics about the different devices the EtherScope can discover Top Details Card The top card...

Страница 385: ...en card depend on the device type and what the EtherScope can discover about the device On the Discovery Details screens you can touch any blue linked name or address to open a Discovery or Wi Fi Anal...

Страница 386: ...n image above opens the Wi Fi app s AP Details screen where you can view the other wireless attributes associated with the Lightweight AP The Nearest Switch and Wi Fi Controller links open a Discovery...

Страница 387: ...hine names as discovered Address Discovered IPv4 IPv6 BSSID and or MAC addresses of the device This section displays the default first discovered addresses of each type For more addresses select the A...

Страница 388: ...es Network services provided by this device such as DHCP or DNS Attributes Other discovered attributes about the device Wi Fi Controller Name and address of the Wi Fi Controller for a Lightweight AP A...

Страница 389: ...ntents Guest OS Operating system running on the virtual machine Memory Reservation Amount of memory reserved for the virtual machine Last Seen Time at which EtherScope most recently detected the devic...

Страница 390: ...cards on a Device Details screen to view more discovered characteristics and drill down to specific Problems Addresses Interfaces etc for the selected device Screens with a list such as Addresses sho...

Страница 391: ...examples of each type of Details screen and options for additional analysis Remember you can touch any card with a right pointing arrow to open a new screen with more information about the device or c...

Страница 392: ...of detected Warning Failure or Error Information and Resolved conditions for the device or network component Tap the Problems card to view the Problems list screen unless only 1 Problem is detected i...

Страница 393: ...the Problems list screen touch a Problem s row to read a detailed description Touch the action overflow button at the top right of the Problem list or description screen to Clear Problems See Problem...

Страница 394: ...d related information From the Addresses list screen you can sort the list order and tap any of the discovered addresses to investigate the address further TCP Port Scan If you have run a TCP Port Sca...

Страница 395: ...card lists open port numbers and shows the total quantity of open ports Tap the card to open the TCP Port Scan screen You can also open this screen from the Discovery floating action menu Discovery Ap...

Страница 396: ...The top of the TCP Port Scan results screen shows the name or IP address of the tested device and the following fields IP address IP address of the device that was scanned Discovery App 396...

Страница 397: ...nt status of the port scan Port Description List of all the detected open ports with their descriptions See also TCP Port Scan Settings VLANs The VLANs card displays the VLAN IDs this device is using...

Страница 398: ...n also shows the description with each VLAN ID Interfaces Interface are discovered using SNMP The Interfaces card shows the number of Up and Down interfaces and the total number of Interfaces to the r...

Страница 399: ...s list provides a number of Sort options and the selected sort option affects the type of information displayed The image above shows Interfaces sorted by Status up or down The image below shows Inter...

Страница 400: ...Touching an Interface row opens a new Discovery Details screen for the selected Interface Discovery App 400...

Страница 401: ...een contains a description of the interface and information about its Status Connected Device and Port and Address MTU Maximum Transmission Unit the maximum packet frame size configured on the interfa...

Страница 402: ...From this screen you can touch the lower cards to review any discovery VLANs and Devices for the Interface as well as graphs of the Interface Statistics Discovery App 402...

Страница 403: ...nding graphs of Utilization Packet Discards Packet Errors See the Trending Graphs topic for an overview of the graphs pan and zoom controls Below the trending graphs are pie charts of Packet transfers...

Страница 404: ...SNMP This card shows device details gathered via SNMP and SNMP connectivity to the device The SNMP card displays the SNMP Uptime Touch the card for SNMP Details Discovery App 404...

Страница 405: ...ta fields are gathered from the system group and other key device version information SNMP SNMP versions the device supports Engine ID for v3 and how the EtherScope is currently communicating with the...

Страница 406: ...While the EtherScope may be unable to directly identify the connected switch the devices connected to it provide clues about where the switch is operating The Connected Devices card shows the number...

Страница 407: ...esources card shows the percentages of CPU memory and storage usage on the device This information is gathered via SNMP Touch the card to view current and maximum resource utilization measurements Dis...

Страница 408: ...em detection and thresholds in the Wired Problem Settings accessed from the Discovery navigation drawer SSIDs The SSIDs card appears in the Details for Wi Fi Controllers This information is gathered v...

Страница 409: ...On the SSIDs screen each SSID is shown with its Security type s and any VLANs SSIDs with a checkmark to the left are enabled and those with an are disabled Discovery App 409...

Страница 410: ...e device type and connection available Opening other NetAlly apps such as Path Analysis Ping TCP or Capture from a Details screen will auto populate the new app with the device s name and or address I...

Страница 411: ...ation opens a dialog where you can assign a custom user name and Authorization status See Assigning a Name and Authorization to a Device in the Wi Fi chapter Auto Populating Device Addresses When anot...

Страница 412: ...hen a user opens the FAB and selects a different app such as Path Analysis only the address and name listed at the top of the Details screen will be populated in the Path Analysis app Discovery App 41...

Страница 413: ...Discovery App 413...

Страница 414: ...Back to Title and Contents To open another screen or app with a different address open the Addresses card and select another address to view its Details screen Discovery App 414...

Страница 415: ...type how it was discovered and your configured settings See Discovery Settings for SNMP Configuration and Devices Discovered Through Other Devices options For descriptions of the different Details ca...

Страница 416: ...Routers EtherScope discovers IP routers by monitoring traffic and querying hosts Discovery App 416...

Страница 417: ...Switches Switches are also discovered by monitoring traffic and querying hosts Discovery App 417...

Страница 418: ...witch is active on the network via the device MAC addresses in that space Unknown Switches are numbered by the EtherScope as they are discovered These numbers may change the next time the discovery pr...

Страница 419: ...card The connected devices provide clues about where the unknown switch may be located Discovery App 419...

Страница 420: ...Network Servers Network servers include NetBIOS DHCP and DNS servers Discovery App 420...

Страница 421: ...Hypervisors VMware hypervisors are discovered via SNMP The hypervisor s SNMP agent must be enabled for the EtherScope to discover it and classify it as a hypervisor Discovery App 421...

Страница 422: ...ual Machines VMware virtual machines are discovered from VMware client table in SNMP enabled VMware hypervisors Devices are also classified as Virtual Machines if they have a VMware MAC Discovery App...

Страница 423: ...Discovery App 423...

Страница 424: ...Wi Fi Controllers EtherScope can discover SNMP enabled Wi Fi controllers including Cisco and Aruba Wi Fi Controllers Discovery App 424...

Страница 425: ...Title and Contents Access Points APs The EtherScope discovers APs through wireless packet analysis and SNMP queries via the wired side of the network See also APs in the Wi Fi analysis app Discovery...

Страница 426: ...Wi Fi Clients Wireless clients are discovered through wireless packet analysis and SNMP queries through the wired side of the network See also Clients in the Wi Fi analysis app Discovery App 426...

Страница 427: ...VoIP Phones VoIP discovery provides visibility into the VoIP and layer 2 3 configuration of the network Discovery App 427...

Страница 428: ...Printers The EtherScope identifies IP printers via the SNMP Printer MIB and IPX printers via diagnostic requests and queries Discovery App 428...

Страница 429: ...es See SNMP Configuration NOTE If EtherScope cannot discover the SNMP agents on your devices they may be connected to another subnet like a man agement subnet Solve this issue by adding the subnet to...

Страница 430: ...identify other NetAlly network testers including EtherScope nXGs AirCheck G2s OneTouches LinkRunners AT and G2 and Test Accessories The image above shows several NetAlly tools as they appear in the m...

Страница 431: ...on the Details screen Hosts Clients Other hosts and clients are discovered by traffic monitoring and querying If a host cannot be identified as belonging to one of the other categories Switch Router V...

Страница 432: ...Back to Title and Contents Discovery App 432...

Страница 433: ...are used Credential Sets Ports Extended Ranges and process intervals Access the Discovery settings screen by sliding out the left side navigation drawer or tapping the menu icon and selecting Discove...

Страница 434: ...To adjust Discovery Settings 1 On the Discovery Settings screen touch each field described in this topic as needed to select or enter your required configuration elements Discovery App 434...

Страница 435: ...very settings by touching the save button on this screen l Load opens a previously saved Discovery configuration l Save As saves the current configuration with an existing name or a new custom name l...

Страница 436: ...Discovery Settings screen title SNMP Configuration The MIB Management Information Base of SNMP managed devices contains information such as device configuration interface con figuration and statistic...

Страница 437: ...ings and credential sets the EtherScope uses to communicate with those devices SNMPv1 v2 Touch the toggle button to enable or disable SNMPv1 and v2 queries This setting is enabled by default and uses...

Страница 438: ...der shown on this screen If it does not receive a response from the queried device using one string it sends the next string NOTE This screen and others in the Discovery settings operate much like the...

Страница 439: ...overflow icon to Duplicate or Delete a Community String CAUTION When you delete a string you delete it from all saved Discovery con figurations To remove a string from those used by the current Disco...

Страница 440: ...g is enabled by default and uses the Credentials configured in the next setting NOTE If this setting is enabled but no SNMPv3 credentials are configured the EtherScope will discover the engine IDs of...

Страница 441: ...Strings screen above EtherScope uses the Credentials in the order shown l Check or uncheck the boxes to include or exclude a set of Credentials from use in the current Discovery configuration l Touch...

Страница 442: ...he FAB to add new credentials On the Credentials Sets screen tap each field to select or enter the credentials required Name Touch the Name field to enter a custom name for the Credential Set Discover...

Страница 443: ...e Discovery supports two SNMPv3 Authorization types HMAC SHA and HMAC MD5 If Authorization is required enter the appropriate password Privacy Type and Password EtherScope Discovery supports four Priva...

Страница 444: ...tive Discovery Ports Touch Active Discovery Ports to select the port Discovery uses to gather data Discovery only runs through the enabled ports if an active network link is available Discovery App 44...

Страница 445: ...rts An AutoTest Wired or Wi Fi Profile must run to establish test port links The last listed Wired Profile runs automatically when you start up the Ether Scope if a connection is available See also Te...

Страница 446: ...PC s and servers subnet additional networks must be configured for discovery l The network address of the remote subnet you want to discover meaning the host PC and server network l The network addres...

Страница 447: ...d range from the current Discovery configuration Unchecked Extended Ranges do not affect the default Discovery behavior in the current con figuration but they may be used in other Discovery configurat...

Страница 448: ...ts For each configured Extended Range you can tap the toggle button to switch from Active to Restricted Discovery is performed on Active Ranges Setting a Range to Restricted disables the discovery pro...

Страница 449: ...figured Active Extended Range l You can also restrict a single device whether it is part of an Active Range or not To enter a single device that you do not want discovered enter its IP address in the...

Страница 450: ...ion Subnet Mask Touch this field to select a subnet mask If you select an already Discovered Subnet the Subnet Mask is also pre populated Devices Discovered Through Other Devices By default EtherScope...

Страница 451: ...Subnets checkbox is enabled any discovered routers are included in discovery results In addition if Discovery has SNMP access to a discovered router its routing tables are read and the next hop router...

Страница 452: ...ite has routers you want to discover using this process but there isn t a local next hop link from this site you can add one of the routers of that site to discovery and the process will run from that...

Страница 453: ...es VoIP Devices When the VoIP Devices checkbox is enabled discovery will add any VoIP devices that it finds in SNMP tables of other devices regardless of the subnet These are usually found in the LLDP...

Страница 454: ...is app because Wi Fi analysis only shows what it detects on wirelessly transmitted packets Virtual Machines When the Virtual Machines checkbox is enabled discovery adds any virtual machines that it fi...

Страница 455: ...rval This setting controls the time between runs of the Discovery process By default Discovery runs every 90 minutes Touch the Refresh Interval field to select a different interval up to 8 hours Disco...

Страница 456: ...c Discovery and the process will only refresh if you select Refresh Discovery from the main Discovery list screen Device Health Interval Discovery automatically runs a set of network health tests to s...

Страница 457: ...l is the minimum time between each run of the Device Health tests Touch the field to disable Device Health testing or to change the interval from the default of 10 minutes to 30 or 60 minutes Disablin...

Страница 458: ...Touch the ARP Sweep Rate field to select a rate between 5 and 100 ARP requests per second This setting can prevent the EtherScope from shutting down ports that sense too many ARPs are being sent Disc...

Страница 459: ...se CPU spikes in the SNMP agents including the ARP cache IP address table routing tables and FDB tables The default SNMP Query delay is No Delay When querying the key large tables the EtherScope asks...

Страница 460: ...t APs are being grouped together inaccurately you can disable the rule that is causing the grouping If your AP manufacturer uses a BSSID variation scheme that is not covered by one of the six default...

Страница 461: ...As with other settings list screens on the EtherScope you can enable or disable add delete and edit the grouping rules from this screen Discovery App 461...

Страница 462: ...e action overflow icon to Duplicate or Delete a rule CAUTION When you delete a rule you delete it from all saved Discovery con figurations To remove a rule from those used by the current Discovery con...

Страница 463: ...efault Prefix filter of 000000 000000 If a Prefix filter is non zero its second and third bytes are compared to discovered BSSIDs before the Filter mask described below is applied These two bytes must...

Страница 464: ...mask specifies what parts of the BSSIDs are compared when determining AP groupings For example default Grouping Rule 1 has a Filter mask of FFFFFF FFFFC0 so any BSSIDs that vary only by the lower six...

Страница 465: ...Discovery and Wi Fi Analysis apps as well as the thresholds for enabled problems such as Packet Discards and Utilization Access the Problem Settings screen by sliding out the left side navigation dra...

Страница 466: ...and displayed in the Wi Fi Analysis app As with Discovery Settings you can save load import and export configured Problem Settings by touching the save button on this screen See Managing Testing App S...

Страница 467: ...All Problem types are enabled by default Tap the toggle button to the right to disable each one Discovery App 467...

Страница 468: ...f each Problem to read a detailed description and recommended actions Red icons indicate Failure conditions and yellow indicate Warning conditions Blue icons are simply inform ational When you finish...

Страница 469: ...om the Discovery Details screen s FAB The EtherScope scans many ports simultaneously and reports the open port s numbers Access the TCP Port Scan Settings by sliding out the left side navigation drawe...

Страница 470: ...Port Wired or Wi Fi Test Port or Wired or Wi Fi Management Port See Test and Management Ports for explanations of the different ports Scan List This setting contains the port numbers that are tested...

Страница 471: ...a response from each port Once all the ports in the Scan List have had this amount of time to respond the scan ends and the TCP Port Scan results screen lists the ports that responded within the thre...

Страница 472: ...power on the EtherScope and measurements update with each channel scan cycle The EtherScope nXG supports 802 11a b g n ac technologies and operates in both the 2 4 GHz and 5 GHz bands EtherScope v1 0...

Страница 473: ...teristics of the different devices and elements of your wireless environment Tap a link below to go directly to the description of the screen listed l Channels Map Utilization or Overlap l Channels l...

Страница 474: ...is enhanced with data gathered by Discovery When the EtherScope is linked to a network through any of the other three ports Wi Fi Management Wired Test or Wired Management Discovery can obtain informa...

Страница 475: ...Wi Fi App List Screens To switch between the different Wi Fi app screens tap the menu icon or swipe right to open the left side navigation drawer Wi Fi Analysis App 475...

Страница 476: ...opulate the Wi Fi screens See the General Settings topic for more explan ation Wi Fi App List Screens The Wi Fi app screens except for Channels Map display a list of discovered items much like a Disco...

Страница 477: ...or Failure condition The app also displays icons in Blue to indicate Problem related information that does not constitute a warning or failure and Green to indicate that a previous Problem has been r...

Страница 478: ...Touch and drag the scrollbar handle to the right of the list to scroll quickly up and down Wi Fi List Cards The information displayed on each card varies depending on the selected Sort characteristic...

Страница 479: ...is sorted by Client Count If a device is grayed out the EtherScope no longer detects a signal from it The client card shown below indicates that the Rspbry client cannot be detected currently The tim...

Страница 480: ...has different Filter options that are appropriate for the network component type you are analyzing Touch the filter button near the top left of the Wi Fi screens to set filters that control which net...

Страница 481: ...annels Overlap Filters screen indicates in parentheses the number of active network characteristics detected for example number of active Channels or detected Security types Touch a category to select...

Страница 482: ...hown for each characteristic In the image above there are 3 Security types detected and 9 APs using the WPA2 P Security type In this example the Overlap screen will show only those APs that fall under...

Страница 483: ...the Filters screen l Tap the button to the right of each filter to clear it l Touch the clear filter icon at the top right to clear all filters Back on the Overlap screen the number of active filters...

Страница 484: ...If the screen is a list like the APs screen below the screen title shows the number of filtered devices out of the total discovered devices 5 filtered devices out of 16 total Wi Fi Analysis App 484...

Страница 485: ...p Tap the Sort bar or down arrow to open the Sort drop down menu Each list screen supports relevant Sort options based on what you are viewing The APs screen Sort options are shown below as an example...

Страница 486: ...item is shown under the type icon and name In the image above the discovered APs are sorted by SSID Count which is shown below each AP icon Tap the sort order icon to switch the sort order between no...

Страница 487: ...groups Refreshing Wi Fi Touch the action overflow icon at the top right of the screen and select Refresh Wi Fi to clear and repopulate the Wi Fi app screens with data Uploading Wi Fi Results to Link...

Страница 488: ...Back to Title and Contents results to the Analysis page on Link Live com See the Link Live chapter for more information Wi Fi Analysis App 488...

Страница 489: ...Interferers opens the Details screen for that device or network ID The example below calls out a Client card and its Details screen On the Wi Fi Details screens you can touch any blue linked name or...

Страница 490: ...ry Each Details screen shows additional information about the selected item any Problems detected by the EtherScope and counts for other connected network devices or IDs See also Data Fields on the To...

Страница 491: ...The Channel Details screen above shows how many SSIDs APs BSSIDs Clients and Interferers are detected on Channel 64 Touch the lower cards in Wi Fi Details to open a list Wi Fi Analysis App 491...

Страница 492: ...BSSIDs screen opens and filters for BSSIDs found on Channel 64 only See the topics for each Wi Fi app screen type SSIDs APs etc for more discussion of the cor responding Details screen Wi Fi Problems...

Страница 493: ...e icon color of the highest severity problem and the number of detected Warning Failure Information and Resolved conditions for the device or network component Touch the card to open the Problems scre...

Страница 494: ...was First Detected Touch the action overflow button at the top right to Clear Problems See Problem Settings in the Discovery app to select which Wi Fi Problems are detected and displayed by your Ether...

Страница 495: ...stics card shows the Channel number or the Signal strength of the strongest AP on the channel and the channel s Utilization percentage Tap the card to view graphs of Signal Noise Utilization and Retri...

Страница 496: ...Strongest AP The AP on the channel with the strongest signal Under each graph a legend table displays the Current Minimum Maximum and Average Wi Fi Analysis App 496...

Страница 497: ...utton at the top of the screen to clear and restart the measurements Signal dBm graph Plots the signal strength in dBm of the selected AP or AP with the strongest signal on a channel l Signal The AP s...

Страница 498: ...abled in General Settings the Utilization graph shows combined channel utilization and 802 11 utilization only for BSSIDs and Clients as shown in the image above Retries of packets graph Plots percent...

Страница 499: ...use your EtherScope to locate APs and Wi Fi clients from the RF and Traffic Statistics screen for BSSIDs and Clients To access the RF and Traffic Statistics screen from a BSSID or Client Details scree...

Страница 500: ...Touching Locate opens the RF and Traffic Statistics screen Wi Fi Analysis App 500...

Страница 501: ...ncreases in rate and pitch as the signal strength of the device increases as you get closer to it Use the device s volume buttons to turn the sound up or down The External Antenna toggle enables the o...

Страница 502: ...kly See Using the Optional External Antenna below In areas with many rooms like a hospital or school the internal antennas are more effective Using the Internal Antennas to Locate EtherScope uses the...

Страница 503: ...3 Divide the area you want to search into four sections 4 Go to one corner of your search area and note the device s signal strength on the Signal graph Wi Fi Analysis App 503...

Страница 504: ...Go to the section with the strongest signal 7 Repeat steps 3 through 6 until you find the device If you still cannot find the device try looking on the floors above or below you If you cannot find a...

Страница 505: ...ormation To get the best measurements with the external antenna hold it at a constant height above any cubicle walls and point the front of the antenna towards your search area as shown below 1 Screw...

Страница 506: ...an audible tone 4 Divide the area you want to search into four sections 5 Go to the center of your search area 6 Point the antenna towards each corner of the area 7 Go to the middle of the section wit...

Страница 507: ...nge any of the information on the actual device only how the device s information displays on the EtherScope on which the Name and Authorization are assigned You only need to assign a Name and or Auth...

Страница 508: ...etwork and may present a security risk l Unspecified Default unassigned Author ization status While the Authorization statuses are designed with these intended meanings you can use them however you li...

Страница 509: ...ices with Authorizations of highest concern appear at the top The image below shows the BSSIDs list screen sorted this way Applying a Name and or Authorization Access the Name and Authorization functi...

Страница 510: ...ization to a device with multiple BSSIDs or MAC addresses the Authorization status is only applied to the MAC address BSSID displayed on the Details screen as shown in this section 1 Touch the FAB on...

Страница 511: ...The example above shows an AP s Details screen in the Discovery app 2 Select Name and Authorization to open the dialog Wi Fi Analysis App 511...

Страница 512: ...3 In the Name and Authorization dialog touch the User Name field to enter a cus tomized name if desired In the image above the user has entered the name Con ference Room AP Wi Fi Analysis App 512...

Страница 513: ...lect an Authorization You do not have to do both 4 Select the radio button to assign an Author ization status as needed 5 Touch OK to apply Once applied the User Name and Authorization are displayed o...

Страница 514: ...The user assigned name for the AP and Author ization for the BSSID also appear on the Wi Fi BSSID Details screen as shown below Wi Fi Analysis App 514...

Страница 515: ...tion dialog again for the same BSSID or MAC address on a device to reassign or clear the assigned User Name or Authorization If the Name or Authorization do not update as expected after a few minutes...

Страница 516: ...alog clear the User Name field and leave it blank and select the Unspecified Authorization Then touch OK Revising or Importing authname txt Custom Names and Authorizations are stored in the authname t...

Страница 517: ...he action overflow icon at the top right and select Show Internal Storage to navigate to the EtherScope nXG folder and sub folders If desired you can manually edit this file on the EtherScope unit or...

Страница 518: ...ion The default authname txt file on your unit contains instructions on how to format your Name and Authorization entries To edit the authname txt file on the EtherScope third party apps such QuickEdi...

Страница 519: ...ents For help importing a file see the Managing Files topic NOTE After importing and overriding the authname txt file we recommend Refresh ing Discovery in the Discovery app or restart ing your unit W...

Страница 520: ...screens provide graphical rep resentations of channel utilization AP coverage and overlap The Channels Map features two tabs Utilization and Overlap Touch the tab names to switch between the two scree...

Страница 521: ...hannels Utilization The Channels Utilization screen displays a bar graph of 802 11 and non 802 11 utilization retry percentage and the number of APs and clients for each channel Wi Fi Analysis App 521...

Страница 522: ...tage on the y axis If the Combine Utilization setting is enabled in General Settings only combined 802 11 and non 802 11 Utilization is shown on the graph AP counts are shown on the APs primary channe...

Страница 523: ...Then tap CHANNEL DETAILS at the bottom to open the Details screen for the channel Wi Fi Analysis App 523...

Страница 524: ...From the Channel Details screen you can examine the addresses and devices operating on the channel and perform a deeper analysis See Channel Details for more about this screen Wi Fi Analysis App 524...

Страница 525: ...deployment with respect to channel coverage and overlap allowing you to spot potential coverage issues Each discovered AP is shown as a colored trapezoid and plotted on the graph based on its channel...

Страница 526: ...l Touch an AP on the graph to select it and its primary channel In the image above the AP named Zyxel 5c6a on channel 7 is selected Wi Fi Analysis App 526...

Страница 527: ...l Touch the blue channel range selectors at the bottom to view a different channel range on the graph Wi Fi Analysis App 527...

Страница 528: ...ion overflow button to open the AP Details or Channel Details screens for the selected AP or Channel See Filtering in the Wi Fi App for an explanation of the Overlap screen s filtering options Wi Fi A...

Страница 529: ...Channels The Channels list screen displays the char acteristics of the wireless Channels as they are scanned in your location Wi Fi Analysis App 529...

Страница 530: ...tions on viewing filtering and sorting By default Channels are ordered by channel number and each card shows the channel frequency number of APs and total Utilization percent Touch a Channel card to o...

Страница 531: ...Channel Details The Channel Details screen displays the channel s Center Frequency under the icon Wi Fi Analysis App 531...

Страница 532: ...and Traffic Statistics card appears when there is an active AP and Utilization on the channel See RF and Traffic Statistics Overview in the Wi Fi Details Screens topic Channel FAB Tap the FAB on the C...

Страница 533: ...SSIDs The SSIDs list screen shows all the network SSIDs the EtherScope has discovered Wi Fi Analysis App 533...

Страница 534: ...he network The security status icons have the following meanings l Green closed lock All APs on the network use secure protocols like WPA2 or WPA3 l Yellow closed lock One or more APs use WEP or Cisco...

Страница 535: ...SSID Details In addition to the Signal and Security Type the SSID Details displays the AP on the network with the strongest signal 802 11 Types that the Wi Fi Analysis App 535...

Страница 536: ...on the network Last Seen EtherScope nXG can detect and display 802 11 types a b g n ac ax SSID FAB Tap the FAB on the SSID Details screen to Connect to the network This action opens the AutoTest app...

Страница 537: ...Back to Title and Contents See Creating a Wi Fi Profile from the Wi Fi Analysis App in the AutoTest chapter for a more detailed description of this process Wi Fi Analysis App 537...

Страница 538: ...APs The APs list screen displays all the Access Points discovered operating on your wireless networks Wi Fi Analysis App 538...

Страница 539: ...rder in the list Refer to the Wi Fi App List Screens topic if needed By default APs are ordered by Signal strength and each card shows the Signal strength in dBm and the AP s manufacturer prefix Touch...

Страница 540: ...AP Details The AP Details screen shows the 802 11 Types the AP supports the AP s Security Type and Wi Fi Analysis App 540...

Страница 541: ...me the AP was last detected Last Seen by the EtherScope Touch the lower cards to view the network IDs Channels and Clients associated with the AP See Wi Fi Problems for more information about the Prob...

Страница 542: ...BSSIDs The BSSIDs list screen shows the BSSID addresses discovered in your wireless environment Refer to the Wi Fi App List Screens topic if needed Wi Fi Analysis App 542...

Страница 543: ...the BSSIDs are ordered by Signal strength and each card shows the Signal strength SSID and channel number on which the BSSID is operating Touch an BSSID s card to open the Details screen Wi Fi Analys...

Страница 544: ...BSSID Details In addition to the characteristics on the BSSID cards the Details screen displays the following information Wi Fi Analysis App 544...

Страница 545: ...se ratio SNR measurement l Network Security type l Time activity was Last Seen on the BSSID BSSID Details can also include Rates and Cap abilities and RF and Traffic Statistics Rates and Capabilities...

Страница 546: ...This screen shows advanced information about the transmit and receive rates and 802 11 cap abilities reported by the beacon Wi Fi Analysis App 546...

Страница 547: ...abilities l 802 11n capabilities are gathered from HT capabilities in the beacon l 802 11ac capabilities are gathered from VHT capabilities in the beacon l 802 11ax capabilities are gathered from HE c...

Страница 548: ...BSSID RF and Traffic Statistics See RF and Traffic Statistics Overview in the Wi Fi Details Screens topic for an explanation of the common elements of this screen Wi Fi Analysis App 548...

Страница 549: ...The RF and Traffic Statistics screen for BSSIDs displays the BSSID and the channel number at the top of the screen Wi Fi Analysis App 549...

Страница 550: ...urements for Channel Utilization BSSID Utilization and Non 802 11 interference using different colors To pan and zoom on the graphs you can swipe double tap and move the slider See the Trending Graphs...

Страница 551: ...BSSID FAB The floating action button on the BSSID screen lets you Locate the wireless device Connect to the BSSID record a packet Capture of the Wi Fi Analysis App 551...

Страница 552: ...network traffic with the current BSSID on the connected channel and assign or change its Name and Authorization Wi Fi Analysis App 552...

Страница 553: ...w Wi Fi profile called Connect to BSSID See Creating a Wi Fi Profile from the Wi Fi Analysis App in the AutoTest chapter for a more detailed description of this process l Selecting Capture opens the C...

Страница 554: ...Clients The Clients list screen displays the wireless clients the EtherScope has discovered connected to your wireless networks Wi Fi Analysis App 554...

Страница 555: ...which the client is connected and the channel number on which the Client is operating The general Client icons indicate whether the device is Probing or Connected to a network and able to receive dat...

Страница 556: ...Client Details The top Client Details card for a connected Client displays the following information Wi Fi Analysis App 556...

Страница 557: ...nt is connected l SSID of the network to which the Client is connected l BSSID on which the Client is operating l Network Security type l Time the Client was Last Seen by the Ether Scope Probing Clien...

Страница 558: ...Overview in the Wi Fi Details Screens topic for an explanation of the common elements of this screen The RF and Traffic Statistics screen for Clients displays the Client s MAC or IP address and the c...

Страница 559: ...NOTE The Sound and External Antenna toggles are used for locating the device See Locating Wi Fi Devices Wi Fi Analysis App 559...

Страница 560: ...zation using different colors See the Trending Graphs topic for an overview of the graph s pan and zoom controls The breaks in the Client RF and Traffic graphs occur because the Client is not consiste...

Страница 561: ...The Clients RF and Traffic Statistics screen also displays a graph of Transmit Tx and Receive Rx Rates in Mbps number of Tx Streams and Tx Channel Width in MHz Wi Fi Analysis App 561...

Страница 562: ...from the client or assign or change its Name and Authorization l Selecting Locate opens the RF and Traffic Statistics screen where the sound and antenna controls are displayed See Locating Wi Fi Devi...

Страница 563: ...Back to Title and Contents l Selecting Name and Authorizationopens the Name and Authorization dialog See Assigning a Name and Authorization to a Device Wi Fi Analysis App 563...

Страница 564: ...Interferers screen displays devices detected by the EtherScope that may be interfering on your networks By default Interferers are ordered by the time they were most recently detected by the Wi Fi An...

Страница 565: ...App List Screens topic if needed EtherScope can detect and display the following potential Interfering devices types l Baby Monitor l Bluetooth l DS Cordless Phone l FH Cordless Phone l Game Controlle...

Страница 566: ...nterferer card to open the Details screen Interferer Details Power The most recently observed power output from the device Utilization The percentage of time during the most recent sample for which th...

Страница 567: ...h EtherScope detects the interfering device Duration Amount of time EtherScope detected the device and when it was first and last detected Event Count Number of separate instances of detected transmis...

Страница 568: ...as overloaded interfaces overloaded device resources and interface errors It also shows how devices within your network and off net devices are connected to each other along a path All switches are pr...

Страница 569: ...nt discovers switches between the router hops by looking for the routers MAC addresses in the switch forwarding tables by sending SNMP queries to all discovered switches The switches found in the path...

Страница 570: ...other app like Discovery the address of the network component you were viewing in the previous app is pre populated as the Path Analysis Destination Configuring Path Analysis Manually Open the app set...

Страница 571: ...to enter the IP address or DNS name of the Path destination The default is www google com Interface This setting determines the EtherScope port from which the test runs Touch the field to select Any...

Страница 572: ...n the order shown in the Interface dialog above See Test and Management Ports for explan ations of the different ports and how to link Protocol Tap to select the Connect TCP Ping ICMP or Echo UDP 7 pr...

Страница 573: ...ntents enter the port number over which you want to run Path Analysis You may need to enter a specific port number because routes can vary based on the port number and or may be blocked by firewalls P...

Страница 574: ...Touch the START button at the top of the app screen to begin a Path Analysis NOTE EtherScope must be linked on the Interface Port selected in the app s settings See Test and Management Ports for help...

Страница 575: ...Path Analysis results are presented on cards The top card shows the main test details the second card shows information for the source device your EtherScope nXG and the following cards show Path Ana...

Страница 576: ...ysis results screens to open the Discovery or Wi Fi app and further examine the linked element Path Analysis Results and Source EtherScope Cards The top Path Analysis results card shows the path s Des...

Страница 577: ...TCP Ping or Echo TCP Port The port number used for a TCP Connect Protocol This field does not appear for Ping or Echo Protocol results Results Started Time at which the Path Analysis began Status Cur...

Страница 578: ...Management port analyses shown above this card displays con nection speed and duplex l For Wi Fi port analyses the card displays the SSID and channel number NOTE This card and screen only display a c...

Страница 579: ...annel and other Wi Fi information the EtherScope can display after running a Path Analysis over Wi Fi The image below shows the source EtherScope card from a Wired Path Analysis which displays the lin...

Страница 580: ...th Layer 3 Hops Each Layer 3 Hop card displays the device type icon DNS name if discovered and IP address Beneath the name or IP the response times for each Connect TCP Ping ICMP or Echo UDP 7 display...

Страница 581: ...hop Details screen No Reply Sometimes Path Analysis displays Hop cards with No Reply as shown below This result means that the device in that portion of the path did not send an ICMP TTL timeout resp...

Страница 582: ...Split Route Path Analyses may obtain a Split Route result as shown above meaning that two or three Path Analysis App 582...

Страница 583: ...uests Tap a Split Route card to view the DNS names and IP addresses of the responding routers Layer 3 Interfaces and Statistics Statistics for Interfaces on Layer 3 devices may be identified and measu...

Страница 584: ...Interfaces and Statistics below Network Problems in Path Analysis The Hop cards can also show detected Problems based on the Problem Settings in the Discovery app and display the device type icons in...

Страница 585: ...the user can investigate the cause of the Warning Layer 2 Devices Layer 2 devices can be switches or APs Layer 2 Switches The image below displays an example of a Path Analysis to a device on the loca...

Страница 586: ...The EtherScope is able to identify these Layer 2 switches and their interfaces because it has configured SNMP access to the switches Path Analysis App 586...

Страница 587: ...nterface IDs VLAN ID and the link speed and duplex if detected of the interfaces Touching a Layer 2 card opens a Details screen for the device A Layer 2 Details screen displays the device name and IP...

Страница 588: ...nformation for these interfaces tap their blue links to open a Interface Details screen in the Discovery app Statistics for Interfaces on Layer 2 switches may be identified and measured if the EtherSc...

Страница 589: ...ce its AP is shown as a Layer 2 device in the path A Layer 2 AP card indicates the connected network SSID channel and 802 11 type in use Layer 2 AP Details screens allow you to further examine the wir...

Страница 590: ...oes not discover Layer 2 devices between Layer 3 devices There may not be any Layer 2 devices or EtherScope might not have SNMP access to those switches The Layer 2 card may also display a result of N...

Страница 591: ...this is an unexpected result check and verify your SNMP Configuration and Extended Ranges in the Discovery app settings Uploading Path Analysis Results to Link Live Touching the UPLOAD TO LINK LIVE li...

Страница 592: ...Back to Title and Contents Path Analysis results are uploaded to the Analysis page on Link Live Path Analysis App 592...

Страница 593: ...to Link Live Cloud Service On Link Live com you can view heatmaps and Wi Fi measurements for each data collection point The Signal heatmap is available to all Link Live users AllyCare Support customer...

Страница 594: ...dimensions l Only png and jpg image files types are supported l You may need to use an image editing application to crop your floor plan image to known dimensions such as the walls of a building or pr...

Страница 595: ...Name Touch the Name field to enter a custom name for your AirMapper project This name is uploaded to Link Live to identify this survey project Description Enter any additional information you want fo...

Страница 596: ...lan 1 Open the Floor Plan list screen to select or load a new floor plan or map of the area to be surveyed 2 On the Floor Plan screen tap the floating action button to load a new image file AirMapper...

Страница 597: ...the map image file in the file system and touch to select it 4 Back on the Floor Plan screen tap the fields to configure the floor plan Name Enter a name for this floor plan This field defaults to th...

Страница 598: ...he General Settings for the test apps accessed from the left side navigation drawer Touch back to return to the main AirMapper settings Signal Propagation This setting is the radius measurement of the...

Страница 599: ...nly the Wi Fi Bands and Channels of interest Access the General Settings from the left side navigation drawer Changing Settings after Starting Once you START your survey on the main AirMapper screen y...

Страница 600: ...nt detected during a survey we recommend creating and enabling a Wi Fi Profile in the AutoTest app configured with the appropriate credentials Otherwise AirMapper will detect the BSSIDs associated wit...

Страница 601: ...ch START to begin the survey To collect data travel around your site and touch the map at your current location to scan the enabled wireless channels in that spot Do not move from that location until...

Страница 602: ...AirMapper App 602...

Страница 603: ...zoom gestures to pan and zoom the map While the EtherScope is scanning the Signal Propagation circle is red Once the scan is complete the circle turns green The completed data points in the AirMapper...

Страница 604: ...ering data open the General Settings Wi Fi Bands and Channels accessed from the left side nav igation drawer For the best AirMapper results we recommend setting a Dwell Time of 250 ms or greater When...

Страница 605: ...Uploading AirMapper Surveys to Link Live When you touch the Link Live upload icon the Link Live sharing screen appears AirMapper App 605...

Страница 606: ...AVE TO AIRMAPPER FILES The current survey remains on the AirMapper screen until you begin a New Survey allowing you to add additional points if needed and re upload Starting a New Survey To start a ne...

Страница 607: ...tency and jitter The Performance test exchanges a stream of traffic with Peers or Reflectors and measures the performance of the traffic stream You can simulate real world traffic by configuring traff...

Страница 608: ...stablish link on the port When you start up the EtherScope the last Wired Profile in the list of active AutoTest profiles runs automatically if an active Ethernet connection is detected on the top RJ...

Страница 609: ...easurements can be shown for Throughput Loss Latency and Jitter When using a Reflector the EtherScope reports round trip data for all measurements Separate upstream and downstream traffic meas urement...

Страница 610: ...l NetAlly s Network Performance Test NPT Reflector PC application can also act as the reflector for a Performance test Download the free NPT Reflector software from NetAlly com support downloads Sele...

Страница 611: ...is acting as the test source and Peer settings that control the unit when it is acting as the test Peer Access the settings by touching the settings button on the Performance Test screen or the Perfo...

Страница 612: ...ng EtherScope nXG as a Performance Peer Saving Custom Performance Tests The Performance app allows you to save two levels of test configurations individual Services and complete Performance Tests with...

Страница 613: ...ities using the Layer 3 options to verify that loss does not occur over the higher priority stream Saved Performance Tests and their Services work much like AutoTest Profile Groups Profiles and Test T...

Страница 614: ...Touch the save icon to load save import or export a settings configuration l Load Open a previously saved settings con figuration Performance Test App 614...

Страница 615: ...rted settings file l Export Create an export file of the current settings and save it to internal or connected external storage See Saving App Settings Configurations for more instructions In the exam...

Страница 616: ...and Contents Once you save a Performance Test con figuration the custom name you entered appears at the top of the Performance Settings screen above and main Performance Test screen below Performance...

Страница 617: ...Configuring the Source EtherScope nXG Open the Performance Settings screen from the main Performance results screen or the left side navigation drawer Performance Test App 617...

Страница 618: ...ou can run up to four unidirectional or bidirectional services sim ultaneously to emulate and test the QoS levels on your network The Services configurations include the Endpoints Frame Size Bandwidth...

Страница 619: ...hen you delete a Service you delete it from all Performance Test con figurations To remove a Service from the current test simply uncheck it NOTE All Services are tested at the same time so the order...

Страница 620: ...Service Name Touch the Service Name field to enter a custom name for the endpoint and associated Performance Test App 620...

Страница 621: ...pen this screen to configure the Endpoint Address Type and Traffic Flow IPv4 Address Tap the field to enter the IPv4 address of your endpoint device Communication UDP Port If needed touch to enter a d...

Страница 622: ...tream only or Downstream only to test only the single traffic flow direction specified l Select Asymmetrical to test each direction using a different Target Rate set under Bandwidth below Asymmetrical...

Страница 623: ...Selecting Frame Size Mix creates traffic with variable frame size patterns generated in a repeating sequence Tap the edit icon to revise the frame size pattern Performance Test App 623...

Страница 624: ...ociated with a frame size The default pattern is abceg meaning the traffic pattern will follow a repeating sequence of 64 128 256 1024 and 1518 bytes Use the letter keys along with the arrows and back...

Страница 625: ...in the pattern NOTE If the Performance Test runs on a VLAN configured in the Wired AutoTest Profile or the Performance Layer 2 options shown below the frame sizes will be four bytes longer You do not...

Страница 626: ...arget Rate is used l For a Peer with an Asymmetrical Traffic Flow configuration you can select a different Upstream and Downstream Target Rate for each direction Touch the Target Rate field s to selec...

Страница 627: ...greater rates are possible under perfect con ditions the limitation of 99 98 of the link rate results from asynchronous clocks in Ethernet The IEEE 802 3 Ethernet standard allows link partners to dif...

Страница 628: ...a Reflector endpoint or you have selected Symmetrical Traffic Flow for a Peer endpoint the same threshold values grade each traffic direction l For a Peer with an Asymmetrical Traffic Flow configurati...

Страница 629: ...old Jitter is a measure of the variation in frame to frame latency in mil liseconds The default threshold is 20 ms Latency Threshold Latency is the amount of time it takes for a packet to go from the...

Страница 630: ...test the corresponding VLANs Open Layer 2 Options in the Performance app settings to override the VLAN settings from AutoTest Override VLAN ID Touch to select or enter a VLAN ID number The Override VL...

Страница 631: ...sed for the Wired Test port VLAN Priority This setting only appears if the Override VLAN Priority setting above is Enabled Touch to select a VLAN Priority Validate Priority Touch the toggle button to...

Страница 632: ...es not occur on the higher priority streams QoS Select the methodology used on your network TOS with DSCP Type of Service with Differentiated Services Code Point or TOS with IP Precedence legacy Then...

Страница 633: ...Touch the field to select an IP Precedence other than the default of Routine 0 IP Precedence Type This field is also only available when TOS with IP Precedence is selected Touch the field to select a...

Страница 634: ...eer l A LinkRunner G2 or LinkRunner AT Reflector l NPT Reflector Software Reflector See our website NetAlly com for more information about OneTouch and LinkRunner and to download the free NPT Reflecto...

Страница 635: ...mance Peer Follow these steps to set up a OneTouch 10G Performance Peer 1 Ensure the OneTouch is connected to an active network via the top RJ 45 or Fiber test port and is plugged into AC power Perfor...

Страница 636: ...t number used by your source EtherScope 5 Turn on Enable AutoStart to cause the Per formance Peer function to start auto matically when the OneTouch is powered on 6 Tap the START button The PERFORMANC...

Страница 637: ...2 Reflector Follow these steps to set up a LinkRunner G2 Reflector 1 Ensure the LinkRunner is connected to an active network via the top RJ 45 or Fiber test port and is plugged into AC power 2 Start t...

Страница 638: ...n your network 6 Once the LinkRunner G2 Reflector has acquired an IP address tap the floating action button FAB at the lower right to start the Reflector 7 The IP address of the Reflector is displayed...

Страница 639: ...e network via the RJ 45 or Fiber test port and is plugged into AC power 2 On the Home screen select Tools 3 In General Configuration Manage Power ensure the Auto Shutoff Enabled is unchecked to preven...

Страница 640: ...rk 6 Select Save to apply any changed settings 7 Select Start F2 to run the Reflector 8 The IP address of the Reflector is displayed at the top of the screen Enter this address on the Endpoint Device...

Страница 641: ...r PC application 1 Download the software from NetAlly com support downloads Select EtherScope nXG from the drop down menu to view the list of downloads 2 Install the Reflector on your PC by running th...

Страница 642: ...you want to use as a Reflector Endpoint for your Performance Test 5 Leave the application window open on your PC during Performance testing 6 Enter IP addresses for the interfaces you want to test aga...

Страница 643: ...ot linked or No IP address but you have an active network connection go to AutoTest and run a Wired Profile to troubleshoot your connection l All configured Performance Test Services are tested at the...

Страница 644: ...d Services may not display on the main Performance Test screen until you touch START To run your configured Performance Test touch START on the main Performance screen Performance Test Results Perform...

Страница 645: ...The top card shows the test duration and status Duration The test duration selected in the Performance Settings Started Time at which the test began Status Current status of the test including any er...

Страница 646: ...Performance Service Detailed Results The Service results screen displays detailed test characteristics and graphs of performance Performance Test App 646...

Страница 647: ...ribed in this section update every 5 or 30 seconds for as long as the test is running The graphs save and display data for the entire test duration with a max duration of 24 hours Peer endpoints displ...

Страница 648: ...eft and right on each graph to move backward and forward in time and double tap or move the slider to zoom in and out See the Trending Graphs topic for an overview of the graph s pan and zoom controls...

Страница 649: ...l outside the Limit are indicated with a red dot next to the failing measurement In the image above the test has failed because Frames Lost Up was above the Limit The table also displays the Current M...

Страница 650: ...n in parentheses next to the Throughput heading In the image above the configured Target Rate is 1 Mbps Loss Frames Lost Up Down Frame loss is quantified by the number of frames received subtracted fr...

Страница 651: ...s Low level electrostatic discharge ESD and low power Electric Fast Transient EFT events also called impulse noise can interfere with newer faster data links with less noise margin These events could...

Страница 652: ...ousands of latencies measured during each interval The one way latency measurements are actually round trip measurements divided by two Peak Latency The highest measured latency The Current column sho...

Страница 653: ...er from the last test interval and Max shows the highest Jitter measured during the entire test Limit This is the Jitter Threshold from the Performance app s settings Uploading Performance Results to...

Страница 654: ...Back to Title and Contents latest results to the Results page on Link Live com See the Link Live chapter for more information Performance Test App 654...

Страница 655: ...e controlling source device EtherScope nXG can also act as a Peer for another EtherScope nXG or a OneTouch AT 10G acting as the source and controller To access the EtherScope Performance Peer tap the...

Страница 656: ...Setting The only setting for the Performance Peer function is the Communication UDP Port Touch the settings button on the Performance Peer screen to change the port number The default NetAlly perform...

Страница 657: ...time status utilization and rates for as long as the test is running Status The current status of the peer Utilization Rx Receive percentage of the link speed Tx Transmit percentage of the link speed...

Страница 658: ...ling source device Port UDP Communication port in use by the peer MAC The EtherScope s MAC address Connections Last Peer Address of the previous peer that was connected to the EtherScope Connected Pee...

Страница 659: ...dized network performance tool used to measure UDP or TCP throughput and loss The iPerf app runs an iPerf3 performance test to a NetAlly Test Accessory or an iPerf server endpoint EtherScope nXG User...

Страница 660: ...rf tests run by other NetAlly handheld testers Learn more about the Test Accessory from NetAlly com products TestAccessory If you are using an iPerf server installed on a PC or other device as an endp...

Страница 661: ...in the iPerf settings Saving Custom iPerf Settings The iPerf app allows you to save a con figuration of settings for running an iPerf test to the same endpoint later Touch the save icon to load save...

Страница 662: ...erf configuration called Server Room Endpoint Test Accessories in Discovery You can start an iPerf test from the Details screen for a Test Accessory in the Discovery app using the floating action butt...

Страница 663: ...Discovery list to open its Details screen 2 Open the floating action button FAB menu iPerf Test App 663...

Страница 664: ...n menu to open the Test Accessory s Web Interface where you can view its status and configure its settings 3 Then select the iPerf app button The iPerf app opens with the IP address populated from the...

Страница 665: ...Configuring iPerf Settings To configure the iPerf test settings manually open the settings on the iPerf screen iPerf Test App 665...

Страница 666: ...This setting determines the EtherScope port from which the test runs Touch the field to select Any Port Wired or Wi Fi Test Port or Wired or Wi Fi Management Port See Test and Management Ports for exp...

Страница 667: ...number is 5201 Tap the field to enter a different port number NOTE The iPerf port number entered here must match the port number used by your iPerf server If needed consult the Test Accessory User Gu...

Страница 668: ...h The default is Upstream and Downstream Touch this field to set the test for only one direction Upstream and Downstream Bandwidth These fields only appear if the UDP Protocol is selected They specify...

Страница 669: ...ports require that an AutoTest Wired or Wi Fi Profile has run to establish link The AutoTest Wired Profile runs automatically but you must open the AutoTest app to run a Wi Fi Profile and link on the...

Страница 670: ...aracteristics and status are displayed at the top of the iPerf results screen while the lower part of the screen displays a real time graph of the TCP or UDP Upload and or Download speeds iPerf Test A...

Страница 671: ...rver Interface The EtherScope Test or Management Port from which the test is running Results l Duration Configured Duration from the iPerf settings l Started Time the test started l Status Success or...

Страница 672: ...Limit This is the Threshold from the iPerf app s settings The threshold value is also displayed on the graph as a red dotted line iPerf Test App 672...

Страница 673: ...played in the table below the graph The Packet Loss Up graph and table do not display measurements until results are received from the iPerf server at the end of the upstream test Uploading iPerf Resu...

Страница 674: ...Link Live sharing screen opens and allows you to revise the auto generated filename and attach comments to the iPerf result which will be displayed on the Results page on Link Live com iPerf Test App...

Страница 675: ...ervice is a free online system for collecting tracking organizing analyzing and reporting your test results AutoTest results are automatically uploaded once your EtherScope nXG is claimed EtherScope n...

Страница 676: ...ications from the NetAlly App Store to use on your Ether Scope l Automatically upload AutoTest results each time you run AutoTest l Attach test and Job comments to Link Live uploads and automatically...

Страница 677: ...com and sign in You can open the Link Live website in the EtherScope s web browser to create and manage your account Quick Claiming on the Unit 1 Open the Link Live app and touch CLAIM NOW on the app...

Страница 678: ...browser window opens to the Link Live com website 3 Sign in if you haven t already Once you are signed in Link Live attempts to claim your unit You do not need to enter the MAC Link Live Cloud Servic...

Страница 679: ...4 If an Update is available note the updating instructions and touch CONTINUE 5 If desired revise the name and description of your EtherScope unit Link Live Cloud Service 679...

Страница 680: ...n to Link Live com a pop up window appears prompting you to claim a device If you already have a user account and other devices claimed to Link Live navigate to the Units page from the left side navig...

Страница 681: ...displayed 2 Touch CLAIM NOW on the Link Live app screen 3 When prompted by the instructions on the Link Live website enter the MAC address After you claim your EtherScope nXG to Link Live a software...

Страница 682: ...Wi Fi Profile s floating action buttons FABs and you can auto matically sort your results into folders in Link Live using test and Job comments If your EtherScope is not connected to an active network...

Страница 683: ...r it to another user or if you no longer want to send any information to Link Live com To unclaim your EtherScope from Link Live from your unit open the About screen from the left side navigation draw...

Страница 684: ...Back to Title and Contents Link Live Cloud Service 684...

Страница 685: ...Link Live app screen on your EtherScope nXG facilitates the claiming process displays Link Live related information and allows you to enable or disable Link Live com uploads as needed Link Live App Sc...

Страница 686: ...e Link Live screen header indicates the number of files stored in the device memory when no active network connection is available The buffered file types are listed below the main app card Link Live...

Страница 687: ...l is the first e mail address assigned to the unit which receives test result notification emails The Organization and Email address shown here are assigned on the Link Live com website The fields dis...

Страница 688: ...your results to the Link Live website you can still save results locally to your EtherScope as JSON files Touch the Save Locally Only toggle field in the Link Live app to save the JSON files to your...

Страница 689: ...C for analysis or you can download a JSON viewer app from the App Store on your EtherScope With Save Locally Only enabled options for uploading or saving to Link Live described in the Link Live and Te...

Страница 690: ...ange the Job Comment The Job Comment attaches to all test results and files uploaded to Link Live until you change or delete it In contrast other Comments like those attached to Wired or Wi Fi AutoTes...

Страница 691: ...To enter or change the Job Comment in the Link Live app 1 With the Link Live app open touch the menu icon or swipe right from the left side of the screen Link Live Cloud Service 691...

Страница 692: ...to change it from multiple locations on the EtherScope No matter where you change the Job Comment it is updated everywhere on the unit Software Updates The left side navigation drawer for the Link Liv...

Страница 693: ...INK LIVE WEBPAGE APP UPLOADS Results AutoTest Performance iPerf and Cable Test results Images Connection Logs and other files when saved to a test result Uploaded Files Captures Images Connection Logs...

Страница 694: ...to Upload Save or Share to Link Live a Link Live sharing screen appears with the appropriate options for the data type For example the Link Live sharing screen for Discovery or Wi Fi app data allows...

Страница 695: ...Link Live sharing screen for a screenshot or other image allows you to attach it to the most recently run AutoTest Performance iPerf or Cable test result on the Results page or Link Live Cloud Service...

Страница 696: ...just to the Uploaded Files page on Link Live com Remember the regular Comment field uploads only to the current result or file while the Job Link Live Cloud Service 696...

Страница 697: ...u change it Sharing a Text File to Link Live You can also select and share text by long pressing text on the unit s screen Text files are attached to the last test results on Link Live com 1 Long pres...

Страница 698: ...2 Touch Select All if needed 3 Touch SHARE 4 Select the Link Live icon to open the Link Live sharing screen Link Live Cloud Service 698...

Страница 699: ...5 Format any comments as needed and then touch SAVE TO LAST TEST RESULT Link Live Cloud Service 699...

Страница 700: ...ify wiremapping of patch and structured cabling and locate cable connections using toning The cable testing port is the RJ 45 port on the left side of the EtherScope unit Connect a cable to this port...

Страница 701: ...setting is contained in the General Settings menu 1 To access General Settings touch the menu icon on the Cable Test app screen and select General Settings 2 Scroll to the bottom of the Settings list...

Страница 702: ...ure cable length and identify shorts opens split pairs crossover cables normal or negative pair polarity and shielded cables l EtherScope nXG cannot perform a cable test on a cable that is connected t...

Страница 703: ...can measure the length of a cable and detect some faults by measuring the electrical reflections of the cable using Time Domain Reflectometry TDR Connect an open cable unterminated into the RJ 45 port...

Страница 704: ...n a cable has no detected faults good is shown next to each pair above the length measurement Cable tests that detect a split or open in the cable also display the cor responding words Cable Test App...

Страница 705: ...This unterminated cable test image shows a shorted cable between pins 4 5 and 7 Cable Test App 705...

Страница 706: ...tional WireViews 2 6 are available for purchase To run a terminated cable test connect the left side RJ 45 port to a cable terminated with an external WireView Cable ID accessory The terminated cable...

Страница 707: ...The image above indicates a crossover between pairs 1 2 and 3 6 and a WireView accessory number 5 Cable Test App 707...

Страница 708: ...nction You can also trace a cable using a Fluke Networks IntelliTone Probe or any analog probe and the Tone function Connect a cable into the left side RJ 45 port touch the FAB and select the appropri...

Страница 709: ...ouch the action overflow icon at the top right of the Cable Test screen and select Upload to Link Live to send the current Cable Test result to the Results page on Link Live com See the Link Live chap...

Страница 710: ...Specifications and Compliance Required compliance information is contained in this chapter EtherScope nXG User Guide Back to Title and Contents...

Страница 711: ...is 3 hours Display 5 0 inch color LCD with capacitive touchscreen 720 x 1280 pixels Host Interfaces RJ 45 Cable Test and Management Port USB Type A Port USB Type C On the Go Port SD Card Port Support...

Страница 712: ...straight through and WireView ID Tone Generator Digital tone 455 KHz Analog tones 400 Hz 1 KHz LEDs 2 LEDs Activity and Link Indicators Wireless EtherScope nXG has two internal Wi Fi Radios l Wi Fi T...

Страница 713: ...latory Domain World Mode Antenna Gain 1 1 dBi peak in the 2 4 GHz band 3 2 dBi peak in the 5 GHz band Data Rates l 802 11a 6 9 12 18 24 36 48 54 Mbps l 802 11b 1 2 5 5 11 Mbps l 802 11g 6 9 12 18 24 3...

Страница 714: ...owed in the country for which it is currently configured in General Set tings These are the center frequencies of the channels that the Wi Fi radio supports l 2 4 GHz band 2 412 2 484 GHz channels 1 t...

Страница 715: ...9 57 dBm Android 1x1 Wi Fi Bluetooth Adapter for Management Applicant s Name NetAlly Model BLUE bean Manufacturer 8devices Manufacture Date 2019 Country of Origin United States Security 64 128 Bit WE...

Страница 716: ...l 802 11ac 80 MHz 32 5 65 97 5 130 195 260 292 5 325 390 433 3 Mbps Operating Frequencies The EtherScope nXG receives on all of the fre quencies in every country but transmits only on the frequencies...

Страница 717: ...256 QAM MCS8 and MCS9 OFDM l 802 11b DBPSK BPSK 1 and 2 Mbps QPSK 2 Mbps CCK 5 5 and 11 Mbps l 802 11g BPSK 6 and 9 Mbps QPSK 12 and 18 Mbps 16 QAM 24 and 36 Mbps 64 QAM 48 and 54 Mbps OFDM BlueTooth...

Страница 718: ...e internal tem perature of the unit is above 113 F 45 C Operating relative humidity RH without condensation 90 50 F to 95 F 10 C to 35 C 75 95 F to 113 F 35 C to 45 C Storage Temperature 4 F to 140 F...

Страница 719: ...the U S Federal Com munications Commission Listed by the Canadian Standards Asso ciation Industry Canada Class A emission compliance statement This Class A digital apparatus complies with Canadian IC...

Страница 720: ...sired operation This device contains license exempt transmitter s re ceiver s that comply with Innovation Science and Economic Development Canada s licence exempt RSS s L metteur r cepteur exempt de l...

Страница 721: ...t maintain a 0 cm sep aration distance between the user s body and the back of the handset The use of belt clips holsters and similar accessories should not contain metallic components in its assembly...

Страница 722: ...e potential difficulties in ensuring electromagnetic compatibility in other environments due to conducted and radiated disturbances EU Compliance This device complies with the following EU Directives...

Страница 723: ...This telecommunication equipment conforms to the requirements of NBTC Specifications and Compliance 723...

Отзывы: