background image


Installation Instruction 

20201210/ML/01 


Nestor Optimus DB Reducers 

Page 3 of 6 


©

 Nestor Cables Ltd. 2020.  


10.12.2020 

The information contained within this document must not be copied, reprinted or reproduced in any form, either wholly or in part, without the 
prior written consent of Nestor Cables Ltd. The information is believed to be correct at the time of issue. Nestor Cables Ltd. reserves the right 
to amend this specification without notice. This specification is not contractually valid unless specifically authorized by Nestor Cables Ltd. 


Installation 


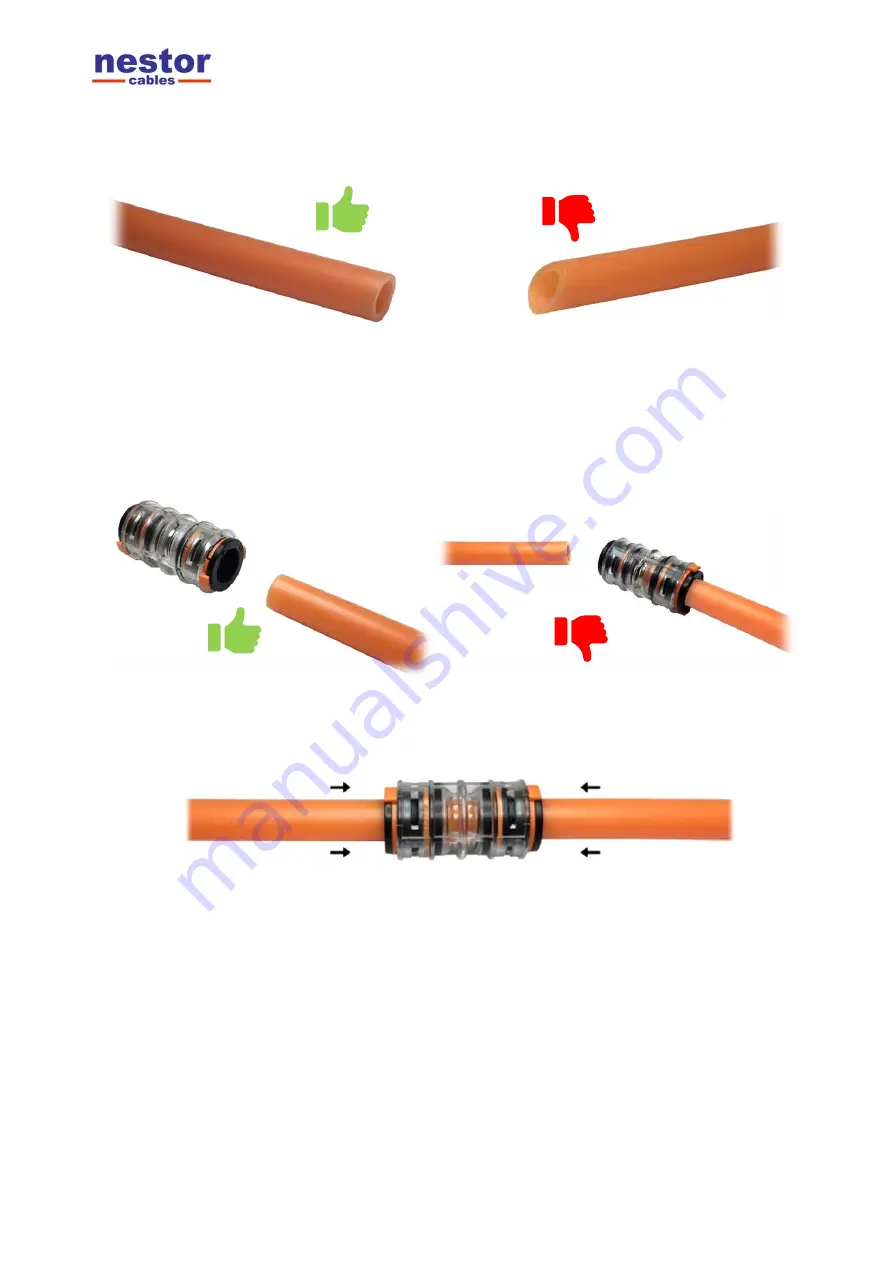
  Make sure that the microduct is clean and does not contain any scratches, cracks, cuts or 

deformities on its surface. 

  Avoid  putting  any  foreign  material  into  the  connector  or  microduct  before  and  during  the 

installation. 


  Align the microduct correctly with the connector to ensure the correct installation. 


  Push the microduct into the connector. This may need a moderate force and a slight rotation. 

  The  microduct  or  the  connector  seal  should  not  be  scratched  or  damaged  during  the 

insertion, otherwise there may be leaks or further misfunctioning. 

  The microduct must be connected by hand without using any kind of tool. 

  Nestor  Optimus  DB  Reducers  are  pre-fitted  with  tamper  proof  locking  clips  as  standard. 

Please note that there is no need to remove locking clips during the installation. 


Содержание Optimus DB Reducers

Страница 1: ...eproduced in any form either wholly or in part without the prior written consent of Nestor Cables Ltd The information is believed to be correct at the time of issue Nestor Cables Ltd reserves the right to amend this specification without notice This specification is not contractually valid unless specifically authorized by Nestor Cables Ltd Installation Instruction Nestor Optimus DB Reducers ...

Страница 2: ...nd duct bundles so that there is enough duct overlap at the connection point In principle all microducts must overlap by at least 60 cm When using duct bundles the connectors should be staggered so that the connectors are not in the same position For example a duct bundle with 12 microducts must overlap more than 60 cm to have enough space for staggered connectors To avoid any possible problem dur...

Страница 3: ...t the microduct is clean and does not contain any scratches cracks cuts or deformities on its surface Avoid putting any foreign material into the connector or microduct before and during the installation Align the microduct correctly with the connector to ensure the correct installation Push the microduct into the connector This may need a moderate force and a slight rotation The microduct or the ...

Страница 4: ...y inserted into the connector seat The transparent body of the connector allows a visual inspection of the correct installation To make sure that the microduct is properly connected please pull it outwards slightly without releasing the collet Do not use too much force If the microduct is not fully inserted into the connector it may cause failures and leakages If locking clips have been removed pl...

Страница 5: ...u need to separate the microducts from the connector in an unpressurized line Product reuse Nestor Optimus DB Reducers can be reused after checking that they are not damaged and correctly working Even if the connector reuse is possible it s only recommended in case of maintenance The microduct network should never be built by reused connectors In case of connector reuse the operator must verify re...

Страница 6: ... must be respected during the installation Do not use the products where ambient temperature and or fluid temperature and pressure may exceed the limits indicated in our technical specifications Additional notices Nestor Cables Ltd reserves the right to modify the products from time to time when required by quality improvements and by market requirements The actual product may differ from the pict...

Отзывы: