background image


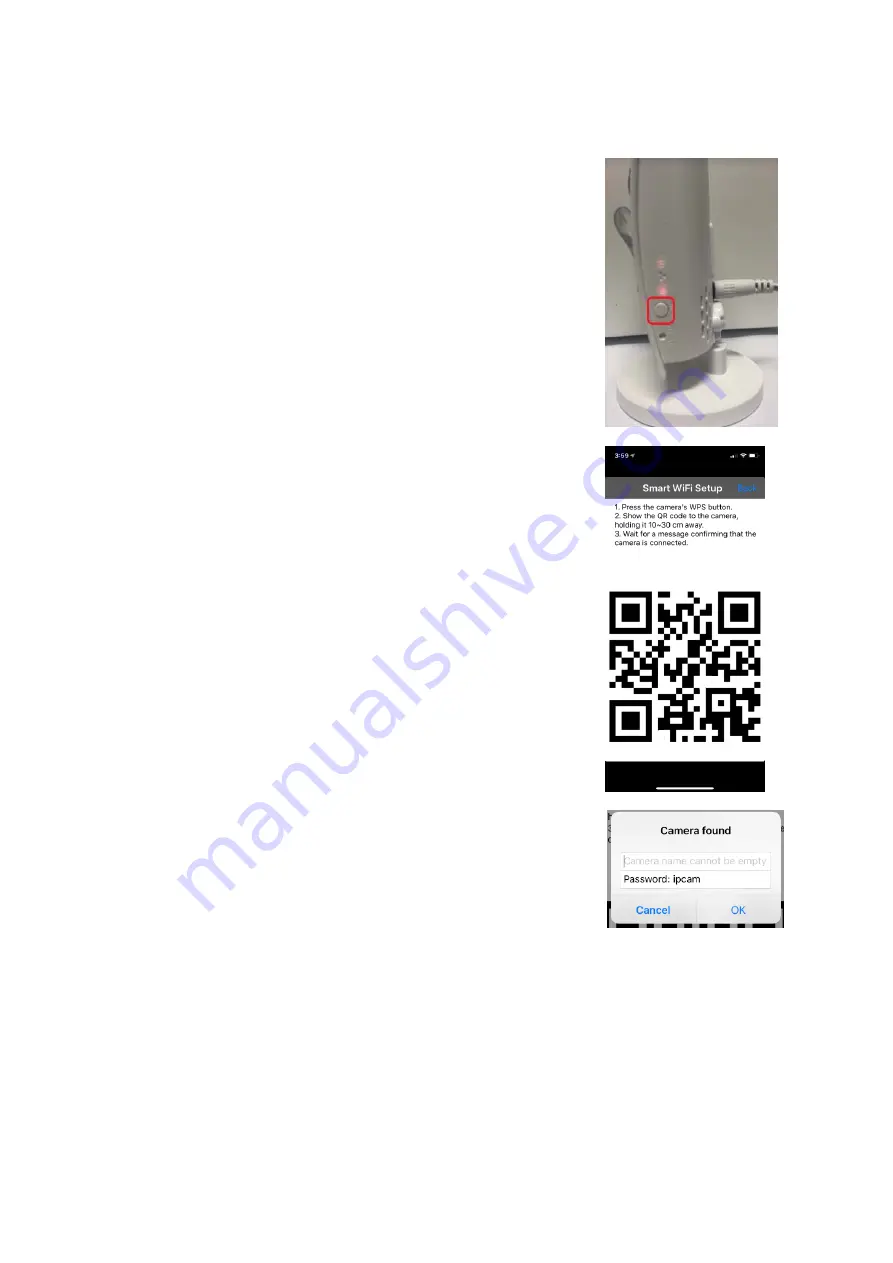
4. Press the WPS Button on the side of the camera.
 
The LEDs on the side of the camera should be flashing. 


5. You now need to have patience with this next step. 
  
Hold your phone screen which has the QR Code facing the IP Camera so the 
camera can view the QR Code. 
 
You need to have the phone approx 10‐30cm from the camera. You may need to 
move it back and forward for it to read the camera. 
 
When the camera successfully reads the QR Code, then the camera will beep. 

 
6. Once successful it will prompt you to give the camera a name. 


7. The camera is now paired into the gateway.


Содержание G1

Страница 1: ...1 NESS G1 ZWAVE GATEWAY Part Number 101 800 Revision 1 1 CAMERA SETUP 101 803 101 804 NESS 722 Z WAVE INDOOR CAMERA NESS 727 Z WAVE OUTDOOR CAMERA ...

Страница 2: ...re connecting the IP camera to your WiFi then select this option This feature is only supported on the 101 803 Camera only Not supported on the 101 804 1 Power up your camera without plugging in the LAN Cable and wait approx 1 2 minutes for it to fully power up 2 Remove the protective plastic cover from the camera lens 3 Select the option Smart WiFi Setup Then press the Next button icon up the top...

Страница 3: ...which has the QR Code facing the IP Camera so the camera can view the QR Code You need to have the phone approx 10 30cm from the camera You may need to move it back and forward for it to read the camera When the camera successfully reads the QR Code then the camera will beep 6 Once successful it will prompt you to give the camera a name 7 The camera is now paired into the gateway ...

Страница 4: ...r it to fully power up 2 Make sure the IP Camera is connected to the same network as your phone 3 Select the Manual Input option in the app 4 Give the Camera a name 5 Enter in the ID number of the Camera from the ID Password card CamID can also be found on the sticker on the camera 6 Enter in the password of your camera from the ID Password card 7 Click Done and now the IP Camera will be added ...

Страница 5: ...p 2 Make sure the IP Camera is connected to the same network as your phone 3 Select the Local Search option in the app The gateway will begin scanning your network for the IP Cameras 4 Select the IP Camera from the list you want to add Note After tapping the camera it may take a moment to move onto the next screen 5 Give the camera a name 6 Enter in the Video Password This is the same password as ...

Страница 6: ... camera with the LAN Cable plugged in and wait approx 1 2 minutes for it to fully power up 2 Make sure the IP Camera is connected to the same network as your phone 3 Select the Scan QR Code option in the app 4 Scan the QR Code Card that come with the IP Camera 5 The fields should be automatically filled in If so tap on the Done button and the IP Camera is now added ...

Страница 7: ... stream of the camera 3 Note To record the video an SD card sold separately must be inserted into the camera Return to Camera List Live Camera Video Record Live Video Stream Take a Snapshot of Live Stream Plays a siren sound out of the camera speaker Microphone volume of Phone when talking to the person at the IP Camera Network signal of IP Camera ...

Отзывы: