background image

9

5. DVR Installation

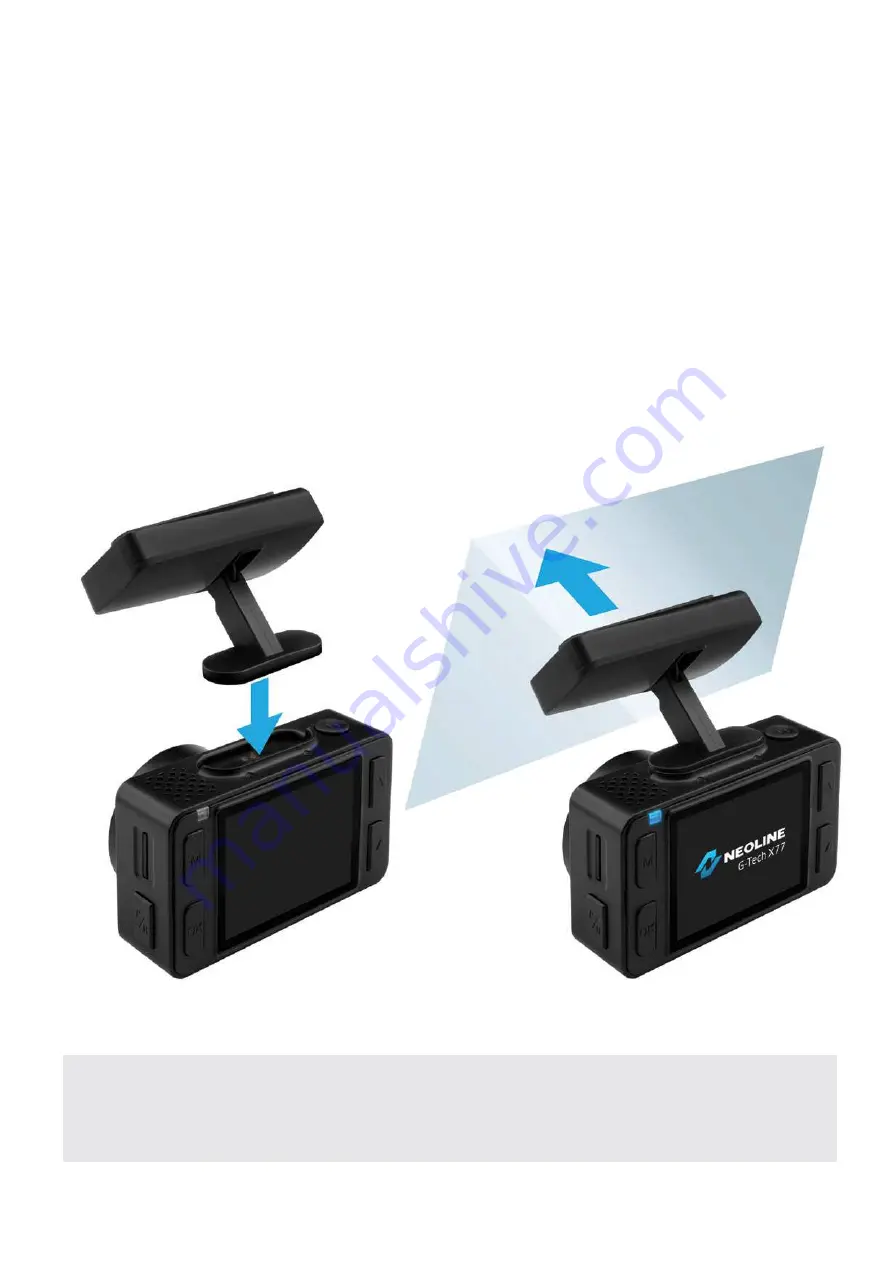
Installation on the windshield

- Choose the installation location in advance, as the adhesive tape on the mount 
is of single use.
- Degrease the mounting location and warm it up to ensure strong adhesion.
- Install the magnet holder into the device and turn the DVR on. When evaluating 
the display image, make sure that the horizontal is kept and the lens captures the 
image symmetrically both on the left and right side. Then remove the protective 
film from the surface of the adhesive tape and lean and press the mount against 
the windshield.

ATTENTION!

 The device only operates when installed into the mount 

properly.

Содержание G-TECH X77

Страница 1: ...NEOLINE G TECH X77 CAR DIGITAL VIDEO RECORDER User manual ...

Страница 2: ...nual carefully and all through to ensure proper use and longer service life of the device Keep the user manual to consult it when necessary Content 1 Operation Conditions 3 2 Specifications 5 3 Equipment 6 4 Description of the device and its buttons 7 5 DVR Installation 9 6 DVR Operation 12 7 Troubleshooting 18 ...

Страница 3: ... use of the device or software their incorrect installation or the use of accessories not included in the package ATTENTION In some cars the power is supplied to the 12 24V socket even when the ignition is off It is recommended to disconnect the device from the vehicle network to avoid the battery discharging Format the microSD card at least once every two months to avoid damage to its file system O...

Страница 4: ... may compromise detection of broadband signals and correct operation of the GPS module The satellite search time may increase due to the weather time of the day terrain conditions and certain features of the car ATTENTION NEOLINE is not responsible for any administrative penalties for violation of the traffic rules by the device owner The speed cameras and other traffic rules reporting are only to pro...

Страница 5: ...rmat MP4 Built in microphone speaker HDR function WDR function G sensor Parking mode Loop recording 1 2 3 5 min Continuous recording Auto Power On Date time stamp State number stamp 8GB to 256GB MicroSD Class 10 Storage temperature 20 to 70 Operating temperature 10 to 60 Input voltage 5V DC 1 5A Charging input voltage 12 24VDC Dimensions 74 x 42 x 35 mm Weight 93 g The DVR is designed to operate u...

Страница 6: ...6 3 Equipment Neoline G Tech X77 car digital video recorder DVR Magnet holder on scotch tape Car charger 1 USB connector CPL filter User Manual Warranty card ...

Страница 7: ...K 4 Display 5 DOWN button 6 UP button 7 Memory card slot 8 Hot key button 9 Power cable connector microUSB 10 Contact area 11 ON OFF button 12 RESET button 13 Microphone 14 Lens with a removable CPL filter 15 Power cable connector microUSB 16 Contact area 17 Built in GPS module 11 10 7 14 9 13 16 15 4 6 5 4 12 8 1 2 3 ...

Страница 8: ...ecording When in the menu use to confirm the selected menu item Press to move up the menu In the VIDEO and PHOTO mode press and hold to zoom in in Playback mode use to select a file Press to move down the menu VIDEO and PHOTO mode press and hold to delete the image if you used zoom before Playback mode press to select a file Press to block video recording Press and hold to activate an additional feat...

Страница 9: ...hesion Install the magnet holder into the device and turn the DVR on When evaluating the display image make sure that the horizontal is kept and the lens captures the image symmetrically both on the left and right side Then remove the protective film from the surface of the adhesive tape and lean and press the mount against the windshield ATTENTION The device only operates when installed into the m...

Страница 10: ...es the image in proportion of 30 sky 70 road Power connection To power the device and charge the battery use only the power adapter includ ed Connect the power cable to the mount or DVR and then plug the charger plug into the car s cigarette lighter socket When the car engine starts the device turns on automatically Note For best view the device should be installed near the rear view mirror in the...

Страница 11: ...nstructions below for the best video results 1 Install the DVR on the windshield in accordance with the recommendations above 2 Put a sheet of white paper on the dashboard 3 Rotate the CPL filter until the reflection of a sheet of white paper on the DVR screen is minimal At night it is recommended to remove the CPL filter to achieve the best recording result After adjusting the position of the CPL fil...

Страница 12: ...vice and or the memory card itself Make sure the memory card is in the correct position WARNING Do not apply excessive force when inserting a memory card to avoid damage to the device To insert a memory card insert the microSD card into the slot until it locks clicks if necessary use a needle to push the card further To remove the memory card push the card until it clicks and remove the card from ...

Страница 13: ...on or at collision Emergency recording is locked automati cally to avoid erasing during loop recording The files protected from overwriting are stored on the memory card in Locked folder ATTENTION Files in the Locked folder can occupy no more than 30 of the memory card space depending on the file size Once the Locked folder is full the device starts a loop recording into the Locked folder When the d...

Страница 14: ...0ms 1000ms Trigger Mode By motion sensor By shock sensor Both ATTENTION When the motion sensor is on the device consumes the car battery more actively Every time a motion is detected in front of the DVR the DVR starts recording automatically All files recorded in the Parking Mode are stored in the Parking folder Playback Delete Files Playback In Standby mode press and hold the M button to switch to...

Страница 15: ... Backup necessary files before proceed with deletion Speeding warning option Thanks to the use of artificial intelligence technologies the video recorder analyzes environment determines the signs of speed limits and notifies you in case of speeding both on display and playing sound ATTENTION The DVR determines the speed limit sign if such a sign is installed in accordance with standards The quality o...

Страница 16: ... 1080p 30 fps max granularity Full HD ECO 1920 1080p 30 fps normal granularity HD 60FPS 1280 720p 60 fps HD 30FPS 1280 720 30 fps VGA 640 480 Hot key Parking mode This setting assigns an additional function to the Hot key As you launch of the original accessories the firmware upgrades and the list of op tions for this setting expands Parking Mode Off On When On is selected the display shows a list o...

Страница 17: ...30 sec 1 min 3 min Key tones On off Language select the preferred menu language from the list Formatting reminder Off 15d 30d 60d Formatting Use the display instructions to format the memory card ATTENTION After formatting a memory card files cannot be recovered Before formatting save the necessary files to your computer Reset use to reset the device to factory settings Software version use to view th...

Страница 18: ...he microSD memory card 3 Insert the memory card with the file into the DVR memory card slot 4 Connect a power source and turn the device on 5 While the firmware file is downloading the indicator flashes 6 Once the update is complete the device restarts automatically 7 Enter Settings menu and check whether the correct firmware version is displayed 8 Format the memory card use the DVR menu ATTENTION If t...

Страница 19: ...iting failure due to microSD card file system error Format the microSD card Blurred image Check for dirt on the lens and the CPL filter If there is any wipe the lens with a soft cloth before use it is recommended to use special care products for the optics in order not to damage the surface of the lens Darkened image when taking pictures of the sky or water Too much con trast in the scene may affect ...

Отзывы: