Neoline G-TECH X62 Скачать руководство пользователя страница 8

8


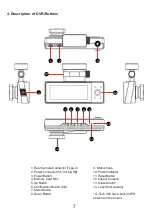
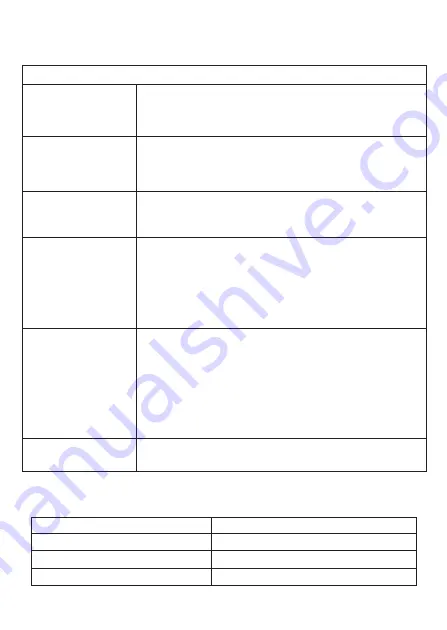
Description of the Buttons


Button 

Description


ON/OFF (It is active only 
when external power is 
connected)


Press and hold for ~3 sec to turn the device off. 
Press to turn the device on.


Press to turn on/off the display backlight when navigating the Menu or in 
Video Recording mode.


Меnu


Press to lock the current file from being overwritten in Playback mode. 
Press to go to the device Settings menu when in standby mode.


When navigating the menu and changing settings or viewing available 
settings, press to go to the Main Menu or to exit the Settings.


Up


Press to change the display of camera images when in Video Recording 
or Standby mode (not recording).


Press to move up or left when navigating Menu or in Playback mode.


Down


Press to enable or disable audio recording when in Video Recording or in 
Standby mode.


Press and hold for 2 sec. to save photos from all camcorders when in 
Video Recording mode.


When saving a photo with 

“Key

 Sound - 

Off”

 there is no on-screen alert 

or shutter sound.


Press to move down or right when navigating Menu or in Playback mode.


OK


Press to stop or to start recording when in Video Recording or in Standby 
mode.


Press and hold for ~ 2 sec to enter the Playback menu when in Standby 
mode.


While in the Playback menu, press and hold for ~ 2 sec.


You will exit the Menu and video recording will start automatically. 
Press to select a setting or to save changes when navigating the Menu.


Press to select a file for viewing or to start/stop viewing the selected file in 
Video Playback mode.


Reset


Press with a hard object of suitable diameter to force reset of the device if 
it does not respond to commands.


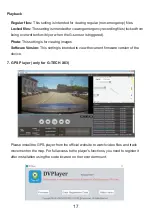
Operation Description


Status


Description


Flashing blue


Recording


Continuous red


Power on, no recording


Blinking blue/red


Updating the firmware


Содержание G-TECH X62

Страница 1: ...NEOLINE G TECH X62 X63 Car digital video recorder User Manual...

Страница 2: ...nual carefully and all through to ensure proper use and longer service life of the device Keep the user manual to consult it when necessary Contents 1 Operating Conditions 3 2 Specifications 5 3 Equip...

Страница 3: ...or software their incorrect installation or the use of accessories not included in the package Format the microSD card at least once every two months to avoid damage to its file system Observe the st...

Страница 4: ...sing the device Set the correct date and time if necessary Heating of the case during operation is normal Please handle the device with due care and avoid dropping crushing the device The manufacturer...

Страница 5: ...te time stamp State number stamp Coordinate speed stamp only for G Tech X63 Storage temperature 20 to 70 Operating temperature 10 to 60 Powered via microUSB connector Input voltage 5VDC 2 5A Charging...

Страница 6: ...Neoline G Tech X6x DVR Optional Full HD Camera only for G Tech X63 Additional Full HD Camera Cable 5 75m only for G Tech X63 Glass Mount Charger USB to MicroUSB Cable for connecting to a computer User...

Страница 7: ...ype C 2 Power Connector 5V microUSB 3 Power Button 4 Memory Card Slot 5 Up Button 6 Confirmation Button OK 7 Menu Button 8 Down Button 9 Microphone 10 Power Indicator 11 Reset Button 12 Interior Camer...

Страница 8: ...ecording or in Standby mode Press and hold for 2 sec to save photos from all camcorders when in Video Recording mode When saving a photo with Key Sound Off there is no on screen alert or shutter sound...

Страница 9: ...recorder in advance Hold the holder base firmly and secure it to the windshield CAUTION Adjusting the viewing angle can only be done along the vertical line so be sure to position the device correctl...

Страница 10: ...nection Use only the supplied charger to power the device Connect the charger to the DVR and then plug the charger plug into the car s cigarette lighter socket When the car engine starts the recording...

Страница 11: ...until it is fully seated after disconnect ing the device from the power supply Installing the card Turn the microSD card to the slot as shown in the picture and insert it until it clicks Removing a c...

Страница 12: ...car and fix it by adjusting the viewing angle according to the camera level on the vehicle 2 Route the additional camera cable under the car trim and connect it to the camera 3 Connect the additional...

Страница 13: ...default is designed to create video files of a certain length When there is no more space left on the memory card the device will automatically replaces the oldest video file with the newest one an e...

Страница 14: ...se download the firmware file at www neoline com and extract the file 2 Format the memory card and move the firmware file s bin to the microSD memory card 3 Insert the memory card into the DVR memory...

Страница 15: ...files in Menu selecting the Format option In this case all files including those from the Locked Files directory will be deleted from the memory card You may also do this with your computer Use a USB...

Страница 16: ...codec h 265 For example VLC media player System Settings Settings Language the setting is for selecting the Menu language Date Stamp This setting is for imposing date stamp on files Time Zone This set...

Страница 17: ...nsor is triggered Photo This setting is for viewing images Software Version This setting is intended to view the current firmware version of the device 7 GPS Player only for G TECH X63 Please install...

Страница 18: ...ds by proven manufacturers Wrong file message appears when trying to view a photo play a video file File writing failure due to microSD card file system error If you cannot play the selected file on t...

Страница 19: ...Manufacturer for UAB NEOLAINAS Made in PRC Warranty 12 months Service life 36 months 5VDC 2 5A Operating temperature 10 to 60 Importer and authorized service organization please see the package...

Отзывы: