8. Stopping your sprinkler
When your sprinkler rides over the shut-off
ramp, the stopper is pushed up, shutting the
sprinkler off. To reposition your hose and
sprinkler for another part of your yard, first turn
off the water. (You will find it very difficult to
pull the stopper down if the hose is still
pressurized.) Bleed some water pressure from
your hose. Then, pull the stopper out to reset it
and proceed to lay out a new hose pattern on
the unwatered portion of your lawn.
9. Maintaining your sprinkler
Follow these tips to keep your sprinkler
working at peak performance: Keep the filter
washer at the hose coupling clean. If the water
flow through the spray arms seems a little
sluggish, check to be sure that nothing is
obstructing the filter washer. If that does not
solve the problem, clean out the spray arms.
Do not drop the sprinkler; this may cause
damage. Always drain the sprinkler after using
it and before storing it away for the winter
(freezing water inside the motor can damage
it). To drain, stand the sprinkler on its back end
and tilt it against a wall; let stand for 5 minutes
so all the water runs out. Note: make sure the
stopper is pulled out so the water can drain.
10. To prevent stripping the gears
Do not push or pull the sprinkler while it is
operating. Do not let the sprinkler bog down in
mud, wet grass, or low spots so that the
wheels keep turning without the sprinkler
moving. Ensure there is no debris obstructing
the path of your traveling sprinkler. The wheels
are made to pull across grass. Never try to
operate your sprinkler on sidewalks or
driveways. Severe damage to the motor
can result from such misuse.
11. Removing Your Motor Assembly
a. Remove spray arms and unscrew tee from
motor assembly.
b. Use a screwdriver of 5/16” nut driver to
remove the 5 screws that hold the motor
assembly to the body. Remove the body.
c. Remove wheels and hubs. Vise grips are
used to remove the silver hub from the
wheel. Lock onto the hub and rock back and
forth until the hub comes off.
12. Repair Instructions
TOOLS NEEDED TO COMPLETE RAINTRAIN
REPAIR: screwdriver, vise grips, channel lock
pliers, 3/8 inch allen wrench, 5/16 nut driver and
light grease.
BODY/MOTOR: Using screwdriver or 5/16 nut
driver, remove 5 screws holding body to motor
assembly.
SELECTOR ASSEMBLY: Use screwdriver or
5/16 nut driver to loosen screw that holds down
selector assembly.
HUBS/WHEELS: Vise grips are used to remove
silver hub from wheel. Lock on hub and rock back
and forth until hub comes off. Remove the left
hand side wheel to replace gears on drive axle.
Make sure that the hose coupling fitting is pointed
towards you. This will determine your left side.
MOTOR TEE: Channel locks are used for holding
worm bearing assembly where the tee screws in.
Hold worm bearing and remove tee.
WORM BEARING ASSEMBLY: 3/8 inch allen
wrench is used to remove the worm bearing
assembly. The allen wrench is placed in the same
hole where the tee is located. Removing the
worm bearing assembly allows you to separate
the upper motor housing from the lower housing.
CAUTION: When screwing worm bearing
assembly into the lower motor housing, you are
screwing brass into plastic. If over tightened,
the housing will split. Rule of thumb: tighten
until it feels snug then go a 1/4 of a turn.
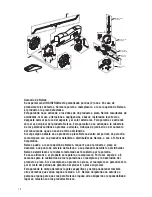
GEARS: Make sure all gears are put on as
shown in the Parts List section. Gear shaft
assembly No. 8 has a slot in axle that must fit
into the housing slotted side.
AXLE BEARING: Axle bearings have a line
pattern on them. This pattern must fit into the
corresponding housing pattern. Otherwise
housing will not fit properly and gears will not
mesh together correctly.
LIGHT NON-PETROLEUM BASED GREASE
should be applied to all gears and worm
bearing. Consult your local hardware or home
improvement store to locate the availability in
your area.
WE AT NELSON HOPE THESE INSTRUCTIONS
WILL PROVE TO BE BENEFICIAL TO YOU. IF
AFTER FOLLOWING THESE INSTRUCTIONS
YOU STILL HAVE QUESTIONS OR NEED SOME
ONE TO WALK YOU THROUGH YOUR REPAIR,
FEEL FREE TO GIVE US A CALL AT
1-800-635-7668.
8:00 A.M. - 5:00 P.M. (CST)
Monday - Friday
3


