background image

en 

Detergents and care products

32

– Separate items of laundry and

shake them out, or observe the
programme description

Detergents and care products

12 Detergents and care

products

Detergents and care products

Notes

¡

More detailed instructions for use
can be found on www.bosch-
home.com or by scanning the QR
code on the title page of this user
manual.

¡

Observe the information on safety
→ 

Page 4

 and preventing material

damage → 

Page 10

.

The manufacturer's instructions for
use and dosage can be found on the
packaging.

Notes

¡

Only use liquid detergents that are
self-flowing

¡

Do not mix different liquid deter-
gents

¡

Do not mix detergent and fabric
softener

¡

Do not use products that have ex-
pired or are highly congealed

¡

Do not use products containing
solvents, caustic agents or volatile
substances (e.g. bleach)

¡

Use dyes sparingly as salt may
damage stainless steel

¡

Do not use bleaching agents in the
appliance

Basic operation

13 Basic operation

Basic operation

Note: 

You can find further information

in the digital instruction manual by
scanning the QR code in the table of
contents or on www.bosch-
home.com.

13.1 Switching on the appli-

ance

Requirement:

 The appliance has

been correctly installed and connec-
ted. 
→ 

"Installation and connection",

Page 12

Turn the programme selector to a
programme.

Note: 

The lighting for the drum goes

out automatically.

13.2 Setting a programme

1.

Turn the programme selector and
set the required programme. 
→ 

"Programmes", Page 28

2.

If necessary, adjust the pro-
gramme settings → 

Page 32

.

13.3 Adjusting the pro-

gramme settings

Requirement:

 A programme has

been set. 
→ 

"Setting a programme", Page 32

Adjust the programme settings. 
→ 

"Buttons", Page 27

Note: 

The programme settings are

not saved permanently for the pro-
gramme.

13.4 Loading laundry

Note: 

To prevent creasing, take note

of the maximum load for the 
→ 

"Programmes", Page 28

.

Requirement:

 The laundry is pre-

pared.
→ 

"Laundry", Page 31

1.

Open the door.
Make sure that the drum is empty.

2.

Place the laundry in the drum.

3.

Close the door.

Содержание W543BX1GB

Страница 1: ...Washing machine en User manual and installation instructions W543BX1GB...

Страница 2: ...ance 21 4 9 Connecting the appliance to the electricity supply 21 5 Familiarising yourself with your appliance 22 5 1 Appliance 22 5 2 Detergent drawer 23 5 3 Control panel 23 6 Before using for the f...

Страница 3: ...of lock 35 15 Basic settings 35 16 Cleaning and servicing 36 16 1 Cleaning the drum 36 16 2 Cleaning the detergent drawer 36 16 3 Cleaning the drain pump 37 17 Troubleshooting 40 17 1 Emergency releas...

Страница 4: ...cts suitable for washing machines In private households and in enclosed spaces in a domestic en vironment Up to an altitude of max 4000 m above sea level 1 3 Restriction on user group This appliance m...

Страница 5: ...e g a timer or remote control When the appliance is installed the mains plug of the power cord must be freely accessible If free access is not possible an all pole isolating switch must be installed...

Страница 6: ...ances may tip over WARNING Risk of suffocation Children may put packaging material over their heads or wrap themselves up in it and suffocate Keep packaging material away from children Do not let chi...

Страница 7: ...use the appliance in enclosed spaces Never expose the appliance to intense heat or humidity Do not use steam or high pressure cleaners hoses or sprays to clean the appliance WARNING Risk of harm to he...

Страница 8: ...on or lean against the open door Do not sit on or lean against the appliance door Do not place any objects on the appliance door Reaching into the drum while it is still turning may cause hand in jur...

Страница 9: ...st be re placed by the manufacturer the manufacturer s Customer Ser vice or a similarly qualified person in order to prevent any risk An ingress of moisture can cause an electric shock Do not use stea...

Страница 10: ...elements such as adapters exten sions valves or similar Make sure that the valve housing for the water inlet hose does not come into contact with its sur roundings and is not subjected to any external...

Страница 11: ...gent is suffi cient Observe the dosage recom mendation from the detergent manufacturer Reduce the washing temperature for lightly and normally soiled laundry a At lower temperatures the appli ance con...

Страница 12: ...rate properly or this may result in material damage or damage to the appliance Do not operate the appliance with incomplete or defective accessor ies Replace the accessories in ques tion before operat...

Страница 13: ...unit Only install the appliance under neath a continu ous worktop that is securely con nected to adja cent cabinets Required niche width 60 cm Note The use of sliding plates Accessories Page 31 makes...

Страница 14: ...olts on the rear of the appliance Note Keep the transit bolt screws and the sleeves in a safe place for fu ture transport 1 Pull the hoses out of the holders 2 Unscrew and remove all 4 screws for the...

Страница 15: ...e appliance 1 To make it easier to slide in the appliance turn in the appliance s rear feet until the appliance is on the runners 2 Measure the built in niche 3 Lay the power cord as well as the water...

Страница 16: ...any cabinet doors with metal elements in the area of the control panel 1 Hold the cabinet door at the re quired height on the appliance and mark the upper edge of the appli ance on the inside of the d...

Страница 17: ...ight hand stop 3 At the previously marked points use a Forstner 35 mm drill to drill the holes for the hinges At the previously marked points use a 2 mm twist drill to drill holes for the screws 4 Ins...

Страница 18: ...8 6 Insert the hinges into the appliance 7 Slide in the covering rail and screw it in 8 Put the magnetic catches on the appliance Aligning the cabinet door Vertically aligning the cabinet door Horizon...

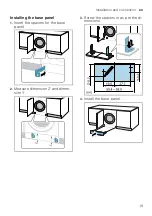
Страница 19: ...llation and connection en 19 Installing the base panel 1 Insert the spacers for the base panel 2 Measure dimension Z and dimen sion Y 3 Screw the spacers in as per the di mensions 4 Install the base p...

Страница 20: ...check that the connection points are tight Water outlet connection types This information is intended to help you to connect this appliance to the water outlet ATTENTION When draining the water outlet...

Страница 21: ...feet Check that the appli ance is level using a spirit level All appliance feet must stand firmly on the ground 3 Screw the lock nuts tightly against the housing using a WAF 17 wrench In doing so hold...

Страница 22: ...can find an overview of the parts of your appliance here 1 2 3 4 5 6 7 7 8 9 On certain models specific details such as the colour and shape may differ from those pictured 1 Maintenance flap for the d...

Страница 23: ...in wash Water softener Bleach Stain remover 3 Compartment Fabric softener Liquid starch Waterproofing agent 4 Compartment I Detergent for prewash Hygiene detergent 5 3 Control panel You can use the co...

Страница 24: ...out the detergent drawer 4 Pour approx 1 litre of tap water into compartment II 5 Pour standard washing powder into compartment II To prevent foaming use only half of the amount of detergent recom me...

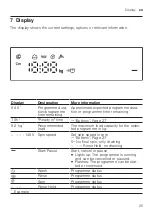
Страница 25: ...ady in time Buttons Page 27 8 0 kg 1 Recommended load The maximum load capacity for the selec ted programme in kg 1400 Spin speed Set spin speed in rpm Buttons Page 27 0 No final spin only draining Ri...

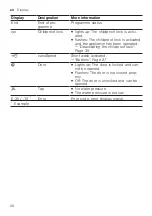
Страница 26: ...tivated and the appliance has been operated Deactivating the childproof lock Page 35 varioSpeed Short wash activated Buttons Page 27 Door Lights up The door is locked and can not be opened Flashes The...

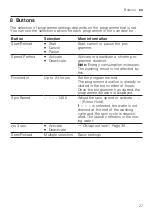
Страница 27: ...on Note Energy consumption increases The washing result is not affected by this Finished in Up to 24 hours Set the programme end The programme duration is already in cluded in the set number of hours...

Страница 28: ...ether The washing performance corresponds to the best possible washing performance class according to the legal requirements For this programme the washing temperature is automatically adjusted depend...

Страница 29: ...clips in a mesh laundry bag Programme setting Max 30 C Max 800 rpm 2 0 Wool Hand or machine washable items that are made from wool or contain wool To prevent the laundry from shrinking the drum moves...

Страница 30: ...Delicates Silk programme to wash shirts and blouses made from silk or delicate fab rics Programme setting Max 40 C Max 800 rpm 2 0 Su per Quick 15 3 0 Wash items made from cotton or synthetic or blen...

Страница 31: ...ents or on www bosch home com 11 1 Preparing the laundry ATTENTION Objects remaining in the laundry may damage the laundry and the drum Remove all items from any pock ets in your laundry before using...

Страница 32: ...the appliance Basic operation 13 Basic operation Basic operation Note You can find further information in the digital instruction manual by scanning the QR code in the table of contents or on www bosc...

Страница 33: ...liquid detergent you can use a measuring aid in the detergent drawer 1 Pull out the detergent drawer 2 Slide the measuring aid forwards 3 Fold the measuring aid down and click it into place 4 Push in...

Страница 34: ...lay indicates the desired Ready in time 3 Press Start Reload The changed Ready in time is ac tivated 13 10 Soaking laundry Note No additional detergent is re quired The washing solution is then used f...

Страница 35: ...k Secure your appliance against being operated unintentionally using the controls 14 1 Activating the childproof lock Press and hold the two 3 sec buttons for approx 3 seconds a The display shows a Th...

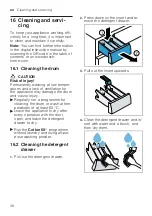
Страница 36: ...ng at low temper atures and a lack of ventilation for the appliance may damage the drum and cause injury Regularly run a programme for cleaning the drum or wash at tem peratures of at least 60 C Leave...

Страница 37: ...ning the drain pump Clean the drain pump in the event of faults e g blockages or rattling noises Emptying the drain pump 1 Turn off the water tap 2 Switch off the appliance 3 Disconnect the appliance...

Страница 38: ...press on the sealing cap 9 Insert the drain hose into the holder Cleaning the drain pump Requirement The drain pump is empty 1 Since water may remain in the drain pump unscrew the pump cap carefully...

Страница 39: ...pump cap must be in a vertical position 6 Install the base panel Before the next wash To prevent unused detergent from flowing straight into the outlet in the next wash run the Drain programme after y...

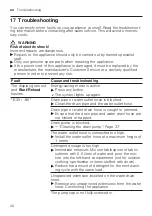
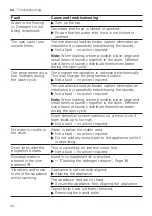
Страница 40: ...mode is active Press any button a The symbol lights up again E 30 80 Drain pipe or water outlet hose is blocked Clean the drain pipe and the water outlet hose Drain pipe or water drain hose is caught...

Страница 41: ...e that the water inlet hose is not kinked or jammed E 35 10 There is water in the base trough Turn off the water tap Call the after sales service Customer Service Page 48 The appliance is leaking Turn...

Страница 42: ...ripped Check the circuit breaker in the fuse box There has been a power cut Check whether the lighting in your kitchen or other appliances are working The programme does not start You have not pressed...

Страница 43: ...mme by selecting Spin or Drain and pressing Start Reload Resuming the programme when the programme status is Rinse Hold Page 35 The water outlet hose is connected too high Install the water outlet hos...

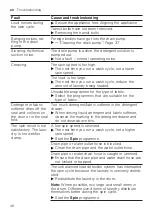
Страница 44: ...by repeatedly redistributing the laundry Not a fault no action required Note When loading where possible place large and small items of laundry together in the drum Different sized items of laundry di...

Страница 45: ...Where possible mix large and small items in the drum Different sized items of laundry distribute themselves better during the spin cycle Start the Spin programme The spin programme does not start Drai...

Страница 46: ...c softener drips off the seal and collects on the door or in the seal fold Too much detergent fabric softener in the detergent drawer When dosing liquid detergent and fabric softener observe the marki...

Страница 47: ...ents may contain water insoluble substances that deposit on the laundry Brush out the laundry after washing and drying Water is leaking out at the water inlet hose Water inlet hose is not correctly se...

Страница 48: ...of charge Detailed information on the warranty period and terms of warranty in your country is available from our after sales service your retailer or on our website If you contact Customer Service yo...

Страница 49: ...Stop according to our instructions this also in cludes correctly fitting the Aqua Stop extension genuine access ory Our guarantee does not cover defective supply lines or fittings up to the Aqua Stop...

Страница 50: ...ton 60 C 8 0 3 16 1 200 84 0 53 1400 52 00 Cotton 40 C 8 0 3 45 1 130 89 0 45 1400 52 00 Easy Care 40 C 4 0 2 30 0 740 62 0 44 1200 30 00 Mixed Load 40 C 4 0 1 00 0 590 41 0 41 1400 55 00 Wool 30 C 2...

Страница 51: ...rgy efficiency class F These light sources are available as a spare part and must only be replaced by trained specialist staff You can find more information about your model online at https eprel ec e...

Страница 52: ...Wery Stra e 34 81739 M nchen GERMANY Valid within Great Britain Imported to Great Britain by BSH Home Appliances Ltd Grand Union House Old Wolverton Road Wolverton Milton Keynes MK12 5PT United Kingd...

Отзывы: