en
Ú
Installation instructions
You must note the following
Electrical connection:
Must only be carried out by a licensed
expert. Incorrect connection will invalidate the warranty.
Installation:
Must only be carried out by a professional. The
fitter is liable for any damage.
Hob and cooker:
Must only be from the same brand and have
the same combination feature.
Protection against accidental contact:
Must be ensured
through the manner of installation.
Installation instructions:
Must be observed for the cooker.
Work surface:
Level, horizontal, stable.
Preparing the units - Figure 1
Fitted unit:
Heat resistant to at least 90 °C.
Cut-out:
After cutting the necessary holes in the work surface,
remove the shavings.
Cut surfaces:
Seal with heat-resistant material.
New installation A:
See drawing for cut-out dimensions.
Replacement of a hob with wide cut-out B:
Check and adapt
the cut-out dimensions. Screw the wooden borders in place so
that they are flush with the upper edge of the worktop.
Granite or marble work surfaces:
Insert wall plugs or sockets
for the securing screws or affix wooden battens.
Attaching securing rails - Fig. 2
Tiled work surfaces:
Use the lower screw holes.
Stone material work surfaces:
Affix securing rails.
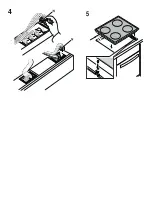
Connecting the hob - Figs 3 and 4
The cooker must be connected to the mains, but switched off.
Put the
hob
down as shown in Fig. 3.
1.
Screw the hob's
PE conductor (green/yellow)
onto the cooker
earthing point
<
.
2.
Plug the
hotplate plug
into the cooker - see Fig. 4. The colour
of the cable must correspond to the colour shown on the label.
The lug
N
on the plug must point to the left.
Fitting the hob - Fig. 5
Cables:
Do not trap cables when fitting.
Push the hob in until it locks into place.
Removing the hob
Disconnect the appliance from the power supply.
Pull out the cooker a short distance. Unplug the cooking zone
plug. Finally, disconnect the
PE
conductor (green/yellow) from
the earthing screw.
Push out the hob from below.
Содержание M14R72N2
Страница 1: ...9000750391 9000750391 000311 Montageanleitung Installation instructions 5 5 5 PLQ PLQ 5...
Страница 2: ......


