en
Steam
18
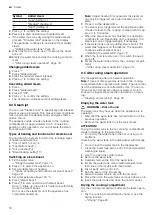
Symbol
Added steam
"Low" (Setting 1)
"Medium" (Setting 2)
"High" (Setting 3)
7.
Press
to confirm the setting.
8.
Press to start operation with added steam.
a
If the water tank runs dry during the added steam
process, "Fill water tank" appears on the display.
The appliance continues to operate without added
steam.
"Refilling the water tank", Page 16
9.
When the food is ready, use to switch the appli-
ance off.
10.
Empty the water tank and dry the cooking compart-
ment.
"After using steam operation", Page 18
Changing added steam
1.
Press .
2.
Press "Added steam".
3.
Press the required steam intensity.
4.
Press
to confirm the setting.
Cancelling added steam
1.
Press .
2.
Press "Added steam".
3.
Press "Off".
4.
Press
to confirm the setting.
a
The operation continues without adding steam.
9.4 Steam jet
You can use "Steam boost" to specifically add intensive
steam at various intervals. This makes bread and bread
rolls in particular wonderfully crispy and gives them a
golden colour.
The appliance adds clouds of steam to the cooking
compartment for approximately 3 to 5 minutes. De-
pending on the operation, you can activate the steam
boost several times.
Types of heating and functions for steam boost
You can switch on steam boost for the following types
of heating and functions:
¡
"Circo Therm hot air"
¡
"Top/bottom heat"
¡
"Circo-roasting"
¡
"Bread baking setting"
Switching on steam boost
1.
Fill the water tank.
"Filling the water tank", Page 15
2.
Press to switch the appliance on.
3.
Set a suitable type of heating.
"Types of heating and functions for steam boost",
4.
Set a temperature above 120 °C.
5.
Press "Steam boost".
6.
Press to start operation with steam boost.
Once lights up, the water is heated up sufficiently
to use the steam boost.
Do not use the steam jet until the appliance has
completely heated up.
Note:
If rapid heating is activated, the steam jet
can only be triggered once rapid heating is com-
plete.
7.
Press at the desired time.
a
The steam jet is triggered and the appliance adds
clouds of steam to the cooking compartment for ap-
prox. 3 to 5 minutes.
a
When the steam boost has finished, the operation
continues to run. Depending on the operation, the
steam jet can be triggered again if necessary.
a
If the water tank runs dry during steam boost, "Fill
water tank" appears on the display. The operation
continues without steam boost.
"Refilling the water tank", Page 16
8.
When the food is ready, use to switch the appli-
ance off.
9.
Empty the water tank and dry the cooking compart-
ment.
"After using steam operation", Page 18
9.5 After using steam operation
Dry the appliance after each steam operation.
Note:
Traces of limescale may remain in the cooking
compartment after operation with steam. The functional-
ity of the appliance is not affected by this. You can re-
move traces of limescale using hot water or a cloth
soaked in vinegar. Observe the information on clean-
ing.
"Cleaning and servicing", Page 25
Emptying the water tank
WARNING ‒ Risk of burns!
The water tank may heat up while the appliance is in
operation.
▶
Wait until the water tank has cooled down from the
previous operation.
▶
Remove the water tank from the tank recess.
ATTENTION!
Drying the water tank in the hot cooking compartment
leads to damage to the water tank.
▶
Do not dry the water tank in the hot cooking com-
partment.
Cleaning the water tank in the dishwasher will damage
it.
▶
Do not clean the water tank in the dishwasher.
▶
Clean the water tank with a soft cloth and standard
washing-up liquid.
1.
Use to open the control panel.
2.
Remove the water tank.
3.
Carefully remove the lid of the water tank.
4.
Empty the water tank, clean it with detergent and
then rinse it thoroughly with clean water.
5.
Dry all parts with a soft cloth.
6.
Rub the seal on the lid until dry.
7.
Leave the water tank to dry with the lid open.
8.
Place the lid on the water tank and push down on it.
9.
Insert the water tank and close the control panel.
Drying the cooking compartment
Dry the cooking compartment after each steam opera-
tion.
▶
Dry the cooking compartment by hand or use the
drying function.
Содержание B59FS3A 0 Series
Страница 1: ...Combi steam oven User manual and installation instructions B59FS3A 0...
Страница 58: ......
Страница 59: ......


