


50
Cleaning and Care
Important cleaning basics:
❑
For cleaning, do not use abrasives, no corrosive cleaners, and no sharp objects.
❑
Do not scratch off burnt-in food residues, but soak them off with a moist cloth and
dishwashing detergent.
❑
Special cleaners, such as oven cleaning spray, must not be used on aluminium or plastic
parts.
Stainless steel front:
❑
When using commercially available
stainless steel cleaning agents, the
lettering may become damaged.
❑
Do not use scouring sponges.
❑
Use commercially available detergents
applied to a soft, moistened cloth or a
chamois.
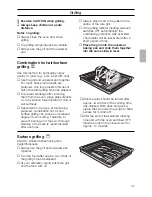
Enamel and glass:
❑
Use hot detergent suds for cleaning.
❑
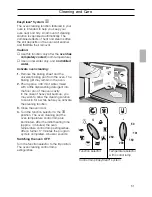
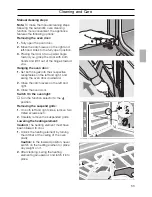
For cleaning the mating surface of the
oven door at the front of the oven, the
door should be removed.
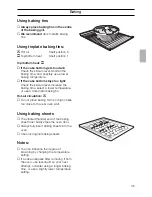
Oven interior:
❑
Clean the oven after each use,
especially after roasting or grilling.
Food remnants burn in when the oven is
reheated.
The baked in remnants are very difficult
to remove once burnt in.
❑
You can reduce the degree of soiling by
frequent cleaning using the hot-air
system.
Do not clean the warm oven with any
of the cleaning products specifically
designed for this purpose.
❑
When baking very moist cake, use the
universal baking pan.
❑
For roasting, use the appropriate
utensils (Dutch oven).
❑
Clean the oven before soiling becomes
too heavy. Wash out the oven cavity
with hot detergent suds.
❑
Leave the door open until the interior
has dried.
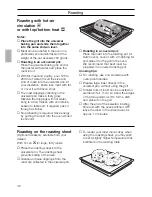
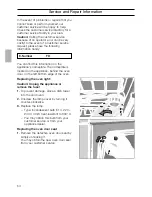
Oven door pane:
❑
The temperature of the pane inside the
oven door is reduced by a heat-
reflecting coating.
❑
The reduced temperature ensures that
visibility through the oven door window
is not impaired.
❑
When the oven door is open, this
coating may have a bright appearance.
This is quite normal and does not
indicate a quality defect.
Содержание B1541N
Страница 1: ...de Gebrauchsanweisung en Instructions for use de en...
Страница 2: ...2 de Seite 003 032 en page 033 055...
Страница 56: ...56 Notizen...
Страница 57: ...57 Notizen...
Страница 58: ...58 201 542 Notizen...
Страница 59: ......
Страница 60: ...B 1541 B 1855 N2 5750 201 542 Printed in Germany 0503 Es...


