background image

FilterCart Original

EN

14

Directions for use

The unit is only intended for indoor use and is designed for extraction and 

filtration of dust or welding fumes. It must not be used for extraction of fluids. 

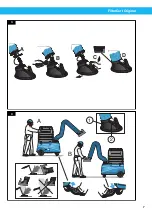
Figure 4 and the following list illustrates how to use the unit:

1. 

Lever for adjusting the damper.

2. 

Switch for spotlight. 

The hood of the extraction arm is to be positioned as close to the pollution 

source as possible. The unit is to be moved from behind according to Figure 4, 

item A and with the wheels unlocked. The extraction arm is to be positioned 

with the wheels locked according to item B.

WARNING! 

Work safety regulations. Risk of personal injury, fire or 

explosion.

• The unit must not be used in an environment with danger of explosion or for 

dust or gases in explosive concentrations.

• 

If the unit has been used for dust applications it must not be used for 
welding fumes or grinding dust.

• The unit must not be used for extracting toxic substances.

• The unit must not be used without filter cartridge and casing.

Changing the filter cartridge

The filter cartridge is disposable and is to be thrown-away after use. The life of 

the filter cartridge varies greatly depending on how the unit is used, how much 

and what type of pollutants are collected.

Regularly monitor the unit’s extraction capacity at the hood and change the 

filter cartridge when the extraction capacity is too poor. Always check that 

the hoses for the extraction arm and the fan inlet are not damaged before it is 

decided to change the filter cartridge.

WARNING! 

Risk of personal injury.

Use necessary personal safety equipment when replacing the filter cartridges.
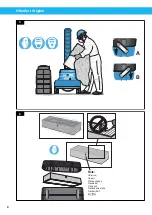
Change the filter cartridge as follows (see also Figure 5):

1. 

Disconnect the mains connection cable.

2. 

Unlock the eccentric locks and remove the filter casing.

3. 

Use the plastic bag which comes with the new filter cartridge and pull it 

over the used cartridge. Fold the plastic bag under the cartridge.

4. 

Handle the used filter cartridge according to the relevant regulations for 

the collected substances.

5. 

Wipe off the filter cartridge contact surfaces in the unit.

6. 

Check that the new filter cartridge is not damaged. Then fit it on the unit.

7. 

Refit the filter casing. Make sure the eccentric locks tighten the filter 

casing properly.

• 

A: Increasing the locking power.

• 

B: Decreasing the locking power.

Содержание FilterCart Original

Страница 1: ...EN USER MANUAL Translation of original User Manual DA BETJENINGSVEJLEDNING DE BEDIENUNGSANLEITUNG ES MANUAL DE INSTRUCCIONES FI K YTT OHJEET FR MANUEL D INSTRUCTION IT MANUALE D ISTRUZIONE NL HANDLEID...

Страница 2: ...FilterCart Original 2 Declaration of conformity 3 Figures 6 English 11 Dansk 17 Deutch 23 Espa ol 29 Suomi 35 Fran ais 41 Italiano 47 Nederlands 53 Polski 59 Portugu s 65 71 Svenska 77 83...

Страница 3: ...lh rer den person der er ansvarlig for s vel overensstemmelseserkl ringen som den tekniske dokumentation Dansk DA Declaraci n de Conformidad Nosotros AB Ph Nederman Co declaramos bajo nuestra nica res...

Страница 4: ...poni szych dyrektyw i norm Dyrektywy 2006 42 EC 2004 108 EC 2006 95 EC Normy EN 60204 1 EN ISO 12100 1 EN ISO 12100 2 EN ISO 15012 1 EN 61000 3 3 EN 61000 6 2 EN 61000 6 4 Na ko cu niniejszego dokume...

Страница 5: ...EC 2006 95 EC EN 60204 1 EN ISO 12100 1 EN ISO 12100 2 EN ISO 15012 1 EN 61000 3 3 EN 61000 6 2 EN 61000 6 4 ZH AB Ph Nederman Co P O Box 602 SE 251 06 Helsingborg Sweden Lars Nagy Manager Product Cen...

Страница 6: ...FilterCart Original 6 240 min 730 29 160 6 3 770 30 3 1145 45 1410 55 5 2 m arm max 1650 65 3 m arm max 2050 81 max 2000 79 3000 118 1 2 3 Figures 1 110 230 240 V 50 Hz 1 120 V 60 Hz 1 2...

Страница 7: ...FilterCart Original 7 D C B A 3 2 1 A B 4...

Страница 8: ...FilterCart Original 8 A B Note UP arrow Pfeil nach oben Fl che HAUT Flecha hacia arriba Freccia SU Yl s nuoli Upp pil 5 6...

Страница 9: ...FilterCart Original 9 7...

Страница 10: ...FilterCart Original 10...

Страница 11: ...t Original 1 Preface 12 2 Hazard notices 12 3 Technical and electrical data 12 4 Hood mounting instruction 13 5 Directions for use 14 6 Changing the filter cartridge 14 7 Changing the HEPA filter acce...

Страница 12: ...without introducing these improvements on previously supplied products We also reserve the right without previous notice to modify data and equipment as well as operating and maintenance instructions...

Страница 13: ...max airflow temp 60 C 140 F Noise level 73 dB A ISO 11203 Material recycling 90 weight without filter cartridge See type label See wiring diagram Figure 2 for electrical details E1 20 W 24 V F1 Start...

Страница 14: ...tridge is disposable and is to be thrown away after use The life of the filter cartridge varies greatly depending on how the unit is used how much and what type of pollutants are collected Regularly m...

Страница 15: ...raly 8 Maintenance Installation repair and maintenance work must be carried out by qualified personnel using only original spare parts Contact your nearest authorised distributor or AB Ph Nederman Co...

Страница 16: ...ate Detail number and name of the spare part see www nederman com Quantity of the parts required 9 Recycling The product has been designed for component materials to be recycled Its different material...

Отзывы: