background image

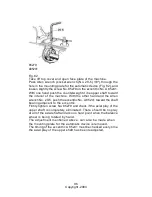
20026

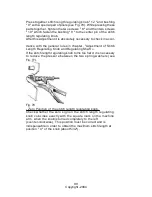
0,011" ^ 0,015

D85506 

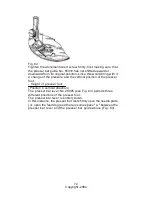
Fig. 76 

Insert the longer end portion of the regulating shaft pin " 13 " into 

the proper hole in the rear side of the arm. 

Note. - 

While assembling the regulating shaft " 11 ", care must 

be taken that the pivot " 10 " in the reverse stitching control plate 

" 5 " is located between the two thread portions of the regvilating 

shaft, as shown in Fig. 76. 

85

Copyright -2004

Содержание Supernova

Страница 1: ...Instructions For Servicing The Necchi Supernova Sewing Machine 1 Copyright 2004...

Страница 2: ...0 Lubrication 11 ADJUSTING THE MOVEMENTS OF THE VARIOUS GROUPS OF PARTS IN RELATION TO EACH OTHER TIMING THE MACHINE 12 Timing of shuttle and needle bar in the SUPERNOVA 13 Timing of feed dog and need...

Страница 3: ...nderside of the presser foot and the teeth of the feed dog 60 5 Minor adjustments of the Feed Dog 62 HOW TO CONTROL THE PRESSURE OF THE PRESSER FOOT62 Positioning of presser bar and presser foot 63 He...

Страница 4: ...of the Stitch Length Regulating Knob 82 ADJUSTMENT OF THE FEED DOG DISENGAGING ME CHANISM See figs 79 and 80 83 ADJUSTMENT OF THE ECCENTRIC N 85663 ON THE NEEDLE POSITIONING LEVER N C 85662 Fig 81 86...

Страница 5: ...nting Plate N C A 26 1 1 for the Automatic Device see Fig 98 104 TAKING CARE OF THE SEWING MACHINE MOTOR 108 A Motor does not run at all or runs only sluggishly 108 B How to replace the motor brushes...

Страница 6: ...nes designed for household use works on the principle of the Lockstitch This type of stitch is obtained by interlocking the upper and lower thread inside the fabric while the needle going down to its...

Страница 7: ...is also derived from the rotary movement of the arm shaft by means of cranks and a connecting link The bobbin case is placed on the post inside the oscillating shuttle and then pressed into the oscil...

Страница 8: ...ith certainty whether the machine sews correctly or not and consequently whether repairs are required Many times a customer calls in a mechanic to have a machine repaired which supposedly is out of or...

Страница 9: ...truction Booklet To insert the needle proceed as follows Turn the balance wheel by hand toward you until the needle bar reaches its highest position then insert the needle so that the flat portion Fig...

Страница 10: ...Correct threading of the SUPERNOVA when using one needle Proceed as follows Fig 3 Bring the needle to its highest position by tiring the balance wheel towards you 10 Copyright 2004...

Страница 11: ...Finally guide the thread from left to right through the eye of the needle T pull the thread through the needle eye leaving about four inches of free thread hanging down from the needle Threading of th...

Страница 12: ...when the machine is at a standstill Turn the design regulating knob clockwise until the square mark is in line with the mark above this knob Turn the balance wheel for one full turn toward you Turn th...

Страница 13: ...Swing back the Cam Disengaging Lever entirely to the right as far as it will go The machine is now ready for straight sewing Fig 5 Fig 6 Cleaning of shuttle race and feed dog Bring the needle up to i...

Страница 14: ...inging them sideways and with left hand remove the race cover plate T by turning it away From the race g Remove shuttle hook R by gripping its center stud with thumb and forefinger of left hand and pu...

Страница 15: ...15 Copyright 2004...

Страница 16: ...sions The tensions of upper and lower thread are correctly balanced if both threads interlock in the center of the fabric as shown in Fig 12 If the tension of the upper thread is too strong in relatio...

Страница 17: ...Fig 11 Fig 12 Fig 13 17 Copyright 2004...

Страница 18: ...of 90 kerosene and 10 lubrication oil Fill an oil can with the cleaning fluid and also pour a sufficient quantity of this liquid into a pan If the machine due do dirt and gummed oil runs heavily force...

Страница 19: ...oil holes in the machine indicate where the oil must be applied Apply 20 to 30 drops of oil into hole A on top cover Fig 15 Open the small cover and apply one or two drops of oil to the vertical gear...

Страница 20: ...er possible a general rule for the timing procedure in question is given in case the corresponding timing gauge should not be available to the mechanic Timing performed in accordance with the rules se...

Страница 21: ...the point of the shuttle is just at the center of the rising needle At this moment the point of the shuttle should be about 1 16 above the upper part of the needle eye Fig 16 If the distance a is mor...

Страница 22: ...Turn the balance wheel by hand and bring the needle bar to its highest position Fig 18 Replace the normal needle of the needle bar with the false one of the gauge The false needle is inserted in the s...

Страница 23: ...False needle Fig 18 False needle Fig 19 23 Copyright 2004...

Страница 24: ...rning the balance False needle Fig 20 wheel move the needle bar up or down by hand until the condi tion shown in Figs 19 and 20 is met Tighten screw No 24 firmly Adjustment Position of the needle eye...

Страница 25: ...t No C 85201 Fig 22 or what amounts to the same thing that the axis a of the needle bar clamp No D 26295 is in the direction of the longitudinal axis of the machine If it is necessary to make an adjus...

Страница 26: ...below the bed of the machine Then move the race body No D 26330 with the carrier shaft No C 26325 in axial direction until the shuttle comes as close as possible to the needle without touching it Befo...

Страница 27: ...21330 In the twin needle machine the correct position of the needle is that shown in Fig 26 To perform this adjustment rotate the race body No D 26330 without moving it in an axial direction around t...

Страница 28: ...The needle A is at equal distance from both edges B Fig 25 Both needles A are at equal distanc es from the edges B Fig 26 B B 28 Copyright 2004...

Страница 29: ...ructions as for the insertion of a needle Loosen screw No 24 of the needle bar connecting stud No 26025 so that the needle bar is still held in position by friction Hold the balance wheel firmly and p...

Страница 30: ...r E does not enter the rectangular hole in the prong of the Gauge No 10 9 and then adjust as follows Loosen the screw F below the bed of the machine Fig 24 in order to allow the race body No D 26330 t...

Страница 31: ...s always the same If in these machines it should be necessary to replace the old carrier shaft No C 26325 with a new one the shuttle carrier and the oscillating crank shaft No D 26306 must be placed i...

Страница 32: ...GEB in the oscillating crank shaft Fig 28 and turn the carrier shaft No C 26325 in the required direction until the point of the shuttle has reached the center of the needle which has remained station...

Страница 33: ...lace a sharply pointed pin into the tapered pin hole of the oscillating crank shaft and mark on the carrier shaft the position of the hole to be drilled and reamed in the carrier shaft Remove the carr...

Страница 34: ...h 4 a Timing of feed dog and needle bar General Rules The feed dog must be adjusted in such a manner that it starts to move away from the operator at about the time the needle begins its downward move...

Страница 35: ...component positions in the top cover Fig 32 Turn the flywheel until the two screws 048080 GEB of the feed dog eccentric 20026 Fig 33 are visible and loosen them slightly Turn the feed dog eccentric on...

Страница 36: ...connecting link H Fig 34 should be in a straight vertical position If the position is not correct rectify it in the following way loo sen the two screws 048080 GEB of the eccentric 20026 Fig 33 and p...

Страница 37: ...ing shaft of the stitch length regulating knob Fig 35 Before starting remove cams from machine as explained previously then swing cam disengaging lever entirely to the right as far as it will go and p...

Страница 38: ...Loosen the screws 8 which hold the collar 9 to the shaft A Do not loosen the two screws 10 Turn the stitch length regulating knob counterclockwise to zero 0 D85506 5 Fig 35 38 Copyright 2004...

Страница 39: ...under the presser foot is moving If the material is not moving firmly tighten the two screw 8 In collar 9 on the shaft A 13 If the material moves proceed as follows Slightly loosen so that there is st...

Страница 40: ...this regulating shaft A 13 can also be performed with the aid of the gauge 10 6 Using timing gauge 10 6 Remove the automatic mechanism mounting plate and the right hand cover 20026 D85506 Fig 36 40 C...

Страница 41: ...er or still better with a finger To facilitate this operation remove first the cams from the ma chine then swing the cam disengaging lever entirely backward toward the machine arm Fig 37 Loosen the fo...

Страница 42: ...moved The lower portion of the gauge 10 7 should rest on the flat alignment portion of rod 1 as shown in Fig 36 In order to reach this position eventually push the reverse stitch button NOTE Be sure t...

Страница 43: ...Fig 38 43 Copyright 2004...

Страница 44: ...xle makes each of the single impulses when the needle bar is on its way upward The timing without gauge has to be done as follows Remove the automatic mechanism mounting plate Bring the needle bar to...

Страница 45: ...he machine Fig 40 If the timing is correct needle bar E should now be at its highest position and the connecting link H should be in a straight vertical position If the above requirements are not met...

Страница 46: ...and the zig zag width to zero completely to the left Fig 40 Turn the balance wheel slowly toward you until the needle bar has reached its highest position and the needle bar connecting link D 26020 is...

Страница 47: ...two screws E Fig 45 The timing of the zig zag movement and the movement of the needle bar can also be performed with the aid of the gauge 10 4 The gauge 10 4 shown in Fig 43 consists of A plate S with...

Страница 48: ...rough the plate S and by turning the balance wheel toward you bring the eccentric A in such a position that the V shaped cut out of the timing gauge U fits properly against the back portion of this ec...

Страница 49: ...49 Copyright 2004...

Страница 50: ...eccentric A in or der to block this eccentric then turn the balance wheel toward you until the needle bar is in its highest position Fig 45 Firmly tighten the two screws E of the worm gear F then tak...

Страница 51: ...ight hand end of rod 7 Remove the needle bar positioning rod 7 by pulling it out of the machine from the face plate side The needle bar positioning lever assembly 13 is now free for removal which shal...

Страница 52: ...r groove of needle bar positioning lever assembly 13 and this will allow you to remove from the machine the sector No 21 and the roller No 16 Remove retaining ring 11B which is slipped over the pin 15...

Страница 53: ...ing rock shaft No 21230 is in its highest position Turn the vertical shaft 31 around its own axle so that the small lever 36 is completely to the right Push link 35 to the back of the arm so that it i...

Страница 54: ...xed in the machine arm with a retaining ring 37B assemble the parts mentioned below in the following order Place the two lever assemblies 20 and 17 upon each other as shown in Fig 48 and close this as...

Страница 55: ...e pass it below the upper shaft so that its bearing E is placed above the washer 14 and the ec centric 22 enters the two sides A and B of the channel see Fig 50 Insert pin 15 into bearing E of the lev...

Страница 56: ...21 move into the groove underneath the lever assembly 13 Take the needle bar positioning lever 12 Figs 46 and 47 and introduce it between the upper shaft and the rear wall of the machine in such a man...

Страница 57: ...t handle 32 into lever assembly 20 Fig 46 and secure it by firmly tightening screw 25 p Replace connecting rod 40 Fig 46 underneath the bed plate and adjust the position of the needle in relation to t...

Страница 58: ...ate with the aid of the rod 7 Fig 46 as follows Remove zig zag mechanism cover plate No 85621 and replace it with gauge 10 4 Set the machine for straight sewing in the center position Fig 40 then brin...

Страница 59: ...up of the zig zag mechanism and it is advisable to check all the connections between the various parts to see whether any undue play sxists Dismantle mechanism and check if and where excessive play ex...

Страница 60: ...at O but still sews zig zag This may be due to two reasons namely Fig 54 The zig zag stitch lever D 85611 drawn back by spring A does not contact the eccentric No 85663 of the lever No C 85641 The lev...

Страница 61: ...olds the eccentric No 85663 to the lever No C 85641 By means of a screw driver inserted into the notch of ec centric No 85663 turn the eccentric itself slightly as re quired until the machine sews str...

Страница 62: ...ch may cause the defects just mentioned Before further investigating the causes of incorrect feeding it is necessary to make certain that the various parts of the feeding mechanism are properly assemb...

Страница 63: ...advisable to check the looseness in the following parts pointed bearing pins for feed rock shaft No 20100 pointed bearing screw No 44 for feed dog support No 20121 Screws No 58 at the ends of the conn...

Страница 64: ...AN Fig 55 the teeth of the feed dog while the thicker portion rests on the needle plate as shown in Fig 56 The two steps a and b between the thinner and the thicker portion of the Gauge are of differe...

Страница 65: ...not adjust the feed dog following this procedure Fig 56 Loosen screw No 1 Fig 55 and adjvist the crank No 2 as require ed tighten the screw No 1 firmly Check again if both conditions 1 and 2 are met I...

Страница 66: ...59 when the feed dog has completed its hori zontal movement in the slot This test can be made by setting the stitch regulating knob for the maximum stitch length both for ward and reverse Adjustment A...

Страница 67: ...7 are not parallel with the edges of the needle plate slots To adjust proceed as follows remove needle plate as shown in Fig 5 and slightly loosen the screws M Fig 60 which fasten the feed dog to its...

Страница 68: ...n the feed dog Lift the presser foot somewhat then insert the piece of thin paper successively between presser foot and feed dog at each of the four corners of the presser foot always lowering the pre...

Страница 69: ...der to change the feed dog Remove needle plate Fig 5 Remove the feed dog C by loosening the screws M Fig 60 Place the new feed dog on its support O Fig 60 and fasten it by inserting and tightening the...

Страница 70: ...necessitate its replacement with a new feed dog HOW TOCONTROLTHEPRESSUREOFTHEPRESSERFOOT The pressure is controlled with the aid of the pressure regulating thumb No 85322 see Fig 61 By loosening the p...

Страница 71: ...bar and presser foot The opening in the presser foot hole or slot which permits the passage of the needle must be adjusted so that it is exactly above the outspending opening in the needle plate Fig 6...

Страница 72: ...ertical position of the presser foot Height of presser foot Position in vertical direction The presser bar lever No 20095 see Fig 63 permits three different positions of the presser foot The presser b...

Страница 73: ...sufficiently high to permit the passage of the embroidery hoop below it while the tension of the upper thread remains unchanged The presser bar lever is raised completely Fig 65 In this instance the p...

Страница 74: ...ects The tension discs must not have rust spots on their contact faces or deep grooves worn into them by the thread Defective tension discs must be corrected if possible Place the contact faces of suc...

Страница 75: ...he upper thread given free by the descending thread take up lever No D 20033 until the eye of the descending needle has entered the fabric To release gently the thread which during the finishing phase...

Страница 76: ...64 If this distance is larger or smaller adjust as follows Fig 67 Open the face plate Loosen screw No 048050 GEB see Fig 67 which holds the tension mechanism to the machine arm Turn the whole tension...

Страница 77: ...whether the following requirements are met The disc opening rod release rod B Fig 68 is as close as possible to disc opening lever N however without touching it The thread take up spring check spring...

Страница 78: ...0179 is completely tightened This tension will gradually decrease when the tension spring screw is loosened The lower thread must always be under some ten sion until the screw No 20179 is completely l...

Страница 79: ...the aid of two knobs No 26337 These knobs are under spring pressure and thus press the race cover against the race body By pulling both knobs away from the race cover and swinging them sideways the r...

Страница 80: ...must be cleaned frequently and thoroughly It is also essential to keep free and clean the vertical groove channel in the lower portion of the race body which serves to let any dirt etc escape A space...

Страница 81: ...e has been blunted or whether those portions of the shuttle over which the thread passes have become rough due to rust or corrosion Moreover it is also essential to check whether the inclined portion...

Страница 82: ...MECHANISM FIGS 74 AND 75 20026D85506 Fig 74 Dismantle and remove from the machine the feed lifting con necting rod No A 26345 to loosen the nut at the end of this rod use the special wrench No 20 1 Di...

Страница 83: ...0 GEB that fasten the feed eccen tric No 20026 to the upper shaft Move the eccentric No 20026 together with the connecting rod No D 85506 toward the left along the upper shaft until the connecting rod...

Страница 84: ...ition so that the free end of the small stud in plate 5 Fig 75 is neither too close to nor too far from the stitch regulating shaft HOW TOREMOVETHESTITCHLENGTHREGULATINGKNOBANDTHE REGULATINGSHAFT FIG...

Страница 85: ...pin 13 into the proper hole in the rear side of the arm Note While assembling the regulating shaft 11 care must be taken that the pivot 10 in the reverse stitching control plate 5 is located between...

Страница 86: ...s shown in Fig 77 The bushing 9 which was previously on the pin end 13 must now be moved along said pin until its opposite end is slipped onto the protruding pivot pin of the stitch length regulat ing...

Страница 87: ...thread portions of the regulating shaft as shown in Fig 76 Assemble the stitch length lever 4 see Fig 75 by inserting its pivot C into the bushing 6 which is fixed to the inside of the arm casting Not...

Страница 88: ...ic connecting rod No D 85506 with its component parts below the bed plate of the machine Note After the assembly of the feed eccentric connecting rod No D 85506 it is necessary to check the timing of...

Страница 89: ...ng of the Regulating Shaft Two thicknesses of sewing material when placed under the pres ser foot while the stitch length regulating knob is at zero move when the balance wheel is turned by hand See a...

Страница 90: ...t of Stitch Length Regulating Knob and Regulating Shaft If the stitch length regulating knob turns too hard it is necessary to reduce the pressure between the two spring washers see Fig 77 Fig 78 Zero...

Страница 91: ...s indispensable to recheck the adjustment c and d as explained in chapter Important Adjustments on the Stitch Length Regulating Knob ADJUSTMENT OF THE FEED DOG DISENGAGING MECHANISM SEE FIGS 79 AND 80...

Страница 92: ...Fig 79 D8555 9 041030 DA 042090 GAB 035150 GAN 85545 85589 Fig 80 Conversely when the knob No 13 85559 is completely raised see Fig 80 there must be a space of about 3 64 between the push pin No 8558...

Страница 93: ...se then the part No 85544 and also the Feed Dog Lifting Shaft No A 85508 are pushed too much to left toward the needle bar Therefore the adjustment has to be made toward the right toward the balance w...

Страница 94: ...zag width lever completely to the left Bring the needle bar to its highest position Without running the machine move the zig zag width lever se veral times back and forth If the eccentric No 85663 is...

Страница 95: ...s correct position ADJUSTMENT OF THE AXIAL PLAY END PLAY OF THE UPPER SHAFT The eccentric No A 85241 Fig 82 which induces the impulses of the cam axle is also being used for regulating the axial play...

Страница 96: ...he Allen wrench No 20 5 push the eccentric No A 85241 toward the shaft bearing adjacent to the eccentric Firmly tighten screw No 85279 and check if the axial play of the upper shaft is completely elim...

Страница 97: ...tment has to eliminate the play between cam and needle positioning lever and between cam and zigzag width lever General rules Place the gauge No 10 2 on the cam axle and move the cam disconnecting lev...

Страница 98: ...of the machine see Fig 85 Loosen slightly the screw No 025040 FDB see Fig 85 which holds the small plate No D A 26 1 24 as shown in Fig 85 With one hand press the stud D Fig 83 which is firmly inserte...

Страница 99: ...ing these parts the screw No 025040 FDB on the small plate No D A 26 1 24 Loosen the screw No 025040 FDB which holds the small plate No D A 26 1 7 as indicated in Fig 85 Repeat for this plate and for...

Страница 100: ...ally the Greek Key Stitch and the automatically made buttonholes Before making the following adjustments it should be made certain that the machine is perfectly assembled and especially that the timin...

Страница 101: ...g adjustment This adjustment is divided into two parts 1st Part Run the machine without thread The material under the presser foot should move forward but with a very slow almost imperceptible motion...

Страница 102: ...econd part of the above test are not met correct them in the following way Loosen the nut A see Fig 86 using wrench No 20 6 Turn the counter nut B either clockwise or counter clockwise until the desir...

Страница 103: ...rward during the first part of the test and moves backward during the second part of the test However the material moves more during the first part of the test than during the second part of it Soluti...

Страница 104: ...r 4 on the design graduating knob in relation to the mark on the machine arm above this knob The adjustment of the number of impulses is made at the factory and any readjustment is not necessary even...

Страница 105: ...ws Turn the balance wheel by hand and bring the thread take up lever to its highest position set the design graduating knob at 4 see Fig 89 Pull the cam connecting lever No D A 26 3 25 to its working...

Страница 106: ...slightly screw A and loosen also very slightly screw B Move the graduation pointer C slightly toward the minus sign Fig 91 Now tighten screws A and B Check again the number of impulses of the cam axle...

Страница 107: ...n the mark on the gauge cam No 10 2 is again in line with the mark on the mounting plate for the Automatic Instead of turning the balance wheel by hand the machine may also be run with the aid of the...

Страница 108: ...ASSEMBLING THE PARTS UNDERNEATH THE MOUNTING PLATE NO C A26 1 1 OF THE AUTOMATIC DEVICE FIG 93 400090BZ A 26 3 14 C A26 1 1 r A26 3 i8 C A26 3li A26 3t C A 26 3 6 108 Copyright 2004...

Страница 109: ...080 FOB A 26 3 12 Fig 93 Fig 93 shows how the various parts of the Automatic Device have to be assembled In the following are indicated a few steps on how to assemble each single group 109 Copyright 2...

Страница 110: ...that the spirals are close to each other without overlapping and that they all stay close to the cylinder of the pulling drum By means of a thin nosed pair of pliers push the two brake shoes No A26 3...

Страница 111: ...lling drum No C A26 3 6 A 26 3 11 035080FDB Fig 95 End of spring No A 26 1 11 Flat portion 0 of drum No C A26 3 6 Place the upper pulling drum No C A26 3 6 which acts as a cover over the already assem...

Страница 112: ...pin into a direction so that the two aforementioned holes are just above each other Place the movement regulating ring No A26 3 15 see Figs 93 and 95 over the upper pulling drum No C A26 3 6 center it...

Страница 113: ...A Fig 97 Take group of Fig 95 in your left hand holding it as its lower portion and with your right hand place the Automatic plate No C A26 1 1 over it Make certain that the cam axle R enters the cam...

Страница 114: ...entered the hole A indicated in Fig 94 This hole is the one farthest away from the end of the spring No A26 1 11 The windings of the pull spring No A26 1 11 must not overlap each other Furthermore the...

Страница 115: ...oves freely in each direction Before inserting the retaining ring No 400090BZ Fig 99 which keeps the entire lower portion of the Automatic device on the mounting plate No C A26 1 1 use one or more dis...

Страница 116: ...larger part is facing backward in this position the head of the screw C Fig 101 is upward and is visible through the hole P in the Automatic mounting plate Bring the zig zag lever O and the needle pos...

Страница 117: ...es for inferior service from the sewing machine motor and suggestions on how to prevent and remedy them Motor does not run at all or runs only sluggishly The above deficiency may be caused by the foll...

Страница 118: ...or of motor is dirty Clean connector with cleaning fluid then wipe it thoroughly dry How to replace the motor brushes The motor brushes are replaced in the following way Loosen and remove the motor co...

Страница 119: ...rior of the machine While replacing the motor into the machine take care that the feed eccentric connecting rod No D 85506 Fig 102 does not touch the motor casing the motor belt is sufficiently tight...

Страница 120: ...he motor pulley after mo tor was mounted in place on the machine Handle motor carefully to prevent above defect Have defective motor repaired Motor bearings are gummed due to use of improper oil Have...

Страница 121: ...d balance wheel Replace worn belt adjust motor bracket tighten all motor mounting screws wipe oil thoroughly from belt balance wheel and motor pulley motor pulley too loose on motor shaft Tighten scre...

Страница 122: ...ms while machine is not sewing Rheostat control lever gets stuck in a depressed position Check rheostat and free the motion of the control lever Motor pulley is loose on motor shaft Tighten screw in m...

Отзывы: