background image

18

DISPLAY

TV Aspect 

4:3 :

Select when a standard 4:3 TV is connected.

16:9 :

Select when a 16:9 wide TV is connected.

Display Mode

Display Mode setting works only when the TV Aspect
mode is set to “4:3”.

Letterbox: 

Displays a wide picture with bands on the

upper and lower portions of the screen.

Panscan: 

Automatically displays the wide picture on the

entire screen and cuts off the portions that do not fit.

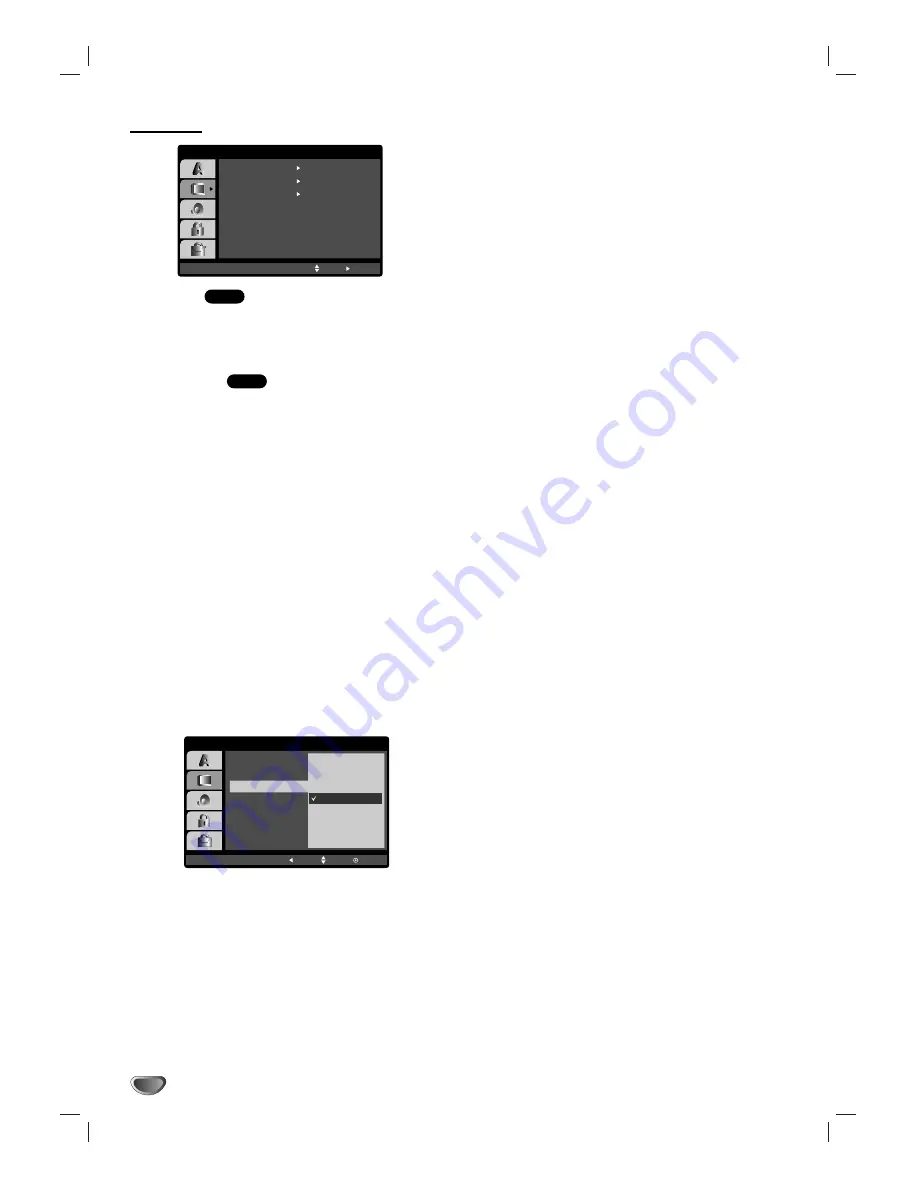
Progressive Scan

Progressive Scan Video provides the highest quality
pictures with less flickering.
If you are using the Component Video jacks for connec-
tion to a TV or monitor that is compatible with a pro-
gressive scan signal, set Progressive Scan to On.

To turn On progressive scan:

Connect component out of this unit to the input of your
monitor/television, set your television or monitor to
Component Input.

1. Select “Progressive Scan” on the DISPLAY menu

then press 

B

.

2. Select “On” using the 

v

/

V

buttons. 

3. Press ENTER to confirm your selection. 

The confirm menu will appear.

Note:

If your TV does not accept the Progressive Scan format,
the picture will appear scrambled if you try Progressive
Scan on the DVD Player.

4. When the confirm menu appears on your screen

Cancel is highlighted as default. Use the 

b

button to

highlight Enter.

5. Pressing ENTER will set this unit to Progressive

scan mode.

Caution:

Once the setting for progressive scan output is entered, an
image will only be visible on a progressive scan 
compatible TV or monitor. If you set Progressive Scan to
On in error, you must reset the unit.
1) Remove any disc from the unit and close the disc tray.

See that “DISC” is displayed on the display window.

2) Press STOP and hold it for five seconds before 

releasing it. The video output will be restored to the
standard setting and a picture will once again be 
visible on a conventional analog TV or monitor.

DVD

DVD

DISPLAY  

TV Aspect

Widescreen

16  :  9 Wide

Display Mode

Off

Progressive Scan

Move

Select         

TV Output Select

YPbPr

DISPLAY  

TV Aspect

TV Output Select

Display Mode

Move

Enter         

Prev.         

On

Progressive Scan

Off

Содержание NDT-42

Страница 1: ...DVD PLAYER VIDEO CASSETTE RECORDER OWNER S MANUAL MODEL NDT 42 Before connecting operating or adjusting this product please read this instruction booklet carefully and completely PAL ...

Страница 2: ...acrovision Corporation Reverse engineering or disassembly is prohibited CONSUMERS SHOULD NOTE THAT NOT ALL HIGH DEFINITION TELEVISION SETS ARE FULLY COMPATIBLE WITH THIS PRODUCT AND MAY CAUSE ARTIFACTS TO BE DISPLAYED IN THE PICTURE IN CASE OF 625 PROGRES SIVE SCAN PICTURE PROBLEMS IT IS RECOMMENDED THAT THE USER SWITCH THE CONNECTION TO THE STANDARD DEFINITION OUTPUT IF THERE ARE QUES TIONS REGAR...

Страница 3: ...ecording using On Screen Display 23 24 Additional Operation with tape 25 27 On Screen Display F OSD 25 Tape Counter Memory Stop 25 Video Doctor Self Diagnosis 25 Copying from DVD To VCR 26 Recording from another video recorder 26 Operation with DVD and Video CD 27 29 Playback Setup 27 General Features 27 Moving to another TITLE 27 Moving to another CHAPTER TRACK 27 Slow Motion 27 Still Picture and...

Страница 4: ...te it easily Chapter DVD only Sections of a picture or a musical piece that are smaller than titles A title is composed of one or several chap ters Each chapter is assigned a chapter number enable you to locate the chapter you want Depending on the disc chapters may not be recorded Track Video CD and audio CD only Sections of a picture or a musical piece on a video CD or an audio CD Each track is ...

Страница 5: ...r playing store the disc in its case Do not expose the disc to direct sunlight or sources of heat or leave it in a parked car exposed to direct sun light as there may be a considerable temperature increase inside the car Cleaning discs Fingerprints and dust on the disc can cause poor pic ture quality and sound distortion Before playing clean the disc with a clean cloth Wipe the disc from the cen t...

Страница 6: ... chapter track Press and hold for two seconds for a fast reverse search Rewinds the tape STOP Á Á Stops playback Tape Compartment PLAY G Starts playback OPEN CLOSE Opens or closes the disc tray Remote Sensor Point the remote control here Display window Shows the current status of the unit DVD VCR Selector Video IN Jack Tape Eject Audio IN L R Jacks POWER Switches the unit to ON or OFF Channel Prog...

Страница 7: ...ording is engaged DVD to VHS copy is in progress Indicates TV mode See Notes on page 21 A disc is in the DVD deck Lights when a disc is in the DVD deck and Flashes when no disc Indicates total playing time elapsed time remaining time or current deck status Playback Pause etc The DVD deck is selected Indicates the Progressive Scan is set to On mode Indicates repeat mode ...

Страница 8: ... chapter or track or go to previous chapter or track 0 9 numerical buttons Select numbered items in a menu AUDIO Select an audio language DVD or an audio channel CD SUBTITLE Select a subtitle language ANGLE Select DVD camera angle if available ZOOM Enlarge video image MARKER Mark any point during playback SEARCH Display MARKER SEARCH menu TITLE Display the title menu of the disc if available OPEN ...

Страница 9: ... stereo system AERIAL Connect the aerial using this jack COAXIAL Digital audio out jack DVD EXCLUSIVE OUT Connect to digital coaxial audio equipment RF OUT Connect to your TV using this jack S VIDEO OUT DVD EXCLUSIVE OUT Connect to a TV with S Video input VIDEO IN VCR IN AV1 Receive the video signals from an external source to VCR VIDEO OUT DVD VCR OUT Connect to a TV with video inputs AC Power Co...

Страница 10: ...n 1 Connect the COMPONENT PROGRESSIVE SCAN VIDEO OUT jacks on the DVD Player to the corre sponding in jacks on the TV using the Y Pb Pr cable 2 Connect the Left and Right AUDIO OUT jacks of the DVD Player to the audio left right in jacks on the TV using the audio cables S Video connection 1 Connect the S VIDEO OUT jack on this unit to the S Video input jack on the TV using the S Video cable 2 Conn...

Страница 11: ...n page 19 Digital Multi channel sound A digital multi channel connection provides the best sound quality For this you need a multi channel Audio Video receiver that supports one or more of the audio formats supported by your unit MPEG 2 Dolby Digital and DTS Check the receiver manual and the logos on the front of the receiver Warning Due to the DTS Licensing agreement the digital output will be in...

Страница 12: ... channel The AV channel is already pre tuned for optimum video playback on your TV 4 Store this channel on your TV You will need to look at the TV instruction book if you do not know how to do this 5 Only carry out stages 5 8 if you cannot obtain clear video playback as described in stages 1 4 Select a TV channel number on which you wish to watch video s Make sure that your VCR is in standby press...

Страница 13: ... The day of the week will appear automatically when you enter the year 3 If you make a mistake press b b or B B and enter the correct details 4 Press i to return to a TV picture To set the colour system 1 Press i 2 The main menu will appear on the TV screen 3 Press 1 or 2 to select the SYS and press OK 4 Press 3 or 4 to select according to the COLOUR system used 5 Press 1 or 2 to select the RF AUD...

Страница 14: ...ress 1 and 2 to select the desired menu Press OK and use 3 or 4 to select 4 Press i to return to a TV picture Tuning in TV Stations Automatically If the TV broadcast signal is weak your DVD VCR may not detect the necessary information and will not be able to store them correctly To overcome this problem please turn to the MANUAL TUNING section on page 15 1 Press OPERATE to turn on your DVD VCR 2 P...

Страница 15: ...cates a stations Press 2 to select MFT Control the fine tuning of the station by using 3 or 4 6 Press 2 to select STATION so that you may name your TV station Press OK 7 Use 3 or 4 to select letters and numbers for the station name Use 1 or 2 to move back and forth between characters Press OK 8 Press i confirm the station placement If you wish to manually tune other stations repeat stages 3 8 9 Pr...

Страница 16: ...s 1 Press i The main menu will appear on the TV screen Use 1 or 2 to select the PR SET Press OK 2 Press i 3 Press 3 or 4 to select the programme number you want to delete for example PR 01 4 Press 1 After a short while the selected station will be deleted If you wish to delete other TV stations repeat stages 3 4 5 Press i to remove the menus from the TV screen 16 SYS 1 2 SET OSD ON OFF OSD f ACMS ...

Страница 17: ...item as well as alternate setting s 4 Use v V to select the second desired option then press B to move to the third level 5 Use v V to select the desired setting then press ENTER to confirm your selection Some items require additional steps 6 Press SETUP or N N exit the Setup menu LANGUAGE Menu Language Select a language for the VCR and DVD s setup menu and information display Disc Audio Subtitle ...

Страница 18: ... Press ENTER to confirm your selection The confirm menu will appear Note If your TV does not accept the Progressive Scan format the picture will appear scrambled if you try Progressive Scan on the DVD Player 4 When the confirm menu appears on your screen Cancel is highlighted as default Use the b button to highlight Enter 5 Pressing ENTER will set this unit to Progressive scan mode Caution Once th...

Страница 19: ...Check the documentation for your amplifier to verify its capabilities DRC Dynamic Range Control With the DVD format you can hear a program s sound track in the most accurate and realistic presentation possible thanks to digital audio technology However you may wish to compress the dynamic range of the audio output the difference between the loudest sounds and the quietest ones This allows you to l...

Страница 20: ...to confirm your rating selection then press SETUP to exit the menu 5 Press OPEN CLOSE to activate parental control Note If you set a rating for the player all disc scenes with the same rating or lower are played Higher rated scenes are not played unless an alternate scene is available on the disc The alterna tive must have the same rating or a lower one If no suitable alternative is found playback...

Страница 21: ...ayback The tape will play back at double speed and without sound Press the N X2 button to return to playback at normal speed Picture search During playing back press either BACKWARD or FORWARD to this will enable you to rapidly wind the tape 7 times normal playback see where you are on the tape Logic search During fast forwarding or rewinding press and hold m or M the picture will be played back a...

Страница 22: ...N AV1 terminals on the rear of your unit AV 2 for recording from AUDIO IN L MONO R VIDEO IN terminals on the front of your unit 5 Press LONG PLAY if you wish to record in Long Play or Standard Play SP will produce improved picture and sound quality however LP will provide twice as much recording time as SP 6 Press REC QSR to start recording RECORD will appear on the TV screen Press REC QSR several...

Страница 23: ...v V to enter the date of the programme If you press OK before entering the date you may select one of the following automated recording fea tures Press 1 or 2 to select then press OK to confirm DLY To record every day except Saturday and Sunday at the same time SU SA To record at the same time every week 6 Use v V 1 2 buttons to enter the recording start and end times of the programme that you wis...

Страница 24: ...cording standby mode If at a later date you wish to delete or change any of the settings in timer event memory you may do so without having to enter all the timer event information again Simply display the timer event screen Use v or V to select the event that you wish to delete or change Press b to delete the event or Press OK to change then press b or B to select Station Date Start and End times...

Страница 25: ...s on the tape 1 Press CLK CTR Press CLEAR to set the counter to 0 00 00 Press N or start playback or recording The tape counter will display the actual play time in hours minutes and seconds 2 Press STOP when playback or recording is complete Press BACKWARD The tape will rewind and automatically stop when the counter returns to 0 00 00 Note To rewind to the beginning of the tape press BACKWARD aga...

Страница 26: ...when the DVD movie ends or the unit may replay and record over and over again Recording from another video recorder With this video recorder you can make recordings from an external source such as copying from another video recorder or a camcorder Note In the following description this video recorder will be one used for recording and will be referred to as VCR B The other appliance will be used f...

Страница 27: ... also may set PBC to Off See PBC on page 19 Notes If parental control is set and the disc is not within the rating settings you must input the password See LOCK on page 20 DVDs may have a region code Your player will not play discs that have a region code different from your player The region code for this player is 4 four General Features Notes Unless stated otherwise all operations described use...

Страница 28: ...ar 3 Press ENTER and playback starts from the marked scene Or Press CLEAR and the marker number is erased from the list 4 You can play any marker by inputting its number on the marker search menu Repeat You can repeat a title chapter all track on a disc Press REPEAT during playback to select a desired repeat mode DVD Video Discs Repeat Chapter Title Off Chapter repeats the current chapter Title re...

Страница 29: ...the b B v V buttons to highlight your selection Then press ENTER Title Menu 1 Press TITLE If the current title has a menu the menu appears on the screen Otherwise the disc menu may appear 2 The menu offers features such as camera angles spoken language and subtitle options and chapters for the title 3 Press TITLE to exit Disc Menu Press DISC MENU and the disc menu is displayed Press DISC MENU agai...

Страница 30: ...terior surfaces clean Do not use volatile liquids such as insecticide spray near the unit Do not leave rubber or plastic products in contact with the unit for a long period of time since they leave marks on the surface Cleaning the unit To clean the player use a soft dry cloth If the surfaces are extremely dirty use a soft cloth lightly moistened with a mild detergent solution Do not use strong so...

Страница 31: ... Music5 6 Music6 7 Music7 MP3 WMA disc compatibility with this player is limited as follows Sampling frequency within 8 48 kHz MP3 within 32 48kHz WMA Bit rate within 8 320kbps MP3 32 192kbps WMA The player cannot read an MP3 WMA file that has a file extension other than mp3 wma CD R physical format should be ISO 9660 If you record MP3 WMA files using software that cannot create a file system eg D...

Страница 32: ...he repeat playback will be cancelled Search 1 Press m or M during playback 2 Press m or M repeatedly to select the required speed X2 X4 and X8 backward or forward 3 To exit SEARCH mode press N Random 1 Press RANDOM during playback Random Playback begins immediately and Random appears on the menu screen 2 To return to normal playback press RANDOM repeatedly until Random disappears from the ßmenu sc...

Страница 33: ...mode will disable Repeat Programmed Tracks 1 Press REPEAT when playing a disc The repeat icon appears 2 Press REPEAT to select a desired repeat mode Track repeats the current track All repeats all the tracks on programmed list Off No display does not play repeatedly Note If you press once during Repeat Track playback the repeat playback will be cancelled Erasing a Track from Program List 1 During ...

Страница 34: ...rsor b or B once while viewing a picture to advance to the next or previous file Zoom Use zoom to enlarge the photo image see page 28 To rotate picture Press v V during showing a picture to rotate the picture clockwise or counter clockwise JPEG JPEG JPEG JPEG JPEG JPEG disc compatibility with this player is limited as follows Depending upon the size and number of JPEG files it could take a long ti...

Страница 35: ... Samoan 8377 Sanskrit 8365 Scots Gaelic 7168 Serbian 8382 Serbo Croatian 8372 Shona 8378 Sindhi 8368 Language Code Singhalese 8373 Slovak 8375 Slovenian 8376 Somali 8379 Spanish 6983 Sudanese 8385 Swahili 8387 Swedish 8386 Tagalog 8476 Tajik 8471 Tamil 8465 Tatar 8484 Telugu 8469 Thai 8472 Tibetan 6679 Tigrinya 8473 Tonga 8479 Turkish 8482 Turkmen 8475 Twi 8487 Ukrainian 8575 Urdu 8582 Uzbek 8590 ...

Страница 36: ...ithin the guide The disc is dirty The Rating level is set There is an obstacle in the path of the remote control and this unit The batteries in the remote control are exhausted Is the cassette compartment empty Audio mode is not set properly Correction Refer to page 2 Plug the power cord into the wall outlet securely Insert a disc Select the appropriate video input mode on the TV so the picture fr...

Страница 37: ...re than 95 dB CD Inputs VCR Audio 6 0 dBm more than 47 kohms Video 1 0 V p p 75 ohms unbalanced Outputs DVD VIDEO OUT 1 Vp p 75 ohms sync negative S VIDEO OUT Y 1 0 Vp p 75 ohms negative sync Mini Din 4 pin x 1 C 0 3 Vp p 75 ohms COMPONENT VIDEO OUT Y 1 0 V p p 75 Ω negative sync RCA jack x 1 Progressive Scan Pb Pr 0 7 V p p 75 Ω RCA jack x 2 Audio output coaxial audio 0 5 V p p 75 Ω RCA jack x 1 ...

Страница 38: ...d Brisbane Unit 4 305 Montague Road West End 4101 07 3840 5858 Southport Shop 1 48 Ferry Road Southport 4215 07 5591 3670 South Australia Adelaide 84A Richmond Rd Keswick 5053 08 8375 5710 Western Australia Perth 45 Sarich Court Osborne Park 6017 08 9445 5901 For service in outer areas please contact your NEC retailer for the address of the nearest NEC Australia Pty Ltd Authorized Service Centre N...

Страница 39: ...P NO 3834RV0037M ...

Отзывы: