55
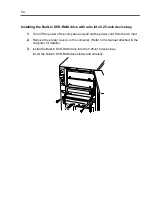
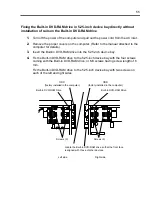
Fixing the Built-in DVD-RAM drive in 5.25-inch device bay directly without
installation of rails on the Built-in DVD-RAM drive
1.
Turn off the power of the computer and pull out the power cord from the AC inlet.
2.
Remove the proper covers on the computer. (Refer to the manual attached to the
computer for details.)
3.
Insert the Built-in DVD-RAM drive into the 5.25-inch device bay.
4.
Fix the Built-in DVD-RAM drive to the 5.25-inch device bay with the four screws
coming with the Built-in DVD-RAM drive, or M3 screws having screw length of 6
mm.
Fix the Built-in DVD-RAM drive to the 5.25-inch device bay with two screws on
each of the left and right sides.
Left side
Right side
ODD
(factory installed in the computer)
Built-in DVD-RAM Drive
Screws (2)
Screws (2)
Locate the Built-in DVD-RAM drive so that the front face
is aligned with those of other devices.
Built-in DVD-RAM Drive
ODD
(factory installed in the computer)
Содержание N8151-74
Страница 2: ......
Страница 13: ...3 付録B DVD RAM ディスクについて 37 DVD RAM ディスクの取り扱い上の注意 38 付録C 推奨品 39 ...
Страница 24: ...14 ...
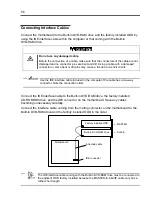
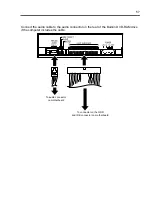
Страница 28: ...18 本体装置にオーディオケーブルがある場合は 本製品の背面にあるオーディオコネクタに 接続してください マザーボード上の オーディオコネクタへ ODD のコネクタおよびマザーボード上の IDE コネクタへ ...
Страница 34: ...24 3 ディスクをトレーにのせる 4 イジェクトボタンを押してトレーを閉じる データ面をトレーに向け レーベルな どの印刷面を上に向ける ホルダーに引っかける ...
Страница 63: ...53 ...
Страница 90: ......
Страница 92: ......


