background image

50

ADJUSTMENT

Static Convergence Adjustment

Adjust the red and blue CRT images to position them over the green

test pattern (center portion only).

NOTE: The static convergence adjustment should be performed for
each CRT (R and B) separately. Carry out the adjustment after
displaying an active image for 20 minutes or more.

Proceed as follows:

1

Press the OPERATE button.

• The “OPERATE” menu is displayed.

2

Use the CURSOR

or

button to highlight the “6/STATIC”

line. Press ENTER to display the STATIC adjustment. You can

also select the STATIC adjustment screen directly by pressing

the INPUT “6” button.

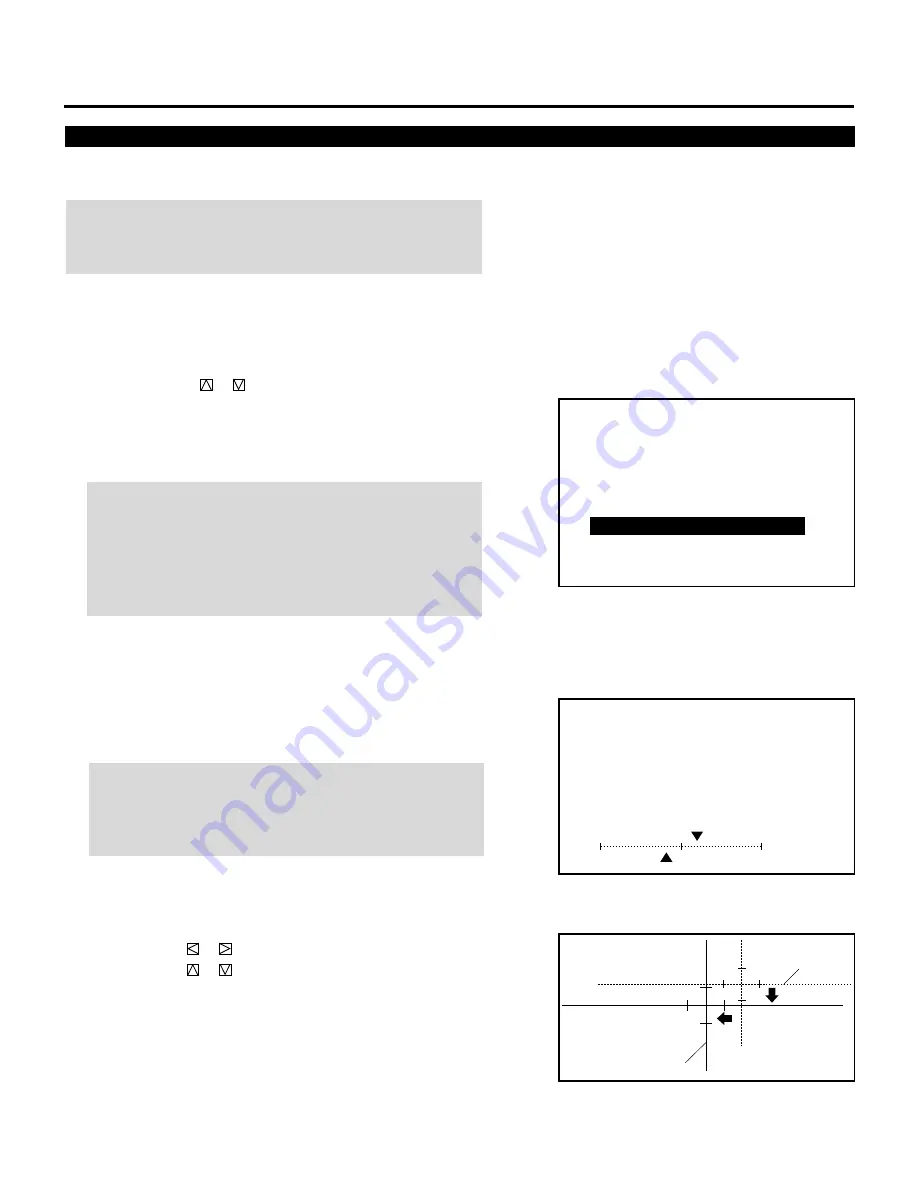
• The CROSS-HAIR test pattern will be automatically displayed.

NOTE: When you are in the ADJUST mode, selecting the
STATIC mode will not automatically select the CROSS-HAIR test
pattern. Reselect the pattern using the TEST button.
NOTE: The “STATIC” adjustment can be also displayed by
pressing the STATIC button on the user or full function remote

control.

3

Press the R or B button to display the pattern to be aligned with

the Green pattern.

• You can turn on or off each CRT beam (R and B) separately.

4

Hold down the CTL button then select the CRT you wish to

adjust with the R and B buttons.

NOTE: Always be aware of what color the on-screen CRT
display is showing (R, G, B). If that color’s test pattern is turned
off, any adjustment to that color will display the “THIS COLOR
IS NOT APPLICABLE” message.

–   O P E R A T E   –
1   /   P I C T U R E
2   /   P O S I T I O N
3   /   S O U N D
4   /   I N P U T   S E L E C T
5   /   S O U R C E   I N F O

6   /   S T A T I C

7   /   C L O S E D   C A P T I O N
8   /   T I M E R

C O N V E R G E N C E

-   S T A T I C   -

`

1 0 %

C R T     -   R   -

1

1 0 %

H

V

Red or Blue

Green

5

Align the center of the Red or the Blue pattern with the center of

the Green pattern (reference color) using the CURSOR buttons.

• The CURSOR

or

button moves the pattern left or right.

The CURSOR

or

button moves the pattern up or down.

6

Repeat steps 

3

 to 

5

 for the other CRTs if necessary.

7

To end this adjustment, press the END button.

• Whenever the END button is pressed, the menus will sequence

in this order:

“OPERATE” menu 

 Source screen

Содержание MultiSync XG-1352

Страница 1: ...k light output XG85 and 1200 lumens XG135LC ECP lens produces an image with true color reproduction AKB circuit provides stable white balance Display size can be altered to accommodate any picture size from 60 to 300 diagonal In addition to ceiling mounting floor desk top and rear installations are possible The ceiling mounting kits can be purchased as an optional item for ceiling installation Dig...

Страница 2: ...e designed to operate on 120 V 60 Hz and the XG 852G and XG 1352G are designed to operate on 220 240 V 50 Hz AC power supply Make sure your local power supply matches these requirements before operation Handle the power cord carefully and avoid excessive bending A damaged cord may cause electric shock or fire If the projector is not to be used for an extended period remove the plug from the power ...

Страница 3: ...Cr G Y B Cb H HV V S VIDEO VIDEO OPTION REMOTE1 REMOTE2 OUT IN INPUT SELECT ENTER ON OFF INDICATOR I INPUT SELECT POWER 1 3 2 4 6 5 7 G F E D C B 8 9 0 I H 123456 123456 123456 123456 123456 123456 PART NAMES AND FUNCTIONS A cover is provided to attach the rear control panel A J ...

Страница 4: ...pment to be connected with the ISS 6020 ISS 6020G Switcher NOTE This projector does not have built in speakers Make sure that the STANDALONE mode is selected from the CONNECT CONDITION menu Contact your dealer for the information in detail When Used in Stand Alone Operation Components with RGB and H V SYNC outputs such as a personal computer External Control VCR or Video disc player ACAT OUT R Cr ...

Страница 5: ... projection angle Yes None Yes Yes Yes Yes Yes Yes Yes 100 inch other than 100 inch 100 inch other than 100 inch 100 inch other than 100 inch 100 inch other than 100 inch Ceiling mounting Front projection Desk top Front projection type Ceiling mounting Rear projection Desk top Rear projection None None Yes Yes Yes Yes None None Various adjustments NOTE For XG85 the 100 inch covers the range of scr...

Страница 6: ...wing proportional formulae When using a screen 150 3810mm or larger in the diagonal direction E B Screen center Ceiling Mounting α Line of sight α α A Screen center B C Ceiling Mounting 11 15 283mm 5 12 130mm Ceiling Mount System 144 180 160 200 192 240 216 270 240 300 A B C E 48 60 Screen size H Width 4 3 Diagonal 56 70 0 976 0 977 0 978 γ cosα 12 7 12 6 12 4 12 1 α 0 220 0 218 0 215 0 210 β sinα...

Страница 7: ...ot indicated on the table use the following proportional formulae When using a screen 150 3810mm or larger in the diagonal direction E B Screen center Ceiling Mounting α Line of sight α α A Screen center B C Ceiling Mounting 11 15 283mm 5 12 130mm Ceiling Mount System 144 180 160 200 192 240 216 270 240 300 A B C E 48 60 Screen size H Width 4 3 Diagonal 56 70 64 80 0 976 0 977 0 979 γ cosα 12 6 12...

Страница 8: ...izes Move the CRT to the 120 180 or 60 300 position For 120 screen size R A 3 B 3 G A 1 B 3 B A 3 B 3 For 180 screen size R A 5 B 5 G A 1 B 5 B A 5 B 5 For 120 180 screen size and the other screen sizes Move the CRT to the 120 180 or 60 300 position f 4 Select an installation from the PJ ORIENTATION menu in the SETTING menu See Projection Type Selection in the setup manual f To change to the ceili...

Страница 9: ...ITUDE 04 LINEARITY 05 KEY STONE 06 PIN CUSHION 07 LINEAR BAL 08 KEY BALANCE 09 PIN BALANCE 10 LINE DIST 11 R G B POINT CONVERGENCE menu CONVERGENCE 1 TILT SKEW 2 BOW 3 AMPLITUDE 4 LINEARITY 5 KEY STONE 6 PIN CUSHION 7 LINEAR BAL 8 LINE DIST 9 POINT 10 PHASE 1 COLOR TEMP 2 WHITE BAL Adjustment screen PASSCODE menu OPTION menu OPTION 1 SETTING MODE 2 MENU MODE 3 SEQUENCER 4 PJ ADDRESS 5 VERSION 6 HO...

Страница 10: ...first whenever inputting video signals for the first time so that you can register the video signals before making any adjustments If the current input signal s has not been registered the UNREGISTERED SIGNAL message is displayed on screen NOTE If you have software which changes scanning mode due to the graphic board of your PC such as VGA it will be necessary to register signal entry for each sca...

Страница 11: ... See page 62 Carry out the adjustments after displaying an image for 20 minutes or more 4 Select the input signal If your input signal has not been recorded it is necessary to perform the signal entry beforehand See page 19 If you want to use the projector in any other configuration than the factory setting perform the following after installation 1 Electrical Focus Adjustment See page 39 2 Alignm...

Страница 12: ...ng the 1 through 0 buttons 1 Each time you press the INPUT button an asterisk appears under the PASSCODE message 2 After you have finished entering the four digit passcode press ENTER NOTE If you have made an error press the NORMAL button to delete the asterisk Then re enter the correct passcode To delete all the entered digits hold down the CTL button then press the NORMAL button 3 If the entered...

Страница 13: ...and press INFO To eliminate the display press END The parameters cannot be changed on the SETTING VIEW screen shown on the right For changing parameters of the setting features refer to the follow ing pages NOTE The INPUT TERMINAL item on the SETTING MODE menu cannot be changed P01 P03 OPTION SETTING MODE CONNECT CONDITION CEILING FRONT DEFAULT INPUT SELECT FOCUS EDGE MODE ALL S VIDEO MODE SELECT ...

Страница 14: ...ctory REF ADJUST 1 ASTIG 2 BRIGHT UNIFORM 3 WHITE UNIFORM 4 RASTER CENTERING 5 FOCUS BAL 6 REF WHITE BAL For service personnel only cannot be selected ASTIG menu Adjustment screen Adjustment screen NOTE Items 5 and 6 cannot be selected as they are for service personnel only If you try to select one the For service personnel only message is displayed at the bottom of the screen Press and hold the C...

Страница 15: ...e 24 for more details 5 Adjust the picture and sound See pages 20 through 23 for more details NOTE The volume function works only with the ISS 6020 ISS 6020G Switcher 6 To turn off the power press the POWER OFF button on the remote control or the POWER button on the rear panel 7 Press the POWER switch on the front panel to the OFF position V to turn off the main power of the projector 8 Last turn ...

Страница 16: ... following signals have been set by factory P 0 1 1 0 1 I N P U T S E L E C T S T A N D A L O N E N O 0 1 0 2 0 3 0 4 0 5 0 6 0 7 0 8 0 9 1 0 S O U R C E V I D E O V I D E O V I D E O V I D E O R G B N A M E N T S C 3 5 8 N T S C 4 4 3 P A L S E C A M V E S A 1 0 2 4 I N P U T A A A A A ...

Страница 17: ...V XG 1352 6 2A AC 120V XG 852 3 4A AC 220 240V XG 1352G 3 1A AC 220 240V XG 852G Safety and regulation XG 1352 XG 852 Meets FCC class A requirements UL Approved UL 1950 CSA 950 DHHS Approved Meets DOC Canada Meets RED ACT XG 1352G XG 852G Meets EMC Directive EN55022 EN61000 3 2 EN61000 3 3 EN50082 1 Meets Low Voltage Directive EN60950 TÜV GS Approved PTB Approved Cabinet dimensions 610 W X812 D X3...

Страница 18: ...djustment is done roughly So performing the POINT ACAT can change the convergence adjustment settings even if you finely adjust the convergence adjustment Proceed as follows 1 Press the ADJUST button to display the ADJUST menu If the projector asks you to enter your passcode enter your passcode 2 Use the CURSOR or button to highlight the 4 CONVERGENCE line Press ENTER to display the CONVERGENCE me...

Страница 19: ...ate 8 To end this adjustment press the END button Whenever the END button is pressed the menus will sequence in this or der POINT menu CONVERGENCE menu ADJUST menu Sourcescreen If the RETURN USER MODE menu appears use the CURSOR or button to select either YES or NO and then press ENTER This will exit the ADJUST mode Items to select YES When you try to enter the ADJUST mode again you will need to r...

Страница 20: ...B VIDEO C D E A B VIDEO C D E A B C D E A B VIDEO C D E A B VIDEO HORIZONTAL VERTICAL HORIZONTAL VERTICAL HORIZONTAL VERTICAL Separate Sync Composite Sync Composite Sync Video Sync on Green Sync Polarity Positive Negative Sync Polarity Positive Negative Sync Polarity Negative ...

Страница 21: ...3 26 1 13 19 26 29 15 14 21 16 13 71 26 1 15 79 11 56 12 68 16 00 12 510 15 754 15 880 E 0 3 0 99 0 3 0 16 1 13 0 12 2 12 0 09 0 3 0 06 0 46 0 044 1 12 0 722 0 369 0 062 Polarity 1 1 1 1 1 1 IBM VGA 350 IBM VGA 400 IDTV Macintosh II IBM VGA 480 Macintosh Quadra VESA 8002600 72 Hz VESA 10242768 60 Hz IBM CGA EGA and VGA are registered trademarks of International Business Machines Corporation Apple ...

Страница 22: ...SOURCE INFORMATION screen PICTURE menu POSITION menu SOUND menu INPUT SELECT screen Adjustment screen OPERATE 1 PICTURE 2 POSITION 3 SOUND 4 INPUT SELECT 5 SOURCE INFO 6 STATIC 7 CLOSED CAPTION 8 T I M E R OPERATE menu Adjustment screen Adjustment screen Adjustment screen CAPTION STATIC CAUTION Do not display a bright and still picture for longer than 20 minutes This could damage the CRTs NOTE The...

Страница 23: ...veral times to return the adjust ment screen to the source screen One input is switched to another The projector is turned off After every 10 minutes of elapsed time mWhen the Automatic Save Feature mode is set to DISABLE projector settings can be stored in the projector s memory manually When you try to return the source screen by pressing END several times the STORE menu is displayed To manually...

Страница 24: ...emory location No 51 NO Does not register settings A registered name is given as follows VIDEO S VIDEO Video standard with a list number e g NTSC51 or PAL52 RGB RGB with a list number e g RGB60 NOTE If the Input list does not have any unassigned memory location starting at No 51 then the NEW item will be selectable For signal registration see SIGNAL ENTRY in the Set Up manual included only with th...

Страница 25: ...be displayed Items to select BRIGHT Brightness control CONTRAST Contrast control COLOR Color intensity control SHARPNESS Picture detail control TINT Red and green values control NOTE When you are in the BRIGHT adjustment mode all the CRTs will be in use The CRT beam cannot be cut off 4 Use the CURSOR buttons to adjust a picture to your preference The CURSOR or button increases the level The CURSOR...

Страница 26: ... area 4 Adjust the position size or screen area When selecting SHIFT Use the CURSOR buttons to move the position of the picture Pressing or moves the picture left or right Pressing or moves the picture up or down You can also finely adjust the shift To do so While displaying the SHIFT screen press and hold CTL and press any one of the CURSOR buttons to display the SHIFT FINE screen Pressing or mov...

Страница 27: ... top or bottom edge The marker on the selected side will turn to a solid color 2 Adjust the blanking using the CURSOR buttons Top and Right Pressing or increases the adjustment values Pressing or decreases the adjustment values Bottom and Left Pressing or increases the adjustment values Pressing or decreases the adjustment values 5 To end this adjustment press the END button Whenever the END butto...

Страница 28: ...e displayed Items to select VOLUME BASS Not available on XG135LC XG110LC and XG75A TREBLE Not available on XG135LC XG110LC and XG75A BALANCE Not available on XG135LC XG110LC and XG75A 4 Use the CURSOR button to adjust sound controls The CURSOR or button increases the level The CURSOR or button decreases the level 5 To end this adjustment press the END button Whenever the END button is pressed the ...

Страница 29: ...INPUT SELECT buttons on the rear control panel 1 Press the INPUT button The INPUT SELECT menu is displayed 2 Press the SELECT button to select an input terminal you wish to input 3 Press the ENTER button to execute selection and to switch to the selected input NOTE Pressing the INPUT button deletes the INPUT SELECT menu during input selection O P E R A T E 1 P I C T U R E 2 P O S I T I O N 3 S O U...

Страница 30: ...switch to any input signal of NO 01 through10 on the INPUT SELECT list by holding down the CTL button and pressing one of the INPUT buttons corresponding to the input number To activate this function you must first select ENABLE in the DIRECT ENTRY ACCESS mode For further details contact your dealer If there are two or more memory locations that contain the same signal information the projector wi...

Страница 31: ...e screen NOTE The items below cannot be set in the OPERATE mode O P E R A T E 1 P I C T U R E 2 P O S I T I O N 3 S O U N D 4 I N P U T S E L E C T 5 S O U R C E I N F O 6 S T A T I C 7 C L O S E D C A P T I O N 8 T I M E R P 0 2 0 3 S O U R C E I N F O R M A T I O N S Y N C C O N T R O L A U T O C O M P C O U N T E R D I S P L A Y T I M E S O U R C E L O C K O F F A K B O F F G Y MATRIX P 0 3 0 3...

Страница 32: ...ed 3 Press the R or B button to display the pattern to be aligned with the Green pattern as used a reference color You can turn on or off each CRT beam R and B separately 4 Hold down the CTL button then select the CRT you wish to adjust with the R and B buttons 5 Align the center of the Red or the Blue pattern with the center of the Green pattern using the CURSOR buttons The CURSOR or button moves...

Страница 33: ...uted Items to select CAPTION 1 4 Text is superimposed TEXT 1 4 Text is displayed in full screen OFF This exits the CLOSED CAPTION mode NOTE 1 The closed caption feature will only work with an NTSC3 58 source 2 Pressing ENTER executes store function Switching to source other than NTSC3 58 will cancel this setting To activate select the NTSC3 58 source again 4 To return to the operate menu press the...

Страница 34: ...E DISPLAY of the OPTION menu See Various Settings Setting DATE TIME DISPLAY Setting in the Set Up manual 1 Press the OPERATE button The OPERATE menu is displayed 2 Use the CURSOR or button to highlight the 8 TIMER item and then press ENTER to display the TIMER menu You can also select the TIMER menu directly by pressing the INPUT 8 button 3 Use the CURSOR or button to select ON OFF TIMER or SLEEP ...

Страница 35: ...day thru Sunday b Use the CURSOR or button to select an item and then press ENTER When YES is selected the item on the day field in the ON OFF TIMER menu is marked with the letter E which indicates that the setting time is enabled Items to select YES Programs to turn on or off every week not deleted after executing the program NO Does not program to turn on or off every week deleted after executin...

Страница 36: ...m number The ON OFF TIMER menu is displayed 4 Use the CURSOR or button to select ACTIVE or INACTIVE and then press ENTER Items to select ACTIVE Enables ON OFF TIMER INACTIVE Disables ON OFF TIMER When selecting ACTIVE Select ACTIVE and press ENTER to enable the pro grammed timer function The ON OFF display appears on the top left of the screen When the all the programs are completed this display d...

Страница 37: ...u and press ENTER to display the SLEEP TIMER screen This indicates the remaining time You can also display the remaining time by holding down CTL and pressing POWER OFF on the remote control To change the setting time repeat the step 2 5 To cancel the setting sleep time select the 2 SLEEP TIMER in the TIMER menu and press ENTER to display the SLEEP TIMER screen This indicates the remaining time Us...

Страница 38: ...Y E S N O X X X X X X X X L O A D C A N C E L X X X X X X X X D A T A C A N C E L Y E S N O Adjustment settings can be returned to the factory preset level or previously stored level or can be cancelled To return to the standard level NORMAL 1 Press the NORMAL button A confirmation message will be displayed 2 Use the CURSOR or button to select YES 3 Press ENTER The NORMAL function is performed If ...

Страница 39: ... Adjust Data Factory Area Ref Adjust Data Ref Adjust Data Input List 00 99 or Default Data 1 6 Default Data 1 6 Input List 00 99 Cancel Data Signal Select Normalize Load Cancel The above list may be different if NORMAL LOAD CANCEL operation is performed during POINT convergence Output data during adjusting is the amount of data in each data area and data other than the current adjustment item data...

Страница 40: ...me time do not use the same input terminal A COMPONENT signal can be input with the RGB input board installed when the projector is used with the ISS 6020 switcher on the SW level mode To enable this you must first specify the RGB input board as the COMPONENT input board on the projector See Setting Mode RGB COMPONENT Searching of the Set up manual Searching Registered Signals When a source is swi...

Страница 41: ...cluded with XG 1352G XG 852G or contact your dealer for changing the on screen display mode If the main power is not supplied to the projector for three days or more the built in clock may be reset If this happens contact your dealer for setting date and time Date BASIC OPERATION M O N 0 1 1 6 9 6 1 2 0 0 0 0 M 0 1 S 0 1 X X X X Current time Input Source name ...

Страница 42: ...RNER Adjusts the four corners on the creen 3 Use the CURSOR or button to select the CENTER EDGE or CORNER item Press the ENTER button to display the ASTIG adjustment screen The DOT COARSE test pattern is automatically displayed Pressing The CTL and FOCUS buttons rotates three items as follows CENTER EDGE CORNER 4 Select the CRT you wish to adjust with R G or B button 5 Press the R G or B button to...

Страница 43: ...n to adjust the selected position diagonally 8 To end this mode press the END button Whenever the END button is pressed the menus will sequence in this order REF ADJUST menu Source screen If the RETURN USER MODE menu appears use the CURSOR or button to select either YES or NO and then press ENTER This will exit the REF ADJUST mode Items to select YES When you try to enter the ADJUST mode the next ...

Страница 44: ... button to increase or decrease the brightness on the right and the left side Press CURSOR or button to increase or decrease the brightness on the top and the bottom side 4 To end this mode press the END button Whenever the END button is pressed the menus will sequence in this order REF ADJUST menu Source screen If the RETURN USER MODE menu appears use the CURSOR or button to select either YES or ...

Страница 45: ...RSOR or button to increase the amount of blue on the right side and the amount of red on the left side Press CURSOR or button to increase the amount of red on the right side and the amount of blue on the left side 4 To end this mode press the END button Whenever the END button is pressed the menus will sequence in this order REF ADJUST menu Source screen If the RETURN USER MODE menu appears use th...

Страница 46: ... s t t h e r a s t e r p o s i t i o n P r e s s i n g C U R S O R o r m o v e s t h e r a s t e r u p P r e s s i n g C U R S O R o r m o v e s t h e r a s t e r d o w n 4 T o e n d t h i s m o d e p r e s s t h e E N D b u t t o n W h e n e v e r t h e E N D b u t t o n i s p r e s s e d t h e m e n u s w i l l s e q u e n c e i n t h i s o r d e r R E F A D J U S T m e n u S o u r c e s c r e e...

Страница 47: ...129 Appendix CONTENTS Timing Charts Pre set Signals 130 Input Signal Referecne Chart 131 Input Signal Timing 132 Message List 133 ...

Страница 48: ...light the 1 SETTING MODE line Press ENTER to display the SETTING MODE menu You can also select the SETTING MODE menu directly by pressing the INPUT 1 button 4 Use the CURSOR or button to select the PJ ORIENTA TION item then press ENTER to display the PJ ORIENTA TION menu NOTE TheSETTINGMODEhasthreemenus The PJORIEN TATION item is on the first menu P01 To access P02 or P03 from P01 press and hold d...

Страница 49: ...D button is pressed the menus will sequence in this order OPTION menu ADJUST menu Source screen If the RETURN USER MODE menu appears use the CURSOR or button to select either YES or NO and press ENTER This will exit the ADJUST mode Items to select YES When you try to enter the ADJUST mode the next time you will need to re enter your passcode N O When you try to enter the ADJUST mode the next time ...

Страница 50: ...s the button to return to P01 from P02 or P03 press and hold down the CTL button then press the button 5 Use the CURSOR or button to select your desired connec tion condition of Switcher and press ENTER The RE START prompt is displayed after setting of the connection condition is modified from the current status to your desired condition Items to select STAND ALONE The projector used in stand alon...

Страница 51: ...never the END button is pressed the menus will sequence in this order OPTION menu Adjust menu Source screen If the RETURN USER MODE menu appears use the CURSOR or button to select YES or NO and then press ENTER Items to select YES When you try to enter the ADJUST mode the next time you will need to re enter your passcode N O When you try to enter the ADJUST mode the next time you will not need to ...

Страница 52: ...lectthe DEFAULT INPUTSELECT item thenpressENTERtodisplaythe DEFAULTINPUTSELECT menu NOTE TheSETTINGMODEhasthreemenus The DEFAULT INPUT SELECT item is on the first menu P01 To access P02 or P03 from P01 press and hold down the CTL button then press the button to return to P01 from P02 or P03 press and hold down the CTL button then press the button A D J U S T 1 S I G N A L E N T R Y 2 F O C U S 3 A...

Страница 53: ...he desired slot number 1 through 10 0 andthenpressENTER When used with two or more Switchers The MASTER and SLAVE slotnumbermenuwillbe displayed UsetheCURSOR or buttontoselectthemasterslotnumber first and then select the slave slot number 1 through 10 0 PressENTER L A S T D E F A U L T D EF AUL T IN PUT S EL ECT S L O T 0 1 S L O T 0 2 S L O T 0 3 S L O T 0 4 S L O T 0 5 S L O T 0 6 S L O T 0 7 S ...

Страница 54: ...SERMODE menuappears usethe CURSOR or buttontoselecteither YES or NO and press ENTER This will exit the ADJUST mode Items to select YES When you try to enter the ADJUST mode the next time you will need to re enter your passcode N O When you try to enter the ADJUST mode the next time you will not need to re enter your passcode RETURN USER MODE Y E S N O SETTING ...

Страница 55: ...ton 4 UsetheCURSOR or buttontoselectthe FOCUSEDGE MODE item on Page 1 then press ENTER to display the FOCUSEDGEMODE menu NOTE TheSETTINGMODEhasthreemenus The FOCUS EDGE MODE item is on the first menu P01 To access P02 or P03 from P01 press and hold down the CTL button then press the button to return to P01 from PO2 or P03 press and hold down the CTL button then press the button A D J U S T 1 S I G...

Страница 56: ...inthisorder OPTION menu ADJUST menu Sourcescreen Ifthe RETURNUSERMODE menuappears usethe CURSOR or buttontoselecteither YES or NO and press ENTER This will exit the ADJUST mode Items to select YES When you try to enter the ADJUST mode the next time you will need to re enter your passcode N O When you try to enter the ADJUST mode the next time you will not need to re enter your passcode A L L S E P...

Страница 57: ...set proceed as follows NOTE An identifying result will be displayed in the SOURCE INFORMATIONscreen 1 PresstheADJUSTbuttontodisplaythe ADJUST menu Theprojectormayaskyoutoenteryourpasscode See page 61 for the explanation of the PASSCODE 2 UsetheCURSOR or buttontohighlightthe 8 OPTION line Press ENTER to display the OPTION menu You can also selectthe OPTION menudirectlybypressingtheINPUT 8 button 3 ...

Страница 58: ...ither YES or NO and press ENTER This will exit the ADJUST mode Items to select YES When you try to enter the ADJUST mode the next time you will need to re enter your passcode N O When you try to enter the ADJUST mode the next time you will not need to re enter your passcode NOTE The input signal must be compatible with the S2 S1 MODE standard Refer to the user manual included with the connected eq...

Страница 59: ... 2 UsetheCURSOR or buttontohighlightthe 8 OPTION line Press ENTER to display the OPTION menu You can also selectthe OPTION menudirectlybypressingtheINPUT 8 button 3 UsetheCURSOR or buttontohighlightthe 1 SETTING MODE line PressENTERtodisplaythe SETTINGMODE menu You can also select the SETTING MODE menu directly bypressingtheINPUT 1 button 4 UsetheCURSOR or buttontoselectthe VIDEOMODE SELECT item t...

Страница 60: ...he PAL mode SECAM Switches to the SECAM mode Select MANUAL when connecting to poor quality signal or non standardsignalssuchasvideogames NOTE The projector may not function correctly with a mono chrome signals in the AUTO mode 6 To complete press the END button Whenever the END button is pressed the menus will sequence inthisorder OPTION menu ADJUST menu Sourcescreen When your passcode is in effec...

Страница 61: ...theINPUT 1 button 4 UsetheCURSOR or buttontoselectthe AUTOPOWER ON MODE item on Page 2 then press ENTER to display the AUTOPOWERONMODE menu NOTE TheSETTINGMODEhasthreemenus The AUTO POWER ON MODE item is on the second menu P02 To access P02 from P01 press and hold down the CTL button then press the button to return to P01 from P02 press and hold down the CTL button then press the button A D J U S ...

Страница 62: ...tched outlet 6 To complete press the END button Whenever the END button is pressed the menus will sequence inthisorder OPTION menu ADJUST menu Sourcescreen Ifthe RETURNUSERMODE menuappears usethe CURSOR or buttontoselecteither YES or NO and thenpressENTER Items to select YES When you try to enter the ADJUST mode the next time you will need to re enter your passcode N O When you try to enter the AD...

Страница 63: ...n 4 UsetheCURSOR or buttontoselectthe WARM UP MODE item on Page 2 then press ENTER to display the WARM UPMODE menu NOTE TheSETTINGMODEhasthreemenus The WARM UP MODE item is on the second menu P02 To access P02 from P01 press and hold down the CTL button then press the button to return to P01 from P02 press and hold down the CTL button then press the button A D J U S T 1 S I G N A L E N T R Y 2 F O...

Страница 64: ... ENDbutton 6 To complete press the END button Whenever the END button is pressed the menus will sequence inthisorder OPTION menu ADJUST menu Sourcescreen Ifthe RETURNUSERMODE menuappears usethe CURSOR or buttontoselecteither YES or NO and thenpressENTER Items to select YES When you try to enter the ADJUST mode the next time you will need to re enter your passcode N O When you try to enter the ADJU...

Страница 65: ...TING MODE menu directly bypressingtheINPUT 1 button 4 UsetheCURSOR or buttontoselectthe AUTOMATIC DATA STORE item on Page 2 then press ENTER to display the AUTOMATICDATASTORE menu NOTE TheSETTINGMODEhasthreemenus The AUTOMATIC DATA STORE item is on the second menu P02 To access P02 from P01 press and hold down the CTL button then press the button to return to P01 from P02 press and hold down the C...

Страница 66: ...ectoristurnedoff Every10minutes NOTE After DISABLE isselectedintheAUTOMATICDATA STORE menu the settings will not be stored in the memory unless you select YES in the STORE menu 6 Ifthe RETURNUSERMODE menuappears usethe CURSOR or buttontoselecteither YES or NO and press ENTER This will exit the ADJUST mode Items to select YES When you try to enter the ADJUST mode the next time you will need to re e...

Страница 67: ...u directly bypressingtheINPUT 1 button 4 UsetheCURSOR or buttontoselectthe PHOSPHOR SAVER item on Page 2 then press ENTER to display the PHOSPHORSAVER menu NOTE TheSETTINGMODEhasthreemenus The PHOSPHOR SAVER item is on the second menu P02 To access P02 from P01 press and hold down the CTL button then press the button to return to P01 from P02 press and hold down the CTL button then press the butto...

Страница 68: ...escreen Ifthe RETURNUSERMODE menuappears usethe CURSOR or buttontoselecteither YES or NO and thenpressENTER Items to select YES When you try to enter the ADJUST mode the next time you will need to re enter your passcode N O When you try to enter the ADJUST mode the next time you will not need to re enter your passcode 6 UsetheCURSOR or buttontoselectyourdesiredinterval timefromthe INTERVAL menuand...

Страница 69: ... 1 button 4 Use the CURSOR or button to select the SIGNAL SWITCHING item on Page 2 then press ENTER to display the SIGNAL SWITCHING menu NOTE The SETTING MODE has three menus The SIGNAL SWITCHING menu is on the second menu P02 To access P02 from P01 press and hold down the CTL button then press the button to return to P01 from P02 press and hold down the CTL button then press the button A D J U S ...

Страница 70: ... complete this press END Whenever the END button is pressed the menus will sequence in this order OPTION menu ADJUST menu Source screen If the RETURN USER MODE menu appears use the CURSOR or button to select either YES or NO and then press ENTER Items to select YES When you try to enter the ADJUST mode the next time you will need to re enter your passcode NO When you try to enter the ADJUST mode t...

Страница 71: ...ou can also select the SETTING MODE menu directly by pressing the INPUT 1 button 4 Use the CURSOR or button to select the DIRECT ENTRY ACCESS item on Page 3 then press ENTER to display the DIRECT ENTRY ACCESS menu NOTE The SETTING MODE has three menus The DIRECT ENTRY ACCESS item is on the third menu P03 To access P03 from P01 press and hold down the CTL button then press the button twice to retur...

Страница 72: ...mplete this press END Whenever the END button is pressed the menus will sequence in this order OPTION menu ADJUST menu Source screen If the RETURN USER MODE menu appears use the CURSOR or button to select either YES or NO and press ENTER This will exit the ADJUST mode Items to select YES When you try to enter the ADJUST mode the next time you will need to re enter your passcode NO When you try to ...

Страница 73: ... press the button twice to return to P01 from P03 press and hold down the CTL button then press the button twice 5 Use the CURSOR or button to select either OFF or ON and press ENTER Items to select OFF Defocuses the blue CRT ON Does not defocus the blue CRT 6 To end this mode press the END button Whenever the END button is pressed the menu will sequence in this order OPTION menu ADJUST menu Sourc...

Страница 74: ...ccess P03 from P01 press and hold down the CTL button then press the button twice to return to P01 from P03 press and hold down the CTL button then press the button twice 5 Use the CURSOR or button to select the baud rate from 4800 to 38400 bps and press ENTER 6 To end this mode press the END button Whenever the END button is pressed the menu will sequence in this order OPTION menu ADJUST menu Sou...

Страница 75: ...ss and hold down the CTL button then press the v button twice to return to P01 from P03 press and hold down the CTL button then press the button twice A D J U S T 1 S I G N A L E N T R Y 2 F O C U S 3 A L I G N M E N T 4 C O N V E R G E N C E 5 K E L V I N 6 R G B G A I N 7 P A S S C O D E 8 O P T I O N 9 R E F A D J U S T O P T I O N 1 S E T T I N G M O D E 2 M E N U M O D E 3 S E Q U E N C E R 4...

Страница 76: ...O and then press ENTER This will exit the ADJUST mode Items to select YES When you try to enter the ADJUST mode the next time you will need to re enter your passcode NO When you try to enter the ADJUST mode the next time you will not need to re enter your passcode SETTING S L O T 0 1 S L O T 0 2 S L O T 0 3 S L O T 0 4 S L O T 0 5 S L O T 0 6 S L O T 0 7 S L O T 0 8 S L O T 0 9 S L O T 1 0 R R R R...

Страница 77: ... the 8 OPTION line Press ENTER to display the OPTION menu You can also select the OPTION menu directly by pressing the INPUT 8 button 3 Use the CURSOR or button to highlight the 2 MENU MODE line Press ENTER to display the MENU MODE menu You can also select the MENU MODE menu directly by pressing the INPUT 2 button 4 Use the CURSOR or button to highlight the MESSAGE MODE item Press ENTER to display...

Страница 78: ...ver the DISPLAY button is pressed If no button operation is made for 20 minutes or more the on screen message will automatically turn off 6 To end this mode press the END button When the END button is pressed the menus will sequence in this order OPTION menu ADJUST menu Source screen If the RETURN USER MODE menu appears use the CURSOR or button to select either YES or NO and press ENTER This will ...

Страница 79: ...MODE line Press ENTER to display the MENU MODE menu You can also select the MENU MODE menu directly by pressing the INPUT 2 button 4 Use the CURSOR or button to highlight the MESSAGE COLOR item Press ENTER to display the MESSAGE COLOR menu A D J U S T 1 S I G N A L E N T R Y 2 F O C U S 3 A L I G N M E N T 4 C O N V E R G E N C E 5 K E L V I N 6 R G B G A I N 7 P A S S C O D E 8 O P T I O N 9 R E ...

Страница 80: ...mode press the END button Whenever the END button is pressed the menus will sequence in this order OPTION menu ADJUST menu Source screen If the RETURN USER MODE menu appears use the CURSOR or button to select either YES or NO and press ENTER This will exit the ADJUST mode Items to select YES When you try to enter the ADJUST mode the next time you will need to re enter your passcode NO When you try...

Страница 81: ...ing the INPUT 2 button 4 Use the CURSOR or button to highlight the DATE TIME DISPLAY item Press ENTER to display the DATE TIME DISPLAY menu 5 Use the CURSOR or button to select any one of the three items DATE DAY and TIME Then press ENTER A D J U S T 1 S I G N A L E N T R Y 2 F O C U S 3 A L I G N M E N T 4 C O N V E R G E N C E 5 K E L V I N 6 R G B G A I N 7 P A S S C O D E 8 O P T I O N 9 R E F...

Страница 82: ... AM PM Is the time in hours minutes seconds am pm format HH MM SS 24 HOUR Is the time in hours minutes seconds 24 hour format OFF Does not display the time NOTE You can select the time input format for timer date preset with this feature When OFF is selected use the AM PM format 6 To end this mode press END Whenever the END button is pressed the menus will sequence in this order OPTION menu ADJUST...

Страница 83: ...an also select the MENU MODE menu directly by pressing the INPUT 2 button 4 Use the CURSOR or button to highlight the DATE TIME PRESET item Press ENTER to display the DATE TIME PRESET menu A D J U S T 1 S I G N A L E N T R Y 2 F O C U S 3 A L I G N M E N T 4 C O N V E R G E N C E 5 K E L V I N 6 R G B G A I N 7 P A S S C O D E 8 O P T I O N 9 R E F A D J U S T O P T I O N 1 S E T T I N G M O D E 2...

Страница 84: ...SER MODE menu appears use the CURSOR or button to select either YES or NO and press ENTER This will exit the ADJUST mode I t e m s t o s e l e c t YES WhenyoutrytoentertheADJUSTmodethenext time youwillneedtore enteryourpasscode N O WhenyoutrytoentertheADJUSTmodethenext time youwillnotneedtore enteryourpasscode NOTE The projector has a built in clock The clock will keep workingforaboutthreedaysafte...

Страница 85: ...address ON Displays PJ address 6 To end this mode press END Whenever the END button is pressed the menu will sequence in this order OPTION menu ADJUST menu Source screen If the RETURN USER MODE menu appears use the CURSOR or button to select either YES or NO and then press ENTER This will exit the ADJUST mode Items to select YES When you try to enter the ADJUST mode again you will need to re enter...

Страница 86: ...IGNAL message OFF Does not display the NEW SIGNAL message 6 To end this mode press END Whenever the END button is pressed the menu will sequence in this order OPTION menu ADJUST menu Source screen If the RETURN USER MODE menu appears use the CURSOR or button to select either YES or NO and then press ENTER This will exit the ADJUST mode Items to select YES When you try to enter the ADJUST mode agai...

Страница 87: ...e EDIT and press ENTER This will bring you to the EDIT mode and a program line is highlighted I t e m s t o s e l e c t START Executestheprogram EDIT Correctsorcreatestheprogramdata A D J U S T 1 S I G N A L E N T R Y 2 F O C U S 3 A L I G N M E N T 4 C O N V E R G E N C E 5 K E L V I N 6 R G B G A I N 7 P A S S C O D E 8 O P T I O N 9 R E F A D J U S T O P T I O N S E Q U E N C E R P 0 1 N O 0 1 ...

Страница 88: ...edesiredtime P O F F Programstoturnoffthepoweratthedesiredtime INSERT Insertstheselectedlineandmovesdownthe following lines DELETE Deletestheselectedlineandmovesupthe following lines m Selecting INPUT When using in stand alone application 1 Use the CURSOR or button to select INPUT and press ENTER The INPUT TERMINAL SELECT terminal menu is displayed 2 Use the CURSOR or button to select an input slo...

Страница 89: ... If you have made an error in the input of numbers press the END button to return to the MASTER menu then start from step 2 The WEEK SELECT screen will appear 4 Use the CURSOR or button to select any day of the week then select either YES or NO with ENTER When DAILY selected the entire week is changed to YES When END is selected the current setting is saved To return to Step 3 press the END button...

Страница 90: ...of the week then select either YES or NO with ENTER When DAILY selected the entire week is changed to YES When END is selected the current setting is saved To return to Step 4 press the END button In that case the changed setting is invalid NOTE Typing99 99 99inthetimeinputmenuwillexecutethe programimmediately Seetheexampleinthefollowing WAIT section I N P U T W A I T G O T O L O O P P O N P O F F...

Страница 91: ...VIDEO then type 99 99 99 in the TIME input screen then select DAILY in the WEEK SELECT menu for INPUT Second line Select type 00 20 00 in the TIME input screen for WAIT Third line Type 99 99 99 then select DAILY for P OFF When this program starts the input signal will change to VIDEO immediately Then the current condition will be retained for 20 minutes Finally the power will be turned off The WAI...

Страница 92: ... 1 Use the CURSOR or button to select LOOP and press ENTER The LOOP COUNT input screen will be displayed 2 Enter the number of the destination line LOOP and the number of the loop times COUNT in this order using the INPUT button and press ENTER If you have made an error press END to return to the Program menu then start again The SEQUENCER screen will be restored to its last setting I N P U T W A ...

Страница 93: ...ignoredifsetinthefirstline Inthis case theprogramwillstartitsexecutionfromthesecondline m Selecting P OFF 1 Use the CURSOR or button to select P OFF and press ENTER The POWER OFF input screen will be displayed 2 Enter the POWER OFF TIME you wish to turn on the projector using INPUT buttons and press ENTER Type the time in hours 24 hours minutes and seconds If you made an error press END to return ...

Страница 94: ...T I O N S E Q U E N C E R P 0 1 N O 0 1 0 2 0 3 0 4 0 5 0 6 0 7 0 8 0 9 1 0 I N P U T M 1 0 M 0 2 M 0 1 W A I T M 0 1 W A I T L O O P M 0 2 P O F F P O N S 0 1 S 0 2 S 0 2 S 0 1 0 3 C O U N T 0 5 S 0 2 T I M E 1 2 0 0 0 0 1 4 0 0 0 0 0 0 1 0 0 0 0 0 2 0 0 0 1 5 5 0 0 0 1 8 0 0 0 0 0 9 0 0 0 0 S T A R T E D I T S M T W T F S X O O O O O X X O O O O O X X O O O O O X X O O O O O X X O O O O O X X O ...

Страница 95: ... MODE menu appears use the CURSOR or button to select either YES or NO and then press ENTER This will exit the ADJUST mode I t e m s t o s e l e c t YES WhenyoutrytoentertheADJUSTmodethenext time youwillneedtore enteryourpasscode N O WhenyoutrytoentertheADJUSTmodethenext time youwillnotneedtore enteryourpasscode RETURN USER MODE Y E S N O O P T I O N S E Q U E N C E R P 0 1 N O 0 1 0 2 0 3 0 4 0 5...

Страница 96: ...NTER to display the ADDRESS screen You can also select the ADDRESS menu directly by pressing the INPUT 4 button or the ADDRESS button on the full function remote control 4 Enter the address number using the INPUT button and press ENTER If you have made a mistake press END to return to the OP TION menu then start again NOTE Enter the address number 01 when only one projector isused A D J U S T 1 S ...

Страница 97: ...en If the RETURN USER MODE menu appears use the CURSOR or button to select either YES or NO and press ENTER This will exit the ADJUST mode I t e m s t o s e l e c t YES WhenyoutrytoentertheADJUSTmodethenext time youwillneedtore enteryourpasscode N O WhenyoutrytoentertheADJUSTmodethenext time youwillnotneedtore enteryourpasscode RETURN USER MODE Y E S N O ...

Страница 98: ... The new remote control address is displayed on the screen When the new remote control address is configured at 00 the display will not be changed However its address has been changed by pressing ENTER The number you can specify ranges from 00 to 64 To stop the address changing press END See the projector address number on the screen NOTE The buttons other than the above mentioned button and the O...

Страница 99: ... or 2 LEVEL 4 To exit this menu press END Whenever the END button is pressed the menus will sequence in this order OPTION menu ADJUST menu Source screen If the RETURN USER MODE menu appears use the CURSOR or button to select either YES or NO and press ENTER This will exit the ADJUST mode I t e m s t o s e l e c t YES WhenyoutrytoentertheADJUSTmodethenext time youwillneedtore enteryourpasscode N O ...

Страница 100: ...ingtimeofCRT USERPJRUNNINGTIME Theamountofoperatingtimeoftheprojector Userresetable How to reset the user projector or CRT running time 1 Use the CURSOR buttons to select the item and then press ENTER The USER PJ RUNNING TIME RESET or USER CRT RUNNING TIME RESET menu is displayed 2 Use the CURSOR or button to select either YES or NO and then press ENTER I t e m s t o s e l e c t YES Thetimewillber...

Страница 101: ... NO and press ENTER This will exit the ADJUST mode I t e m s t o s e l e c t YES WhenyoutrytoentertheADJUSTmodethenext time youwillneedtore enteryourpasscode N O WhenyoutrytoentertheADJUSTmodethenext time youwillnotneedtore enteryourpasscode 4 To exit the HOUR METER display press END Whenever the END button is pressed the menus will sequence in this order ADJUST menu Source screen If the RETURN US...

Страница 102: ...me you press the INPUT button an asterisk will appear under the NEW PASSCODE message NOTE 0000 and 9999 cannot be used as a passcode 2 Once you have finished entering your four digit passcode press ENTER to store the code NOTE If you have made an error press the NORMAL button to delete the asterisk Then re enter the correct passcode To delete all the entered digits hold down the CTL button then pr...

Страница 103: ...COMPLETE message will be displayed NOTE If the passcode is not correct the WARNING DIFFER ENT PASSCODE message will be displayed You are required to enter the new passcode correctly 6 To complete press the END button When the END button is pressed once the RETURN USER MODE menu will be displayed Use the CURSOR or button to select either YES or NO and then press ENTER This will exit the ADJUST mode...

Страница 104: ...de using the 1 through 0 buttons 1 Each time you press the INPUT button an asterisk will appear under the CURRENT PASSCODE message 2 Once you have finished entering the four digit passcode press ENTER NOTE If you have made an error press the NORMAL button to delete the asterisk Then re enter the correct passcode To delete all the entered digits hold down the CTL button then press the NORMAL button...

Страница 105: ...essage 2 Once you have finished entering the four digit new passcode press ENTER NOTE If you have made an error press the NORMAL button to delete the asterisk Then re enter the correct passcode To delete all the entered digits hold down the CTL button then press the NORMAL button 3 If the entered passcode is correct the CHANGE PASSCODE COMPLETE message is displayed NOTE If the passcode is not ente...

Страница 106: ...e the current passcode using the 1 through 0 buttons 1 Each time you press the INPUT button an asterisk will appear under the CURRENT PASSCODE message 2 Once you have finished entering the four digit passcode press ENTER NOTE If you have made an error press the NORMAL button to delete the asterisk Then re enter the correct passcode To delete all the entered digits hold down the CTL button then pre...

Страница 107: ... to select YES When selecting YES the current passcode will be canceled You will not be required to re enter your passcode when you press the ADJUST button to re enter the ADJUST mode N O When selecting NO the current passcode will remain in effect PASSCODE DISABLE Y E S N O PASSCODE ...

Страница 108: ...elect the FOCUS menu directly by pressing the INPUT 2 button 3 Use the CURSOR or button to highlight your preferred adjustment item Press ENTER to display the selected adjustment screen You can also select the adjustment screen directly by pressing the INPUT 1 through 4 button For edge focus you can select either EDGE ALL or EDGE SEPA in the FOCUS EDGE mode of the OPTION menu See page 65 Items to ...

Страница 109: ...s Always be aware of what color the on screen CRT display is showing R G B when CENTER EDGE SEPA or COR NER is selected If that color s test pattern is turned off any adjustment to that color will display the THIS COLOR IS NOT APPLICABLE message 6 Use the CURSOR buttons to adjust the focus m When selecting CENTER Pressing the or button increases the control levels of the center focus The gauge mar...

Страница 110: ...f the edge focus The gauge mark in the scale moves to the left 3 To switch to the CENTER screen use the CTL and CURSOR buttons as follows To switch to CENTER from Top press and hold CTL then press CURSOR To switch to CENTER from Bottom press and hold CTL then press CURSOR To switch to CENTER from Right press and hold CTL then press CURSOR To switch to CENTER from Left press and hold CTL then press...

Страница 111: ...ct either YES or NO and then press ENTER This will exit the ADJUST mode Items to select YES WhenyoutrytoentertheADJUSTmodethenext time youwillneedtore enteryourpasscode N O WhenyoutrytoentertheADJUSTmodethenext time youwillnotneedtore enteryourpasscode NOTE ThecenterfocusfortheBlueCRTispre adjustedsothat thebestwhiteuniformitycanbeobtainedatthegaugecenter 0 For this reason it has been set at the f...

Страница 112: ...l and vertical pincushion LINEAR BAL Adjusts the horizontal and vertical linearity balance KEY BALANCE Adjusts the horizontal and vertical keystone tilt balance PIN BALANCE Adjusts the horizontal and vertical pincush ion bow balance LINE DIST Adjusts S shaped and biquadratic distortion of vertical and horizontal lines R G B POINT Adjusts the horizontal and vertical line in detail using a intersect...

Страница 113: ... moment If this happens reduce the total amount of the current adjust ment data m Adjusting LINE DISTORTION 1 Select the 10 LINE DIST item then press ENTER The LINE DIST menu is displayed 2 Use the CURSOR or buttons to select the item and press ENTER to display the selected adjustment screen You can also select the item directly by pressing the corresponding INPUT number button The selected adjust...

Страница 114: ...at the same time while the convergence adjustment needs to be performed for each CRT R and B separately 1 Select 11 R G B POINT from the ALIGNMENT menu and press ENTER to display the R G B POINT menu For dynamic convergence select 9 POINT from the CONVER GENCE menu and press ENTER to display the POINT menu m Adjusting R G B POINT 3 Use the CURSOR buttons to align the pattern When selecting CENTER ...

Страница 115: ...lect COARSE Coarse adjustment Number of adjust ment zones is 3 x 3 MEDIUM Number of adjustment zones is 7 x 7 FINE Fine adjustment Number of adjustment points is 13 x 16 3 Use the CURSOR or buttons to move the cursor mark to the point to be adjusted Pressing the CURSOR button moves the cursor to the right Pressing the CURSOR button moves the cursor to the left Pressing the CURSOR button moves the ...

Страница 116: ...gence adjustment RETURN USER MODE Y E S N O 6 To end this adjustment press the END button Whenever the END button is pressed the menus will sequence in this order ALIGNMENT menu ADJUST menu Source screen If the RETURN USER MODE menu appears use the CURSOR or button to select either YES or NO and then press ENTER This will exit the ADJUST mode Items to select YES When you try to enter the ADJUST mo...

Страница 117: ...ITY Adjustleftandrightlinearity Vertical BOW Adjusthorizontalcenterlinebow Horizontal BOW Adjustverticalcenterlinebow Vertical AMPLITUDE Adjustverticalheightofimage Horizontal AMPLITUDE Adjusthorizontalsizeofimage Vertical KEYSTONE Adjusttopandbottomkeystoneerror Horizontal KEYSTONE Adjustleftandrightkeystoneerror Alignment Adjustment Items ...

Страница 118: ...ror Horizontal KEY BALANCE Equalize left and right keystone balance error Vertical LINEAR BALANCE Equalize top and bottom linearity balance error Horizontal LINEAR BALANCE Equalize left and right linearity balance error Vertical POINT Adjust the point peak vertically Horizontal POINT Adjust the point peak horizontally LINE DIST CENTER Correct S shaped horizontal line Horizontal LINE DIST EDGE Corr...

Страница 119: ...3 Press the R or B button to display the pattern to be aligned with the Green pattern You can turn on or off each CRT beam R and B separately 4 Hold down the CTL button then select the CRT you wish to adjust with the R and B buttons NOTE Alwaysbeawareofwhatcolortheon screenCRT displayisshowing R G B Ifthatcolor stestpatternisturned off anyadjustmenttothatcolorwilldisplaythe THISCOLOR ISNOTAPPLICAB...

Страница 120: ...displayed See pages 54 to 56 for the explanation of the selected adjust ment NOTE Youcanalsoselectadjustmentsdirectlyusingbuttonsonthe fullfunctionremotecontrol IfyouareintheALIGNMENT mode seepage41 pressandholddowntheCTLbuttonthen presstheRorBbutton ThiswillbringyoutotheCONVER GENCEadjustmentscreen Toselect LINEAR BAL conver gence pressandholddowntheCTLbuttonthenpressthe LINEAR button Toselect LI...

Страница 121: ...BALANCE Press and hold the CTL button then press any one of the CURSOR buttons to select the position to be adjusted CTL CTL CTL CTL Use the CURSOR buttons to correct the error C O N V E R G E N C E T I L T S K E W C R T R 1 0 H 9 0 V C O N V E R G E N C E T I L T S K E W C R T R 1 0 H ABNORMAL CORRECTION DATA V Top Bottom Right Left m Adjusting LINE DISTORTION 1 Select the 8 LINE DIST item then p...

Страница 122: ...enceagain RETURN USER MODE Y E S N O C O N V E R G E N C E K E Y S T O N E C R T R 1 0 S C R E E N T O P CONVERGENCE LINE DIST CENTER 0 CONVERGENCE LINE DIST EDGE CRT R 0 CRT R SCREEN TOP 3 Use the CURSOR buttons to align the pattern When selecting CENTER Pressing the CURSOR or button increases the level Pressing the CURSOR or button decreases the level To switch to the EDGE screen press and hold ...

Страница 123: ...y by pressing the corresponding INPUT number button The CROSS COARSE test pattern will be automatically displayed The POINT convergence screen can be also displayed by pressing the POINT button on the full function remote control The POINT button rotates the adjustment screen in the following order COARSE MEDIUM FINE Items to select COARSE Coarse adjustment Number of adjust ment zones is 3 x 3 MED...

Страница 124: ...e CROSS COARSE test pattern will be automatically displayed and the adjustments will be cancelled You can also display the adjustment screen by pressing PHASE button on the service remote control 2 Use the CURSOR or button to adjust the convergence phase for horizontal line Adjust the pattern so the sharp turns at the left and right edges in the diagonal lines are equal 3 Use the CURSOR or button ...

Страница 125: ...zontalcenterline KEYSTONE Adjusttheselectedpart WhenTOPisselected Vertical LINEARITY Adjusttopandbottomlinearity Vertical AMPLITUDE Adjusttopandbottomheight Vertical BOW Adjusthorizontalcenterlinebow WhenBOTTOMisselected WhenLEFTisselected WhenRIGHTisselected ...

Страница 126: ...lected WhenBOTTOMisselected WhenLEFTisselected Horizontal POINT Adjust the point peak horizontally Vertical POINT Adjust the point peak vertically LINE DIST CENTER Correct S shaped horizontal line LINE DIST EDGE Correct S shaped horizontal line WhenBOTTOMisselected WhenTOPisselected ADJUSTMENT LINE DIST BIQUAD Correct biquadratic distortion Markerup Markerdown ...

Страница 127: ...V PHASE Adjust the pattern so the sharp turns at the left and right edges in the diagonal lines are equal CURSOR PHASE Align the vertical center line of the point cursor with the point peak ADJUSTMENT Screen center ...

Страница 128: ... white level WHT The CURSOR button increases the black level BLK The CURSOR button decreases the black level BLK 4 Repeat the above steps for the other CRTs if necessary 5 To end this adjustment press the END button Whenever the END button is pressed the menus will sequence in this order ADJUST menu Source screen If the RETURN USER MODE menu appears use the CURSOR or button to select either YES or...

Страница 129: ... Connect the projector and the Switcher with a oscillo scope then adjust the CURSOR buttons to obtain a value of 0 7Vp p of the projector input level or the Switcher output level on the oscilloscope 5 Repeat steps 3 and 4 for other input signals if necessary 6 To end this adjustment press END Whenever the END button is pressed the menus will sequence in this order ADJUST menu Source screen If the ...

Страница 130: ...tton to select NEW ENTRY and press ENTER The INPUT TERMINAL SELECT menu will be displayed When using the projector in stand alone application Use the CURSOR or button to select one of the three slots and press ENTER Items to select INPUT A Standard INPUT B Optional board INPUT C Optional board Use the CURSOR or button to select VIDEO RGB S VIDEO or COMPO and press ENTER The NAME INPUT screen will ...

Страница 131: ...d matches the selected signal Check if the installed input board matches the slot number When using with two or more ISS 6020 ISS 6020G switchers Use the CURSOR or button to select the input slot number of the master Switcher and press ENTER Then select the slot number of the slave Switcher and press ENTER The MASTER menu will be displayed when the slot number of the master Switcher is selected Th...

Страница 132: ... INPUT 7 S T U and 7 s t u and INPUT 8 V W X and 8 v w x and INPUT 9 Y Z and 9 y z and INPUT 10 and 0 and If you have made an error in the input of a character use the CURSOR button and enter the correct letter or number To delete one character move the CURSOR button to the character to be deleted and then press the NORMAL button To delete all the entered name hold down the CTL button then press N...

Страница 133: ...lect ALL Copies all the settings EXCEPT H POSI PHASE Copies the settings except H position and Phase adjustments data The SOURCE INFORMATION screen will be displayed Pressing END will return to the SIGNAL ENTRY list Go on to Step 5 NOTE You can check and change various parameters on the SOURCE INFORMATION menu See page 29 D E F A U L T T E M P O R A R Y E N T R Y N U M B E R I N I T I A L D A T A ...

Страница 134: ...cted line To do this proceed as follows 1 Use the CURSOR or button to select ENTRY MOVE and then press ENTER The ENTRY MOVE SELECT SOURCE message will be displayed at the bottom of the screen 2 Use the CURSOR or button to select a line you wish to move and then press ENTER The ENTRY MOVE SELECT DESTINATION message will be displayed at the bottom of the screen 3 Use the CURSOR or button to select a...

Страница 135: ...s To do this proceed as follows 1 Use the CURSOR or button to select ENTRY DELETE and then press ENTER The DELETE SELECT START LINE message will be displayed at the bottom of the screen 2 Use the CURSOR or button to select the first of the lines you wish to delete and then press ENTER The DELETE SELECT END LINE message will be displayed at the bottom of the screen 3 Use the CURSOR or button to sel...

Страница 136: ...displayed this completes the DATA COPY mode The SIGNAL ENTRY list will be displayed Go on to Step 5 m When selecting CHANGE DEFAULT All of the adjustment data of the selected signal will be stored in the DEFAULT AREA The data stored in the DEFAULT AREA can be recalled by pressing the NORMAL button Selecting DEFAULT from the INITIAL DATA SELECT menu during signal entry will utilize the data stored ...

Страница 137: ...not be stored in the DEFAULT AREA If the SIGNAL ENTRY list will be displayed this completes the CHANGE DEFAULT mode To end the SIGNAL ENTRY list go on to Step 5 m When selecting SOURCE EDIT This feature allows you to change various parameters of the source on the selected line This can be done to the current projected signal as well as not projected source NOTE The setting INPUT TERMINAL cannot be...

Страница 138: ...he Switcher and press ENTER The SIGNAL ENTRY screen is displayed When used with two or more Switchers ISS 6020 ISS 6020G Use the CURSOR or button to select the master slot number 1 through 10 0 first from the master menu then select the slave slot number 1 through 10 0 from the slave menu and press ENTER The SIGNAL ENTRY screen is displayed For changing parameters of the setting feature see pages ...

Страница 139: ...ect the RETURN USER MODE screen will be displayed If this happens use the CURSOR or button to select either YES or NO and press ENTER Items to select YES When you try to enter the ADJUST mode the next time you will need to re enter your passcode NO When you try to enter the ADJUST mode the next time you will not need to re enter your passcode RETURN USER MODE Y E S N O SIGNAL ENTRY ...

Страница 140: ... SOURCE LOCK AKB G Y MATRIX POSITION FONT APERTURE SYNC TERMINA TION and AFC See the following pages for an explanation of eachsetting Checking and Setting Various Parameters A D J U S T 1 S I G N A L E N T R Y 2 F O C U S 3 A L I G N M E N T 4 C O N V E R G E N C E 5 K E L V I N 6 R G B G A I N 7 P A S S C O D E 8 O P T I O N 9 R E F A D J U S T P 0 2 0 3 S O U R C E I N F O R M A T I O N S Y N C...

Страница 141: ... same procedure of the signal entry See page 20 for more details The screen will return to the SOURCE INFORMATION screen m Setting SYNC CONTROL This function is used to select the detection method of the sync signal for an RGB signal To do this proceed as follows 1 Use the CURSOR buttons to select SYNC CONTROL and then press ENTER The SYNC CONTROL menu will be displayed 2 Use the CURSOR or button ...

Страница 142: ...INFORMATION AUTO COMP OFF OFF SYNC CONTROL COUNTER DISPLAY TIME SOURCE LOCK AKB G Y MATRIX COUNTER RESET Y E S N O DISPLAY TIME RESET Y E S N O m Setting DISPLAY TIME This function is used to reset the time of signal display 1 Use the CURSOR buttons to select DISPLAY TIME and then press ENTER The DISPLAY TIME RESET screen will be displayed 2 Use the CURSOR or button to select either YES or NO and ...

Страница 143: ...SOURCE INFORMATION AUTO COMP OFF OFF SYNC CONTROL COUNTER DISPLAY TIME SOURCE LOCK AKB G Y MATRIX O F F O N S O U R C E L O C K C O N T R O L P02 03 SOURCE INFORMATION AUTO COMP OFF OFF SYNC CONTROL COUNTER DISPLAY TIME SOURCE LOCK AKB G Y MATRIX m Setting AKB This function is used to activate the auto white balance control 1 Use the CURSOR buttons to select AKB and then press ENTER The AKB CONTRO...

Страница 144: ...Use the CURSOR buttons to select G Y MATRIX and press ENTER The G Y MATRIX menu will be displayed 2 Use the CURSOR or button to select an item and press ENTER The screen will return to the SOURCE INFORMATION screen Items to select HD For an HDTV signal NTSC 1 3 For a DVD signal P02 03 SOURCE INFORMATION AUTO COMP OFF OFF SYNC CONTROL COUNTER DISPLAY TIME SOURCE LOCK AKB G Y MATRIX G Y MATRIX HD NT...

Страница 145: ...ITION FONT APERTURE SYNC TERMINATION AFC W I D E N A R R O W P O S I T I O N m Setting FONT This function is used to specify the appropriate font size to the on screenmessage To do this proceed as follows 1 Use the CURSOR buttons to select FONT and then press ENTER The FONT SIZE menu will be displayed 2 Use the CURSOR or button to select either NORMAL or SMALL and then press ENTER The screen will ...

Страница 146: ... MANUAL LEVEL 1 m Setting SYNC TERMINATION This function is used to select the impedance of the sync signal 1 Use the CURSOR buttons to select SYNC TERMINA TION then press ENTER The SYNC TERMINATION menu will be displayed 2 Use the CURSOR or button to select 75 Ω or Hi Z then press ENTER The screen will return to the SOURCE INFORMATION screen P03 03 SOURCE INFORMATION WIDE NORMAL MANUAL LEVEL1 75Ω...

Страница 147: ...ER MODE Y E S N O SIGNAL ENTRY m Setting AFC This function is used to reduce jitter by changing time constant of AFC of the sync generator circuit 1 Use the CURSOR buttons to select AFC then press ENTER The AFC menu will be displayed 2 Use the CURSOR or button to select NORMAL or SLOW then press ENTER The screen will return to the SOURCE INFORMATION screen Items to select NORMAL Standard AFC time ...

Страница 148: ...rce screen One input is switched to another The projector is turned off After every 10 minutes of elapsed time mWhen the Automatic Save Feature mode is set to DISABLE projector settings can be stored in the projector s memory manually When you try to return the source screen by pressing END several times the STORE menu is displayed To manually save settings proceed as follows 1 Use the END button ...

Страница 149: ...ignal in an unassigned location starting at memory location No 51 NO Does not register settings A registered name is given as follows VIDEO S VIDEO Video standard with a list number e g NTSC51 or PAL52 RGB RGB with a list number e g RGB60 COMPONENT COMPO with a list number e g COMPO 70 NOTE If the Input list does not have any unassigned memory location starting at No 51 then the NEW item will be s...

Страница 150: ...n the ADJUST menu See Entering Passcode Registering Passcode Changing Your Passcode and Canceling Your Passcode on pages 61 through 66 When your passcode has already been registered When finishing the ADJUST mode the RETURN USER MODE menu will be displayed If you select YES and press ENTER to end the ADJUST mode you will have to enter your passcode to re enter the ADJUST mode When finishing the AD...

Страница 151: ...ave been turned off by the R G and B buttons on the remote control CROSS HAIR CROSS COARSE CROSS FINE DOT COARSE DOT FINE FOCUS WINDOW WHITE Adjustment test pattern H H H H H H H H H H H H H H H H H H H H H H H H H H H H H H H H H H H H H H H H H H H H H H H H H H H H H H H H H H H H H H H H H H H H H H H H H H H H H H H H H H H H H H H H H H H H H H H H H H H H H H H H H H H H H H H H H H H H H H...

Страница 152: ...he 120 180 or 60 300 position f To change to the ceiling mount system rear f 1 Reverse the scan See page 14 2 Set the focus ring to the proper position See page 17 For 100 screen size R H 3 V 3 G H 5 V 3 B H 3 V 3 3 Adjust the angle of the CRT s See page 18 For 100 screen size Move the CRT to the 100 position For 120 screen size R H 3 5 V 2 5 G H 5 V 2 5 B H 3 5 V 2 5 For 180 screen size R H 3 5 V...

Страница 153: ... These are retaining screws There are two lids on the top cover Open the lid to access the two screws each The other two screws hold the front panel 2 Slide and open the top cover in the direction of the arrow 3 To reinstall it aligning the catches with the hole and slide the top cover in the direction of the arrow 4 Tighten the two A screws Screws A PROJECTION CONFIGURATION CHANGE ...

Страница 154: ...ct the projector from the AC source before reversing the plug Failure to observe this precaution may result in electric shock or damage to the projector 1 Remove the top cover See Removing and reinstalling Top Cover section 2 Reverse the horizontal scan To reverse the scan there are three plugs on the sweep board EB EG and ER are the horizontal connectors First remove the dummy plug Secondly remov...

Страница 155: ... the XG85 There are three sets of adjusting focus rings two between each CRT and lens These focus rings are used for maintaining optimum edge focus for the various screen sizes and projection angles When setting the focus rings or changing CRT angle you must first remove the front panel CAUTION Be careful not to remove any of the four screws completely The falling lens can cause serious injury esp...

Страница 156: ...our screen size NOTE The threaded hole marked 60 300 F is drilled lengthwise so you can move the CRT assembly to any screen size Adjust the red and blue lens so that the red or blue beam is aligned with the green beam After doing this adjust the lens focus see the next page Then tighten the screws E Metal impression stamp screen size Range of screen size diagonal 60 300 60 300 100 100 120 120 180 ...

Страница 157: ...5 5 5 5 5 5 5 5 5 5 4 3 2 5 2 5 2 5 2 1 1 1 1 1 2 Rotate and set the knobs H and V to the right position The table below lists which position the knob should be set to for any given screen size and angle The similar table is also on the back of the front panel 3 Tighten the four screws CRT Projection angle and screen size Diagonal 60 69 70 89 90 109 110 129 130 169 170 209 210 300 60 69 70 89 90 1...

Страница 158: ...e below to select the proper setting for your screen size NOTE The threaded hole F is drilled lengthwise so you can move the CRT assembly to any screen size Adjust the red and blue lens so that the red or blue beam is aligned with the green beam After doing this adjust the lens focus see the next page Then tighten the screws E Metal impression stamp screen size Range of screen size diagonal 60 300...

Страница 159: ...justed You can turn on or off each CRT beam R G and B separately 2 Adjust the center focus Loosen the wing nut A Rotate the lens using the wing nut A until the center of the screen is in focus When you get the best center focus tighten the wing nut A NOTE Do not over tighten the wing nut 3 Adjust the edge focus Loosen the wing nut B Rotate the lens barrel until the edge area of the screen is focus...

Страница 160: ...ed by the following formulae Units inches W Screen H Width A 25 962W 112 5 25 47 71 85 D β2A 10 04 Units mm W Screen H Width A 25 962W 112 5 2141 1825 D β2A 245 Screen size Diagonal 60 89 90 129 130 179 180 300 α 11 8 12 2 12 4 12 6 β 0 204 0 211 0 215 0 218 209 57 5323 55 37 1406 232 48 5905 60 37 1533 309 17 7853 77 10 1958 120 150 144 180 160 200 192 240 216 270 240 300 12 4 12 6 82 83 2104 26 ...

Страница 161: ...ween 48 60 and 240 300 inches are determined by the following formulae Units inches W Screen H Width A 25 962W 112 5 25 47 71 85 Units mm W Screen H Width A 25 962W 112 5 2141 1825 Screen size Diagonal 60 89 90 129 130 179 180 300 α 11 8 12 2 12 4 12 6 Screen center A α A Distance between the lens and the screen center Rear Projection System inch mm 71 10 1806 82 83 2104 94 61 2403 A 48 60 Screen ...

Страница 162: ... by the following formulae Units inches W Screen H Width A 25 962W 112 5 24 99 70 28 D β2A 10 08 Units mm W Screen H Width A 25 962W 112 5 2126 64 1785 D β2A 256 Screen size Diagonal 60 79 80 129 130 179 180 300 α 12 1 12 4 12 6 12 7 β 0 210 0 215 0 218 0 220 196 11 4981 53 20 1351 214 02 5436 57 13 1451 290 48 7378 73 94 1878 144 180 160 200 192 240 216 270 240 300 12 6 12 7 315 67 8018 79 48 201...

Страница 163: ...h Sizes not found between 48 60 and 240 300 inches are determined by the following formulae Units inches W Screen H Width A 25 962W 112 5 24 99 70 28 Units mm W Screen H Width A 25 962W 112 5 2126 64 1785 Screen size Diagonal 60 79 80 129 130 179 180 300 α 12 1 12 4 12 6 12 7 Screen center A α A Distance between the lens and the screen center Rear Projection System inch mm 70 28 1785 81 54 2071 A ...

Страница 164: ... 100 120 and 180 diagonal adjust the CRT angle using the threaded holes See pages 16 and 18 for detailed procedures CAUTION ON ALIGNMENT ADJUSTMENT The adjustment value of the items on the right must be within the recommended range of the values on the right If it is hard or impossible to adjust the items on the right within the recommended range of values the most probable cause of this is incorr...

Страница 165: ...SS 6020G Personal computer Audio equipment VCR ACAT OUT R Cr G Y B Cb H HV V S VIDEO VIDEO OPTION REMOTE1 REMOTE2 OUT IN INPUT SELECT ENTER ON OFF INDICATOR I INPUT SELECT POWER From R G B H V on separate H and V on the RGB OUTPUT module To REMOTE1 From REMOTE 1 Terminal on the SYSTEM CONTROL module Optional control cable 15p 15p CTL 6010 5BNC 5BNC coaxial cable separate sync recommended To INPUT ...

Страница 166: ... slave Connect all the Switchers with optional control cables Make sure that the SW2 LEVEL mode is selected from the CONNECT CONDITION menu Contact your dealer for the informa tion in detail Refer to the user s manual accompanying the Switcher Cables mentioned are not included with the projector NOTE Be sure to set all the slide switches S8603 of the Switcher to RS 422 positions Set the one on the...

Страница 167: ...e Master Slot 10 of the Master Master Slave 1 Slave 2 Slave 3 Slave 4 Slave 5 Slave 6 Slave 7 Slave 8 Slave 9 Slave 10 1 2 3 4 5 6 7 8 OPEN 1 2 3 4 5 6 7 8 OPEN 1 2 3 4 5 6 7 8 OPEN 1 2 3 4 5 6 7 8 OPEN 1 2 3 4 5 6 7 8 OPEN 1 2 3 4 5 6 7 8 OPEN 1 2 3 4 5 6 7 8 OPEN 1 2 3 4 5 6 7 8 OPEN 1 2 3 4 5 6 7 8 OPEN 1 2 3 4 5 6 7 8 OPEN 1 2 3 4 5 6 7 8 OPEN ISS 6020 ISS 6020G Output to Setting of S8601 NOTE...

Страница 168: ...eiving data when the Switcher is used 9 Identifying the Projector 15 Ground Others Used inside the Projector Normally set to OPEN When using with the Switcher ISS 6020 ISS 6020G connect no 1 2 6 7 9 and15 pins of the projector to the same no pins of the switcher as shown below REMOTE 1 terminal of the Switcher mini D sub 15 pin male REMOTE 1 terminal of the Projector mini D sub 15 pin male Shield ...

Страница 169: ...r when turning the power off using the external control power off the AC supply to the projector about three seconds after opening Pin 5 These procedures are to protect your projector and the connected equipment INPUT A INPUT A INPUT A INPUT A INPUT B INPUT B INPUT C INPUT C 1 Some settings allow you to retrieve a COMPONENT signal automatically See RGB COMPONENT Search Setting of the Set up manual...

Страница 170: ...NPUT C slots J Active Indicator green LED Lights up when the INPUT A slot is selected Front Panel 1 Power Switch Main power To turn on the main power to the projector press the switch to the ON position I The STANDBY and the RC READY indicator will light In this condition you can start up the projector by pressing the POWER ON button on the remote control or the POWER button on the rear panel Pres...

Страница 171: ...model RGB INPUT Board XG RGBIN A Front view 1 Active Indicator green LED Lights up when this board is selected 2 R Input Terminal Connects an Red output signal 3 G Input Terminal Connects a Green output signal 4 B Input Terminal Connects a Blue output signal 5 H HV Input Terminal Connects horizontal sync or horizontal vertical sync output signals 6 V Input Terminal Connects a vertical sync output ...

Страница 172: ...l Y Y G B terminal C Pb Cb B Board Identification VIDEO COMPONENT RGB Input Signal Setting of Rotary switch and Jumpers Table for Setting Rotary Switch and Jumpers Setting of Rotary switch indicates factory preset 1 Some settings allow you to retrieve a COMPONENT signal automatically See RGB COMPONENT Search Setting 2 When the optional RGB input board is installed and the RGB input is set an RGB s...

Отзывы: