background image

English-38

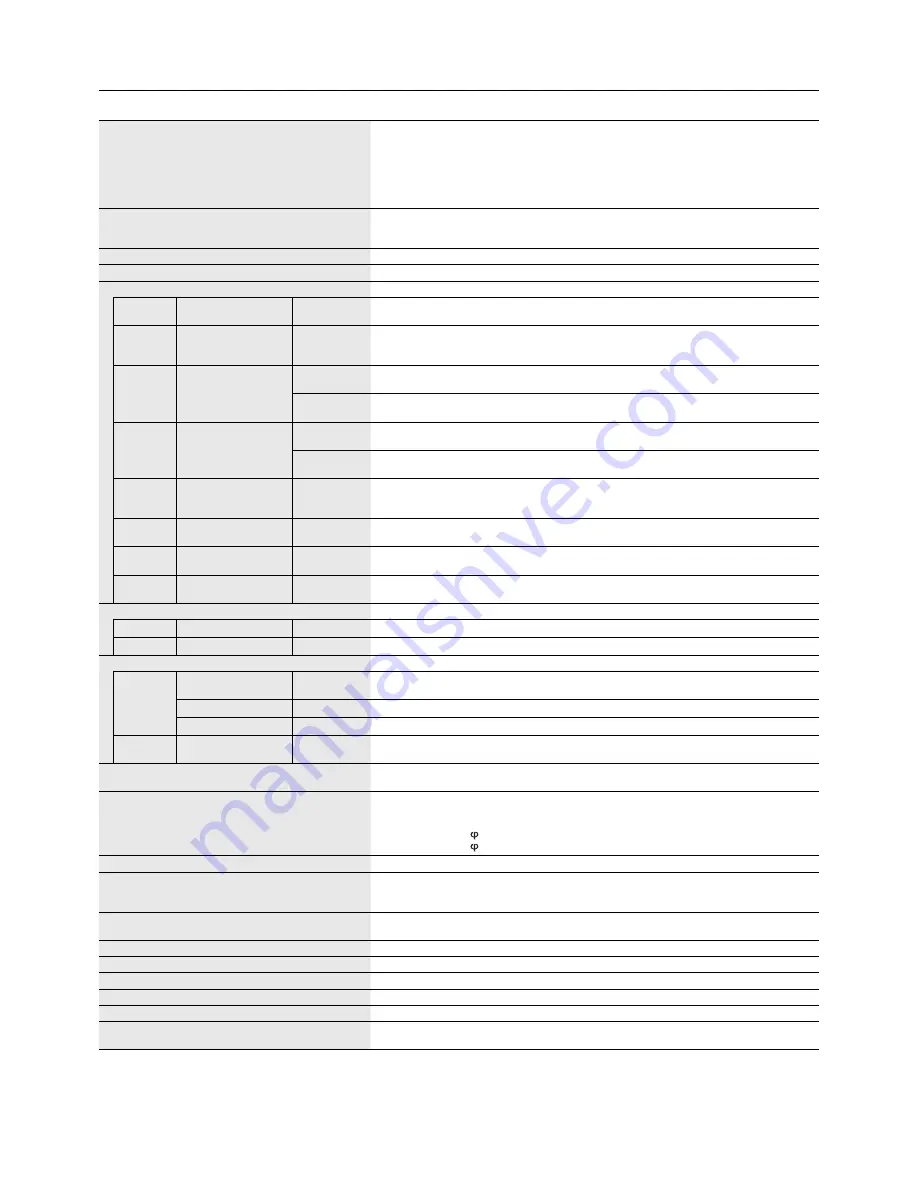
Specifi cations - V462

Product Specifi cations

LCD Module

Pixel Pitch:

Resolution: 

Color:

Brightness:

Contrast Ratio:

Viewing Angle:

46”/1168 mm diagonal
0.530 mm
1920 x 1080
 Over 16 million colors (depending on video card used)
450 cd/m

2

 (Max.), 340 cd/m

2

 (Factory setting Typ.) @25°C

3000:1
89° (typ) @ CR>10

Frequency

Horizontal:

Vertical:

15.625/15.734 kHz, 31.5 kHz - 91.1 kHz (Analog Input)
31.5 kHz - 91.1 kHz (Digital Input)
50.0 - 85.0 Hz

Pixel Clock

25.2 MHz - 162.0 MHz

Viewable Size

1018.1 x 572.7 mm

Input Signal

DVI

DVI-D 24pin

Digital RGB

DVI (HDCP)
VGA60, SVGA60, XGA60, WXGA60, SXGA60, UXGA60*

1

, 1920X1080 (60Hz), 1080p, 1080i

DisplayPort DisplayPort Connector  Digital RGB

DisplayPort Complies with Standard V1.1a, applicable to HDCP V1.3
VGA60, SVGA60, XGA60, WXGA60, SXGA60, UXGA60*

1

, 1920x1080 (60 Hz), 1080p, 1080i, 

720p@50Hz/60Hz, 576p@50Hz, 480p@60Hz

VGA

15pin Mini D-sub

Analog RGB

0.7 Vp-p/75 ohm
VGA60, SVGA60, XGA60, WXGA60, SXGA60, UXGA60*

1

, 1920X1080 (60Hz)

Sync

Separate: TTL level (Pos./Neg.)
Composite sync on Green Video: 0.3 Vp-p Neg.

RGB/HV*

2

BNC (R,G,B,H,V)

Analog RGB

0.7 Vp-p/75 ohm
VGA60, SVGA60, XGA60, WXGA60, SXGA60, UXGA60*

1

, 1920X1080 (60Hz)

Sync

Separate: TTL level (Pos./Neg.)
Composite sync on Green Video: 0.3 Vp-p Neg.

HDMI

HDMI Connector

Digital YUV
Digital RGB

HDMI
VGA60, SVGA60, XGA60, WXGA60, SXGA60, UXGA60*

1

, 1920x1080 (60 Hz), 1080p, 1080i, 

720p@50Hz/60Hz, 576p@50Hz, 480p@60Hz

DVD/HD*

2

BNC X 3

Component

Y: 1.0 Vp-p/75ohm, Cb/Cr (Pb/Pr): 0.7 Vp-p/75 ohm
HDTV/DVD: 1080p, 1080i, 720p@50Hz/60Hz, 576p@50Hz, 480p@60Hz, 576i@50Hz, 480i@60Hz

VIDEO1
VIDEO2*

2

BNC
BNC

Composite

1.0 Vp-p/75 ohm
NTSC/PAL/SECAM/4.43NTSC/PAL60

S-VIDEO

Mini DIN 4 pin

S-VIDEO

Y: 1.0 Vp-p/75 ohm C: 0.286 Vp-p/75 ohm (NTSC), 0.3 Vp-p/75 ohm (PAL/SECAM)
NTSC/PAL/SECAM/4.43NTSC/PAL60

Output Signal

DVI

DVI-D 24pin

Digital RGB

DVI (HDCP)

VIDEO1

BNC

Composite

1.0 Vp-p with 75 ohm terminated

AUDIO

AUDIO 
Input

RCA (L/R)
STEREO Mini Jack X2

Analog Audio

Stereo L/R 0.5 Vrms

HDMI Connector

Digital Audio

PCM 32, 44.1, 48 KHz (16/20/24bit)

DisplayPort Connector  Digital Audio

PCM 32, 44.1, 48 KHz (16/20/24bit)

AUDIO 
Output

STEREO Mini Jack

Analog Audio

Stereo L/R 0.5 Vrms

Speaker Output

External Speaker Jack 15 W + 15 W (8 ohm)
Internal Speaker 10W + 10W

Control

RS-232C In:

RS-232C Out:

LAN:

Remote IN:

Remote OUT:

9 Pin D-sub
9 Pin D-sub (with daisy chain)
RJ-45 10/100 BASE-T
Stereo Mini jack 3.5 

Power Supply

1.4 - 3.1 A @ 100-240V AC, 50/60Hz

Operational Environment

Temperature:

Humidity:

Altitude:

5 - 40°C / 41 - 104°F (Default brightness), 5 - 20°C / 41 - 68°F (Max brightness)
20 - 80% (without condensation)
0 - 3000 m (Brightness may decrease with altitude)

Storage Environment

Temperature:

Humidity:

-20 - 60°C / -4 - 140°F
10 - 90% (without condensation) / 90% - 3.5% x (Temp - 40°C) regarding over 40°C

Dimension

1121.5 (W) x 664.7 (H) x 107.0 (D) mm / 44.2 (W) x 26.2 (H) x 4.2 (D) inches

Weight

25.3 kg (55.8 lbs)

VESA compatible arm mounting interface

300 mm x 300 mm (M6, 4 Holes)

Power Management

VESA DPM

Plug & Play

VESA DDC2B, DDC/CI, DisplayPort

Accessories

Setup manual, Power Cord, Video Signal cable, Remote Control, AA Battery x 2, Clamp x 2,
Screw x 2, CD-ROM, Thumbscrew for optional stand x 2

NOTE:

 Technical specifi cations are subject to change without notice. 

  *1: Compressed image          *2: Common terminal    

Содержание MultiSync V462

Страница 1: ...User s Manual MultiSync V462 MultiSync V651 For use in landscape position only ...

Страница 2: ...ON and OFF Modes English 17 Power Indicator English 18 Using Power Management English 18 Selecting a video source English 18 Picture Aspect English 18 Information OSD English 19 Picture Mode English 19 OSD On Screen Display Controls English 20 PICTURE English 21 ADJUST English 21 AUDIO English 22 SCHEDULE English 22 PIP English 23 OSD English 23 MULTI DISPLAY English 24 DISPLAY PROTECTION English ...

Страница 3: ...idential installation This equipment generates uses and can radiate radio frequency energy and if not installed and used in accordance with the instructions may cause harmful interference to radio communications However there is no guarantee that interference will not occur in a particular installation If this equipment does cause harmful interference to radio or television reception which can be ...

Страница 4: ...lly in order to avoid any problems CAUTION CAUTION Please use the power cord provided with this monitor in accordance with the table below If a power cord is not supplied with this equipment please contact your supplier For all other cases please use a power cord that matches the AC voltage of the power outlet and has been approved by and complies with the safety standard of your particular countr...

Страница 5: ...not connect to a peripheral device with wiring that might have excessive voltage Connecting to a TV Cable distribution system should be grounded earthed in accordance with ANSI NFPA 70 the National Electrical Code NEC in particular Section 820 93 Grounding of Outer Conductive Shield of a Coaxial Cable The screen of the coaxial cable is intended to be connected to earth in the building installation...

Страница 6: ...mbscrew for optional stand x 2 2 Setup Manual Video Signal Cable Mini D SUB 15 pin to Mini D SUB 15 pin Wireless Remote Control and AA Batteries Eyebolt x 2 3 Remember to save your original box and packing material to transport or ship the monitor 1 Type and number of power cords included will depend on the where the LCD monitor is to be shipped When more than one power cord is included please use...

Страница 7: ... M8 screws 15 16 mm thickness of bracket in length If using screws longer than 15 16 mm check the depth of the hole Recommended Fasten Force 1125 1375N cm NEC recommends mounting interfaces that comply with UL1678 standard in North America Prior to mounting inspect the installation location to insure that it is strong enough to support the weight of the unit so that the unit will be safe from harm...

Страница 8: ... with attachable eyebolts to aid in mounting Screw the eyebolts into eyebolt holes as shown in the picture Be sure eyebolts are secure In order to move the monitor into position use a lifting device attached to the eyebolts DO NOT mount the monitor using only the eyebolts Use an approved mounting accessory Eyebolt Hole Eyebolt 2 Attach Mounting Accessories Be careful to avoid tipping monitor when ...

Страница 9: ...unting in an enclosed space or recessed area leave adequate room between the monitor and the enclosure to allow heat to disperse as shown below Allow adequate ventilation or provide air conditioning around the monitor so that heat can properly dissipate away from the unit and mounting apparatus especially when you use monitors in multiple screen NOTE The sound quality of the internal speakers will...

Страница 10: ...to select adjustment items within OSD menu 쐊 EXIT button Activates the OSD menu when the OSD menu is turned off Acts as EXIT button within the OSD to move to previous menu 쐎 Remote control sensor and Power Indicator Receives the signal from the remote control when using the wireless remote control See also page 11 Glows green when the LCD monitor is in active mode Glows red when the LCD is in POWE...

Страница 11: ...I IN DVI D To input digital RGB signals from a computer or HDTV device having a digital RGB output This connector does not support analog input 쐊 DVI OUT DVI D To output the DVI signal from either DVI IN or HDMI connection To output the DVI signal from the HDMI connection the HDMI input must be selected 쐎 HDMI connector To input digital HDMI signals 쐅VGA IN mini D Sub 15 pin To input analog RGB si...

Страница 12: ...switch 씎 Kensington Lock For security and theft prevention 씏 Option board slot Slot for board accessories Please contact your supplier for detailed information NOTE Please contact your supplier for available option board NOTE When you use an option board which is compliant with Intel s OPS standard you need to install it with the optional SB 02AM adapter Internal speaker Cable holder BNC input sig...

Страница 13: ...r right 씉 SET button Makes selection 씊VOLUME UP DOWN button Increases or decreases audio output level 씋 CH UP DOWN button 2 씌 GUIDE button 2 씍 MUTE button Turns on off mute function 씎 STILL button ON OFF button Activates deactivates still picture mode STILL CAPTURE button Captures still picture 씏 PIP Picture In Picture button ON OFF button Toggle switches between PIP POP PICTURE BY PICTURE ASPECT ...

Страница 14: ...osed captioning Note VIDEO1 VIDEO2 S VIDEO inputs only 1 The product you purchased may not have this feature 2 This button s action depends on which option board you use Refer to the option board s manual for further information Caution Important the remote control system may not function when direct sunlight or strong illumination strikes the remote control sensor or when there is an object in th...

Страница 15: ...he panel 2 Install the remote control batteries The remote control is powered by two 1 5V AA batteries To install or replace batteries A Press and slide to open the cover B Align the batteries according to the and indications inside the case C Replace the cover CAUTION Incorrect usage of batteries can result in leaks or bursting NEC recommends the following battery use Place AA size batteries matc...

Страница 16: ...Adjust the screen See pages 21 and 22 Make adjustments of the screen display position when necessary 9 Adjust the image See page 21 Make adjustments such as backlight or contrast when required 10 Recommended Adjustments To reduce the risk of the Image Persistence please adjust the following items based on the application being used SCREEN SAVER SIDE BORDER COLOR See page 25 DATE TIME SCHEDULE SETT...

Страница 17: ...video signal Dotted lines audio signal Connected equipment Connecting terminal Setting in Terminal Mode Input signal name Connecting Audio terminal Input button in remote control AV DVI DVI D DVI MODE DVI HD DVI AUDIO IN1 IN2 IN3 DVI HDMI RAW EXPAND 1 HDMI HDMI HDMI 5BNC VIDEO BNC MODE SCART SCART AUDIO IN1 IN2 IN3 DVD HD VIDEO1 BNC VIDEO1 AUDIO IN1 IN2 IN3 VIDEO S VIDEO S VIDEO AUDIO IN1 IN2 IN3 ...

Страница 18: ... s manual for more information about your computer s video output requirements and any special identification or configuration your monitor s image and monitor may require Input TMDS signals conforming to DVI standards To maintain display quality use a cable that conforms to DVI standards Connecting a DVD Player or Computer with HDMI out Please use an HDMI cable with HDMI logo It may take a moment...

Страница 19: ... green while powered on and will turn red or amber while powered off NOTE The Main Power Switch must be in the ON position in order to power up the monitor using the remote control or the Power Button on the front of the LCD Main Power Switch ON OFF Power Button Using the remote control Power Button ...

Страница 20: ...d Red ON Green Blinking Diagnosis Detecting failure Red Blinking See Troubleshooting page 37 1 If OFF is selected in POWER INDICATOR page 24 the LED will not light when the LCD monitor is in active mode 2 Without any option with factory settings VGA input only Using Power Management The LCD monitor follows the VESA approved DPM Display Power Management function The power management function is an ...

Страница 21: ...ID number assigned to current monitor 1 ID number assigned monitor to be controlled via RS 232C 2 Input Name Audio input mode Picture aspect Input Signal Information Sub picture information 1 IR CONTROL should be set Primary or Secondary 2 IR CONTROL should be set Primary Picture Mode DVI VGA RGB HV DPORT STANDARD sRGB HIGHBRIGHT HDMI DVD HD SCART VIDEO1 VIDEO2 S VIDEO STANDARD CINEMA HIGHBRIGHT ...

Страница 22: ...ONMENT CARBON FOOTPRINT 86 0 Input source Main Menu Icons Main Menu Item Sub Menu Key Guide Adjustment Settings Remote Control Press UP or DOWN button to select sub menu Press SET Press UP or DOWN PLUS or MINUS to select the function or setting to be adjusted Press MENU or EXIT Press UP or DOWN button to select Press INPUT button to decide Press UP or DOWN PLUS or MINUS button to select Press EXIT...

Страница 23: ...IVE Gamma correction is handled by the LCD panel 2 2 Typical display gamma for use with a PC 2 4 Good for video DVD etc S GAMMA Special gamma for certain types of movies Raises the dark parts and lowers the light parts of the image S Curve DICOM SIM DICOM GSDF curve simulated for LCD type PROGRAMMABLE A programmable gamma curve can be loaded using NEC optional software MOVIE SETTINGS NOISE REDUCTI...

Страница 24: ...DJUST H POSITION V POSITION CLOCK PHASE H RESOLUTION V RESOLUTION ASPECT AUDIO VOLUME Increases or decreases output volume level BALANCE Adjust the balance of L R volume Press button to move the stereo sound image to right Press button to move the stereo sound image to left CENTER TREBLE To accentuate or reduce the high frequency sound Press button to increase TREBLE sound Press button to decrease...

Страница 25: ... where the PIP appears on the screen X 95 Y 92 ASPECT Selects sub picture aspect FULL NORMAL and WIDE See page 18 FULL TEXT TICKER OFF MODE Enables Text Ticker and allows you to set Horizontal or Vertical direction POSITION Selects the location of the Text Ticker on the screen SIZE Determines the size of the Text Ticker in relationship to the overall screen size BLEND Sets the transparency of the ...

Страница 26: ...ng the remote controller PRIMARY Choose PRIMARY for the first monitor within an RS 232C daisy chain SECONDARY Choose SECONDARY for all subsequent monitors within an RS 232C daisy chain LOCK Prevents the monitor from being controlled by the wireless remote controller To return to normal operation press the DISPLAY button on the remote controller for 5 seconds TILE MATRIX Allows one image to be expa...

Страница 27: ...cept LAN SETTING DISPLAY PROTECTION POWER SAVE Sets how long the monitor waits to go into power save mode after the signal is lost Note When connecting DVI the video card might not stop sending the digital data even though the image might have disappeared If this occurs the monitor will not switch into power management mode ON HEAT STATUS Displays status of the FAN BACKLIGHT and TEMPERATURE FAN CO...

Страница 28: ...VIDEO1 VIDEO2 or S VIDEO input CUSTOM DETECT Set the priority of input signals When CUSTOM DETECT is selected monitor searches listed inputs only INPUT CHANGE Sets input change speed NOTE When QUICK is selected picture may be distorted when signal input is changed This function should be chosen after all adjustment options have been made for the input NORMAL TERMINAL SETTING DVI MODE Selects the k...

Страница 29: ...PTION POWER Allow the monitor to supply power to Option board slot during power save mode or standby mode OFF INTERNAL PC The function is available for OPS based PC OFF WARNING When OPTION POWER is OFF warning message is shown when monitor power off or power save mode AUTO OFF Select if monitor power is OFF when connected PC is OFF START UP PC When ON is selected connected PC start up FORCE QUIT W...

Страница 30: ...emains visible on the screen Unlike CRT monitors LCD monitors image persistence is not permanent but constant images being displayed for a long period of time should be avoided To alleviate image persistence turn off the monitor for as long as the previous image was displayed For example if an image was on the monitor for one hour and a residual image remains the monitor should be turned off for o...

Страница 31: ...n while using the keypad to input the REMOTE CONTROL ID number 1 100 The REMOTE ID NUMBER should match the MONITOR ID number of the display to be controlled Choose 0 to simultaneously control all displays in range 3 Point the remote control towards the remote sensor of the desired monitor and press the REMOTE ID SET button The MONITOR ID number is shown in red on the display If the REMOTE CONTROLI...

Страница 32: ...tor while aiming at the PRIMARY monitor The MENU OSD will appear on the selected target monitor NOTE If the ID No mode select OSD is showing press the DISPLAY button on the remote control while pointing at the PRIMARY monitor to clear this OSD HINT If you lost control due to the incorrect setting of IR CONTROL pressing the DISPLAY button on the remote control for 5 or more seconds will reset the I...

Страница 33: ...to function the RS 232C OUT terminal can only be connected to another monitor of the same model Do not connect to other types of equipment To control monitor or multiple monitors that are daisy chained together please use the control command Instructions for the control command can be found on the CD included with the display The file is called External_control pdf Multiple monitors that are daisy...

Страница 34: ...ript and Cookies and the browser should be set to accept these functions The setting method will vary depending on the version of browser Please refer to the help files and the other information provided in your software Access is gained to the HTTP server function by starting the Web browser on the computer via the network connected to the monitor and entering the following URL Network Setting ht...

Страница 35: ...ss or the entry column of the URL Example 2 When the IP address of the monitor is 192 168 73 1 access is gained to the mail alert settings by specifying http 192 168 73 1 index html for the address or the entry column of the URL Network Settings http the Monitor s IP address index html DHCP Enabling this option automatically assigns an IP address to the monitor from your DHCP server Disabling this...

Страница 36: ...ail transmission POP3 Server This specifies the address of the POP3 server that is used in the authentication of the e mail User Name This sets the user name for logging into the authentication server when authentication is required for the e mail transmission Up to 60 alphanumeric characters can be used Password This sets the password for logging into the authentication server when authentication...

Страница 37: ...ure Abnormal Please contact your supplier A2h SENSOR reached at the temperature that the user had specified condition DISPLAY PROTECTION FAN CONTROL COOLING FAN AUTO Reconfirm the setting condition from OSD DISPLAY PROTECTION FAN CONTROL or please contact your supplier B0h BFh The monitor doesn t have the input signal No signal Please check No picture in Troubleshooting C0h CFh The monitor caused ...

Страница 38: ... of your monitor energy costs reducing emissions and lowering the air conditioning costs of the workplace FullScan Capability Allows you to use the entire screen area in most resolutions significantly expanding image size VESA Standard FDMIv1 Mounting Interface Allows you to connect your LCD monitor to any VESA standard FDMIv1 third party mounting arm or bracket NEC recommends using mounting inter...

Страница 39: ...ain Power Switch it should be in the ON position Make certain the computer is not in a power saving mode touch the keyboard or mouse Check to see that the power indicator option in the OSD is set to ON RED LED on monitor is blinking A certain failure might have occurred please contact your nearest authorized NEC DISPLAY SOLUTIONS service facility If the monitor is powered off by the inside tempera...

Страница 40: ...Hz 480i 60Hz VIDEO1 VIDEO2 2 BNC BNC Composite 1 0 Vp p 75 ohm NTSC PAL SECAM 4 43NTSC PAL60 S VIDEO Mini DIN 4 pin S VIDEO Y 1 0 Vp p 75 ohm C 0 286 Vp p 75 ohm NTSC 0 3 Vp p 75 ohm PAL SECAM NTSC PAL SECAM 4 43NTSC PAL60 Output Signal DVI DVI D 24pin Digital RGB DVI HDCP VIDEO1 BNC Composite 1 0 Vp p with 75 ohm terminated AUDIO AUDIO Input RCA L R STEREO Mini Jack X2 Analog Audio Stereo L R 0 5...

Страница 41: ... VIDEO2 2 BNC BNC Composite 1 0 Vp p 75 ohm NTSC PAL SECAM 4 43NTSC PAL60 S VIDEO Mini DIN 4 pin S VIDEO Y 1 0 Vp p 75 ohm C 0 286 Vp p 75 ohm NTSC 0 3 Vp p 75 ohm PAL SECAM NTSC PAL SECAM 4 43NTSC PAL60 Output Signal DVI DVI D 24pin Digital RGB DVI HDCP VIDEO1 BNC Composite 1 0 Vp p with 75 ohm terminated AUDIO AUDIO Input RCA L R STEREO Mini Jack X2 Analog Audio Stereo L R 0 5 Vrms HDMI Connecto...

Страница 42: ... 9 D SUB 9P Pin No Name 1 connected to 7 8 2 RXD 3 TXD 4 connected to 6 5 GND 6 connected to 4 7 connected to 1 8 8 connected to 1 7 9 NC This LCD monitor uses RXD TXD and GND lines for RS 232C control 2 REMOTE IN 3 REMOTE OUT Pin Assignment ...

Страница 43: ... necdisplay com in USA Energy Saving This monitor features an advanced energy saving capability When a VESA Display Power Management Signalling DPMS Standard signal is sent to the monitor the Energy Saving mode is activated The monitor enters a single Energy Saving mode Mode Power consumption LED colour Normal Operation 1 Approx 165 W V462 Approx 330 W V651 Green Energy Saving Mode 1 2 Less than 1...

Отзывы: