background image

English-20

Using the Auto Brightness function

The brightness of the LCD screen can be set to increase or decrease depending on the amount of ambient light within the
room. If the room is bright, the monitor becomes correspondingly bright. If the room is dim, then the monitor will dim
accordingly. The purpose of this function is to make the viewing experience more comfortable to the eye in a variety of lighting
conditions.

The Auto Brightness function is set to OFF by default.

SETUP

Use the following procedure to select the Brightness Range that the monitor will use when the Auto Brightness function is
activated.

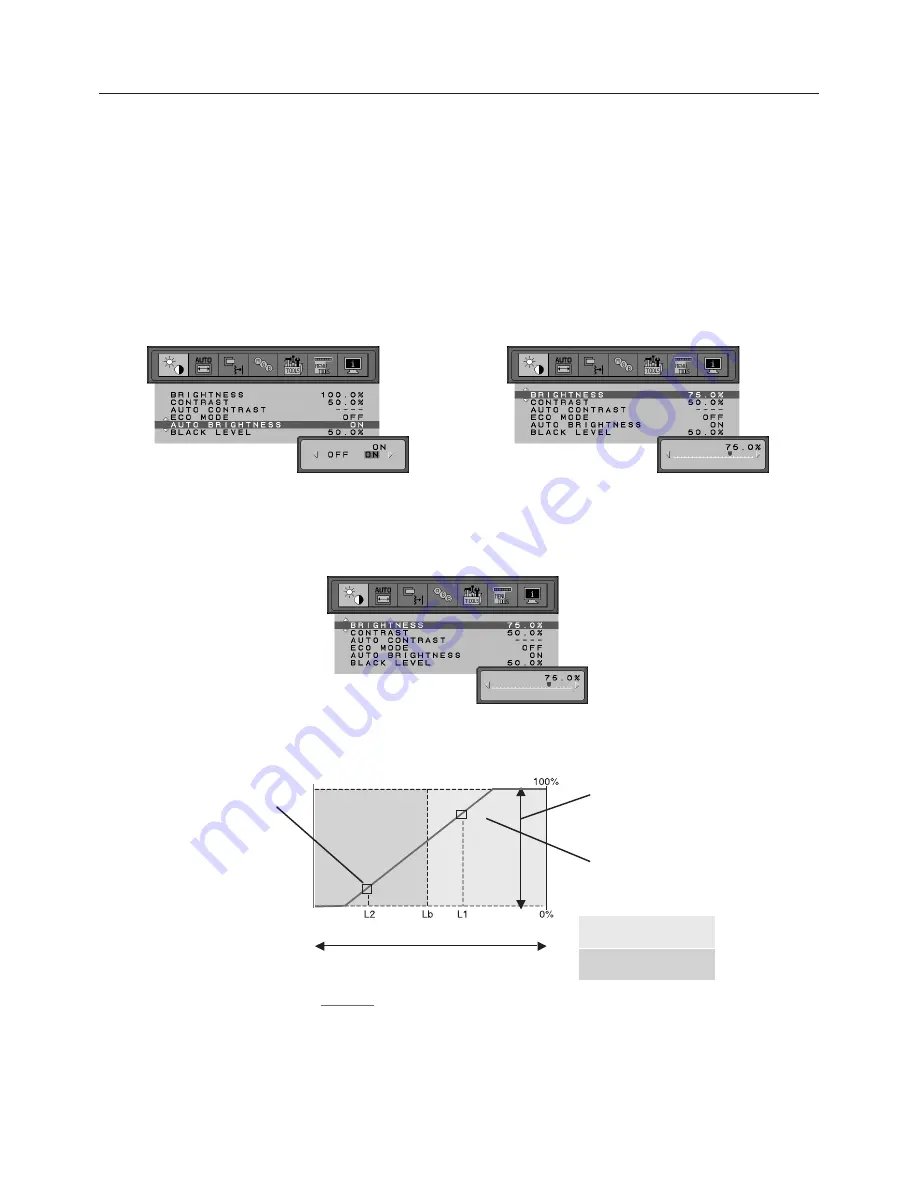
1. Set the BRIGHT level. This is the brightness level that the monitor will go up to when the ambient light level is highest.

Make sure the room is at its brightest when setting this level.

Select “ON” in the AUTO BRIGHTNESS menu (

Figure 1

). Then use the front buttons to move the cursor up to the

BRIGHTNESS setting. Choose the desired brightness level (

Figure 2

).

2. Set the DARK level. This is the level of brightness that the monitor will go down to when the ambient light level is low.

Make sure the room is at its darkest when setting this level.

Then use the front buttons to move the cursor up to the BRIGHTNESS setting. Choose the desired brightness level
(

Figure 3

).

Figure 1

Figure 2

Figure 3

When the “Auto Brightness” function is enabled the Brightness level of the screen changes automatically according to the
lighting conditions of the room (

Figure 4

).


BRIGHTNESS level set
for the monitor to use
when ambient lighting
level is low.

BRIGHTNESS level set for the
monitor to use when ambient
lighting level is high.

BRIGHTNESS range

Lb: Border between bright and dim lighting conditions; set at factory
L1: BRIGHTNESS level set for the monitor to use when ambient lighting level is high (L1>Lb)
L2 : BRIGHTNESS level set for the monitor to use when ambient lighting level is low (L2<Lb)

L1 and L2 are the brightness levels set by the user to compensate for changes in ambient lighting.

Figure 4

dark

bright

room bright condition

Screen Brightness value by Auto Brightness function

Bright condition area

Dark condition area

Содержание MultiSync LCD1990FXp

Страница 1: ...MultiSync LCD1990FXp User s Manual ...

Страница 2: ...tion of Conformity English 2 Contents English 3 Quick Start English 4 Controls English 8 Recommended use English 12 Specifications English 14 Features English 15 Troubleshooting English 16 Appendix English 17 Using the Auto Brightness function English 20 TCO 03 English 21 Manufacturer s Recycling and Energy Information English 22 ...

Страница 3: ... and complies with the safety standard of your particular country TO PREVENT FIRE OR SHOCK HAZARDS DO NOT EXPOSE THIS UNIT TO RAIN OR MOISTURE ALSO DO NOT USE THIS UNIT S POLARIZED PLUG WITH AN EXTENSION CORD RECEPTACLE OR OTHER OUTLETS UNLESS THE PRONGS CAN BE FULLY INSERTED REFRAIN FROM OPENING THE CABINET AS THERE ARE HIGH VOLTAGE COMPONENTS INSIDE REFER SERVICING TO QUALIFIED SERVICE PERSONNEL...

Страница 4: ...cur in a particular installation If this equipment does cause harmful interference to radio or television reception which can be determined by turning the equipment off and on the user is encouraged to try to correct the interference by one or more of the following measures Reorient or relocate the receiving antenna Increase the separation between the equipment and receiver Connect the equipment i...

Страница 5: ...DVI D cable User s Manual CD ROM Cable Cover Screw x 4 to mount the monitor to a flexible arm page 7 Power Cord Continental User s Manual DVI D to DVI D cable Cable Cover CD ROM 15 pin mini D SUB male to 15 pin mini D SUB male Screws Power Cord UK Remember to save your original box and packing material to transport or ship the monitor NOTE This monitor can be equipped with optional loudspeakers Mu...

Страница 6: ... 30 degree angle and lift up to the highest position Figure C 1 4 Connect all cables to the appropriate connectors Figure C 1 NOTE Incorrect cable connections may result in irregular operation damage display quality components of LCD module and or shorten the module s life 5 To keep the cables neatly organized place them into the cable management system that is built into the stand Place the power...

Страница 7: ...inlet must be turned on Turn on the monitor with the front power button Figure E 1 and the computer NOTE The Vacation Switch is a true on off switch If this switch is on the OFF position the monitor cannot be turned on using the front button DO NOT switch on off repeatedly 10 No touch auto adjust automatically adjusts the monitor to optimal settings upon initial setup for most timings For further ...

Страница 8: ...e top of the display by the handle using the other hand to grip the bottom Lift up to the highest position Figure RL 1 To rotate screen place hands on each side of the monitor screen and turn clockwise from Landscape to Portrait or counter clockwise from Portrait to Landscape Figure R 1 To rotate OSM menu between landscape and portrait refer to Controls section Figure R 1 Figure RL 1 Raise and Low...

Страница 9: ...Stand for Mounting to remove the stand 2 Using the 4 screws from the stand removal and attach the arm to the monitor Figure F 1 Caution Use ONLY the screws 4 pcs that are included when mounting to avoid damage to the monitor and stand To fulfil the safety requirements the monitor must be mounted to an arm which guaranties the necessary stability under consideration of the weight of the monitor The...

Страница 10: ...rious settings resulting in a more comfortable viewing experience Do not cover this sensor Turns the monitor on and off Indicates that the power is on Can be changed between blue and green in the Advanced OSM Control menu Enters the OSM Control menu Enters OSM sub menus Changes the input source when not in the OSM Control menu Access OSM menu Exits the OSM sub menu Exits OSM Control menu Navigates...

Страница 11: ...n within the display area of the LCD H SIZE V SIZE Analog input only Adjusts the horizontal size by increasing or decreasing this setting If the AUTO Adjust function do not give you a satisfactory picture setting a further tuning can be performed using the H Size or V Size function dot clock For this a Moiré test pattern could be used This function may alter the width of the picture Use Left Right...

Страница 12: ...urce automatically The monitor will not look for other video signals while the current video source is present NONE The Monitor will not search the other video input port unless the monitor is turned on OFF TIMER Monitor will automatically power down when the end user has selected a pre determined amount of time Before powering off a message will appear on the screen asking the user if they want t...

Страница 13: ...djusted while in the lock out mode OSM LOCK OUT with BRIGHTNESS only control To activate the OSM Lock Out function press SELECT then Down and Left buttons and hold down simultaneously To deactivate the OSM Lock Out press SELECT then Down and Left buttons and hold down simultaneously while in the OSM menu BRIGHTNESS can be adjusted while in the lock out mode CUSTOM Refer to the Advanced OSM Menu RE...

Страница 14: ... outlet and refer servicing to qualified service personnel under the following conditions When the power supply cord or plug is damaged If liquid has been spilled or objects have fallen into the monitor If the monitor has been exposed to rain or water If the monitor has been dropped or the cabinet damaged If the monitor does not operate normally by following operating instructions Allow adequate v...

Страница 15: ...fixed patterns on the monitor for long periods of time to avoid image persistence after image effects Get regular eye checkups Ergonomics To realize the maximum ergonomics benefits we recommend the following Adjust the Brightness until the background raster disappears Do not position the Contrast control to its maximum setting Use the preset Size and Position controls with standard signals Use the...

Страница 16: ...on at 60 Hz for 1280 x 1024 at 60 Hz to 75 Hz optimal display performance Active Landscape Horiz 376 mm 14 8 inches Display Area Vert 301 mm 11 9 inches Portrait Horiz 301 mm 11 9 inches Vert 376 mm 14 8 inches Power Supply AC 100 240 V 50 60 Hz Current Rating 1 0 0 5 A Dimensions Landscape 392 2 mm W x 408 9 558 9 mm H x 247 3 mm D 15 4 inches W x 16 1 22 0 inches H x 9 7 inches D Portrait 326 7 ...

Страница 17: ...just all elements of your screen image via simple to use on screen menus ErgoDesign Features Enhance human ergonomics to improve the working environment protect the health of the user and save money Examples include OSM controls for quick and easy image adjustments tilt base for preferred angle of vision small footprint and compliance with MPRII and TCO guidelines for lower emissions Plug and Play...

Страница 18: ...UT OF RANGE is displayed screen is either blank or shows rough images only Image is displayed only roughly pixels are missing and OSM warning OUT OF RANGE is displayed Either signal clock or resolution is too high Choose one of the supported modes OSM warning OUT OF RANGE is displayed on a blank screen Signal frequency is out of range Choose one of the supported modes Image is unstable unfocused o...

Страница 19: ... monitor with your BRIGHTNESS setting NOTE Do not cover environmental brightness sensor Ambibright sensor Black Level Allows you to manually adjust the black level Press Left or Right to adjust Tag2 Auto Adjust Automatically adjusts the Image Position and H Size settings and Fine settings Analog input only Press SELECT to activate Auto Adjustment Tag3 H Position Controls Horizontal Image Position ...

Страница 20: ... IPM Intelligent Power The Intelligent Power Manager allows the monitor to enter into a power saving mode after Manager a period of inactivity The IPM has two settings STANDARD Monitor enters power save mode automatically when the input signal is lost OPTION Monitor enters power save mode automatically when the amount of surrounding light goes below the level that is determined by the user IPM Set...

Страница 21: ...ESS only control To activate the OSM Lock Out function press SELECT then Down and Left buttons and hold down simultaneously To deactivate the OSM Lock Out press SELECT then Down and Left buttons and hold down simultaneously while in the OSM menu BRIGHTNESS can be adjusted while in the lock out mode CUSTOM Press RESET and EXIT to enter the CUSTOM Menu Select ENABLE or DISABLE for POWER KEY INPUT SE...

Страница 22: ...l Figure 2 2 Set the DARK level This is the level of brightness that the monitor will go down to when the ambient light level is low Make sure the room is at its darkest when setting this level Then use the front buttons to move the cursor up to the BRIGHTNESS setting Choose the desired brightness level Figure 3 Figure 1 Figure 2 Figure 3 When the Auto Brightness function is enabled the Brightness...

Страница 23: ...ergy Energy saving mode after a certain time beneficial both for the user and the environment Electrical safety Emissions Electromagnetic fields Noise emissions Ecology The product must be prepared for recycling and the manufacturer must have a certified environmental management system such as EMAS or ISO 14 001 Restrictions on chlorinated and brominated flame retardants and polymers heavy metals ...

Страница 24: ...ignal is sent to the monitor the Energy Saving mode is activated The monitor enters a single Energy Saving mode Mode Power consumption LED colour Normal Operation Approx 35W Green or Blue Energy Saving Mode Less than 2W Amber Off Mode Less than 1W Unlit Manufacturer s Recycling and Energy Information Disposing of your old NEC product Within the European Union EU wide legislation as implemented in ...

Отзывы: