2. Equipment Connections and Settings
���
���
���
���
When Using a Network Environment
What Can Be Accomplished
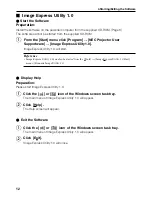
• Using Image Express Utility 1.0, the screen image displayed by the personal computer can be
sent to the projector and then projected to a screen.
• Using Dynamic Image Utility 2.0, a picture or slide can be sent to the projector and then
projected to a screen.
• Using the projector control function of Dynamic Image Utility 2.0 allows operations to be
performed from the personal computer which include switching the projector power on/off,
signal selection, and adjustment of the picture quality.
Equipment to Be Prepared
• Projector (This unit)
• Personal computer
• LAN card
Settings at the Projector Side
Preparation:
(1) Insert the LAN card into the PC Card slot of the projector. (“Inserting and Removing a PC
card” in the user’s manual)
(2) Switch on the projector power and project to the screen. (“Projecting an Image” in the
user’s manual)
(3) Switch to the advanced menu. (“Menu” in the User's manual)
Press the MENU button.
The menu will be displayed.
Use the SELECT
button to align the cursor with [Projector Options],
then press the ENTER button.
The sub menu will be displayed.
Use the SELECT
button to align the cursor with [LAN Mode], then
press the ENTER button.
The LAN mode setting screen will be displayed.
Set the various items.
See "Using On-Screen Menu"
씮
"Menu Description & Functions"
씮
"Setting LAN
Mode" in the user's manual on the supplied CD-ROM for information about the various
items.
NOTE
When switching the power of the projector on/off with the projector control function, please
set [Projector Options]
씮
[Setup]
씮
[Page 4]
씮
[Idle Mode] to "On".
2. Equipment Connections and Settings
6


