background image


Messaging 


39 


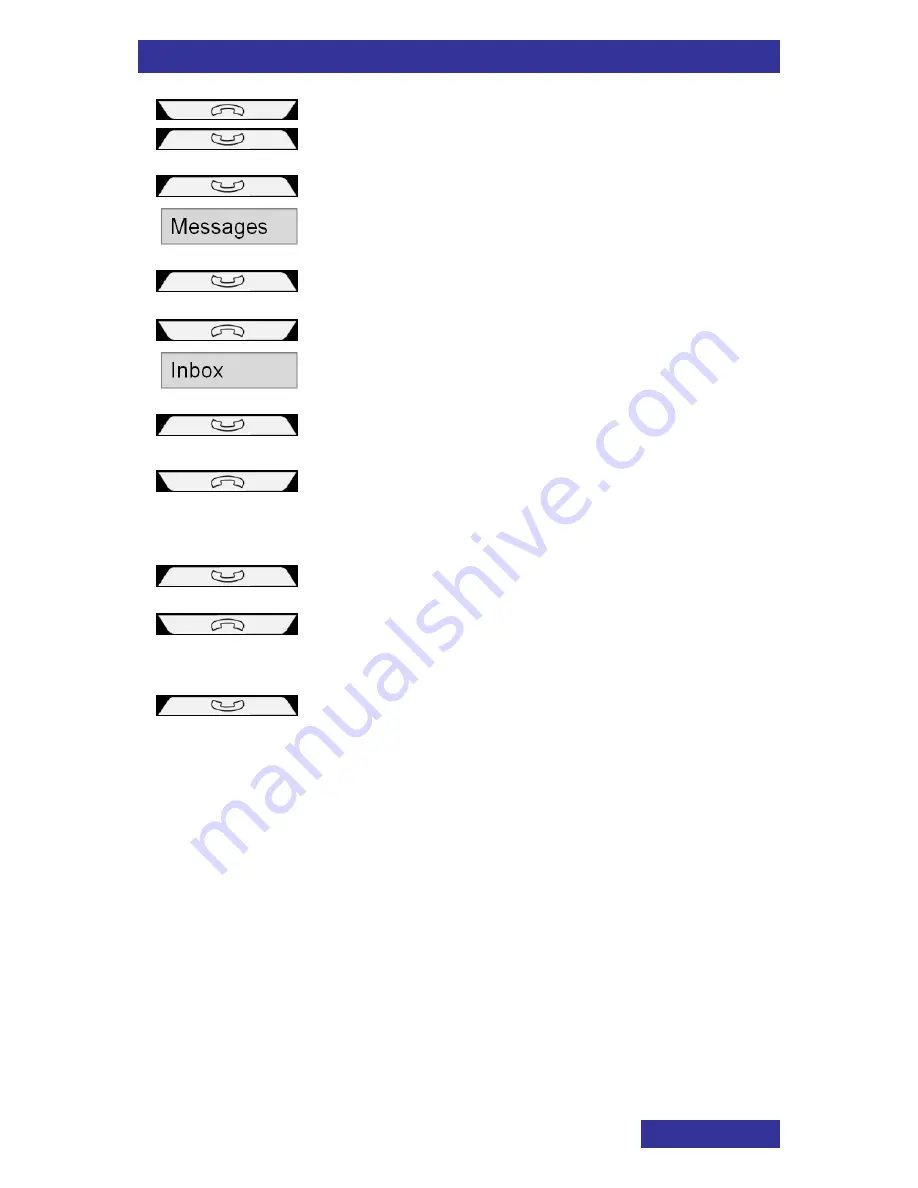
1.  Simultaneously press both keys for a short 

time. 


2.  Repeatedly press the Upper key for a short 

time until the display shows: 

Messages


3.  Press the Lower key for a short time. 


4.  Repeatedly press the Upper key for a short 

time until the display shows: 

Inbox


5.  Press the Lower key for a short time. 


6.  Repeatedly press the Upper key for a short 

time until the display shows: the required 
message stored in the 

Inbox

 of the M155. 


[

]


7.  Press the Lower key for a short time. 

The message is displayed. If so required use 
(repeatedly) pressing the Upper key for a 
short time to scroll through the message. 


8.  Press the Lower key for a short time. 


The call is set up to the destination. 

Содержание M155

Страница 1: ...Business Mobility IP DECT M155 DECT Messenger User Guide ...

Страница 2: ...vision history October November 2008 Creation of the User Manual Manual is based on software version 19 May 2009 Subscribing the M155 enhanced with part on dealing with the PIN code Manual is based on software version 1 00 ...

Страница 3: ...o make a suggestion for improving this handbook they are invited to send the relevant details to NEC Unified Solutions Nederland B V P O BOX 32 1200 JD HILVERSUM THE NETHERLANDS NEC Unified Solutions Nederland B V 2010 All right are reserved Reproduction in whole or in part is prohibited without the written consent of the copyright owner All brand names and product names in this document are trade...

Страница 4: ...ion USA 13 FCC information 13 Exposure to Radio Frequency RF Signals 13 Regulatory information Canada 15 IC Information 15 Exposure to Radio Frequency RF Signals 15 Product disposal information 16 For countries in the European Union 16 For countries outside the European Union 16 Battery information 16 Getting started 18 Location of the M155 and the charger 18 Installing the charger and charging th...

Страница 5: ...31 Answering a call 31 Rejecting a call 31 Terminating a call 32 Messaging 33 Sending a predefined message 33 Sending an SOS message 34 Incoming message 34 Reading an incoming message 35 Replying to an incoming message 35 Replying with a message to an incoming message 36 Replying with a voice call to an incoming message 37 Replying with a message to a stored incoming message 37 Replying with a voi...

Страница 6: ...Contents 6 System Admistrator determined settings 44 ...

Страница 7: ...ssages Set up and receive incoming speakerphone calls personal alarm device either by sending an SOS alarm message or setting up an SOS loudspeaking call automatic update of the time and date settings when switching on the M155 Notice to the user The M155 DECT Messenger described in this manual should only be used in combination with DECT systems delivered by NEC To take advantage of all features ...

Страница 8: ...nt incidental influence can appear You are advised not to place the DECT device on or close less then 10 cm to this kind of equipment even in stand by mode Charging the battery This product uses a rechargeable non replaceble Li Polymer battery 3 7V 400mAh Charge the battery of the M155 only in combination with the M155 Desktop Charger and the attached Ktec KSLFB0500035W1UV 1 adapter that comes wit...

Страница 9: ...ntains magnetic material Be aware that small metallic objects may stick for example to the loudspeaker This may deteriorate the audio quality and can be harmful Warning Never touch the charger contacts with conductive objects such as keys paper clips rings or bracelets Usage Like all other cordless telephones the M155 uses radio signals which do not guarantee a connection set up under all circumst...

Страница 10: ...tavust direktiivi 1999 5 EÜ põhinõuetele ja nimetatud direktiivist tulenevatele teistele asjakohastele sätetele http www nec unified com doc English Hereby NEC Unified Solutions declares that this M155 is in compliance with the essential requirements and other relevant provisions of Directive 1999 5 EC http www nec unified com doc Español Por medio de la presente NEC Unified Solutions declara que ...

Страница 11: ...55 megfelel a vonatkozó alapvetõ követelményeknek és az 1999 5 EC irányelv egyéb elõírásainak http www nec unified com doc Nederlands Hierbij verklaart NEC Unified Solutions dat het toestel M155 in overeenstemming is met de essentiële eisen en de andere relevante bepalingen van richtlijn 1999 5 EG http www nec unified com doc Norsk NEC Unified Solutions erklærer herved at utstyret M155 er i samsva...

Страница 12: ...n ehtojen mukainen http www nec unified com doc Svenska Härmed intygar NEC Unified Solutions att denna M155 står I överensstämmelse med de väsentliga egenskapskrav och övriga relevanta bestämmelser som framgår av direktiv 1999 5 EG http www nec unified com doc 0979 NEC Unified Solutions Anton Philipsweg 1 1223 KZ Hilversum The Netherlands ...

Страница 13: ...dio or television reception which can be determined by turning the equipment off and on the user is encouraged to try to correct the interference by one or more of the following measures Reorient or relocate the receiving antenna Increase the separation between the equipment and receiver Connect the equipment into an outlet on a circuit different from that to which the receiver is connected Consul...

Страница 14: ...ompliance for localized specific absorption rate SAR for uncontrolled environment general population exposure limits specified in ANSI IEEE Std C95 1 1992 and had been tested in accordance with the measurement procedures specified in FCC OET Bulletin 65 Supplement C 2001 and IEEE 1528 2003 For body worn operation this handset has also been tested and meets the FCC RF exposure guideline when used w...

Страница 15: ...y of Health Canada Safety Code 6 These limits are part of comprehensive guidelines and establish permitted levels of RF energy for the general population The guidelines are based on the safety standards previously set by both U S and international standards bodies These standards include a substantial safety margin designed to assure the safety of all persons regardless of age and health This devi...

Страница 16: ...gal disposal of electrical and electronic products via the general municipal waste stream To facilitate separate disposal and environmentally sound recycling arrangements have been made for local collection and recycling If you need to dispose of your electrical and electronic products please refer to your supplier or the contractual agreements that your company made when these products were acqui...

Страница 17: ...information 17 This product uses a non replaceble Li Polymer battery The battery of the M155 should never be removed by the customer Return old M155s to the supplier a licensed dealer or a designated collection facility ...

Страница 18: ...here is excessive dust and areas subject to vibration shock or extreme temperature fluctuations within reach of small children Installing the charger and charging the M155 To install the charger perform the following steps 1 Place the charger on a flat even surface 2 Select the appropriate mains plug from the set of four supplied with the charger AC adapter and click the mains plug in place on the...

Страница 19: ...lace the complete M155 Charging and operating times A discharged battery requires no more than 8 hours to completely recharge A completely charged battery provides the M155 set with up to 8 hours of operating time 1 and 80 hours of standby time Charge display The battery charge status appears on the display screen When the battery is nearly discharged the battery symbol flashes and a warning tone ...

Страница 20: ...bined to one line with characters of double height The information shown on the display depends on the operational mode of the M155 The M155 has two keys for operation an Upper key and a Lower key Access to the various functions of the M155 is given to the user by Pressing the Upper key the Lower key or both keys simultaneously for a short time a fraction of a second Pressing the both keys simulta...

Страница 21: ... 1 for Battery status icons Menu item phonebook indication Silent mode indication Steady on Off hook indication Flashing Incoming call indication Operational modes Idle mode In Idle mode the display shows the following information time and or date the name of the M155 if defined the number of the M155 If you leave the range of the DECT system Out of range appears on the display screen Call mode In...

Страница 22: ...play shows the following information time and date the number of the message sender if available the message the message icon Menu mode In Menu mode the display shows the menu items and options If so appropriate the contents of a menu item option is shown Note that your system administrator might have blocked access to certain menu items The menu structure is as follows item Menu makes no part of ...

Страница 23: ...rted 23 Drafts 1 message 5 message Back Back Audio Ringtone Melody 1 Melody 12 Back Silent On Off Back Language English Française Deutsch Español Italiano Back Connectivity Register Deregister Back Power off Exit ...

Страница 24: ...alue is 1234 PARK code Use a PARK code system ID only if more than one DECT system overlaps in your location Authentication code A code required by the DECT system Number The local phone number assigned to your M155 Name The name assigned to your M155 To subscribe your M155 to a DECT system perform the following steps 1 Simultaneously press both keys for a short time 2 Repeatedly press the Upper k...

Страница 25: ...e required digit 8 Press the Lower key for a short time Note that the selected digit is added to the code 9 Repeat previous two steps until the complete code is formed 10 Press the Lower key for a short time PARK code is not needed 11 Repeatedly press the Upper key for a short time until the display shows Skip PARK 12 Continue with step 16 PARK code is needed 11 Repeatedly press the Upper key for ...

Страница 26: ...press the Upper key for a short time until the display shows Enter AC 17 Press the Lower key for a short time 18 Enter the authentication code at the AC prompt 19 Repeatedly press the Upper key for a short time until the display shows the required digit 20 Press the Lower key for a short time Note that the selected digit is added to the code 21 Repeat previous two steps until the complete code is ...

Страница 27: ...ription you will not be able to receive or send messages nor make calls over the DECT system To terminate the DECT system subscription perform the following steps 1 Simultaneously press both keys for a short time 2 Repeatedly press the Upper key for a short time until the display shows Connectivity 3 Press the Lower key for a short time 4 Enter the PIN code at the PIN prompt 5 Repeatedly press the...

Страница 28: ...e is formed 8 Press the Lower key for a short time 9 Repeatedly press the Upper key for a short time until the display shows Deregister 10 Press the Lower key for a short time 11 When the display shows Not Registered the M155 is deregistered and can no longer be used at the DECT system ...

Страница 29: ...ess both keys for a short time Switching the M155 off To switch your M155 off perform the following step 1 Simultaneously press both keys for a short time 2 Repeatedly press the Upper key for a short time until the display shows Power off 3 Press the Lower key for a short time The display shows Goodbye and then becomes blank the M155 is powered off ...

Страница 30: ...rom the telephone book To dial a number from the local telephone book perform the following steps 1 Simultaneously press both keys for a short time 2 Repeatedly press the Upper key for a short time until the display shows Phone book 3 Press the Lower key for a short time 4 Repeatedly press the Upper key for a short time until the display shows required number and optionally the related name 5 Pres...

Страница 31: ...on your M155 the ringer sounds and the call alert symbol flashes If no auto answer has been configured by your System Administrator then you can either answer or reject the incoming call When auto answer has been configured the call will be answered automatically Answering a call To answer an incoming call perform the following step 1 Press the Upper key for a short time OR 1 Press the Lower key f...

Страница 32: ...Call features 32 Terminating a call To terminate an existing call perform the following step 1 Simultaneously press both keys for two seconds or more ...

Страница 33: ... time 2 Repeatedly press the Upper key for a short time until the display shows Messages 3 Press the Lower key for a short time 4 Repeatedly press the Upper key for a short time until the display shows Drafts 5 Press the Lower key for a short time 6 Repeatedly press the Upper key for a short time until the display shows the message you want to send 7 Press the Lower key for a short time The messag...

Страница 34: ...r must have configured your M155 with an SOS number and an SOS message To send an SOS message perform the following step 1 Simultaneously press both keys for two seconds or more 2 While sending the message the display shows Sending 3 When the message is successfully sent and acknowledged Msg sent is displayed Incoming message When you receive an incoming message on your M155 then The new text mess...

Страница 35: ...existing call is with respect to the voice connection not interrupted The last 5 incoming message are stored in the Inbox Reading an incoming message To read an incoming message perform the following steps 1 The new message is displayed upon receipt If the message is too large to show on the display in one go use repeatedly pressing the Upper key for a short time to scroll through the message 2 Pr...

Страница 36: ...e to show on the display in one go use repeatedly pressing the Upper key for a short time to scroll through the message 2 Simultaneously press both keys for a short time Urgent and Emergency messages are given a receipt confirmation 3 Repeatedly press the Upper key for a short time until the display shows the message you want to send 4 Press the Lower key for a short time The message is displayed ...

Страница 37: ...he Upper key for a short time to scroll through the message 2 Simultaneously press both keys for a short time Urgent and Emergency messages are given a receipt confirmation The call is set up to the destination If the M155 is already involved in a voice call this voice call will be cleared first Replying with a message to a stored incoming message To send a reply to the sender of a stored message ...

Страница 38: ...ort time until the display shows the message you want to send 10 Press the Lower key for a short time The message is displayed If so required use repeatedly pressing the Upper key for a short time to scroll through the message 11 Press the Lower key for a short time 12 While sending the message the display shows Sending 13 When the message is successfully sent Msg sent is displayed The M155 return...

Страница 39: ...until the display shows Inbox 5 Press the Lower key for a short time 6 Repeatedly press the Upper key for a short time until the display shows the required message stored in the Inbox of the M155 7 Press the Lower key for a short time The message is displayed If so required use repeatedly pressing the Upper key for a short time to scroll through the message 8 Press the Lower key for a short time T...

Страница 40: ...quired language The M155 supports the following 5 languages English Spanish Español German Deutsch French Française Italian Italiano To set the required language perform the following steps 1 Simultaneously press both keys for a short time 2 Repeatedly press the Upper key for a short time until the display shows Language 3 Press the Lower key for a short time 4 Repeatedly press the Upper key for a...

Страница 41: ...silent option Defining the ring melody The M155 contains 12 available melodies for incoming voice calls To select the required ring melody perform the following steps 1 Simultaneously press both keys for a short time 2 Repeatedly press the Upper key for a short time until the display shows Audio 3 Press the Lower key for a short time 4 Repeatedly press the Upper key for a short time until the disp...

Страница 42: ...ess both keys for a short time The M155 returns to the idle mode Defining the notification option The M155 gives a notification beep in the following circumstances When a normal message is received When the M155 leaves the DECT system coverage warning To turn the notification beep on or off perform the following steps 1 Simultaneously press both keys for a short time 2 Repeatedly press the Upper k...

Страница 43: ...me 8 Simultaneously press both keys for a short time 9 Simultaneously press both keys for a short time The M155 returns to the idle mode Defining the silent option With the silent option it is possible to configure the M155 in such a way that ring tones and notification beeps will or will not be given to the user To change the setting of the silent option perform the following steps 1 Simultaneous...

Страница 44: ...e 8 Simultaneously press both keys for a short time 9 Simultaneously press both keys for a short time The M155 returns to the idle mode System Admistrator determined settings To change the following settings on your M155 please contact your System Administrator The number and name of your M155 The predefined destination numbers in the telephone book The predefined messages and message destination ...

Страница 45: ...M155 settings 45 The used time and date format The coverage warning mode Block remove menu options i e Audio Language Connectivity and Power off from your M155 The silent charging mode ...

Страница 46: ...PinAtPrompt Enter the PIN code at the PIN prompt M155Deregistered When the display shows Not Registered the M155 is deregistered and can no longer be used at the DECT system M155Registered When the display shows the time date the M155 is registered and can be used MelodiesPlayed The melodies will be played when going through the various melodies MsgAckSuccessfullySent When the message is successfu...

Страница 47: ...ageFromInbox the required message stored in the Inbox of the M155 ReqMessageFromDrafts the message you want to send ReturnToIdle The M155 returns to the idle mode SelectByPressUpperKeyShort Repeatedly press the Upper key for a short time until the display shows ConfigureNameNumber Configure the number and name of your M155 by means of the DECT Handset Configurator Application available to your Sys...

Страница 48: ...function your System Administrator must have configured your M155 with an SOS number and an SOS message OnAudioSettings The user can set the following audio related options Defining the ring melody for voice calls Defining the notification option Defining the silent option OnDisplayIncomingMsg When you receive an incoming message on your M155 then The new text message icon is given The sender s nu...

Страница 49: ...l back information in a text message OnNeedForSubscription Before you subscribe to a DECT system you need the following information PIN code the PIN code used by your M155 The default value is 1234 PARK code Use a PARK code system ID only if more than one DECT system overlaps in your location Authentication code A code required by the DECT system Number The local phone number assigned to your M155...

Страница 50: ...omingMsg Replying to an incoming message is possible in the following ways With reply message this is only possible when the sender s number has been given to the M155 With a voice call this is only possible when the message contains a call back number The call back number is identified in the message by xxxx where xxxx is an existing telephone number and is the destination of the voice call OnRin...

Страница 51: ...essage Not Registered appears on the display screen and the M155 cannot be used Always involve your System Administrator in subscribtion activities OnSystemAdminstrator To change the following settings on your M155 please contact your System Administrator The number and name of your M155 The predefined destination numbers in the telephone book The predefined messages and message destination number...

Страница 52: ... steps ToChangeSilent To change the setting of the silent option perform the following steps ToDialFromTelephonebook To dial a number from the local telephone book perform the following steps ToMakeSosCall To make an SOS call perform the following step ToReadIncomingMsg To read an incoming message perform the following steps ToRejectIncomingCall To reject an incoming call perform the following ste...

Страница 53: ... perform the following step ToSetLanguage To set the required language perform the following steps ToSubscribe To subscribe your M155 to a DECT system perform the following steps ToSwitchOff To switch your M155 off perform the following step ToSwitchOn To switch your M155 on perform the following step ToTerminate To terminate the DECT system subscription perform the following steps ToTerminateCall...

Страница 54: ...werOff Power off PhoneBook Phone book NotRegistered Not Registered Messages Messages Drafts Drafts Inbox Inbox MsgSent Msg sent Sending Sending Audio Audio Language Language English English Ringtone Ringtone Silent Silent Notification Notification On On Off Off BatteryLow Battery low OutOfRange Out of range Goodbye Goodbye Back Back Melody1 Melody 1 Melody12 Melody 12 French Française German Deuts...

Страница 55: ...equired Bookmark Name Box BoxLowerKey BoxUppperKey BoxConnectivity BoxRegister BoxSkipPark BoxDigit0 BoxDigit9 BoxAcCode BoxEnterPark BoxDigitStar BoxEnterAC BoxAC BoxTimeDate BoxStartReg BoxDeregister BoxPin BoxPinCode BoxNotRegistered BoxPowerOff BoxPhoneBook BoxMessages ...

Страница 56: ...nslations from menu translations 56 BoxInbox BoxDrafts BoxSending BoxMsgSent BoxIdle BoxAudio BoxLanguage BoxEnglish BoxRingtone BoxMelody6 BoxNotification BoxOn BoxOff BoxMelody1 BoxMelody12 BoxSilent BoxGoodbye ...

Отзывы: