background image

E-11

INSTALLATION AND CONNECTIONS

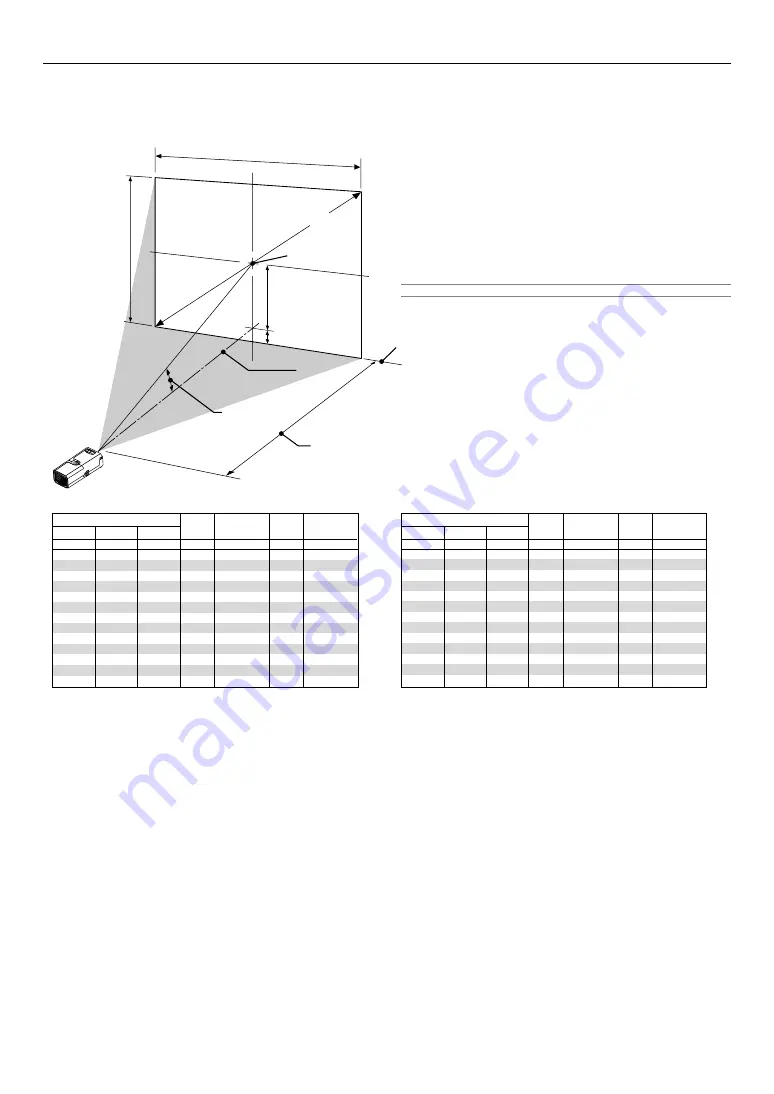
Lens Center

Throw Angle (

α

)

Throw Distance (C)

Screen center

Screen Diagonal

Screen Width

Screen Height

Screen Bottom

(D)

(B)

Distance Chart

B = Vertical distance between lens center and screen center
C = Throw distance
D = Vertical distance between lens center and top of screen (bottom of
screen for desktop)

α

 = Throw angle

NOTE: 

Distances may vary +/-5%.

Throw Distance and Screen Size

The following shows the proper relative positions of the projector and screen. Refer to the table to determine the position of installation.

Reflecting the Image

Using a mirror to reflect your projector's image enables you to enjoy a
much larger image. Contact your NEC dealer if you need a mirror. If you're
using a mirror and your image is inverted, use the MENU button and
SELECT dial on your projector cabinet or the MENU and the 

왖왔왗왘

buttons on your remote control to correct the orientation. (See page E-
33.)

WARNING
* Installing your projector on the ceiling must be done by a quali-

fied technician. Contact your NEC dealer for more information.

* Do not attempt to install the projector yourself.

• Only use your projector on a solid, level surface. If the projector falls to

the ground, you can be injured and the projector severely damaged.

• Do not use the projector where temperatures vary greatly. The projec-

tor must be used at temperatures between 41˚F (5˚C) and 95˚F (35˚C).

• Do not expose the projector to moisture, dust, or smoke. This will harm

the screen image.

• Ensure that you have adequate ventilation around your projector so

heat can dissipate. Do not cover the vents on the side or the front of
the projector.

α

Wide – Tele

Screen Size

B

C

Wide – Tele

Diagonal

Width

Height

degree

9.7 -

8.7

9.5 -

8.7

9.5 -

8.6

9.5 -

8.6

9.4 -

8.6

9.4 -

8.6

9.4 -

8.6

9.4 -

8.6

9.4 -

8.6

9.4 -

8.6

9.4 -

8.5

9.4 -

8.5

9.4 -

8.5

D

mm
457
610
914

1021
1097
1219
1280
1372
1524
1829
2286
2743
3048

mm

1070 - 1190
1450 - 1590
2190 - 2410
2450 - 2700
2640 - 2900
2930 - 3230
3080 - 3390
3300 - 3640
3680 - 4050
4420 - 4860
5530 - 6090
6650 - 7310
7390 - 8130

mm

183
244
366
408
439
487
512
548
609
731
914

1097
1219

mm
762

1016
1524
1702
1829
2032
2134
2286
2540
3048
3810
4572
5080

mm
610
813

1219
1361
1463
1626
1707
1829
2032
2438
3048
3658
4064

mm

46
61
92

102
110
122
128
137
153
183
229
275
305

α

Wide – Tele

Screen Size

B

C

Wide – Tele

Diagonal

Width

Height

degree

9.7 -

8.7

9.5 -

8.7

9.5 -

8.6

9.5 -

8.6

9.4 -

8.6

9.4 -

8.6

9.4 -

8.6

9.4 -

8.6

9.4 -

8.6

9.4 -

8.6

9.4 -

8.5

9.4 -

8.5

9.4 -

8.5

D

inch

18
24
36
40
43
48
50
54
60
72
90

108
120

inch

42 -

47

57 -

63

86 -

95

96 - 106

104 - 114
115 - 127
121 - 133
130 - 143
145 - 159
174 - 191
218 - 240
262 - 288
291 - 320

inch

7

10
14
16
17
19
20
22
24
29
36
43
48

inch

30
40
60
67
72
80
84
90

100
120
150
180
200

inch

24
32
48
54
58
64
67
72
80
96

120
144
160

inch

2
2
4
4
4
5
5
5
6
7
9

11
12

Содержание LT170 - XGA DLP Projector

Страница 1: ...LT170 Portable Projector User s Manual ...

Страница 2: ...in ternal components 6 Do not place heavy objects on top of the projector 7 If you wish to have the projector installed on the ceiling a Do not attempt to install the projector yourself b The projector must be installed by qualified technicians in order to ensure proper operation and reduce the risk of bodily injury c In addition the ceiling must be strong enough to support the pro jector and the ...

Страница 3: ... putting the projector in the soft carrying case be sure to close the lens shutter so as not to mar the lens Do not handle the projector roughly Do not send the soft carrying case by parcel delivery service or cargo shipment The projector inside the soft carrying case could be damaged However it is possible to use it as a carrier case on board 4 Select High in the Fan mode if you continue to use t...

Страница 4: ... 22 CONVENIENT FEATURES E 24 Turning Off the Image and Sound E 24 Freezing a Picture E 24 Enlarging and Moving a Picture E 24 Getting the Information E 24 Security E 24 USING ON SCREEN MENU E 27 Basic Menu Operation E 27 Using the Menus E 27 Adjusting and Setting Items E 28 List of Menu Items E 29 Menu Elements E 30 Menu Descriptions Functions E 31 Basic Menu E 31 Auto Adjust Executed E 31 Aspect ...

Страница 5: ...orized individuals from changing projector settings Cabinet Button Lock helps prevent unauthorized adjustments to the projector One touch projection angle adjustment Manual lens shutter for protecting the lens Supplied carrying case with pouch for accessories Short focal length lens Remote features one touch source change buttons New Color Management system Newly designed menu system with dial con...

Страница 6: ...g here and plug the other end into an active wall outlet ZOOM FOCU S PU SH PU SH LAMP ME NU SOURCE EN TE R ST AT US PO WER ON STA ND BY SEL E C T Lamp Cover Lamp Cover Screw Ventilation outlet Built in Security Slot Monaural Speaker 0 5W This security slot supports the MicroSaver Security System MicroSaver is a registered trademark of Kensington Microware Inc The logo is trademarked and owned by K...

Страница 7: ...akes menu selec tions See page E 27 When the menu is not displayed rotating the dial increases or de creases the volume See page E 21 7 SOURCE ENTER Button When the menu is not displayed this button works as the SOURCE button A press of the SOURCE button displays the Source Select screen See page E 19 When the menu is displayed this button works as the ENTER but ton A press of the ENTER button exe...

Страница 8: ...this button to display the Aspect Ratio select screen See page E 31 9 왖왔왗왘 Button 왖왔 Use these buttons to select the menu of the item you wish to adjust 왗왘 Use these buttons to change the level of a selected menu item When no menus appear these buttons work as a volume con trol When an image is magnified the 왖왔왗왘 button moves the image 10 ENTER Button Executes your menu selection and activates ite...

Страница 9: ...e using the remote control for a long time remove the batteries Do not place the batteries upside down Do not use new and old batteries together or use different types of batteries together Operating Range for Wireless Remote Control Remote control Remote sensor on projector cabinet Actual operating range may differ from the above drawing The infrared signal operates by line of sight up to a dista...

Страница 10: ... the projector Connect your computer or video equipment to the projector See pages E 12 to 15 Connect the supplied power cable See page E 17 NOTE Ensure that the power cable and any other cables are disconnected before mov ing the projector When moving the projec tor or when it is not in use close the lens shutter 1 3 2 200 180 150 120 100 80 60 40 30 1 1 4 4 5 1 5 5 9 8 2 3 9 0 6 3 1 1 2 1 3 3 9 ...

Страница 11: ...or where temperatures vary greatly The projec tor must be used at temperatures between 41 F 5 C and 95 F 35 C Do not expose the projector to moisture dust or smoke This will harm the screen image Ensure that you have adequate ventilation around your projector so heat can dissipate Do not cover the vents on the side or the front of the projector α Wide Tele Screen Size B C Wide Tele Diagonal Width ...

Страница 12: ...sh Notebook type IBM PC or Compatibles Desktop type or Macintosh Desktop type RGB signal cable supplied To mini D Sub 15 pin connector on the pro jector It is recommended that you use a commercially available distribution amplifier if connecting a signal cable longer than the supplied one NOTE For older Macintosh use a commercially available pin adapter not supplied to connect to your Mac s video ...

Страница 13: ...de with the projector on its side Place the projector on a location such as a table with the terminal panel side up Be sure to place the projector on a flat level surface Auto Keystone correction feature is not available The on screen menu will not be rotated ZOOM FOCUS PUSH LAMP MENU SOURCE ENTER STATUS POWER ON STAND BY S E L E C T COM PUTE R S VI DEO IN AUD IO IN VIDE O IN 5 Press the MENU butt...

Страница 14: ...able component video cable RCA 3 and the optional 15 pin to RCA female 3 cable to connect your DVD player to the COMPUTER input connector on the projector For a DVD player without component video Y Cb Cr output use common RCA cables not provided to connect a composite VIDEO output of the DVD player to the Video Input of the projector 3 Turn on the projector and DVD player NOTE Refer to your DVD pl...

Страница 15: ...r to the projector and VCR laser disc player or document camera 2 Connect one end of your RCA cable to the video output connector on the back of your VCR or laser disc player connect the other end to the Video input on your projector Use an audio cable not supplied to connect the audio from your VCR or laser disc player to your audio equipment if your VCR or laser disc player has this capability B...

Страница 16: ... kg including attachment Place the tripod with its feet fully open and weight evenly distributed for stability When using a tripod with a geared elevator do not ex tend the geared elevator When displaying an image in portrait mode with the projector on its side page E 13 be sure the tripod is balanced for stability Failure to do so may result in the tripod falling over Preparation 1 Disconnect all...

Страница 17: ... E L E C T CO MPU TE R S VIDE O IN AU DIO IN VIDE O IN P U S H LAMP MENU STATUS ON STAND BY POWER POWER POWER The projector will go into its standby mode and the power indicator will glow orange LAMP MENU SOURCE ENTER STATUS ON STAND BY SELECT POWER POWER POWER CAUTION Do not unplug the power cable from the wall outlet under any one of the following circumstances Doing so can cause damage to the p...

Страница 18: ...Y SELECT MENU SOURCE ENTER OFF COMPUTER AUTO ADJ P0WER ON VIDEO AUTO MENU CANCEL ASPECT COMP S VIDEO ENTER 2 Press the ENTER button to execute the selection LAMP STATUS POWER ON STAND BY SELECT MENU SOURCE ENTER OFF COMPUTER AUTO ADJ P0WER ON VIDEO AUTO MENU CANCEL ASPECT COMP S VIDEO ENTER After this has been done you can proceed to the menu operation NOTE Immediately after turning on the project...

Страница 19: ... use the Keystone feature for proper adjustment See page E 20 Move the projector left to center the image horizontally on the screen Adjust the Tilt Foot 1 Lift the front part of the projector Push and hold the PUSH symbol of the Adjustable Tilt Foot button on the front top of the projector to extend the adjustable tilt feet up to a maximum height ZOO M FOC US LAM P ME NU SOU RCE EN TER STA TU S P...

Страница 20: ... the vertical keystone distortion manually To do so 1 Press the MENU button The menu will be displayed PROJECTING AN IMAGE BASIC OPERATION ZOOM FOCUS PUSH ZOOM FOCUS PUSH 2 Select the Keystone function Rotate the SELECT dial to select Keystone and then press the ENTER button The three options will be displayed 3 Rotate the SELECT dial to select Manual and then press the ENTER button The Keystone a...

Страница 21: ... optimize an RGB image This function adjusts the clock frequencies that eliminate the horizontal banding in the image This function also adjusts the clock phase to re duce video noise dot interference or cross talk This is evident when part of your image appears to be shimmering This adjustment may be necessary when you connect your computer for the first time NOTE Some signals may not be displaye...

Страница 22: ...ER ON VIDEO AUTO MENU CANCEL ASPECT COMP S VIDEO ENTER LAMP STATUS POWER ON STAND BY SELECT MENU SOURCE ENTER PROJECTING AN IMAGE BASIC OPERATION After Use Preparation Make sure that the projector is not turned on 1 Unplug the power cable 2 Disconnect any other cables 3 Retract adjustable tilt feet if extended ZOO M FOC US LAM P ME NU SOU RCE EN TER STA TU S PO WE R ON ST AN D BY S E L E C T CO MP...

Страница 23: ...ough and fix it Work should be done on a flat level surface to prevent overturning Put through ZOOM FOCU S PUSH PUSH LAMP MEN U SOUR CE ENTE R STAT US POW ER ON S TAND BY SEL E C T OF F COM PUT ER AUT O ADJ PC MUT E MAG NIF Y P0 WE R VID EO AUT O ASP ECT CO MP S VI DEO EN TER ME NU HEL P MUT E PICT URE CAN CEL FRE EZE ON Remote control Power cable Projector RGB signal cable Quick Guide The length ...

Страница 24: ...PC MUTE MAGNIFY MENU HELP MUTE PICTURE FREEZE CANCEL PC MUTE MAGNIFY MENU HELP MUTE PICTURE FREEZE CANCEL PC MUTE MAGNIFY MENU HELP MUTE PICTURE FREEZE CANCEL PC MUTE MAGNIFY MENU HELP MUTE PICTURE FREEZE CANCEL OFF COMPUTER AUTO ADJ P0WER ON VIDEO AUTO MENU CANCEL ASPECT COMP S VIDEO ENTER Security A keyword can be set for your projector to avoid operation by an unau thorized user using the Menu ...

Страница 25: ...nd press the ENTER button To cancel the selected keyword rotate the SELECT dial to high light and press the ENTER button 6 After finishing typing keyword rotate the SELECT dial to highlight Exit and press the ENTER button The confirmation screen will be displayed 7 Rotate the SELECT dial to select Yes and press the ENTER but ton The Security function is enabled To turn on the projector when Securi...

Страница 26: ...ct and press the ENTER but ton The Security is unlocked The Security menu will be displayed 6 Rotate the SELECT dial to select Security and press the ENTER button 7 Rotate the SELECT dial to select Disable and press the ENTER button This will disable the Security function and return to the Security menu 8 Rotate the SELECT dial to select Exit and press the ENTER 9 Press the MENU button to close th...

Страница 27: ... Press the ENTER button The Picture Management item will be displayed on its right side 4 Rotate the SELECT dial to highlight the item you want to adjust or set The example below is for Graphic 5 Press the ENTER button The item is selected This will return to the Basic menu 6 Press the MENU button to close the menu NOTE The menu will automatically disappear if no operation is made for 45 seconds T...

Страница 28: ...efault Adjusting and Setting Items For Adjusting items 1 Rotate the SELECT dial to highlight the menu item you want to adjust 2 Press the ENTER button 3 Rotate the SELECT dial to adjust the item 4 Press the ENTER button Changes will take effect For Selecting items 1 Rotate the SELECT dial to highlight the menu item you want to set USING ON SCREEN MENU 2 Press the ENTER button The selected item wil...

Страница 29: ...kground Orientation Cabinet Button Security Portrait Power Management Auto Start Fan Mode Signal Select Page 1 Page 2 Page 3 Page 4 Factory Default Current Signal Factory Default All Data Clear Lamp Hour Meter On Off On Off On Off Normal Eco English Deutsch Français Italiano Español Svenska Nederlands Suomi Color Monochrome Manual Auto 5 sec Auto 15 sec Auto 45 sec Blue Black Logo Desktop Front Ce...

Страница 30: ...und button to select an option in a dialog box Check mark Indicates the item is selected Slide bar Indicates settings or the direction of adjustment Key symbol Indicates the Cabinet Button is locked Thermometer symbol Indicates the lamp mode is forcibly set to Eco mode because the internal temperature is too high Menu Elements Slide bar Highlight Radio button Source Key symbol Thermometer symbol U...

Страница 31: ... in a venue such as a coffee shop or hotel and employing compression or expansion of the screen image with a Aspect Ra tio setting may raise concern about the infringement of copyrights which are protected by copyright law Picture Management This option allows you to adjust neutral tint for yellow cyan or magenta There are 5 factory presets optimized for various types of images or you can set user...

Страница 32: ...Flicker Reduction Flicker Reduction Reduces flicker which can occur in an interlaced signal NOTE When the Flicker Reduction is ON jagged lines can be visible depending on the signal In that case select OFF Adjusting White Balance Brightness R G B Contrast R G B This allows you to adjust the white balance Brightness for each color RGB is used to adjust the black level of the screen Contrast for eac...

Страница 33: ...jector from being used by unauthorized individuals See page E 24 for details Selecting Display Orientation Portrait This allows you to select the projector s display orientation when you display an image in portrait mode with the projector on its side See page E 13 You can rotate the projected image 0 or 180 clockwise depending on your PC The default setting is 180 Setup2 Enabling Power Management...

Страница 34: ...amp Hour Meter Clearing Lamp Hour Meter Clear Lamp Hour Meter Resets the lamp clock back to zero Selecting this option displays submenu for a confirmation NOTE The projector will turn off and go into standby mode after 1600 hours up to 2100 hours in Eco mode of service If this happens press the HELP button on the remote control for ten seconds to reset the lamp clock back to zero Do this only afte...

Страница 35: ...screw driver to remove the lamp cover and lamp housing 1 Loosen the lamp cover screw until the screwdriver goes into a free wheeling condition Press firmly and slide the lamp cover off The lamp cover screw is not removable 3 Insert a new lamp housing until the lamp housing is plugged into the socket CAUTION Do not use a lamp other than the NEC replacement lamp LT70LP Order this from your NEC deale...

Страница 36: ...hinner 3 Use a blower or lens paper to clean the lens and be careful not to scratch or mar the lens Cleaning the Cabinet and the Lens ZOO M FOC US PU SH LAM P ME NU SOU RCE EN TE R ST AT US PO WE R ON ST AN D BY S E L ECT CO MP UT ER S VIDE O IN AU DIO IN VIDE O IN ZO OM FO CU S LA MP ME NU SO UR CE EN TE R ST AT US PO WE R ON ST AN D BY S E L E C T CO MPU TE R S VIDE O IN AU DIO IN VIDE O IN P U ...

Страница 37: ...cle 0 5 sec ON 0 5 sec OFF Normal Lamp cover error or lamp housing error Temperature error Power Failure Fan error Lamp error Re firing the lamp Cabinet button is locked Replace the lamp cover or lamp housing correctly The projector is overheated Move the projector to a cooler location Power supply unit will not work cor rectly Contact your dealer Fans will not work correctly Lamp fails to light W...

Страница 38: ...hen using with a notebook PC be sure to connect between the projector and the notebook PC before turning on the power to the notebook PC In most cases signal cannot be output from RGB output unless the notebook PC is turned on after connecting with the projector If the screen goes blank while using your remote control it may be the result of the computer s screen saver or power management software...

Страница 39: ... TV lines SECAM 300 TV lines YCbCr 540 TV lines RGB 1024 dots H 768 dots V External Control RS232 IR Sync Compatibility Separate Sync Composite Sync Sync on G Built in Speaker 0 5W monaural Power Requirement 100 240V AC 50 60 Hz Input Current 2A Max Power Consumption 196W 4W in Standby mode Mechanical Installation Orientation Desktop Front Desktop Rear Ceiling Front Ceiling Rear Dimensions 4 8 W 3...

Страница 40: ...ue Ground Cb Ground 9 No Connection 10 Sync Signal Ground 11 Scart Sync 12 Bi directional DATA SDA 13 Horizontal Sync or Composite Sync 14 Vertical Sync 15 Data Clock Signal Level Video signal 0 7Vp p Analog Sync signal TTL level 5 1 4 2 3 10 11 12 13 14 15 6 9 7 8 ZOOM FOCUS PUSH LAMP MENU SOURCE ENTER STATUS POWER ON STAND BY S E L E C T COMPUTER S VIDEO IN AUDIO IN AC IN VIDEO IN CLOSE 280 11 0...

Страница 41: ... 900 61 796 65 95 SGI 1152 900 71 736 76 05 VESA 1280 960 60 60 VESA 1280 1024 63 981 60 02 MAC 1280 1024 69 89 65 18 HP 1280 1024 78 125 72 01 SUN 1280 1024 81 13 76 11 VESA 1280 1024 79 976 75 03 VESA 1280 1024 91 146 85 02 SXGA 1400 1050 SDTV 576i 625i 15 6 50 SDTV 576p 625p 31 5 50 HDTV 1080i 1125i 1920 1080 33 75 60 Interlace HDTV 1080i 1125i 1920 1080 28 125 50 Interlace HDTV 720p 750p 1280 ...

Страница 42: ... name serial number and name of the store of purchase are not indicated on the warranty or have been altered 2 Problems or damage caused by dropping or shocks during ship ment or movement by the customer or by improper handling by the customers 3 Problems or damage caused by improper usage or unwarrant able alterations or repairs by the customer 4 Problems or damage caused by fire salt damage gas ...

Страница 43: ...e 65 6 274 2226 Email Address daniel rsc necsin nec com sg WEB Address http www nec com sg Regions Covered Singapore Hyosung Data System Ltd Address 7th Floor Cheongdam Building 52 Cheongdam Dong Kangnam Ku Seoul Korea 135 100 Telephone 82 2 510 0234 Fax Line 82 2 540 3590 Email Address hds ykc hyosung com Regions Covered South Korea Lenso Communication Co Ltd Address 292 Lenso House 4 1st Floor S...

Страница 44: ...lso confirm following information is correct Regards Application Sheet for TravelCare Service Program Date P 1 Country product purchased User s Company Name User s Company Address Phone No Fax No User s Name User s Address Phone No Fax No Local Contact office Local Contact office Address Phone No Fax No User s Model Name Date of Purchase Serial No on cabinet Problem of units per User Required Serv...

Страница 45: ...idents transportation neglect misuse abuse water dust smoke or default of or by the Customer its employees or agents or any third party 2 Failure or fluctuation of electrical power electrical circuitry air condi tioning humidity control or other environmental conditions such as use it in smoking area 3 Any fault in the attachments or associated products or components whether or not supplied by NEC...

Отзывы: