

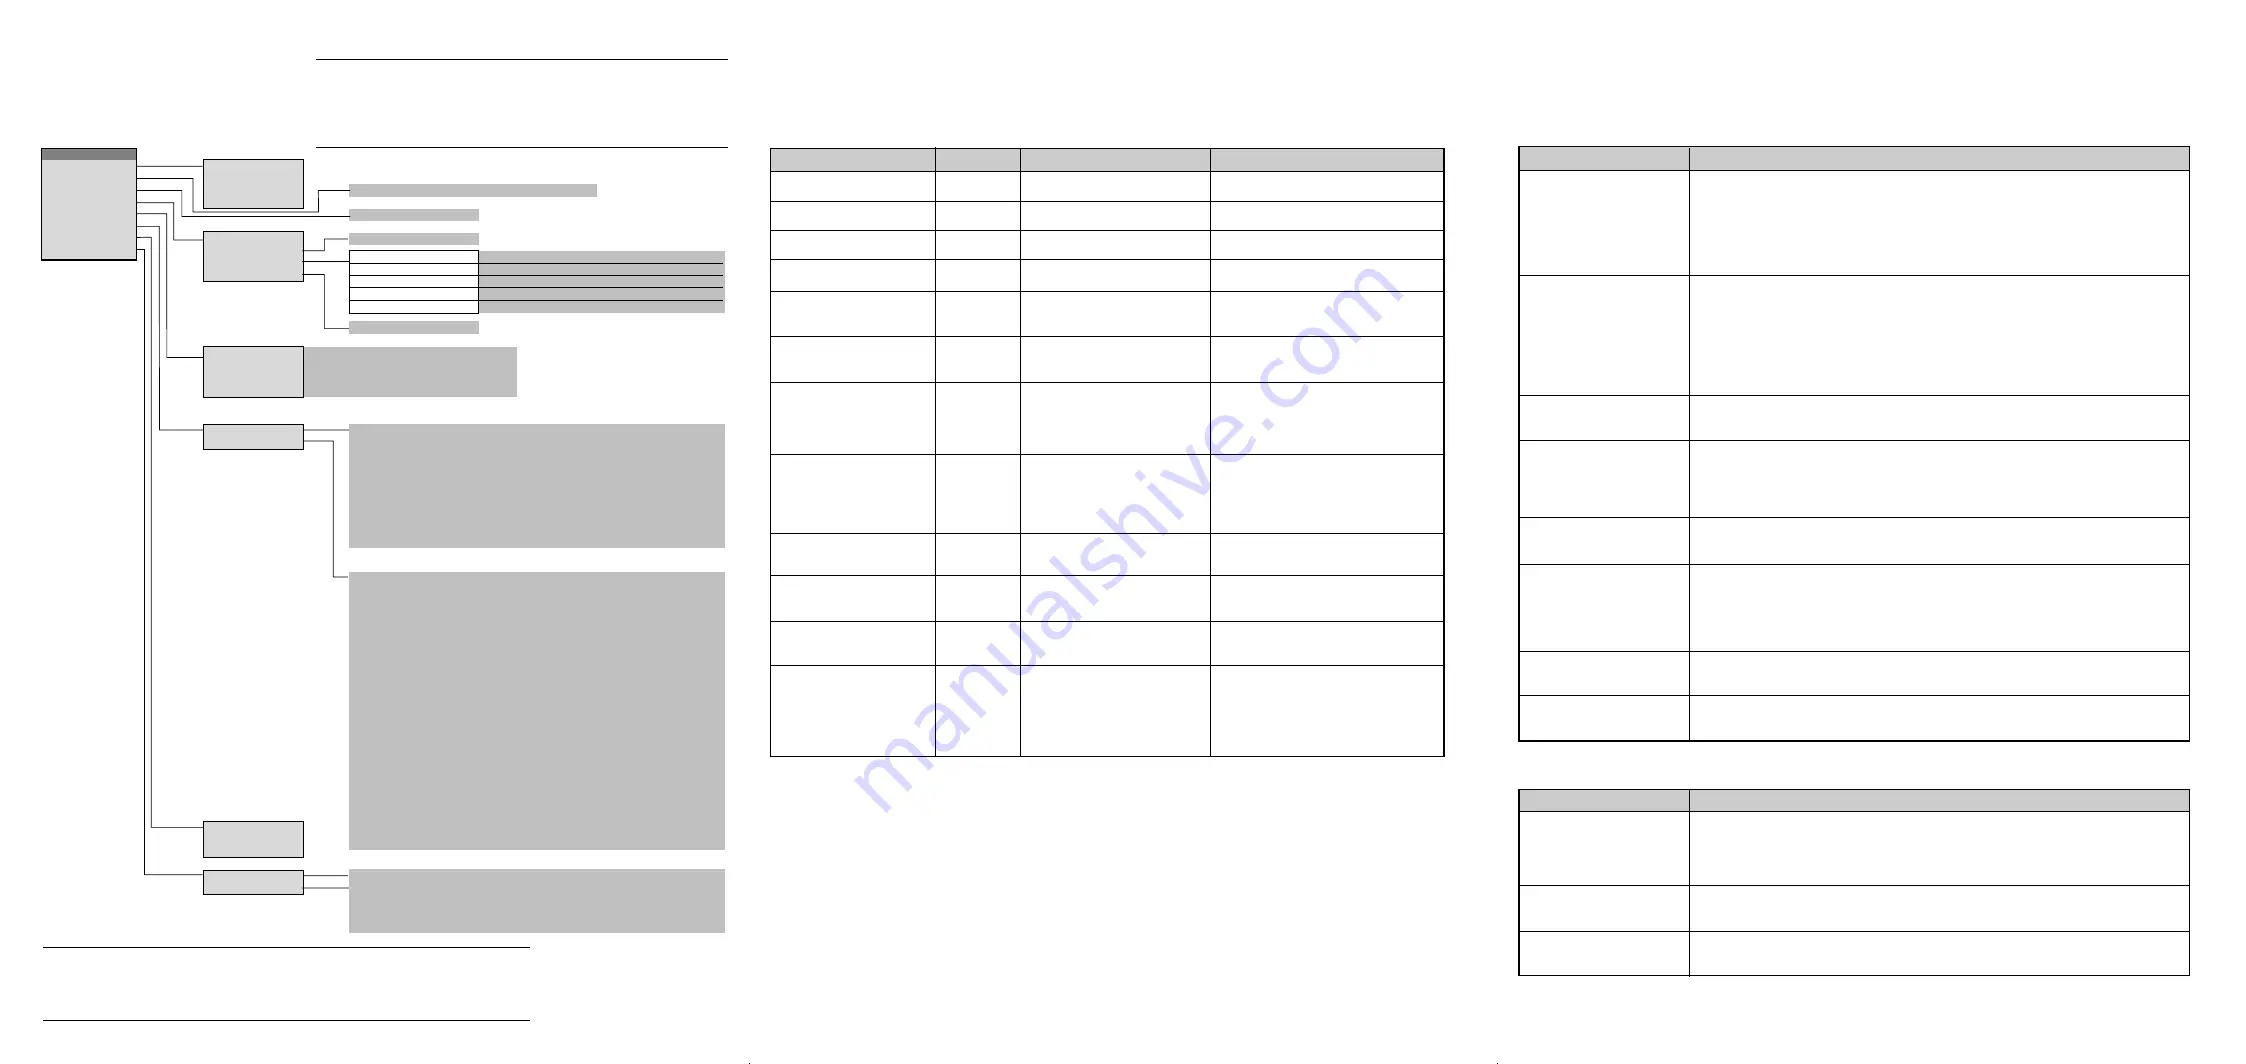
Menu Tree
Troubleshooting
Advanced Menu
Source Select
RGB*
1
Picture
Video
Volume
S-Video
Brightness/Contrast/Color/Hue/Sharpness
Image Options
Color Management
PC Card Viewer
Projector Options
Volume
Tools
Help
Keystone
Normal/Eco
Lamp Mode
Aspect Ratio
Normal/Zoom/Wide Zoom/Cinema
Advanced Options
Noise Reduction
Off/Low/Medium/High
Factory Default
Position/Clock
Horizontal/Vertical/Clock/Phase
Resolution
Auto/Native
Video Filter
On / Off
All Data/Current Signal
Menu
Menu Mode (Advanced Menu, Basic/Custom Menu)
Setup
White Balance
Gamma Correction
Color Matrix
Basic/Custom Menu Edit
Language (English/German/French/Italian/Spanish/Swedish/Japanese)
Projector Pointer (Pointer 1-8)
Menu Display Time (Manual/Auto 5 sec/Auto 15 sec/Auto 45 sec)
Message
Source Display
Direct Button
Volume Bar
Keystone Bar
No input
(On/Off)
(On/Off)
(On/Off)
(On/Off)
Clean Filter
(On/Off)
Page 1
Background (Blue/Black/Logo)
Mouse Button(Right Hand/Left Hand)
Sensitivity(Fast/Medium/Slow)
Page 2
Page 1 Orientation (Desktop Front/Ceiling Rear/Desktop Rear/Ceiling Front)
Cinema Position (Top/Center/Bottom)
Page 2 PC Card Viewer Options Show Folder List
(Auto Play/Manual Play)
Interval (5-300 sec)
Capture Options (High Quality/Normal/High Compression)
Page 3 Signal Select RGB*
2
(Auto/RGB/Component)
Video (Auto/NTSC3.58/NTSC4.43/PAL/PAL-M*
3
/PAL-N*
3
/PAL60/SECAM)
S-Video (Auto/NTSC3.58/NTSC4.43/PAL/PAL-M*
3
/PAL-N*
3
/PAL60/SECAM)
Page 4 Auto Adjust (RGB Only)
Auto Start
Power Management
Power Off Confirmation
Keystone Save
Clear Filter Usage
Clear Lamp Hour Meter
Capture
Page 5 Communication Speed(4800/9600/19200/38400)
PC Card Files
Default Source Select(Last/Auto/Select)
ChalkBoard
Control Panel Key Lock (Enable/Disable)
(RGB*
4
/Video/S-Video/PC Card Viewer)
Contents
Contents
Information
Page1
Source Name/Input Terminal/Horizontal Frequency/Vertical Frequency/Sync Polarity
Page2
Signal Type/Video Type/Sync Type/Interlace/Resolution
Page3
Aspect Ratio/Gamma Correction/Noise Reduction/Color Matrix/Matrix Type
Page4
Remaining Lamp Time/Lamp Hour Meter/Filter Usage/Projector Usage
Select Color Matrix HDTV/SDTV
Normal/Natural 1/Natural 2
Select Color Matrix Type B-Y/R-Y,Cb/Cr,Pb/Pr
Brightness R/G/B, Contrast R/G/B
This section helps you resolve problems you may encounter while setting up or using the projector.
Power/Status Light Messages
Standby
Cooling down
Lamp in Normal mode
Lamp in Eco mode
Retrying lamp turn on
One minute after lamp is turned
on
Lamp has reached its end of life
(Normal: 1500 hours or over)
(Eco: 2500 hours or over)
Lamp life has reached its end of
life
(Normal: 1600 hours or over)
(Eco: 2600 hours or over)
Lamp or filter cover error
Temperature error
Fan error
Lamp error
Condition
Steady orange
Blinking green
Steady green
Steady green
Steady green
Blinking green
Steady green
Steady orange
Steady orange
Steady orange
Steady orange
Steady orange
–
–
–
Steady green
Blinking orange
No light in Normal mode / Steady
green in Eco mode
Steady red
Steady red
Blinking red (1 sec interval)
Blinking red (4 sec interval)
Blinking red (8 sec interval)
Blinking red (12 sec interval)
–
Blinks green for 90 seconds
–
–
The projector retries 3 times at an interval of
15 sec for max. 45 sec)
–
Message appears on screen during 1500-1600
hours (2500-2600 hours: Eco mode) of lamp
usage. The projector reaches its end of life.
Please replace the lamp as soon as possible
The projector is in standby mode and cannot
be turned on.
The projector is in standby mode and cannot
be turned on.
The projector is in standby mode and cannot
be turned on.
The projector is in standby mode and cannot
be turned on.
The projector is in standby mode and cannot
be turned on.
Power Indicator
Status Indicator
Note
• Is “PC Card Viewer” selected from the Source menu?
• Is the CompactFlash memory card seated in the PC CARD slot completely?
• Is slide data stored in the CompactFlash memory card?
• Have the contents of the CompactFlash memory card been destroyed?
• While an image with over 1024
⳯
768 dots is projected, several lines of information will be lost. Use
the supplied software to change the image to 1024
⳯
768 dots in size.
• Use a computer, etc., to repair the data.
Problem
Check These Items
When using the PC Card Viewer function
For more information contact your dealer.
No picture
Part of a slide is not displayed
Contents of CompactFlash Card
are damaged
Common Problems & Solutions
Does not turn on
No picture
Image isn’t square to the screen
Picture is blurred
Image is scrolling vertically,
horizontally or both
Remote control does not work
Status indicator is lit or blink-
ing
Cross color in RGB mode
• Check that the power cable is plugged in and that the power button on the projector cabinet or the
remote control is on.
• Ensure that the lamp cover or filter cover is installed correctly. See pages E-48 and E-49.
• Check to see if the projector has overheated or the lamp usage exceeds 1600 hours (up to 2600 hours
: Eco mode). If there is insufficient ventilation around the projector or if the room where you’re
presenting is particularly warm, move the projector to a cooler location.
• Use the menu to select your source [Video, S-Video, RGB (DVI digital or DVI analog on LT158) or
PC Card Viewer]. See pages E-18 and E-33.
• Ensure your cables are connected properly.
• Use menus to adjust the brightness and contrast. See page E-33
• Remove the lens cap.
• Reset the settings or adjustments to factory preset levels using the Factory Default in the Adjustment
Menu. See page E-35
• Reposition the projector to improve its angle to the screen. See page E-25
• Use the Keystone to correct the trapezoid distortion. See page E-29 or E-34
• Adjust the focus. See page E-25
• Reposition the projector to improve its angle to the screen. See page E-25
• Ensure that the distance between the projector and screen is within the adjustment range of the lens.
See page E-16
• Use menus or Source button on the remote control or the cabinet to select the source you want to
input.
• Install new batteries. See page E-13
• Make sure there are no obstacles between you and the projector.
• Stand within 22 feet (7 m) of the projector. See page E-13
• Make sure that you are in the Projector mode and the PJ button lights in red. If not, press the PJ
button.
• See the Power/Status Light messages above.
• If Auto Adjust is off, turn it on. If Auto Adjust is on, turn it off and balance the image with the
Position/Clock in the Image Options. See page E-35 or E-38
Problem
Check These Items
NOTE:
1) When menu items are not available, they are indicated in white.
2)
For LT158:
When DVI (DIGITAL) is selected, making any adjustment executes the
Auto Adjust feature. The AUTO ADJUST button on the remote control is also avail-
able. You can adjust the horizontal and the vertical position for DVI digital signal but
cannot save those adjustments.
NOTE:
*
1 On LT158, "DVI (DIGITAL)" and "DVI (ANALOG)" are displayed in the Source Select submenu.
*
2 On LT158, "DVI (ANALOG)" is displayed in the Signal Select on Page 3.
*
3 LT158 Only.
*
4 On LT158, "DVI (DIGITAL)" and "DVI (ANALOG)" can be also selected.


