background image

English-3

English

Controls

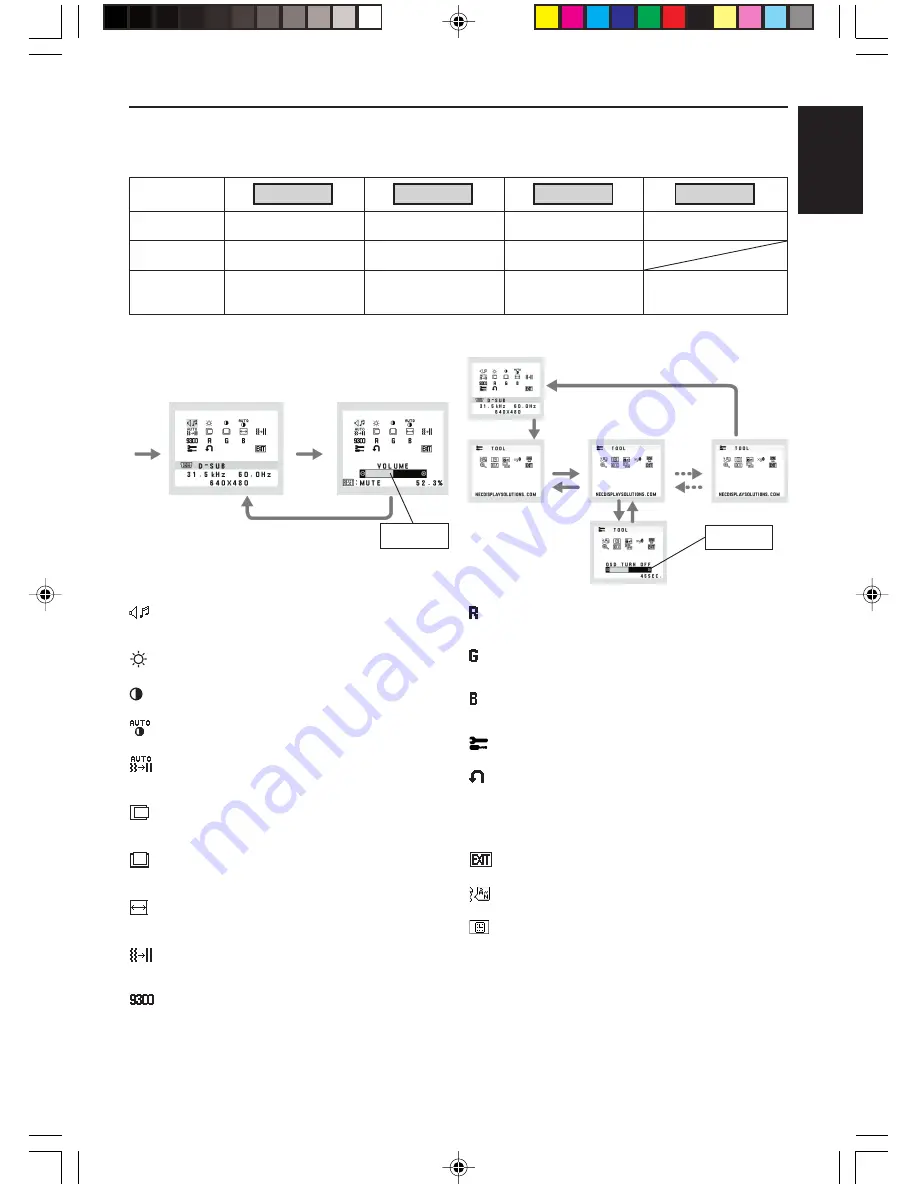
OSD (On-Screen-Display) control buttons on the front of the monitor function as follows:

1. Basic function at pressing each key

Showing OSD.

Shortcut to Brightness
adjust Menu.

Button

At No OSD
showing

Shortcut to Volume adjust
Menu.

At OSD showing

(Icon selection stage)

Go to Adjustment stage.

Cursor goes to left.

Cursor goes to right.

At OSD showing

(Adjustment stage)

Go to Icon selection stage.

Adjust value decrease or
Cursor for adjust goes to
left.

Adjust value increase or
Cursor for adjust goes to
right.

SELECT

+

Input signal select.

Reset operation.
Mute off/on switch on
Volume adjustment Menu.

1<->2 / RESET

Sub Menu

(Icon Select)

Press

 “–” or “+”

Sub Menu (Adjust)

Press “SELECT” key

Press

 “–” or “+”

Example Tool:

Press “SELECT” key

Press “SELECT” key

Main Menu

(Icon Select, Analog Input)

Main Menu (Adjust)

Press

“SELECT”

key

Press

“SELECT”

key

Press “SELECT” key

Adjust by using

“–” or “+”

Adjust by using

“–” or “+”

VOLUME

Control the sound volume of speakers and headphone.
To mute the speaker sound, press the 1<->2/RESET key.

BRIGHTNESS

Adjusts the overall image and background screen brightness.

CONTRAST

Adjusts the image brightness in relation to the background.

AUTO CONTRAST (Analog Input only)

Adjusts the image displayed for non-standard video inputs.

AUTO ADJUST (Analog Input only)

Automatically adjusts the Image Position, the H. Size and
Fine setting.

LEFT/RIGHT (Analog Input only)

Controls Horizontal Image Position within the display area of
the LCD.

DOWN/UP (Analog Input only)

Controls Vertical Image Position within the display area of the
LCD.

H. SIZE (Analog Input only)

Adjusts the horizontal size by increasing or decreasing this
setting.

FINE (Analog Input only)

Improves focus, clarity and image stability by increasing or
decreasing this setting.

COLOR CONTROL SYSTEMS

Five color presets (9300/7500/sRGB/USER/NATIVE) select
the desired color setting.
The sRGB and NATIVE, color presets are standard and
cannot be changed.

COLOR RED

Increase or decreases Red. The change will appear on
screen.

COLOR GREEN

Increase or decreases Green. The change will appear on
screen.

COLOR BLUE

Increase or decreases Blue. The change will appear on
screen.

TOOL

Selecting TOOL allows you to get into the sub menu.

FACTORY PRESET

Selecting Factory Preset allows you to reset all OSD control
settings back to the factory settings. The RESET button will
need to be held down for several seconds to tage effect.
Individual settings can be reset by highlighting the control to
be reset and pressing the RESET button.

EXIT

Selecting EXIT allows you exit OSD menu/ sub menu.

LANGUAGE

OSD control menus are available in nine languages.

OSD TURN OFF

The OSD control menu will stay on as long as it is in use. In
the OSD Turn OFF submenu, you can select how long the
monitor waits after the last touch of a button to shut off the
OSD control menu. The preset choices are 10 - 120 seconds
by 5 seconds step.

2. OSD structure

01_English

6/6/07, 8:37 AM

3

Содержание LCD205WXM - MultiSync - 20" LCD Monitor

Страница 1: ...MultiSync LCD205WXM MultiSync LCD225WXM User s Manual Bedienerhandbuch Manual del usuario Manuel Utilisateur Manuale utente Руководство пользователя 00_Cover 6 6 07 8 36 AM 1 ...

Страница 2: ... after a certain time beneficial both for the user and the environment Electrical safety Emissions Electromagnetic fields Noise emissions Ecology The product must be prepared for recycling and the manufacturer must have a certified environmental management system such as EMAS or ISO 14 001 Restrictions on chlorinated and brominated flame retardants and polymers heavy metals such as cadmium mercury...

Страница 3: ...any in Europe http www nec display com in Japan or http www necdisplay com in USA Energy Saving This monitor features an advanced energy saving capability When a VESA Display Power Management Signalling DPMS Standard signal is sent to the monitor the Energy Saving mode is activated The monitor enters a single Energy Saving mode WEEE Mark European Directive 2002 96 EC Within the European Union EU w...

Страница 4: ...Chinese RoHS information relevant for Chinese market 00_Cover 6 6 07 8 36 AM 4 ...

Страница 5: ...tor User s Manual Audio Cable Power Cord 15 pin mini D SUB male to 15 pin mini D SUB male DVI D to DVI D for Europe MultiSync LCD monitor Quick Start To attach the MultiSync LCD monitor to your system follow these instructions 1 Turn off the power to your computer 2 For the PC or MAC with DVI digital output Connect the DVI D signal cable not included for the U S and China to the connector of the d...

Страница 6: ...s User s Manual for a full description of these OSD controls NOTE If you have any problem please refer to the Troubleshooting section CD ROM Raise and Lower Monitor Screen The monitor may be raised or lowered To raise or lower screen place hands on each side of the monitor and lift or lower to the desired height Figure RL 1 NOTE Handle with care when raising or lowering the monitor screen Tilt and...

Страница 7: ...alog Input only Controls Horizontal Image Position within the display area of the LCD DOWN UP Analog Input only Controls Vertical Image Position within the display area of the LCD H SIZE Analog Input only Adjusts the horizontal size by increasing or decreasing this setting FINE Analog Input only Improves focus clarity and image stability by increasing or decreasing this setting COLOR CONTROL SYSTE...

Страница 8: ...tor INPUT RESOLUTION Analog Input Only Sets of the resolution of input signal to one of the following When vertical active size is 768 you can select resolution from 1024 x 768 1280 x 768 1360 x 768 When vertical active size is 1050 you can select resolution from 1400 x 1050 1680 x 1050 OSD Warning OSD Warning menus disappear with SELECT button NO SIGNAL This function gives a warning when there is...

Страница 9: ...packungsmaterial für spätere Transporte des Monitors auf Kurzanleitung Gehen Sie folgendermaßen vor um den MultiSync LCD Monitor an Ihr System anzuschließen 1 Schalten Sie Ihren Computer aus 2 PC oder Mac mit digitalem DVI Ausgang Verbinden Sie das DVI D Signalkabel nicht mitgeliefert für USA und China mit dem Anschluss der Grafikkarte in Ihrem System Abbildung A 1 Ziehen Sie die Schrauben fest PC...

Страница 10: ...ung Automatische Einstellung Im Abschnitt Bedienelemente dieser Bedienungsanleitung finden Sie eine ausführliche Beschreibung der OSD Steuerungen HINWEIS Sollten Probleme auftreten beachten Sie den Abschnitt Fehlerbehebung CD ROM Heben und Senken des Bildschirms Der Monitor kann gehoben oder gesenkt werden Fassen Sie den Monitor zu diesem Zweck auf beiden Seiten an und heben oder senken Sie ihn au...

Страница 11: ...r Analogeingang Steuert die horizontale Bildposition im Anzeigebereich des LCD UNTEN OBEN Steuert die vertikale Bildposition im Anzeigebereich des LCD BILDBREITE nur Analogeingang Durch Erhöhen oder Verringern dieses Werts wird das Bild breiter bzw schmaler OPTIMIERUNG nur Analogeingang Optimiert Schärfe Deutlichkeit und Bildstabilität durch Erhöhen oder Verringern dieses Werts FARBSTEUERUNGSSYSTE...

Страница 12: ...NGSAUFLÖSUNG nur analoger Eingang Legt die Auflösung des Eingangssignals auf eine der folgenden Einstellungen fest Wenn die aktive Bildhöhe 768 ist können Sie zwischen folgenden Auflösungen wählen 1024 x 768 1280 x 768 1360 x 768 Wenn die aktive Bildhöhe 1050 ist können Sie zwischen folgenden Auflösungen wählen 1400 x 1050 1680 x 1050 OSD Warnung Die Menüs der OSD Warnungen können mit der Taste SE...

Страница 13: ...erial de embalaje originales para poder transportar el monitor en el futuro Inicio rápido Para conectar el monitor LCD MultiSync a su sistema siga estas indicaciones 1 Apague el ordenador 2 Para PC o MAC con salida digital DVI conecte el cable de señal DVI D no incluido para EE UU ni en China al conector de la tarjeta de monitor de su sistema figura A 1 Apriete todos los tornillos Para PC con sali...

Страница 14: ...ma inicial en la mayoría de cadencias sólo para entrada analógica Para llevar a cabo otros ajustes utilice los siguientes controles de OSD Contraste automático Auto ajuste Consulte el apartado Controles de este manual del usuario si desea obtener una descripción detallada de estos controles OSD NOTA si surgiera algún problema consulte la sección Solución de problemas CD ROM Cómo subir y bajar la p...

Страница 15: ...STÁNDAR se selecciona la configuración del color deseada Las configuraciones de color sRGB y ESTÁNDAR son estándar y no se pueden modificar COLOR ROJO Aumenta o disminuye el Rojo El cambio aparecerá en la pantalla COLOR VERDE Aumenta o disminuye el Verde El cambio aparecerá en la pantalla COLOR AZUL Aumenta o disminuye el Azul El cambio aparecerá en la pantalla HERRAMIENTAS Seleccionando TOOL HERR...

Страница 16: ...La imagen se amplía sin modificar la relación entre la altura y la anchura DDC CI Activa o desactiva la comunicación y control bidireccional del monitor RESOLUCIÓN ENTRADA sólo para entradas analógicas Determina que la resolución de la señal de entrada es una de las siguientes Cuando el tamaño vertical activo es 768 puede seleccionar una resolución entre 1024 x 768 1280 x 768 y 1360 x 768 Cuando e...

Страница 17: ...riel d emballage d origine pour le cas où vous seriez amené à transporter ou expédier le moniteur Démarrage rapide Pour connecter le moniteur LCD MultiSync à votre système suivez ces instructions 1 Éteignez votre ordinateur 2 Pour un PC ou un Mac équipé d une sortie numérique DVI Branchez le câble vidéo DVI D non inclus pour les Etats Unis et la Chine au connecteur de la carte graphique de votre s...

Страница 18: ...sateur pour une description complète de ces commandes OSD REMARQUE Si vous rencontrez des problèmes veuillez vous reporter à la section Résolution des problèmes CD ROM Élévation et abaissement de l écran du moniteur Le moniteur peut être élevé ou abaissé Pour élever ou abaisser l écran placez les mains de chaque côté du moniteur et élevez ou abaissez ce dernier à la hauteur qui vous convient Figur...

Страница 19: ... préréglages des couleurs sRVB et NATIVE sont des préréglages standard et ne peuvent pas être modifiés COULEUR ROUGE Augmente ou diminue le Rouge La modification sera visible à l écran COULEUR VERT Augmente ou diminue le Vert La modification sera visible à l écran COULEUR BLEU Augmente ou diminue le Bleu La modification sera visible à l écran OUTIL La sélection de l option OUTIL vous permet d entr...

Страница 20: ...CT L image est agrandie sans modification des proportions DDC CI ACTIVE ou DÉSACTIVE le contrôle et la communication bidirectionnels du moniteur RÉSOLUTION D ENTRÉE Entrée analogique seulement Définit la résolution du signal d entrée sur une des valeurs suivantes Lorsque la taille active verticale est 768 vous pouvez sélectionner une résolution de 1024 x 768 1280 x 768 ou 1360 x 768 Lorsque la tai...

Страница 21: ...ne ed il materiale di imballaggio originali per trasportare o spedire il monitor Guida rapida Per collegare il monitor LCD MultiSync al sistema attenersi alle seguenti istruzioni 1 Spegnere il computer 2 Per il PC o il Mac con l uscita digitale DVI Collegare il cavo segnali DVI D non incluso per Stati Uniti e Cina al connettore della scheda video del sistema Figura A 1 Serrare tutte le viti Per il...

Страница 22: ...lo ingresso analogico Per ulteriori regolazioni usare i seguenti controlli OSD Contrasto autom Auto Aggiust Fare riferimento alla sezione Controlli di questo Manuale Utente per una descrizione completa di questi controlli OSD NOTA In caso di problemi fare riferimento alla sezione Ricerca guasti CD ROM Sollevare ed abbassare lo schermo del monitor Il monitor può essere sollevato o abbassato Per sol...

Страница 23: ...a modifica comparirà sullo schermata COLORE VERDE Aumenta o diminuisce il verde La modifica comparirà sullo schermata COLORE BLU Aumenta o diminuisce il blu La modifica comparirà sullo schermata STRUMENTI Selezionando STRUMENTO è possibile ottenere il sottomenu CONFIG DI FABBRICA Selezionando Config di fabbrica è possibile resettare tutte le impostazioni dei controlli OSD riportandole alle configu...

Страница 24: ...o ingresso analogico Imposta la risoluzione del segnale di ingresso su uno dei seguenti valori Quando la dimensione verticale attiva è 768 è possibile selezionare una risoluzione da 1024 x 768 1280 x 768 1360 x 768 Quando la dimensione verticale attiva è 1050 è possibile selezionare una risoluzione da 1400 x 1050 1680 x 1050 Avvertenza OSD I menu di avvertenza OSD scompaiono quando si preme il pul...

Страница 25: ...аните коробку и упаковочный материал для транспортировки или перевозки монитора TЧтобы подключить ЖКД монитор MultiSync LCD к системе выполните следующие инструкции 1 Отключите питание компьютера 2 Для компьютера PC или Macintosh с цифровым выходом DVI Подключите сигнальный кабель DVI D не входит в комплект для США и Китая к разъему видеоплаты в компьютере Рисунок A 1 Затяните все винты Для ПК с а...

Страница 26: ...тих параметров OSD см в разделе Органы управления этого руководства пользователя ПРИМЕЧАНИЕ В случае каких либо неполадок обратитесь к разделу Устранение неисправностей на компакт диске Установкаэкранамониторавверхнееинижнееположения Монитор можно поднимать и опускать Чтобы поднять или опустить экран возьмите монитор с двух сторон и поднимите или опустите его на нужную высоту Рисунок RL 1 ПРИМЕЧАН...

Страница 27: ...овки цвета 9300 7500 sRGB USER NATIVE для выбора необходимой настройки цвета Палитры цветов sRGB и NATIVE являются стандартными и неизменяемыми COLOR RED КРАСНЫЙ Увеличение или уменьшение красного цвета Изменение будет отображаться на экране COLOR GREEN ЗЕЛЕНЫЙ Увеличение или уменьшение зеленого цвета Изменение будет отображаться на экране COLOR BLUE СИНИЙ Увеличение или уменьшение синего цвета Из...

Страница 28: ...680 x 1050 независимо от разрешения ASPECT ФОРМАТ Изображение увеличивается без изменения соотношения сторон DDC CI Включение или отключение двухстороннего управления монитором INPUT RESOLUTION ВХОДНОЕ РАЗРЕШЕНИЕ только аналоговый вход Выбор одного из следующих значений для разрешения входного сигнала Если активный размер изображения по вертикали равен 768 то доступны следующие типы разрешений 102...

Страница 29: ...xx_Back 6 6 07 8 38 AM 1 ...

Страница 30: ...Printed in China Part Number 1E505392 Printed on recycled paper xx_Back 6 6 07 8 38 AM 2 ...

Отзывы: