background image

 25

Tag A

TILE MATRIX

The “TILE MATRIX” feature allows one image to be displayed 

over multiple screens. This feature can be used with up to 25 

monitors.  (5 horizontal x 5 vertical)

Using the Tile Matrix function requires the PC output signal to 

be sent through a distribution amplifi er to each of the individual 

monitors.

ENABLE: Select “ON”, to expand the signal to the selected TILE 

MATRIX settings.

H MONITOR: Selects the number of horizontal displays. 

V MONITOR: Selects the number of vertical displays. 

MONITOR NO.: Selects a position to expand the screen. 

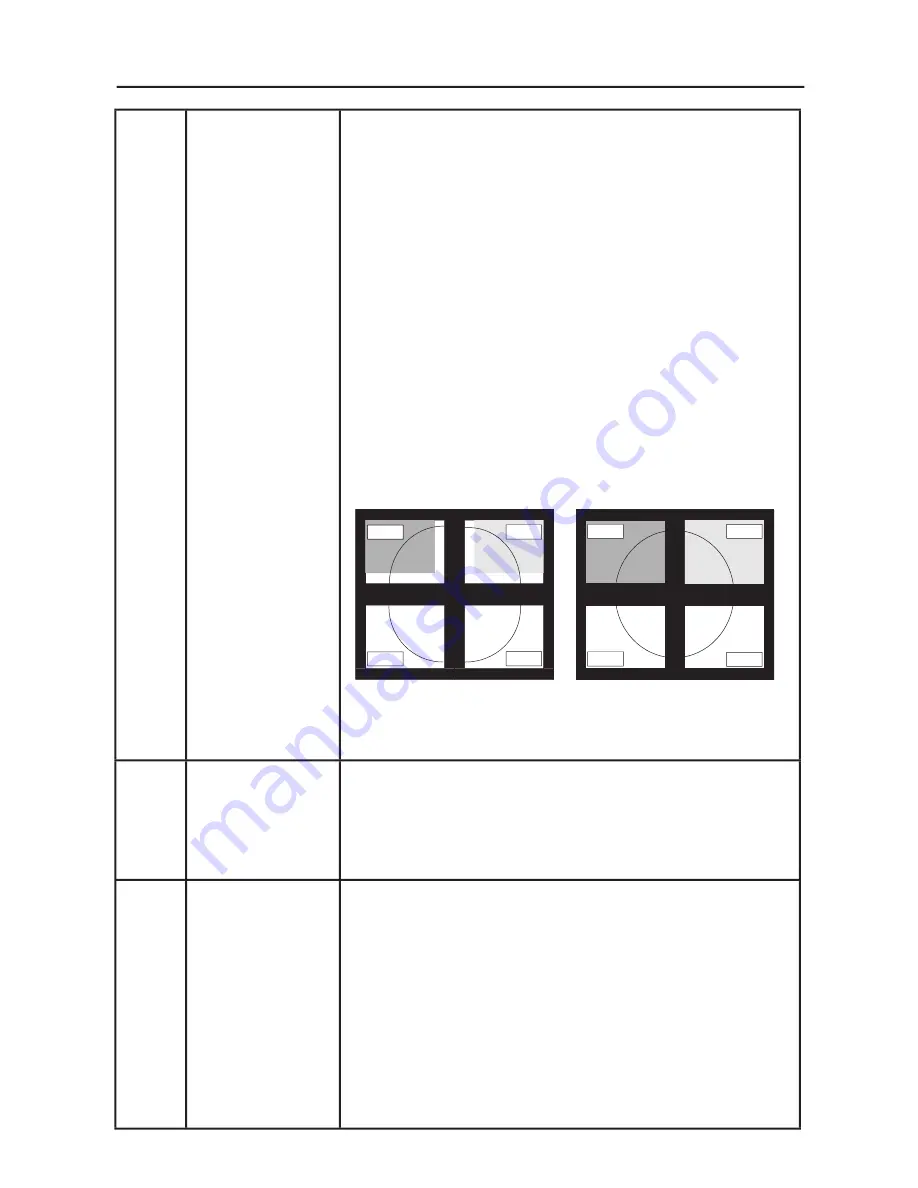
TILECOMP: Works in tandem with “TILE MATRIX” to            

compensate for the bezel width of the tiled monitors in order to 

accurately display the image. 

   TileComp using 4 monitors (black area shows monitor frames).

The EXPANSION mode will be set to “FULL” when the “TILE 

MATRIX” is activated.

Tag B

DATE & TIME

Sets the current date and time for the internal clock.

Date and Time has to be set in order for the “SCHEDULE” 

feature to work properly.

DAYLIGHT SAVING: For those timezones where Daylight     

Saving Time (Summertime) is observed. 

Tag C

SCHEDULE

Programs the monitor’s working schedule. Sets the hour and 

day of the week when the monitor powers on or off. Also sets 

the input port. Select “EXIT” to set schedule.

Using the “SCHEDULE” function allows you to set up to seven 

different scheduled time intervals when the LCD Monitor will 

be activated.  You can select the time the monitor turns on and 

turns off, the day of week the monitor is activated, and which 

input source the monitor will use for each scheduled activation 

period.  A check mark in the box next to the number of the 

schedule indicates that the selected schedule is in effect. 

Advanced OSM Controls

continued

monitor1

monitor2

monitor3

monitor4

monitor1

monitor2

monitor3

monitor4

TileComp OFF

TileComp ON

Содержание LCD1990SXP - MultiSync - 19" LCD Monitor

Страница 1: ...990SXp To learn about other special offers register online at www necdisplay com Pour en savoir plus long sur d autres offres spéciales inscrivez vous en ligne à www necdisplay com Para informarse sobre otras ofertas especiales regístrese en línea en www necdisplay com ...

Страница 2: ...e 57 Utilisation de la fonction de luminosité automatique 69 Utilisation de la fonction de CableCompMD 71 Utilisation recommandée 72 Fiche technique 75 Fonctions 76 Dépannage 78 Références 80 Garantie limitée 81 TCO 03 82 Informations du fabricant relatives au recylage et aux économies d énergie 83 Advertencia 85 Contenidos 86 Inicio rápido 87 Controles 93 Controles OSM avanzados 100 Uso de la fun...

Страница 3: ...ules These limits are designed to This equipment has been tested and found to comply with the limits for a Class B provide reasonable protection against harmful interference in a residential installation digital device pursuant to part 15 of the FCC Rules These limits are designed to provide reasonable protection against harmful interference in a residential installation digital device pursuant to...

Страница 4: ...ignal Cable 15 pin mini D SUB male to DVI A Video Signal Cable DVI D to DVI D cable User s Manual Cable cover Screws 4 for mounting the monitor to a flexible arm see page 8 Remember to save your original box and packing material to transport or ship the monitor Power Cord 15 pin mini D SUB male to DVI A User s Manual Cable Cover DVI D to DVI D cable Screws 4 Screws 4 ...

Страница 5: ...osh cable adapter NOTE To obtain the MultiSync Macintosh cable adapter call NEC Display Solutions of America Inc 800 632 4662 3 Place hands on each side of the monitor Tilt the LCD panel backwards to a 30 degree angle and lift up to the highest position Connect all cables to appropriate connectors Figure 4 4 To keep the cables neatly organized place them into the cable management system that is bu...

Страница 6: ... turned on using the front button DO NOT turn the vacation switch ON OFF repeatedly 9 For Analog input only Upon initial setup the No Touch Auto Adjust feature automatically adjusts the monitor to the optimal settings that are needed for most signal timings For further adjustments refer to the Controls section of this User s Manual for a full description of the OSM controls For download informatio...

Страница 7: ...place hands on each side of the monitor and lift or lower to the desired height Figure RL 1 NOTE Handle with care when raising or lowering the monitor screen Figure RL 1 Figure 7 Figure 8 Vacation Switch Power Button Figure 9 Figure 10 NOTE The Vacation Switch is a true on off switch If this switch is in the OFF position the monitor cannot be turned on using the front button ...

Страница 8: ... clockwise from Landscape to Portrait or counter clockwise from Portrait to Landscape Figure R 1 Note To toggle the orientation of the OSM menu between Landscape and Portrait modes refer to the Controls section of this user s manual Swivel Grasp both sides of the monitor screen with your hands and adjust the swivel as desired Figure TS 2 Tilt Grasp top and bottom sides of the monitor screen with y...

Страница 9: ... one hand around the base and one hand on the Quick Release Lever Move the Quick Release Lever in the direction indicated by the arrows Figure S 2 5 Lift up the bottom of the stand to unhook it from the monitor Figure S 3 The monitor can now be mounted using and alternate method Reverse the process to reattach stand NOTE Use only VESA compatible alternative mounting method 100mm pitch NOTE Handle ...

Страница 10: ... to attach the arm to the monitor Figure F 1 Quick Start continued CAUTION Use ONLY the 4 screws that are included when mounting to avoid damaging the monitor and the stand or arm For safety requirements the monitor must be mounted to an arm which guaranties the necessary stability under consideration of the weight of the monitor The LCD monitor should only be used with an approved arm e g GS mark...

Страница 11: ...ts the OSM sub menu Exits OSM Control menu 6 LEFT RIGHT Navigates to the left or right through the OSM Control menu 7 UP DOWN Navigates up or down through the OSM Control menu 8 RESET ROTATE OSM Resets the OSM back to factory settings Pressing when the OSM is not showing rotates the OSM Control menu between portrait and landscape mode See page 23 Tag9 OSM ROTATION 9 KEY GUIDE The Key Guide appears...

Страница 12: ...ns AUTO BRIGHTNESS There are three settings for Auto Brightness OFF Auto Brightness does not function 1 Adjusts the brightness automatically by detecting the brightness level of your environment and adjusting the monitor accordingly with the best BRIGHTNESS setting see page 35 for AmbiBright explanation making the viewing experience more comfortable 2 Adjusts the BRIGHTNESS level of the monitor to...

Страница 13: ...sfactory picture further tuning can be performed using the satisfactory picture further tuning can be performed using the satisfactory picture further Fine function Adjusting this setting improves focus clarity and image stability For Fine adjustment a Moiré test pattern should be used If the Fine setting is incorrect the screen would show horizontal banding like the drawing on the left The image ...

Страница 14: ... on the MAC the DVI Input mode on the monitor must be set to DIGITAL in the DVI SELECTION menu To set the DVI SELECTION to DIGITAL press the SELECT button then CONTROL button when the DVI signal cable is connected to the DVI I connector of the monitor Otherwise the MAC may not turn on NOTE Depending on the type of PC Video card or the type of video signal cable used the DVI SELECTION function may ...

Страница 15: ...OSM Control menu When in power save mode the LED on the front of the monitor blinks amber While in power save mode push any of the front buttons except for POWER and SELECT to return to normal operation When the amount of surrounding light returns to normal levels the monitor will automatically return to normal mode COLORCOMP This function electronically compensates for the slight variations in th...

Страница 16: ... To activate press the SELECT Left and Down buttons simultaneously while in the OSM menu To deactivate press SELECT then Left and Down buttons simultaneously while in the OSM menu 4 CUSTOM refer to the Advanced OSM Menu OSM TRANSPARENCY Adjusts the transparency of the OSM Menu OSM COLOR Tag window frame color Item select color and Adjust window frame color can be changed to Red Green Blue or Gray ...

Страница 17: ...or advanced user menu items see Advanced OSM Controls Note It is possible to change the DVI selection or to change the IPM settings while the NO SIGNAL or OUT OF RANGE messages are displayed OSM WARNINGS OSM Warning menus alert the user when there are problems with the input signal These warnings will disappear when the Exit button is pressed NO SIGNAL This warning appears when there is no Horizon...

Страница 18: ...kground screen brightness Contrast Adjusts the image brightness and contrast in relation to the background Auto Contrast Analog input only Adjusts the image displayed for non standard video inputs Auto Black Level Analog input only Adjusts the black level for non standard video inputs ECO Mode Decreases the amount of power consumed by reducing the brightness level 1 Decreases the brightness by 25 ...

Страница 19: ...e Press Left or Right to adjust G SHARPNESS Analog input only Adjusts the SHARPNESS setting of the GREEN component of the image Press Left or Right to adjust B SHARPNESS Analog input only Adjusts the SHARPNESS setting of the BLUE component of the image Press Left or Right to adjust DVI LONG CABLE Digital input only Compensates for image degradation caused by using a long DVI cable There are 4 poss...

Страница 20: ...POSITION Sets Vertical Image Position within the display area of the LCD Press Left or Right to adjust H SIZE Analog input only Increases or decreases the horizontal or vertical size If the Auto Adjust function does not give a satisfactory picture further tuning can be performed manually using the H Size or V Size function dot clock To manually adjust the monitor a Moiré test pattern should be use...

Страница 21: ...S H ZOOM Available in Custom Expansion mode only The image is expanded from 1 to 3 times in the horizontal H EXPANSION direction by 0 01 increments V ZOOM Available in Custom Expansion mode only The image is expanded from 1 to 3 times in the vertical V EXPANSION direction by 0 01 increments ZOOM POS Available in Custom Expansion mode only LEFTTOP LEFTTOP indicates the set point for image expansion...

Страница 22: ...usts the black level after the signal is converted from analog to digital Tag 6 COLOR CONTROL ACCUCOLOR CONTROL SYSTEM Seven preset color settings Settings 1 2 3 and 5 can be adjusted For each of these settings the following levels can be adjusted Color temperature Red Yel low Green Cyan Blue and Magenta The sRGB and NATIVE color presets are standard and cannot be changed The PROGRAMMABLE setting ...

Страница 23: ...wer saving mode after a period of inactivity The IPM has three settings OFF Monitor does not go into power save mode when the input signal is lost STANDARD Monitor enters power save mode automatically when the input signal is lost OPTION Monitor enters power save mode automatically when the amount of surrounding light goes below the level that is determined by the user IPM SETTING Adjusts the lumi...

Страница 24: ...all OSM control functions When attempting to activate OSM controls while in the Lock Out mode a screen will appear indicating the OSM controls are locked out There are four ways to use OSM LOCK OUT function 1 OSM LOCK OUT with BRIGHTNESS and CONTRAST control This mode locks all OSM functions except for BRIGHTNESS and CONTRAST To activate press the SELECT and Up buttons simultaneously while in the ...

Страница 25: ...reset allows the user to reset most of the OSM control settings back to the factory settings Individual settings can be reset by highlighting the control needing to be reset and pressing the RESET button Tag 9 GRAYSCALE MODE This mode changes the display s screen image from color to grayscale There are 3 settings for monochrome mode OFF The display s screen image is normal MODE1 The monitor uses o...

Страница 26: ...he separate or composite input signals Try this option if the FINE adjustment does not successfully eliminate the noise SOG THRESHOLD Analog input only Adjusts the sensitivity of the Sync On Green input signals Adjusts the slice level when separating a synchronization from Sync On Green signal input Press Left or Right to select EDGE LOCK Operating your monitor at a non standard timing may cause i...

Страница 27: ... TILE MATRIX is activated Tag B DATE TIME Sets the current date and time for the internal clock Date and Time has to be set in order for the SCHEDULE feature to work properly DAYLIGHT SAVING For those timezones where Daylight Saving Time Summertime is observed Tag C SCHEDULE Programs the monitor s working schedule Sets the hour and day of the week when the monitor powers on or off Also sets the in...

Страница 28: ...e weekly Schedules are numbered 1 7 If two schedules are programmed for the same time then the highest numbered schedule has pri ority For example schedule 7 will take priority over schedule 5 When schedules are overlapping a scheduled Power ON time has priority over a scheduled Power OFF time When the OFF TIMER see page 21 is set the SCHEDULE function is disabled Before powering off a message wil...

Страница 29: ... that the monitor will go down to when the ambient light level is low Make sure the room is at its darkest when setting this level Then use the front buttons to move the cursor Then use the front buttons to move the cursor up to the BRIGHTNESS setting Choose the up to the BRIGHTNESS setting Choose the desired brightness level Figure 3 Figure 1 Figure 2 Figure 2 Figure 3 Figure 3 Using the Auto Bri...

Страница 30: ...ween bright and dim lighting conditions set at factory L1 BRIGHTNESS level set for the monitor to use when ambient lighting level is high L1 Lb L2 BRIGHTNESS level set for the monitor to use when ambient lighting level is low L2 Lb L1 and L2 are the brightness levels set by the user to compensate for changes in ambient lighting Figure 4 When the Auto Brightness function is enabled the Brightness l...

Страница 31: ...Control menu EXIT LEFT RIGHT UP or DOWN To exit the Advanced OSM Control Menu Turn off and restart your monitor Perform AUTO ADJUST by using the OSM function Press select to adjust For additional information on user controls and software utilities visit our website at www necdisplay com SIMPLE X FULL X DETAIL Size Fine Position O O O X O O O 1 seconds 1 5 seconds 5 seconds Time Contrast Long cable...

Страница 32: ...rneararadiatororotherheatsources Do not put anything on top of monitor The power cable connector is the primary means of detaching the system from the power supply The monitor should be installed close to a power outlet which is easily accessible Handle with care when transporting Save packaging for transporting Image Persistence Image persistence is when a residual or ghost image of a previous im...

Страница 33: ...n your screen If reflected light makes it hard for you to see your screen use an antiglare filter Clean the LCD monitor surface with a lint free non abrasive cloth Avoid using any cleaning solution or glass cleaner Adjust the monitor s brightness and contrast controls to enhance readability Use a document holder placed close to the screen Position whatever you are looking at most of the time the scr...

Страница 34: ...e Human Factors Society Inc P O Box 1369 Santa Monica California 90406 Cleaning the LCD Panel When the liquid crystal panel becomes dusty or dirty wipe gently with a soft cloth Do not rub the LCD panel with hard or coarse material Do not apply pressure to the LCD surface Do not use OA cleaner as it will cause deterioration or discolor the LCD surface Cleaning the Cabinet Unplug the power supply Ge...

Страница 35: ...ONS cites 1152 x 870 1 at 75 Hz NEC DISPLAY SOLUTIONS cites 1152 x 870 1 at 75 Hz NEC DISPLAY SOLUTIONS cites 1280 x 960 1 at 60 Hz recommended resolution at 60Hz for optimal 1280 x 960 1 at 60 Hz recommended resolution at 60Hz for optimal 1280 x 960 1 at 60 Hz recommended resolution at 60Hz for optimal 1280 x 1024 at 60 Hz to 75 Hz display performance 1280 x 1024 at 60 Hz to 75 Hz display perform...

Страница 36: ...nalog video and IEEE 1394 995 The VESA committee has recognized that DFP is a subset of P D As a DVI based connector for the digital input pins only a simple adapter is necessary for compatibility between P D and other DVI based digital connector such as DVI and DFP Pivoting Stand Allows users to adjust the monitor to the orientation that best fits their application either Landscape orientation for...

Страница 37: ...ical desktop space for multiple monitor applications NaViSet software Offers an expanded and intuitive graphical interface allowing you to more easily adjust OSM display settings via mouse and keyboard CableComp Automatic long cable compensation prevents image quality degradation caused by long cable lengths Advanced No Touch Auto Adjust Provides optimal image settings upon initial power on and cl...

Страница 38: ...nitor Check the Vacation Switch on the left side of the monitor Image Persistence Message OUT OF RANGE is displayed screen is either blank or shows rough images only Image is displayed only roughly pixels are missing and OSM warning OUT OF RANGE is displayed Either signal clock or resolution is too high Choose one of the supported modes OSM warning OUT OF RANGE is displayed on a blank screen Signa...

Страница 39: ...re the ECO MODE AUTO BRIGHTNESS and COLORCOMP functions are turned off If the brightness fluctuates make sure that the AUTO BRIGHTNESS function is turned off Display image is not sized properly Use the OSM Image Adjust controls to increase or decrease the Coarse total Check to make sure that a supported mode has been selected on the display card or system being used Consult display card or system m...

Страница 40: ...ay com Online Technical Support www necdisplay com Sales and Product Information Sales Information Line 888 632 6487 Canadian Customers 866 771 0266 Ext 4037 Government Sales 800 284 6320 Government Sales email gov necdisplay com Electronic Channels World Wide Web www necdisplay com Product Registration www necdisplay com European Operations www nec display solutions com Drivers and Downloads www ...

Страница 41: ...ned to NEC DISPLAY SOLUTIONS for service MUST have prior approval which may be obtained by calling 1 800 632 4662 The Product shall not have been previously altered repaired or serviced by anyone other than a service facility authorized by NEC DISPLAY SOLUTIONS to render such service the serial number of the product shall not have been altered or removed In order to be covered by this warranty the...

Страница 42: ...nergy saving mode after a certain time beneficial both for the user and the environment Electrical safety Emissions Electromagnetic fields Noise emissions Ecology The product must be prepared for recycling and the manufacturer must have a certified environmental management system such as EMAS or ISO 14 001 Restrictions on chlorinated and brominated flame retardants and polymers heavy metals such as ca...

Страница 43: ...n recycling your old NEC monitors please visit our website at USA http www necdisplay com Europe http www nec display solutions com Japan http www nec display com Country specific recycling programs can also be found at Sweden http www el retur se Germany http www recyclingpartner de Holland http www mirec nl Japan http www diarcs com Energy saving This monitor features an advanced energy saving ca...

Страница 44: ...carrying the mark left must be disposed of separately from normal household waste This includes monitors and electrical accessories such as signal cables or power cords When you need to dispose of your NEC display products please follow the guidance of your local authority or ask the shop where you purchased the product or if applicable follow any agreements made between yourself and NEC The mark ...

Страница 45: ...nce et si non installé protectionraisonnablecontrelesinterférencesnuisiblesdansuneinstallationrésidentielle et utilisé conformément aux instructions peut causer des interférences nuisibles aux Cet équipement génère utilise et peut radier une énergie de fréquence et si non installé et utilisé conformément aux instructions peut causer des interférences nuisibles aux Cet équipement génère utilise et ...

Страница 46: ... signal vidéo DVI D au câble DVI D Manuel de l utilisateur Protecteur de câble Vis 4 pour monter le moniteur à un bras flexible voir page 50 Vis 4 pour monter le moniteur à un bras flexible voir page 50 Conserver le carton et les matériaux d emballage d origine pour faciliter le transport et l expédition du moniteur Câble d alimentation Mini D SUB 15 broches mâle à DVI A Manuel de l utilisateur Prot...

Страница 47: ... Pour obtenir un adaptateur de câble MultiSync Macintosh veuillez joindre NEC Display Solutions of America Inc au 800 6324662 3 Placez vos mains de chaque côté du moniteur Inclinez le panneau ACL vers l arrière de 30 en le soulevant dans sa position la plus haute Connectez tous les câbles aux connecteurs appropriés Figure 4 4 Pour garder les câbles correctement organisés placez les dans le système...

Страница 48: ...sition arrêt le moniteur ne peut pas se mettre sous tension en utilisant la touche frontale NE PAS MODIFIER la position de ce commutateur de veille de façon répétée 9 Entrée analogique seulement Lors du réglage initial le dispositif d ajustement sans intervention automatique ajuste le moniteur sur les réglages optimaux nécessaires pour la plupart des synchronisations de signaux Pour des ajustement...

Страница 49: ...niteur et inclinez ou descendez à la hauteur désirée Figure RL 1 REMARQUE élevez ou descendez l écran du moniteur avec précaution Figure RL 1 Figure 7 Figure 8 Veille Interrupteur Alimentation Bouton Figure 9 Figure 10 REMARQUE Le commutateur de veille est un réel commutateur de mise sous hors tension Si ce Bouton est en position arrêt le moniteur ne peut pas se mettre sous tension en utilisant le...

Страница 50: ...lles d une montre du mode paysage au mode portrait ou dans le sens inverse du mode portrait au mode paysage Figure R 1 Remarque Pour alterner l orientation du menu OSM du mode paysage au mode portrait consultez la section Commandes de ce manuel d utilisation Inclinaison Attrapez l écran du moniteur des deux côtés avec vos mains et réglez l inclinaison comme vous la souhaitez figure TS 2 Pivotement ...

Страница 51: ...e main autour du support et l autre sur le levier de dégagement rapide Déplacez le levier de dégagement rapide dans le sens indiqué par les flèches Figure S 2 5 Relevez le socle du support pour le décrocher du moniteur Figure S 3 Le moniteur peut maintenant être remonté en inversant le la méthode Inversez le processus pour remettre le socle en place REMARQUE Utilisez uniquement une méthode de monta...

Страница 52: ... le bras du moniteur Figure F 1 Mise en train Suite MISE EN GARDE Utilisez uniquement les 4 vis qui sont incluses pour le montage afin d éviter d endommager le moniteur le support ou le bras Les exigences sur la sécurité requièrent que le moniteur soit monté sur un bras garantissant la stabilité de l appareil et capable de soutenir son poids Le moniteur ACL ne doit être utilisé qu avec un bras appr...

Страница 53: ...SM 7 UP DOWN HAUT BAS Navigue de haut en bas dans le menu de commande OSM 8 RESET ROTATE OSM RÉINITIALISER ROTATION du OSM Réinitialise les réglages OSM aux paramètres effectués à l usine à appuyer lorsque l OSM ne semble pas changer le menu de commande OSM entre le mode portrait et le mode paysage voir la page 66 Tag9 ROTATION du OSM 9 GUIDE DES ACCÈS Le guide des accès apparaît sur l écran quand...

Страница 54: ...té automatique en détectant le niveau de luminosité de votre environnement et ajuste le moniteur selon le meilleur réglage de LUMINOSITÉ voir page 77 pour les explications du Ambibright de votre environnement et ajuste le moniteur selon le meilleur réglage de LUMINOSITÉ voir page 77 pour les explications du Ambibright de votre environnement et ajuste le moniteur selon le meilleur réglage donnant u...

Страница 55: ...ction Finesse L ajustement de ce réglage améliore la mise au point la netteté et la stabilité de l image Pour ce faire vous devrez utiliser un motif de test Moiré Si le réglage de Finesse n est pas correctement étalonné vous obtiendrez le résultat illustré sur le dessin de gauche L image doit être impeccable FINESSE AUTO Entrée analogique seulement Ajuste automatiquement les réglages de précision ...

Страница 56: ... sur mettre sous tension le MAC le mode d entrée DVI du moniteur doit être réglé sur NUMÉRIQUE appuyez sur la touche de SÉLECTION puis sur la touche NUMÉRIQUE dans la sélection DVI OSM Pour régler la SÉLECTION DVI sur NUMÉRIQUE appuyez sur la touche de SÉLECTION puis sur la touche NUMÉRIQUE dans la sélection DVI OSM Pour régler la SÉLECTION DVI sur COMMANDE quand le signal DVI est connecté au conn...

Страница 57: ...e ambiante passe sous le seuil déterminé par l utilisateur Le niveau peut être déterminé sur le tag 7 du menu de commandes OSM Option avancée En mode économique le DEL sur l avant du moniteur clignote en orangé En mode économique appuyez sur une des touches frontales exceptées les touches TENSION et SÉLECTION pour retourner en mode normale de En mode économique appuyez sur une des touches frontale...

Страница 58: ...la Pour activer appuyez simultanément sur les touches SÉLECTION et EN HAUT dans le menu OSM Pour désactiver appuyez simultanément sur les touches SÉLECTION et EN HAUT dans le menu OSM 2 VERROUILLAGE OSM sans contrôle Ce mode empêche l accès à toutes les commandes OSM Pour activer appuyez simultanément sur les touches SÉLECTION et DROITE Pour désactiver appuyez simultanément sur les touches SÉLECTI...

Страница 59: ...tions sur la résolution actuellement affichée par le moniteur Fournit aussi les informations techniques incluant des informations sur la synchroni sation programmée utilisée ainsi que les fréquences horizontales et verticales AVERTISSEMENT OSM Les menus d avertissement OSM mettent en garde l utilisateur quand des problèmes interviennent dans le signal d entrée Ces aver tissements disparaissent quan...

Страница 60: ...isez les touches pour faire l ajustement TER pour retourner au menu précédent Tag 1 BRIGHTNESS Luminosité Ajuste la luminosité globale de l image et du fond CONTRAST Contraste Ajuste la luminosité et le contraste de l image par rap port au fond Ajuste la luminosité et le contraste de l image par rap port au fond Ajuste la luminosité et le contraste de l image par rap AUTO CONTRAST Contraste Auto E...

Страница 61: ... pour ajuster G SHARPNESS Netteté G Entrée analogique seulement Ajuste le réglage de la NETTETÉ de la composante VERT de l image Appuyez sur droite ou gauche pour ajuster B SHARPNESS Netteté B Entrée analogique seulement Ajuste le réglage de la NETTETÉ de la composante BLEU de l image Appuyez sur droite ou gauche pour ajuster DVI LONG CABLE Câble long DVI Entrée numérique uniquement Compense la dé...

Страница 62: ...ésolution ni la fréquence de rafraî chissement n ont été modifiées Si plusieurs ordinateurs sont branchés au moniteur et que chacun transmet des signaux très semblables ou même identiques en termes de résolution et de fréquences de rafraîchissement le moniteur reconnaît qu il y a un nouveau signal et optimisera automatiquement l image sans intervention de l utilisateur OFF ARRÊT A NTAA est désactiv...

Страница 63: ...gnal d entrée L ajustement intervient approximativement toutes les 33 minutes ou quand un changement de synchronisation de signal est détecté H RESOLUTION Résolution H Ajuste la résolution horizontale Appuyez sur droite ou gauche pour ajuster V RESOLUTIONS Résolution V Ajuste la résolution verticale Appuyez sur droite ou gauche pour ajuster EXPANSION Expansion Sélectionne le mode zoom FULL PLEIN L...

Страница 64: ...réréglées OFFSET CORRECTION ajuste numériquement le niveau du noir une fois que le signal est converti d analogique à numérique Tag 6 COLOR CONTROL Contrôle de Couleur SYSTÈME DE COMMANDE ACCUCOLOR Sept réglages de couleurs préréglées Les réglages 1 2 3 et 5 peuvent être ajustés Pour chacun de ces réglages les niveauz suivant peuvant être ajustés La tem pérature de couleur rouge jaune vert cyan bl...

Страница 65: ...s d entrée du moniteur quand le moniteur est en mode de première détection le moniteur passera automatiquement sur la nouvelle source LAST DERN Si LAST DERN est sélectionné comme option de DÉTECTION VIDÉO le moniteur affiche LAST DERN Si LAST DERN est sélectionné comme option de DÉTECTION VIDÉO le moniteur affiche LAST DERN Si LAST DERN est sélectionné comme option de automatiquement le nouveau sign...

Страница 66: ... Appuyez sur droite ou gauche pour ajuster OSM H POSITION Position H OSM Vous pouvez choisir l endroit où vous souhaitez que l image de contrôle OSM apparaisse à l écran Le fait de sélectionner l emplacement OSM vous permet d ajuster manuellement la position du menu de contrôle OSM à gauche à droite OSM V POSITION Position V OSM Vous pouvez choisir l endroit où vous souhaitez que l image de contrô...

Страница 67: ...L ENTRÉE SÉLECTION HOT KEY ACCÈS RAPIDE BRIGHTNESS CONTRAST LUMINOSITÉ CONTRASTE ECO MODE MODE SEL ENTRÉE SÉLECTION HOT KEY ACCÈS RAPIDE BRIGHTNESS ÉCO WARNING AVERTISSEMENT RESOLUTION NOTIFIER OSM CONTRAST LUMINOSITÉ CONTRASTE ECO MODE MODE ÉCO WARNING AVERTISSEMENT RESOLUTION NOTIFIER OSM CONTRAST LUMINOSITÉ CONTRASTE ECO MODE MODE LOCKOUT NOTIFICAT RÉSOLUTION VERROUILLAGE OSM ÉCO WARNING AVERTI...

Страница 68: ...ANTE VIDÉO Entrée analogique seulement Règle la bande passante du signal vidéo Peut être utilisée pour éliminer les bruits vidéo venant d un signal faible Appuyez sur droite ou gauche pour ajuster SYNC THRESHOLD SEUIL DE SYNCHRONISATION Entrée analogique seulement Règle le niveau de coupe d un signal de synchronisation Appuyez sur SELECTION pour déplacer le menu d ajustement Ajuste la sensibilité ...

Страница 69: ...res du moniteur Le MODE EXPANSION sera réglé sur INTÉGRAL quand la MATRICE EN MOSAÏQUE est activée Le MODE EXPANSION sera réglé sur INTÉGRAL quand la MATRICE EN MOSAÏQUE est activée Le MODE EXPANSION sera réglé sur INTÉGRAL quand la MATRICE Tag B DATE TIME Date et Heure Règle la date et l heure courantes pour l horloge interne La date et l heure ont été réglées que le dispositif de PRO GRAMME fonc...

Страница 70: ...précédent sera utilisée La sélection de EVERY DAY CHAQUE JOUR dans un programme est prioritaire sur les autres programmes qui sont installés pour fonctionner chaque semaine Quand les programmes se chevauchent le temps de mise SOUS tension programmé a la priorité sur le temps de mise HORS tension programmé S il y a deux programmes prévus en même temps alors le programme dont le numéro est le plus é...

Страница 71: ...uminosité désiré Figure 2 2 Réglage du niveau de sombre Il s agit du niveau de sombre que le moniteur utilisera quand le niveau de lumière ambiante est bas Assurez vous que la pièce est la plus sombre pendant le réglage de ce niveau sombre pendant le réglage de ce niveau Utilisez alors les touches frontales pour déplacer le curseur sur réglage de LUMINOSITÉ Choisissez le niveau de déplacer le curs...

Страница 72: ...veau de LUMINOSITÉ réglé pour le moniteur en utilisation quand le niveau de lumière ambiante est élevé L1 Lb L2 Niveau de LUMINOSITÉ réglé pour le moniteur en utilisation quand le niveau de lumière ambiante est élevé L1 Lb L2 Niveau de LUMINOSITÉ réglé pour le moniteur en utilisation quand le niveau de lumière ambiante est élevé L1 Lb de lumière ambiante est bas L2 Lb L1 et L2 sont réglés sur les ...

Страница 73: ...anément sur les boutons MARCHE et SÉLECTION Mettez votre moniteur sous tension en appuyant simultanément sur les boutons Appuyez sur la touche OSM pour entrer dans le menu de commande OSM option avancée EXIT GAUCHE DROITE HAUT BAS Pour sortir du menu de commande OSM Option avancée Mettez votre moniteur hors tension puis remettez le en marche Effectuez un RÉGLAGE AUTO en utilisant la fonction OSM A...

Страница 74: ...e fluorescent qui se trouve à l intérieur du moniteur ACL contient du mercure L utilisateur doit se Ne tordez pas le cordon d alimentation conformer aux règlements municipaux en vigueur en ce qui a trait à la mise au rebut du tube Ne tordez pas le cordon d alimentation conformer aux règlements municipaux en vigueur en ce qui a trait à la mise au rebut du tube Ce moniteur ne doit pas être utilisé da...

Страница 75: ...hiffon doux non abrasif Évitez Si la réflexion de la lumière nuit à la qualité de l affichage utilisez un filtre antireflet Nettoyez la surface du moniteur ACL avec un chiffon doux non abrasif Évitez Si la réflexion de la lumière nuit à la qualité de l affichage utilisez un filtre antireflet d utiliser une solution de nettoyage ou un produit de nettoyage pour le verre Ajustez l intensité lumineuse et le c...

Страница 76: ...90406 Entretien de l écran ACL S il est poussiéreux ou sali nettoyez l écran d affichage à cristaux liquides ACL à l aide d un chiffon doux Ne frottez pas l écran ACL avec d une substance ou d un chiffon abrasif N appliquez pas de pression sur l écran ACL Veuillez ne pas utiliser du nettoyant OA parce qu il causera une détérioration ou une décoloration sur la surface ACL Nettoyage du boîtier Coupez...

Страница 77: ... 85 Hz 1152 x 870 1 à 75Hz 1152 x 870 1 à 75Hz NEC Display Solutions of America Inc recommande 1280 x 960 1 à 60 Hz 1280 x 960 1 à 60 Hz recommandé pour une résolution à 60Hz optimale 1280 x 1024 à 60 Hz à 75 Hz performance d affichage 1280 x 1024 à 60 Hz à 75 Hz performance d affichage 1024 x 1280 1 à 60 Hz 1024 x 1280 1 à 60 Hz Zone d affichage active en paysage Horiz 376 mm 14 8 pouces Zone d affic...

Страница 78: ...mité VESA a reconnu que le DFP est un sous jeu de P D En tant que connecteur basé DVI pour broches d entrée numériques un simple adaptateur suffit pour assurer la compatibilité entre P D et les autres connecteurs numériques basés DVI tels que DVI et PFD Support pivotant Permet aux utilisateurs d ajuster le moniteur dans l orientation qui cor respond le mieux à leur application orientation paysage p...

Страница 79: ...mme à la verticale pour des applications à multiples moniteurs Logiciel NaViSetMD Offre une interface graphique étendue et intuitive vous permettant de régler les paramètres d affichage OSM plus aisément avec la souris et le clavier CableCompMD La compensation automatique des câbles longs évite la dégradation de la qualité de l image causée par la longueur des câbles Autoréglage avancé sans interve...

Страница 80: ...ors tension et le réinitialiser Vérifiez le commutateur de veille sur le côté gauche du moniteur Image persistante Le message HORS LIMITE est affiché l écran est vide ou montre des images grossières seulement L image est affichée grossièrement seulement des pixels sont manquants et l avertissement OSM HORS LIMITE est affiché L horloge du signal et la résolution sont trop élevés Choisissez un des modes...

Страница 81: ...surez vous que les fonctions MODE ÉCO de LUMINOSITÉ AUTO et COMP COLEUR L image n est pas très lumineuse soient éteintes Si la luminosité est fluctuante assurez vous que la fonction de LUMINOSITÉ AUTO est éteinte L image affichée est mal dimensionnée Utilisez les commandes OSM pour augmenter ou diminuer la trame totale Vérifiez si le mode sélectionné par la carte d affichage ou le système utilisé est ...

Страница 82: ...nce technique en ligne www necdisplay com Information sur les ventes et les produits Ligne d information sur les ventes 888 632 6487 Clients canadiens 866 771 0266 poste 4037 Ventes gouvernementales 800 284 6320 Courriel des Ventes gouvernementales gov necdisplay com Canaux électroniques World Wide Web www necdisplay com Enregistrement de produit www necdisplay com Activités en Europe www nec disp...

Страница 83: ...u vendeur de l acheteur et le numéro de série du produit Pour obtenir un service au titre de la garantie vous devez expédier le produit en port prépayé ou le déposer chez le revendeur agréé qui vous l a vendu ou dans un autre centre autorisé par NEC DISPLAY SOLUTIONS soit dans l emballage d origine soit dans un emballage similaire procurant un niveau équivalent de protection Avant de retourner tou...

Страница 84: ...conomiseur d énergie après une durée déterminée intéressant pour l utilisateur comme pour l environnement Sécurité de l installation électrique Émissions Champs électromagnétiques Émissions de bruit Écologie Le produit doit être préparé pour le recyclage et le fabricant doit posséder un système de gestion environnemental certifié comme EMAS ou ISO 14 001 Restrictions sur les produits ignifugeants e...

Страница 85: ...ons et pour obtenir de l aide pour recycler votre ancien moniteur NEC veuillez visiter notre site Web à USA http www necdisplay com Europe http www nec display solutions com Japon http www necdisplay com Vous pouvez trouver également des programmes de recyclage sur les sites suivants Suède http www el retur se Allemagne http www recyclingpartner de Hollande http www mirec nl Japon http www diarcs ...

Страница 86: ...héant conformez vous à toute entente conclue entre NEC et vous La marque apposée sur les produits électriques et électroniques est valide uniquement dans les états membres de l Union européenne À l extérieur de l Union européenne En ce qui a trait à la mise au rebut de produits électriques et électroniques usés à l extérieur de l Union européenne veuillez communiquer avec les autorités locales pou...

Страница 87: ... Este equipo genera usa y puede irradiar energía de frecuencia radial y si no se instala y protección razonable contra interferencia perjudicial en una instalación residencial Este usa de acuerdo con las instrucciones puede causar interferencia nociva a las comuni equipo genera usa y puede irradiar energía de frecuencia radial y si no se instala y usa de acuerdo con las instrucciones puede causar ...

Страница 88: ...avijas macho a DVI A Cable de señal de video DVI D a DVI D cable Manual del usuario Tapa de cable Tornillos 4 para la instalación del monitor en un brazo flexible Ver la página 92 Recuerde guardar la caja y el material de embalaje original para transportar o enviar el monitor Cable de alimentación mini D SUB 15 clavijas macho a DVI A Manual del usuario Tapa de cable DVI D a DVI D cable Tornillos 4 ...

Страница 89: ...r el adaptador de cable MultiSync Macintosh co muníquese con NEC Display Solutions of America Inc al 800 632 4662 3 Coloque las manos en ambos lados del monitor Incline el panel LCD hacia atrás en un ángulo de 30 grados y levántelo hasta la posición más elevada Conecte todos los cables a los conectores apropiados Figura 4 4 Para mantener los cables cuidadosamente organizados colóquelos en el siste...

Страница 90: ...tor no puede prenderse usando el botón del frente NO encienda y apague reiteradamente el interruptor vacation 9 Para entrada análoga únicamente Durante la configuración inicial la función No Touch Auto Adjust ajusta automáticamente el monitor a la configuración óptima que se necesita para la mayoría de las temporizaciones de señal Para llevar a cabo otros ajustes consulte la sección Controles de est...

Страница 91: ...onitor y súbalo o bájelo hasta conseguir la posición deseada Figura RL 1 NOTA Manipule con cuidado cuando suba o baje la pantalla del monitor Figura RL 1 Figura 7 Figura 8 Interruptor Vacation Interruptor Vacation Interruptor Botón de encendido Figura 9 Figua 10 NOTA El interruptor vacation es un interruptor de encendido apagado Si este interruptor está en posición de APAGADO el monitor no puede p...

Страница 92: ...e las agujas del reloj de modo horizontal a modo vertical o en sentido contrario a las agujas del reloj de modo vertical a modo horizontal Figura R 1 Nota Para que el menú OSM pase del modo horizontal al modo vertical consulte la sección Controles de este manual del usuario Giro Sujete ambos lados de la pantalla del monitor con las manos y gírelo como desee Figura TS 2 Inclinación Sujete el monito...

Страница 93: ...a mano alrededor de la base y la otra en la palanca de liberación rápida Mueva la palanca de liberación rápida en la dirección indicada por las flechas Figura S 2 5 Levante la parte de abajo del soporte para desengancharlo del monitor Figura S 3 Ahora se puede montar el monitor utilizando un método alternativo Revierta este proceso para volver a colocar la base NOTA Use sólo el método de montaje co...

Страница 94: ...nistran con el producto para conectar el brazo al monitor Figura F 1 Inicio rápido continuación PRECAUCIÓN Use SÓLO los 4 tornillos originales para el montaje para evitar que el monitor y el soporte o brazo se dañen Para cumplir con las normas de seguridad el monitor debe estar montado a un brazo que garantice la estabilidad necesaria de acuerdo con el peso del monitor El monitor LCD sólo se debe ...

Страница 95: ...Se desplaza hacia la izquierda o hacia la derecha en el menú de control OSM 7 UP DOWN ARRIBA ABAJO Se desplaza hacia arriba o hacia abajo en el menú de control OSM 8 RESET ROTATE OSM RESTABLECER ALTERNAR OSM Restablece la configuración de OSM a la configuración de fábrica Al presionarlo cuando no se visualiza el OSM alterna el menú de control OSM entre el modo vertical y horizontal Vea la página 108...

Страница 96: ...da BRILLO AUTOM Hay tres opciones de configuración para el ajuste au tomático del brillo APAGADO El brillo automático no funciona 1 Ajusta el brillo automáticamente al detectar el nivel de brillo de su ambiente y al ajustar el monitor de acuerdo con la mejor configuración de BRILLO consulte la página 119 para obtener información acerca de AmbiBright para lograr la mejor calidad de imagen 2 Ajusta el...

Страница 97: ...ciones Auto Ajuste y Anchura puede realizar un ajuste más preciso mediante la función Estabilidad Al ajustar esta configura ción mejora el enfoque la claridad y la estabilidad de la imagen Para ajustar la Estabilidad se debe utilizar una prueba de muaré Si la configuración de Estabi lidad es incorrecta la pantalla muestra franjas horizontales como el dibujo de la izquierda La imagen debe ser nítida ...

Страница 98: ...se como DIGITAL en el menú SELECCIÓN DVI Para configurar la SELECCIÓN DVI como DIGITAL entrada de DVI del monitor debe configurarse como DIGITAL en el menú SELECCIÓN DVI Para configurar la SELECCIÓN DVI como DIGITAL entrada de DVI del monitor debe configurarse como DIGITAL en el menú presione el botón SELECCIONAR y luego el botón CONTROL cuando el cable de señal DVI esté conectado al conector DVI I de...

Страница 99: ...luminación ambiente está por debajo del nivel determinado por el usuario Se puede determinar el nivel en la Entrada 7 del menú de control OSM avanzado Durante el modo ahorro de energía el LED en la parte frontal del monitor parpadea en color ámbar Mientras se encuentre en el modo ahorro de energía presione cualquier botón frontal excepto ENCENDIDO y SELECCIONAR para volver a la operación normal Cu...

Страница 100: ...M Para desactivarlo presione simultáneamente los botones SELECCIONAR y Arriba mientras se encuentre en el menú OSM 2 BLOQUEO DE OSM sin control Este modo impide el acceso a todas las fun ciones OSM Para activarlo presione simultáneamente los botones SELECCIO NAR y Derecha Para desactivarlo presione simultáneamente los botones SELECCIONAR y Derecha mientras se encuentre en el menú OSM 3 BLOQUEO DE ...

Страница 101: ... que se está utilizando como también las frecuencias horizontales y verticales ADVERTENCIAS OSM Los menús Advertencias OSM avisan al usuario cuando hay problemas con la señal de entrada Estas advertencias desaparecen cuando se presiona el botón Salir NO HAY SEÑAL Esta advertencia aparece cuando no hay sincronización horizontal ni vertical Después del encendido o cuando se modifica la señal de entra...

Страница 102: ...ELECCIONAR Use los botones para realizar los ajustes Una vez que la configuración se encuentre en el nivel deseado presione SELECCIONAR deseada y presione SELECCIONAR Use los botones para realizar los ajustes Una y luego SALIR para volver al menú anterior vez que la configuración se encuentre en el nivel deseado presione SELECCIONAR y luego SALIR para volver al menú anterior vez que la configuración ...

Страница 103: ...z B para entrada análoga únicamente Nitidez B para entrada análoga únicamente Nitidez B Ajusta la configuración NITIDEZ del componente AZUL de la imagen Presione Izquierda o Derecha para ajustar DVI LONG CABLE Cable largo DVI para entrada digital únicamente Cable largo DVI para entrada digital únicamente Cable largo DVI Compensa para la degradación de la imagen causada usando un cable largo de DVI ...

Страница 104: ... cambiado Si varias PC están conecta das al monitor y cada una transmite señales muy similares o inclusive la misma en función de la resolución y velocidad de actualización el monitor reconoce que existe una nueva señal y automáticamente optimiza la imagen sin necesidad de la ayuda del usuario OFF APAGADO A NTAA está deshabilitado ON ENCENDIDO Si se detecta un cambio de señal A NTAA ajustará el mo...

Страница 105: ...uado se detecta una modificación en la temporización de señal H RESOLUTION Resolución H Ajusta la resolución horizontal Presione Izquierda o Derecha para ajustar V RESOLUTION Resolución V Ajusta la resolución vertical Presione Izquierda o Derecha para ajustar EXPANSION Expansión Selecciona el modo zoom FULL COMPLETO La imagen se amplía a 1280 x 1024 independientemente de la resolución ASPECT ASPECT...

Страница 106: ...Curva de acuerdo con DICOM GSDF para uso con imá genes en la escala de grises PROGRAMABLE Se puede cargar una curva de gamma programable mediante software de NEC como GammaComp Gamma CompMD y SpectraView II CUSTOM PERSONALIZADO La siguiente configuración se puede ajustar cuando se selecciona PERSONALIZADO como la configuración de SELECCIÓN DE GAMA puede ajustar cuando se selecciona PERSONALIZADO com...

Страница 107: ...O como la opción de DETECCIÓN DE VIDEO cada vez que se detecte una nueva fuente LAST ÚLTIMO Si se selecciona LAST ÚLTIMO como la opción de de entrada el monitor muestra automáticamente la nueva señal NONE NINGUNO El monitor sólo buscará otros puertos de entrada mientras esté encendido OFF TIMER Temporizador de Apagado El monitor se apagará automáticamente después de un período determinado por el u...

Страница 108: ...ntrada 8 LANGUAGE Idioma Los menús OSM control están disponibles en ocho idiomas Pre sione Izquierda o Derecha para seleccionar OSM H POSITION Posición H del OSM Puede elegir el lugar donde desea que aparezca la imagen del control OSM en la pantalla Al seleccionar Posición del OSM puede ajustar automáticamente la ubicación del menú de control OSM hacia la izquierda o hacia la derecha OSM V POSITIO...

Страница 109: ...IÓN BLO MODE MODE ECO WARNING ADVERTENCIA RESOLUTION QUEO OSM Para desactivar la función Bloqueo de OSM presione RESTABLECER y SALIR para que aparezca el aviso Bloquear Presione SELECCIONAR SELECCIONAR SALIR OSM TRANSPARENCY OSM Transparen Ajusta la transparencia del menú OSM OSM COLOR Color OSM Se puede cambiar el Color del marco de la ventana de en trada Color de selección del elemento y Color d...

Страница 110: ...pantalla no se gira IMAGE ROTATION ROTACIÓNDE LA IMAGE se establece de forma OFF APAGADO La imagen de la pantalla no se gira IMAGE predeterminada en APAGADO ON ENCENDIDO La imagen de la pantalla se gira siempre INPUT SETTING Configuración de Entrada VIDEO BANDWIDTH ANCHO DE BANDA DE VIDEO para entra das análogas únicamente Ajusta el ancho de banda de la señal de video Se lo puede utilizar para elim...

Страница 111: ...ora para que la función PROGRAMACIÓN opere adecuadamente Se debe configurar la fecha y la hora para que la función DAYLIGHT SAVING Horario de verano Para aquellas zonas horarias donde se aplica el horario de verano Entrada C SCHEDULE Programación Programa la programación de funcionamiento del monitor Programa la fecha y la hora de la semana en que el monitor debe encenderse o apagarse También selec...

Страница 112: ...ramaciones se superponen el horario programado de encendido tiene prioridad sobre el horario programado de apagado Si hay dos programaciones establecidas para el mismo horario tiene prioridad la programación con el número más alto Cuando se programa el TEMPORIZADOR DE APAGADO consulte la página 105 se deshabilita la función PROGRAMACIÓN Cuando se programa el TEMPORIZADOR DE APAGADO consulte la pág...

Страница 113: ...nzará el monitor cuando el nivel de la luz ambiente sea bajo Asegúrese de que la habitación tenga la máxima oscuridad cuando ajuste este nivel Luego use los botones frontales para desplazar el cursor hasta el ajuste de BRILLO Elija el nivel de brillo deseado Figura 3 Figura 1 Figura 2 Figura 2 Figura 3 Figura 3 Uso de la función Brillo automático El brillo de la pantalla LCD puede configurarse para...

Страница 114: ...ntre condiciones de iluminación claras y oscuras predefinido en fábrica L1 Nivel de BRILLO configurado para que el monitor use cuando el nivel de iluminación ambiente sea alto L1 Lb L2 Nivel de BRILLO configurado para que el monitor use cuando el nivel de iluminación ambiental sea bajo L2 Lb L1 y L2 son los niveles del brillo fijados por el usuario para compensar para los cambios en la iluminación amb...

Страница 115: ...LECCIONAR Presione el botón EXIT IZQUIERDA DERECHA ARRIBA ABAJO para ingresar al menú Control OSM avanzado Para salir del menú Control OSM avanzado Apague y vuelva a encender el monitor Active AJUSTE AUTO mediante la función OSM Presione seleccionar para ajustar Para obtener más información sobre los controles del usuario y las utilidades los controles del usuario y las utilidades de software visi...

Страница 116: ...l cristal líquido Si se presenta alguna de estas circunstancias desenchufe inmediatamente el monitor del tomacorriente y contacte al personal de servicio calificado Cuando el cable de alimentación o el tapón estén dañados Si se ha derramado líquido o se han caído objetos dentro el monitor Cuando el cable de alimentación o el tapón estén dañados Si se ha derramado líquido o se han caído objetos dent...

Страница 117: ...tor de modo que el techo no se refleje en su pantalla Si el reflejo de la luz le dificulta la visión de la pantalla use un filtro antireflejos Limpie la superficie del monitor LCD con un paño sin pelusas que no sea abrasivo Evite utilizar soluciones limpiadoras o limpiadores para vidrios Regule el brillo y los controles de contraste del monitor para mejorar la legibilidad Use un sujetador de documentos ...

Страница 118: ...988 The Human Factors Society Inc P O Box 1369 Santa Monica California 90406 Limpieza del panel LCD Cuando el panel de cristal líquido tenga polvo o se ensucie limpie con cui dado con un paño suave No frote el panel LCD con material rígido o áspero No ejerza presión sobre la superficie LCD No use un limpiador absorbente de olores ya que deteriorará o decolorará la superficie LCD Limpieza del gabinet...

Страница 119: ... menciona 1152 x 870 1 a 75Hz NEC DISPLAY SOLUTIONS menciona 1280 x 960 1 a 60 Hz esta resolución a 60Hz para garantizar 1280 x 960 1 a 60 Hz esta resolución a 60Hz para garantizar 1280 x 1024 a 60 Hz hasta 75 Hz el rendimiento óptimo de pantalla 1280 x 1024 a 60 Hz hasta 75 Hz el rendimiento óptimo de pantalla 1024 x 1280 1 a 60 Hz 1024 x 1280 1 a 60 Hz Área activa de la pantalla Horizontal Horiz...

Страница 120: ...deo análogo e IEEE 1394 995 El comité de VESA ha reconocido que DFP es un subconjunto de P D Como conector basado en DVI para las terminales de entrada digital sólo se necesita un adaptador simple para que P D sea compatible otros conectores digitales basados en DVI como DVI y DFP Soporte pivotante Permite al usuario ajustar el monitor a la orientación que prefiera en cada momento ya sea horizontal...

Страница 121: ...escritorio para aplica ciones con varios monitores Software NaViSet Ofrece una interfaz gráfica expandida e intuitiva que le per mite ajustar de manera más sencilla la configuración en pantalla de OSM mediante el mouse y el teclado CableComp La compensación automática de cable largo evita la degradación de la calidad de la imagen provocada por las extensiones de los cables Advanced No Touch Auto Adj...

Страница 122: ... el monitor Verifique el interruptor vacation en la parte izquierda del monitor Persistencia de la imagen Aparece el mensaje FRECUENCIA EXCESIVA la pantalla está en blanco o sólo aparecen imágenes borrosas La imagen no se ve claramente faltan píxeles y aparece el mensaje de adverten cia OSM FRECUENCIA EXCESIVA El tiempo de señal Esther o la resolución son demasiado altos Elija uno de los modos comp...

Страница 123: ...e la claridad suficiente Asegúrese de que las funciones MODE ECO BRILLO AUTOM y COMP COLOR estén apagadas Si el brillo varía asegúrese de que la función BRILLO AUTOM esté apagada La imagen de la pantalla no posee el tamaño apropiado Use los controles de ajuste de la imagen de OSM para aumentar o reducir el total del ancho Asegúrese de que se ha elegido un modo compatible con la tarjeta de visualiza...

Страница 124: ... com Soporte técnico en línea www necdisplay com Información sobre ventas y productos Línea de información sobre ventas 888 632 6487 Clientes canadienses 866 771 0266 ext nº 4037 Ventas gubernamentales 800 284 6320 Correo electrónico para ventas gubernamentales gov necdisplay com Canales electrónicos Internet www necdisplay com Registro de productos www necdisplay com Operaciones europeas www nec ...

Страница 125: ...OLUTIONS tampoco se debe haber alterado ni quitado el número de serie del producto A los fines de estar cubierto por la presente garantía no se debe haber expuesto el Producto a la visualización de imágenes fijas por períodos de tiempo pro longados lo cual haya provocado la persistencia de la imagen efectos de imagen reflejada a accidentes mal uso o abuso ni se lo haya utilizado de forma contraria a ...

Страница 126: ...o ahorro de energía luego de transcurrido un tiempo es beneficioso tanto para el usuario como para el medio ambiente Seguridad eléctrica Emisiones Campos electromagnéticos Emisiones acústicas Ecología El producto debe estar preparado para poderse reciclar y el fabricante debe disponer de un sistema de gestión medioambiental certificado como EMAS o ISO 14001 Restricciones en cuanto a polímeros y reta...

Страница 127: ...nuestra página web USA http www necdisplay com Europa http www nec display solutions com Japón http www nec display com También encontrará programas de reciclado específicos de cada país en Suecia http www el retur se Alemania http www recyclingpartner de Holanda http www mirec nl Japón http www diarcs com Ahorro de energía Este monitor dispone de una función avanzada de ahorro de energía Cuando se...

Страница 128: ...e adquirió el producto o si corresponde cumpla con cualquier acuerdo realizado entre usted y NEC La marca en los productos eléctricos y electrónicos solamente se aplica a los actuales Estados Miembros de la Unión Europea Fuera de la Unión Europea Si desea desechar productos eléctricos y electrónicos fuera de la Unión Europea comuníquese con su autoridad local para cumplir con el método de eliminac...

Страница 129: ...s préavis La reproduction totale ou partielle de ce document sans l accord préalable de NEC Display Solutions of America Inc est interdite NEC Display Solutions of America Inc est interdite DÉCLARATION DE CONFORMITÉ Cet appareil est conforme à l article 15 du Règlement de la FCC L utilisation est assujettie aux deux conditions suivantes 1 cet appareil ne doit pas occasionner d interférences nuisib...

Страница 130: ...E CONFORMIDAD Este dispositivo cumple con la Parte 15 de las Normas FCC La operación está sujeta a las siguientes condiciones 1 Este dispositivo puede no causar interferencia dañina y 2 este dispositivo debe aceptar cualquier interferencia recibida incluidas las interferencias que puedan provocar un funcionamiento no deseado Parte responsable en Estados Unidos NEC Display Solutions of America Inc ...

Страница 131: ...on is subject to the following two conditions 1 This device may not cause harmful interference and 2 this device must accept any interference received including interference that may cause undesired operation U S Responsible Party NEC Display Solutions of America Inc Address 500 Park Blvd Suite 1100 Itasca Illinois 60143 Tel No 630 467 3000 Type of Product Display Monitor Equipment Classification C...

Отзывы: