background image

7

Display Setup 

–continued

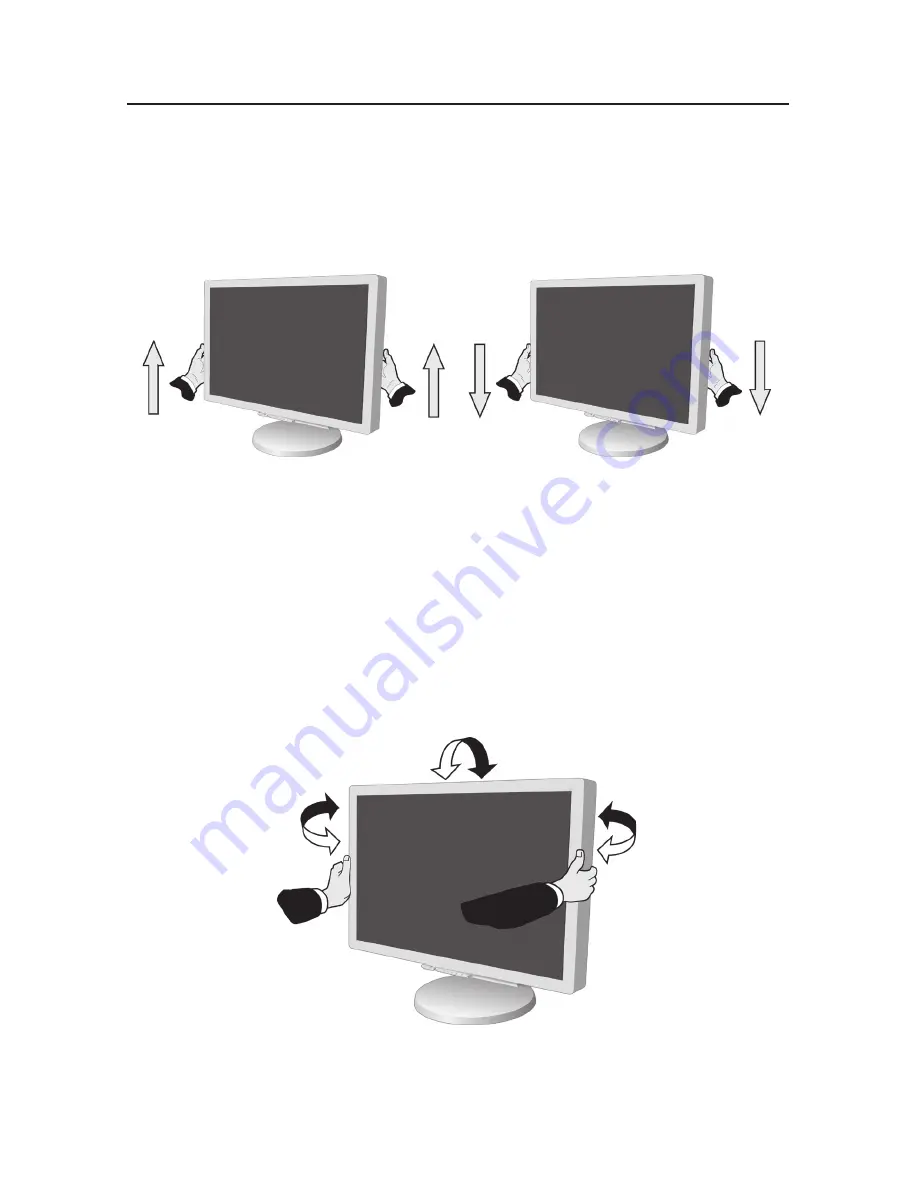
Raise and Lower Monitor Screen

The monitor may be raised or lowered. To raise or lower screen, place hands on 

each side of the monitor and lift or lower to the desired height 

(Figure RL.1)

.

NOTE:

  Handle with care when raising or lowering the monitor screen.

Tilt and Swivel

Grasp both sides of the monitor screen with your hands and adjust the tilt and 

swivel as desired 

(Figure TS.1)

.

NOTE:

  Handle with care when tilting and swiveling the monitor screen.

Figure RL.1

Figure TS.1

Содержание L205GX

Страница 1: ...User s Manual Manuel de l utilisateur MultiSync LCD2070WNX ...

Страница 2: ...arranty 20 TCO 03 21 Manufacturer s Recycling and Energy Information 22 Avertissement 24 Contenu 25 Configuration de I affichage 26 Montage 31 Installation du bras flexible 32 Commandes 33 Usage recommandé 36 Fiche technique 39 Fonctions 40 Dépannage 41 Menu Advancé 42 Références 43 Garantie limitée 44 TCO 03 45 Informations du fabricant relatives au recylage et aux économies d énergie 46 Index ...

Страница 3: ...limits for a Class B digital device pursuant to part 15 of the FCC Rules These limits are designed to provide reason able protection against harmful interference in a residential installation This equipment generates uses and can radiate radio frequency energy and if not installed and used in accordancewiththeinstructions maycauseharmfulinterferencetoradiocommunications However there is no guarant...

Страница 4: ...able User s Manual Your new NEC MultiSync LCD monitor box should contain the following MultiSync LCD monitor with height adjustable stand Power Cord User s Manual USB Cable Cable Cover Video Signal Cable mini D SUB 15 pin to mini D SUB 15 pin Video Signal Cable DVI D to DVI D DVI D Cable USB Cable Cable Cover MultiSync LCD ...

Страница 5: ...re 3 Tighten all screws NOTE To obtain the MultiSync Macintosh cable adapter call NEC Display Solutions of America Inc at 800 632 4662 3 Remove the Connector Cover Figure 4 4 Place hands on each side of the monitor to tilt the LCD panel 30 degree angle and lift up to the highest position Figure 5 5 Connect all cables to the appropriate connectors Figure 5 Using the USB cable connect the B type con...

Страница 6: ...ce the cables in the following order into the cable management power cable and DVI cable Figure 7 8 Place DVI cable and power cable into the specific hooks indicated in Figure 8 9 Place the D Sub and the USB cable into the specific hooks indicated in Figure 9 10 Make sure all cables are resting flat against the stand Figure 9 Figure 6 Figure 9 D Sub Cable USB Cable Flat ...

Страница 7: ...le with care when removing cable cover NOTE If you use this monitor at AC125 240V please refer to Recommended Use section of this manual for proper selection of power cord 13 The vacation switch on the back side of the monitor must be turned on Figure 13 Turn on the monitor with the front power button and the computer NOTE The vacation switch is a true on off switch If this switch is on the OFF po...

Страница 8: ...following OSM controls Auto Adjust Contrast Auto Adjust Refer to the Controls section of this User s Manual for a full description of these OSM controls NOTE For download information on the Windows 95 98 Me 2000 XP INF file for your monitor refer to the References section of this User s Manual NOTE If you have any problems please refer to the Troubleshooting section of this User s Manual ...

Страница 9: ... the monitor and lift or lower to the desired height Figure RL 1 NOTE Handle with care when raising or lowering the monitor screen Tilt and Swivel Grasp both sides of the monitor screen with your hands and adjust the tilt and swivel as desired Figure TS 1 NOTE Handle with care when tilting and swiveling the monitor screen Figure RL 1 Figure TS 1 ...

Страница 10: ...d then remove as shown in Figure Handle with care when removing cable cover 2 Disconnect all cables 3 Place monitor face down on a non abrasive surface Figure M 3 NOTE Handle with care when the monitor is facing down to avoid damaging the front buttons 4 Remove the 4 screws connecting the stand to the monitor Figure M 3 5 Remove the stand Figure M 4 6 Connect the cables to the back of the monitor ...

Страница 11: ... arm to the monitor Figure F 1 NOTE The LCD monitor should only be used with an approved arm e g GS mark To meet the safety requirements the monitor must be mounted to an arm which guaranties the necessary stability under consideration of the weight of the monitor Weight of LCD assembly 5 7 kg MAX 4 Screws 4M Max Depth 18 mm Thickness of Bracket Arm 2 0 3 2mm 100mm 100mm Figure F 1 NOTE Please use...

Страница 12: ... select the suitable setting for Movie Picture etc Auto Adjust Analog input only Automatically adjusts the Image Position H Size and Fine settings Image Controls Analog input only LEFT RIGHT Controls Horizontal Image Position within the display area of the LCD DOWN UP Controls Vertical Image Position within the display area of the LCD H SIZE Adjust this setting to increase or decrease the horizont...

Страница 13: ...n the end user has se lected a predetermined amount of time LED BRIGHTNESS You can adjust the brightness of the Green LED on the front of the monitor HOT KEY You can adjust the brightness and contrast directly When this function is set to ON you can adjust the brightness with left or right control and contrast with up or down control while the OSM menu is off FACTORY PRESET Selecting Factory Prese...

Страница 14: ...pear with Exit button NO SIGNAL This function gives a warning when there is no signal present After power is tuned on or when there is a change of input signal or video is inactive the No Signal window will appear RESOLUTION NOTIFIER This function gives a warning if a resolution other than the optimal resolution is used After power is turned on or when there is a change of input signal or the vide...

Страница 15: ...r vent on monitor Immediately unplug your monitor from the wall outlet and refer servicing to qualified service person nel under the following conditions When the power supply cord or plug is damaged If liquid has been spilled or objects have fallen into the monitor If the monitor has been exposed to rain or water If the monitor has been dropped or the cabinet damaged If the monitor does not opera...

Страница 16: ... the preset Size and Position controls with standard signals Use the preset Color Setting Use non interlaced signals with a vertical refresh rate between 60 75Hz Do not use primary color blue on a dark background as it is difficult to see and may produce eye fatigue to insufficient contrast For more detailed information on setting up a healthy work environment write the American National Standard ...

Страница 17: ...PLAY SOLUTIONS cites recommended resolution at 60 Hz for optimal display performance Active Display Area Horizontal Vertical 433 0 mm 17 0 inches 271 0 mm 10 7 inches USB Hub I P Port Load Current USB Specification Revision 2 0 Upstream 1 Downstream 4 Maximum 0 5A per port Power Supply 100 240 V 50 60 Hz Current Rating 1 3 0 7 A Dimensions 471 4 mm W x 371 3 481 3 mm H x 220 0 mm D 18 6 inches W x...

Страница 18: ...uick and easy image adjustments tilt base for preferred angle of vision small footprint and compliance with MPRII and TCO guidelines for lower emissions Plug and Play The Microsoft solution with the Windows 95 98 Me 2000 XP operat ing system facilitates setup and installation by allowing the monitor to send its capabilities such as screen size and resolutions supported directly to your computer au...

Страница 19: ...tor for one hour and a residual image remains the monitor should be turned off for one hour to erase the image As with all personal display devices NEC DISPLAY SOLUTIONS recommends display ing moving images and using a moving screen saver at regular intervals whenever the screen is idle or turning off the monitor when not in use Image is unstable unfocused or swimming is apparent Signal cable shou...

Страница 20: ...Turn on your monitor by pressing the POWER and SELECT buttons simultaneously for a few seconds You will see the Advanced Menu To exit the Advanced Menu Turn off and restart you monitor in the normal manner Tag 1 AUTO BLACK LEVEL Analog Input Only Automatically adjusts the black level BLACK LEVEL Analog Input Only Manually adjusts the black level ...

Страница 21: ...ay com Online Technical Support www necdisplay com Sales and Product Information Sales Information Line 888 632 6487 Canadian Customers 866 771 0266 Ext 4037 Government Sales 800 284 6320 Government Sales email gov necdisplay com Electronic Channels World Wide Web www necdisplay com Product Registration www necdisplay com European Operations www nec display solutions com Drivers and Downloads www ...

Страница 22: ...ll Products returned to NEC DISPLAY SOLUTIONS for service MUST have prior approval which may be obtained by calling 1 800 632 4662 The Product shall not have been previously altered repaired or serviced by anyone other than a service facility authorized by NEC DISPLAY SOLUTIONS to render such service the serial number of the product shall not have been altered or removed In order to be covered by ...

Страница 23: ...rgy saving mode after a certain time beneficial both for the user and the environment Electrical safety Emissions Electromagnetic fields Noise emissions Ecology The product must be prepared for recycling and the manufacturer must have a certified environmental management system such as EMAS or ISO 14 001 Restrictions on chlorinated and brominated flame retardants and polymers heavy metals such as ...

Страница 24: ...it our website at USA http www necdisplay com Europe http www nec display solutions com Japan http www nec display com Country specific recycling programs can also be found at Sweden http www el retur se Germany http www recyclingpartner de Holland http www mirec nl Japan http www diarcs com Energy saving This monitor features an advanced energy saving capability When a VESA Display Power Manageme...

Страница 25: ...ts carrying the mark left must be disposed of separately from normal household waste This includes monitors and electrical accessories such as signal cables or power cords When you need to dispose of your NEC display products please follow the guidance of your local authority or ask the shop where you purchased the product or if applicable follow any agreements made between yourself and NEC The ma...

Страница 26: ... câble d alimentation fourni ou équivalent pour assurer la conformité FCC 2 Veuillez utiliser le câble de signal vidéo blindé fourni Utilisez les câbles USB à tores magnétiques fournis L utilisation d autres câbles et adaptateurs peut provoquer des interférences avec la réception radio et télévision 2 Cet appareil a été testé et s avère conforme avec les spécifications d équipements de Classe B se...

Страница 27: ... de câble Câble pour le signal vidéo Mini D SUB mâle 15 broches vers D SUB Câble pour le signal vidéo Câble DVI D vers DVI D Ne pas oublier de conserver la boîte et le matériel d emballage d origine pour transporter ou expédier le moniteur Contenu Cordon d alimentation Câble de signal vidéo D SUB à D SUB Manuel de l utilisateur Câble DVI D Câble d USB Couverture de câble LCD MultiSync ...

Страница 28: ...ure de connecteu Figure 4 4 Placez les mains de chaque côté du moniteur pour incliner l écran ACL dans un angle de 30 degrés tout en le soulevant dans sa position la plus haute Figure 5 5 Branchez tous les câbles dans les connecteurs appropriés Figure 5 A l aide du câble USB connectez le connecteur de type B sur le port amont USB sur le côté droit du moniteur et le connecteur de type A sur le port...

Страница 29: ... câbles câble d alimentation et câble DVI Figure 7 8 Placez le câble DVI le câble d alimentation dans les crochets spécifiques indiqués dans la Figure 8 9 Placez le câble D Sub et le câble USB dans les crochets spécifiques indiqués dans la Figure 9 Figure 8 USB Cable Câble D SUB Figure 7 Câble DVI haut Cordon d alimentation milieu Figure 6 Figure 9 Câble D SUB Câble USB Plat ...

Страница 30: ...uverture de câble REMARQUE Si vous utilisez ce moniteur à 125 CA 240 V veuillez vous reporter à la section Utilisation recommandée de ce manuel pour sélectionner le cordon d alimentation approprié 13 Le commutateur de veille à l arrière du moniteur doit être mis sous tension Figure 13 Mettez le moniteur avec le bouton de mise en marche frontal et l ordinateur sous ten sion REMARQUE Le commutateur ...

Страница 31: ...es commandes OSM suivantes Réglage automatique du contraste Réglage automatique Référez vous à la section des commandes de ce manuel de l utilisateur pour une description complète de ces commandes OSM REMARQUE Pour de l information sur le téléchargement du fichier INF de Windows 95 98 Me 2000 XP pour votre moniteur référez vous à la section Références de ce manuel de l utilisateur REMARQUE Si vous...

Страница 32: ... moniteur et situez le à la hauteur de votre choix Figure RL 1 REMARQUE Manipule sur soin quand augmentant ou l écran diminuant écran Figure RL 1 Inclinaison et pivotement Maintenez les deux côtés du moniteur puis ajustez l inclinaison et l orientation à votre convenance Figure TS 1 REMARQUE Prenez des précautions lorsque vous inclinez ou basculez l écran du moniteur Figure TS 1 ...

Страница 33: ...z avec soin en enlevant la couverture de câble 2 Débranchez tous les câbles 3 Placez le moniteur avec l écran vers le bas sur une surface non abrasive Figure M 2 REMARQUE Lors de manipulation du moniteur le maintenir avec la face dirigée vers le bas pour éviter d endommager les boutons 4 Ôtez les 4 vis qui fixent le support au moniteur Figure M 2 5 Enlevez le support Figure M 3 6 Branchez les câbl...

Страница 34: ...support pour fixer le bras au moniteur Figure F 1 REMARQUE Le moniteur ACL ne doit être utilisé qu avec un bras homologué par ex de marque GS Afin de répondre aux exigences relatives à la sécurité le moniteur doit être monté sur un bras qui garantit la stabilité nécessaire en tenant compte du poids du moniteur L épaisseur de parenthése Arme 2 0 3 2 mm 100mm 100mm 4 Vis 4M MAX depth 18 mm Figure F ...

Страница 35: ...OITE Contrôle la position horizontale de l image dans la zone d affichage du LCD BAS HAUT Contrôle la position verticale de l image dans la zone d affichage du LCD HAUTEUR Corrige automatiquement la position horizontale et verticale dans la zone d affichage du LCD FINESSE Améliore la mise au point la netteté et la stabilité de l image en augmentant ou en diminuant la valeur Fin NOTA En appuyant su...

Страница 36: ...s agrandie ARRÊT PROGRAMMATEUR Le moniteur se mettra automatiquement hors tension lorsque l utilisateur final a sélectionné une durée prédéterminée ÉCLAT DE LED Vous pouvez ajuster l éclat de la LED verte sur l avant du moniteur TOUCHE DE RACCOURCI Vous pouvez ajuster la luminosité et le contraste directement Lorsque cette fonction est réglée sur ON vous pouvez ajuster la luminosité à l aide de la...

Страница 37: ...ésolution de l écran la fréquence horizontale et verticale et le réglage de polarité du moniteur Les numéros de modèle et de série de votre moniteur sont également indiqués Avertissement OSM OSM prémunissant menu disparaît sur Exit bouton PAS DE SIGNAL Cette fonctionne vous avertit de l absence de signal Après la mise sous tension ou si le signal d entrée a été changé ou si la vidéo est inactive l...

Страница 38: ... glass sur soin Débrancher immédiatement le moniteur de la prise murale et confier la réparation à du personnel techni que qualifié dans les cas suivants Lorsque le cordon d alimentation ou la fiche est endommagé e Si du liquide a été renversé ou des objets sont tombés à l intérieur du moniteur Si le moniteur a été exposé à la pluie ou à de l eau Si le moniteur est tombé ou le boîtier est endommag...

Страница 39: ...liorer la lisibilité Utiliser un support de document placé près de l écran Positionner ce que l on regarde le plus souvent l écran ou les documents de référence directement devant soi pour réduire au maximum les mouvements de la tête lorsque l on dactylographie Consulter régulièrement un ophtalmologiste Ergonomie Pour optimiser les avantages ergonomiques observez les directives suivantes Utiliser ...

Страница 40: ...au essuyez le et continuez avec un chiffon sec REMARQUE De nombreux plastiques sont utilisés sur la surface du coffret N utilisez PAS de benzène de diluant de détergent alcalin de détergent de système à base d alcool de produit nettoyant pour vitres de cire de nettoyant pour vernis de poudre de savon ou d insecticide Ne touchez pas le coffret avec du caoutchouc ou du vinyle pendant une longue péri...

Страница 41: ...Horizontale Verticale 433 0 mm 17 0 inches 271 0 mm 10 7 inches Concentrateur USB I P Port Courant en charge Révision 2 0 de spécification USB En amont 1 En aval 4 Maximum 0 5A per port Alimentation 100 240 V 50 60 Hz Tension d alimentation 1 3 0 7 A Dimensions 471 4 mm W x 371 3 481 3 mm H x 220 0 mm D 18 6 pouces W x 14 6 18 9 pouces H x 8 7 pouces D Weight 8 5 kg 18 7 livres Environmental Consi...

Страница 42: ...OSM pour un réglage rapide et facile de l image un socle inclin able pour un meilleur confort de visualisation et la conformité aux directives MPRII et TCO concernant les réductions d émissions Plug and Play La solution Microsoft avec le système d exploitation Windows 95 98 Me 2000 XP facilite la configuration et l installation en permettant au moniteur d envoyer ses capacités telles que le format...

Страница 43: ... si une image est restée affichée sur l écran pendant une heure et qu il reste une image résiduelle le moniteur doit être mis hors tension pendant une heure pour effacer I image Comme pour tous les équipements d affichage personnels NEC DISPLAY SOLUTIONS recommande d afficher des images animées et d utiliser à intervalles réguliers un économiseur d écran animé chaque fois que l écran est en veille...

Страница 44: ...dant enfoncés simultanément les boutons POWER et SELECT pendant au moins une seconde Le menu Avancé va s afficher Comment quitter le menu Avancé Éteignez le moniteur et redémarrez le de la manière normale Élement1 NIVEAU AUTO DE NOIR Entrée analogique seulement Règlage automatiquement le niveau de noir NIVEAU DE NOIR Entrée analogique seulement Règlage le niveau de noir ...

Страница 45: ...Assistance technique en ligne www necdisplay com Ventes et information produit Ligne d information sur les ventes 888 632 6487 Clientèle canadienne 866 771 0266 Ext 4037 Ventes au gouvernement 800 284 6320 Adresse électronique du service des ventes au gouvernement gov necdisplay com Courrier électronique World Wide Web www necdisplay com Produit enregistré www necdisplay com Opérations Européennes...

Страница 46: ... vous devez d abord obtenir une autorisation de retour de marchandise en composant le 1 800 632 4662 Le produit ne pourra avoir été enlevé ou modifié réparé ou entretenu au préalable par personne d autre que du personnel technique autorisé par NEC DISPLAY SOLUTIONS et le numéro de série du produit ne pourra pas avoir été enlevé Pour être couvert par cette garantie le produit ne pourra pas avoir ét...

Страница 47: ... certain temps un avantage à la fois pour l utilisateur et l environnement Sécurité électrique Émissions Champs électromagnétiques Émissions de parasites Écologie Le produit doit être conçu afin d être recyclable et le fabriquant doit disposer d une certification relative à l environnement telle qu EMAS ou ISO 14 001 Restrictions sur l usage des polymères et retardants au feu chlorés ou bromés mét...

Страница 48: ...er notre site Web au É U http www necdisplay com Europe http www nec display solutions com Japon http www nec display com Vous pouvez trouver également des programmes de recyclage sur les sites suivants Suède http www el retur se Allemagne http www recyclingpartner de Hollande http www mirec nl Japon http www diarcs com Économie d énergie Ce moniteur est équipé d une capacité d économie d énergie ...

Страница 49: ... vendu le produit en question Vous pouvez aussi respecter tout accord passé entre NEC et vous même Ie cas échéant Ce symbole présent sur les produits électriques et électroniques ne s applique qu aux membres actuels de 1 Union Européenne En dehors de 1 Union Européenne Si vous souhaitez vous débarrasser de produits électriques ou électroniques usagés en dehors de 1 Union Européenne veuillez contac...

Страница 50: ...enues dans ce document sont sujettes à modifications sans préavis La reproduction totale ou partielle de ce document sans l accord préalable de NEC Display Solutions of America Inc est interdite DÉCLARATION DE CONFORMITÉ Cet appareil est conforme à l article 15 du règlement de la FCC L utilisation est soumise à deux conditions 1 Cet appareil ne peut pas occasionner d interférences nuisibles et 2 c...

Страница 51: ......

Страница 52: ...ut notice Reproduction of this document or portions thereof without prior approval of NEC Display Solutions of America Inc is prohibited DECLARATION OF CONFORMITY This device complies with Part 15 of FCC Rules Operation is subject to the following two conditions 1 This device may not cause harmful interference and 2 this device must accept any interference received including interference that may ...

Отзывы: