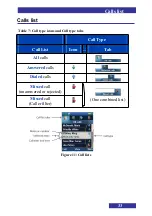
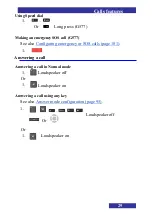
background image

29


Calls features


Using Speed dial 

1. 


….  


Or  

Long press (G577) 


Making an emergency SOS call (G577) 

See also 

Configuring emergency or SOS calls (page 101)

1. 


Answering a call 


Answering a call in Normal mode 


1. 

Loudspeaker off 

Or 

1.


Loudspeaker on 


Answering a call using any key 

See also 

Answer mode configuration (page 95)


1. 

      ,                  ,


  .. 

,  

,  


Or 


Loudspeaker off 

Or 


1.


Loudspeaker on 


Содержание G577

Страница 1: ...Business Mobility IP DECT DECT G277 577 Handset User Manual NDA 31991 Issue 1 0...

Страница 2: ...on for improving this handbook they are invited to send the relevant details to NEC Nederland B V P O BOX 32 1200 JD HILVERSUM THE NETHERLANDS NEC Nederland B V 2019 All right are reserved Reproductio...

Страница 3: ...rves the right to revise or make changes or improvements to the products described in the user manual or to this user manual itself at any time without obligation to notify any person of such revision...

Страница 4: ...4 Revision history May 2019 First version Revision history...

Страница 5: ...guidelines 12 Charging and operating times 12 Charge display 13 Handset keys and display areas 14 Handset keys 15 Display 17 Icon line 18 Time Date area 19 Dialogue area 19 Idle mode 19 Call mode 19...

Страница 6: ...ansfer 31 Shuttle the call 32 Calls list 33 Actions on the calls lists 34 Open Calls list 34 Checking the details of a call 34 Dialling the number of the call list entry 34 First edit then dial the nu...

Страница 7: ...Calendar G577 55 Open the Calendar 55 Changing the calendar format week or month view 55 Open schedule for today 55 Open schedule for a given date 55 Adding an appointment 56 Open appointment 58 Edit...

Страница 8: ...eature 84 Setting the vibrator feature 85 Alerts 86 Feedback 88 Display settings 90 Selecting Wallpaper 90 Selecting startup screen 91 Configuring power save 91 Calls settings 93 View statistics infor...

Страница 9: ...onnecting a paired Bluetooth headset 109 Renaming a paired Bluetooth headset 110 Retrieve information for a paired Bluetooth headset 111 Delete a paired Bluetooth headset 112 Delete all paired Bluetoo...

Страница 10: ...h do not guarantee a connection under all circumstances Do not rely exclusively on the DECT handsets when making indispensable calls such as medical emergencies SOS functions The SOS functions of the...

Страница 11: ...emove the battery compartment cover 4 Push the battery pack into the casing 5 Replace the battery cover Installing the charger 1 Place the charger on a flat surface 2 Connect the USB C connector of th...

Страница 12: ...ompartment Upside down and with text on the battery pack f a ci n g to the front 2 Slide the spare battery pack under the plastic holder to keep it in place Charging guidelines Please read the concern...

Страница 13: ...cons Icon Charge status Almost empty Less than 10 10 to 20 20 to 90 the bigger the green bar the higher the charged percentage Fully charged more than 90 When the battery is nearly discharged a warnin...

Страница 14: ...14 Getting started Handset keys and display areas Figure 4 Elements of the G277 577 Front View Figure 5 Elements of the G277 577 Side Views...

Страница 15: ...display RIGHT SOFT KEY Key related to the action given on the bottom right of the display UP Use the navigation keys to Select the required menu icon or menu element Navigate the cursor In some cases...

Страница 16: ...off hook and initiate enquiry using hands free MENU Used to access main menu items SOS G577 Long press the SOS key to make an emergency call if configured VOLUME UP To increase the handset volume VOL...

Страница 17: ...Switch between Normal and Silent sounds alerts settings by long pressing more than 2 seconds the key Toggle the character case capital lower case or digit when in edit mode LINE KEY Use one of the fou...

Страница 18: ...on line displays the status of the handset Table 3 Icon line icons Icon Description Level of radio signal always shown New text message received Voice message waiting indication Keypad locked Alarm se...

Страница 19: ...is added to the Dialogue area see next Dialogue area The Dialogue area displays information according to the operational mode of the handset Idle mode In Idle mode the dialogue area displays informat...

Страница 20: ...all Conversation icons Icon Description Call in conversation Call set up by this phone Call in conversation Call set up to this phone Loudspeaker on Microphone muted while loudspeaker on Microphone mu...

Страница 21: ...ys the menu icons or menu sections tabs and the specific menu items E g Figure 9 Main menu and General setting menu Edit mode In Edit mode you can use the dialogue area to enter and edit digits e g fo...

Страница 22: ...s used in the Edit mode to insert symbol characters Table 6 key functions in text mode Key Uppercase Lowercase 1 1 1 2 A B C 2 a b c 2 3 D E F 3 d e f 3 4 G H I 4 g h i 4 5 J K L 5 j k l 5 6 M N O 6 m...

Страница 23: ...23 Getting started Soft key line Soft keys appear below the handset dialogue area The key functions change automatically according to the operational state of the handset...

Страница 24: ...a selected menu item To select the appropriate menu item use the UP and or DOWN NAVIGATION key White box with dark blue top containing text indicates some text or number needs to be given To supply th...

Страница 25: ...eypad and or the NAVIGATION keys to enter or change a number date name or text Use the keypad to insert one or more digits 0 9 and or characters To delete a digit or character use soft key Use the Nav...

Страница 26: ...ey can be skipped by the user OR they are not offered to the user Used when the following actions steps depend on some condition The condition is preceding the arrow and the next action to be taken is...

Страница 27: ...ck Attention You can dial 911 and 112 when the key lock is active The key lock does not affect the SOS key Locking 1 2 Also automatic keypad lock can be set from the Settings menu Unlocking 1 2 Also a...

Страница 28: ...2 Using Central or Private Directory1 1 Or Optional step s 2 Enter the first character s of the required name 3 4 Select required contact Select appropriate number 6 1 Central Directory is only avail...

Страница 29: ...cy SOS call G577 See also Configuring emergency or SOS calls page 101 1 Answering a call Answering a call in Normal mode 1 Loudspeaker off Or 1 Loudspeaker on Answering a call using any key See also A...

Страница 30: ...uring a call Adjusting the headset or loudspeaker volume Volume up Volume down Adjusted volume setting is saved for future calls Using mute during a call Deactivate the microphone mute 1 Activate the...

Страница 31: ...ter edit Number Optional step s 3 Await answer 4 Using Private or Central Directory then transfer 1 2 Or 3 Optional step s 4 Enter the first character s of the required name 5 6 Select required contac...

Страница 32: ...32 Calls features Shuttle the call To alternate between the two parties before transfer 1...

Страница 33: ...ls list Table 7 Call type icons and Call type tabs Figure 11 Call lists Call Type Call List Icon Tab All calls Answered calls Dialed calls Missed call unanswered or rejected One combined list Missed c...

Страница 34: ...on the calls lists Open Calls list 1 2 Checking the details of a call Or Or Dialling the number of the call list entry Open Calls list Or Or Or 1 Select required entry 2 Or Open Calls list Or 1 Select...

Страница 35: ...of the call list entry Open Calls list Or Or Or 1 Select required entry 2 3 4 5 Enter edit Number 6 Or Transferring a name number to your contacts list Open Calls list Or Or Or 1 Select required entr...

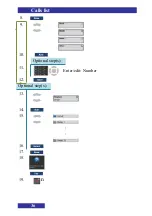
Страница 36: ...36 Calls list 8 9 10 Optional step s 11 Enter edit Number 12 Optional step s 13 14 15 16 17 18 19 n...

Страница 37: ...37 Calls list Add a number to an existing contact Open Calls list Or Or Or 1 Select required entry 2 3 4 5 Select required contact 6 7 Or Optional step s 8 Enter edit Number 9 10 11 12 n...

Страница 38: ...ferring a number to the caller filter list Open Calls list Or Or Or 1 Select required entry 2 3 4 Optional step s 5 Enter edit Name 6 7 8 n Deleting an entry Open Calls list Or Or Or 1 Select required...

Страница 39: ...d from the list if You answer a call from the to the entry related number entry moved to the Answered calls list You dial the to the entry related number entry moved to the Dialed calls list Deleting...

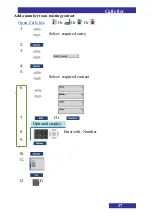
Страница 40: ...Contacts 40 Contacts Adding a new contact 1 2 3 4 5 6 7 8 9 10 11 12...

Страница 41: ...lue is marked by a blue dot 19 n Changing information of a contact 1 2 Select required contact 3 Continue as in Adding a new contact page 40 from step 5 Deleting a contact 1 2 Select required contact...

Страница 42: ...contacts 1 2 3 4 5 6 7 8 n Speed dial feature See also Using Speed dial page 29 Attention Only the first number in the chain Work Mobile Home and Other assigned to the contact will be used by the Spe...

Страница 43: ...Contacts 43 Adding replacing or deleting a speed dial contact 1 2 Select required contact 3 4 5 6 3 add replace delete add n replace n delete n 3 2 9 L1 L2 L3 or L4 7 8 7 8 7 8...

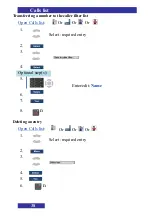
Страница 44: ...Contacts 44 Adding contact to the caller filter list 1 2 Select required contact 3 4 5 6 7 n Contacts...

Страница 45: ...messages The handset shows urgent messages immediately on the display The melody assigned to Notification urgent plays when you receive an urgent message If you receive an urgent message during a call...

Страница 46: ...was not delivered To confirm Positively Or Negatively Or Message list full Attention If the display shows this warning no new message can be received Delete some messages or change the Overwrite old s...

Страница 47: ...47 Messaging Open Message menu section 1 2 3 4 Actions on the messages Reading a message Open Message menu section Or 1 Select required message 2 Scroll the text 4 n Optional step s 3...

Страница 48: ...ting and saving a new draft message Open Message menu section 1 Or 1a Select required message 2 3 4 5 Writing and sending a new draft message Open Message menu section 1 Or 1a Select required message...

Страница 49: ...49 Messaging 6 Contacts Select required contact Enter number 7 8 9 Optional step s 10 11 n 7 8 9 Optional step s 10 11 n...

Страница 50: ...required contact ect appropriate number Central directory 7 8 Enter the first character s of the required name 9 Optional step s 10 Select required contact 11 Optional step s 12 13 n 8 9 10 11 Option...

Страница 51: ...sage menu section Or 1 Select required message 2 3 4 Optional step s 5 6 Continue as page 48 fr in Writing and sending a new draft message om step 3 Replying to an incoming message Open Message menu s...

Страница 52: ...52 Messaging 8 n Deleting a message Open Message menu section Or 1 Select required message 2 3 4 5 6 n Deleting all messages Open Message menu section Or 1 2 3 4 Optional step s 7...

Страница 53: ...Select required message 2 3 4 5 Continue as in Transferring a name number to your contacts list page 35 from step 5 Add sender to existing contact Open Message menu section 1 Select required message...

Страница 54: ...written Off new message is not stored An Urgent or Emergency message is shown on the display a Normal message is rejected Sent messages to control whether sent messages are stored in the handset On or...

Страница 55: ...endar G577 Open the Calendar 1 2 3 Changing the calendar format week or month view Open the Calendar 1 2 3 4 n Open schedule for today Open the Calendar 1 2 3 4 Open schedule for a given date Open the...

Страница 56: ...56 Calendar 4 5 6 Adding an appointment Open the Calendar 1 2 3 4 5 6 Go to step 12 7...

Страница 57: ...57 Calendar 7 8 9 10 11 12 13 14 15 16 17 18 n...

Страница 58: ...bottom right of the date Open the day date of the appointment using Open schedule for today Open schedule for a given date 1 Select required appointment 2 Editing an appointment Open appointment 1 2...

Страница 59: ...59 Calendar Copying an appointment Open appointment 1 2 3 4 Make the necessary changes like in Adding an appointment page 56 from step 2 Deleting an appointment Open appointment 1 2 3 4 5 n...

Страница 60: ...ing holds used to insert a decimal point used to make a percentage of the given entry change the use of the NAVIGATION keys between Mathematical operators Moving the cursor to the insertion point 1 2...

Страница 61: ...Use of the stopwatch soft keys Table 9 Stopwatch soft keys Soft key Description Start a new measurement Or Continue a stopped measurement Halt the measurement Save the intermediate result and continue...

Страница 62: ...62 Alarms alarm clock Open Alarms 1 2 3 4 5 Assigning or change a daily alarm Open Alarms 1 Assign new Change existing 2 3 4 5 n Turning off a daily alarm Open Alarms 1 2 3 4 n...

Страница 63: ...ories Assigning or change a recurrent alarm Open Alarms 1 Assign new Change existing 2 3 4 For the required days of the week 5 6 Or 7 Turning off a recurrent alarm Note Already selected days are marke...

Страница 64: ...Telephone settings 64 Additional features Accessories Setting snooze time Open Alarms 1 2 3 Note Currently set value is marked by a blue dot 4 5 n...

Страница 65: ...gs Telephone settings The Settings menu contains a number of sections Table 10 Settings Menu Sections Description Section General Sounds normal Sounds silent Display Calls Connectivity Open Settings m...

Страница 66: ...t menus and features by pressing a navigation key 70 Assign a certain condition to one of the three LEDs 71 Set the security settings Phone lock Automatic keylock PIN Code and Proxy password 72 Set th...

Страница 67: ...e Sounds normal settings Open Settings menu section 1 2 Or 3 n Quickly toggle Silent setting 1 Long press Setting the time and date Note If your communication system provides the date and time then se...

Страница 68: ...settings 5 9 10 n Setting the date Open Settings menu section 1 2 3 4 5 Note Currently set value is marked by a blue dot Optional step s 6 7 8 Optional step s 6 7 Note Currently set value is marked b...

Страница 69: ...9 10 n Setting the language Open Settings menu section 1 2 3 Note Currently set value is marked by a blue dot 4 5 n Configuringshortcuts Shortcuts are used to get quick access to menu items Open Sett...

Страница 70: ...a blue dot 6 7 n Configuring the LED signal The Red LED Green LED and Yellow LED can be used to indicate certain conditions to the user Missed call Text message Voice message Text or voice msg Low bat...

Страница 71: ...y a blue dot 6 7 n Security options Setting the Phone lock feature If the Phone lock is set then upon turning on your handset you ll be asked to enter the PIN Code Open Settings menu section 1 2 3 4 5...

Страница 72: ...hone settings Setting the Automatic keypad lock feature Open Settings menu section 1 2 3 4 5 Note Currently set value is marked by a blue dot 6 7 n Changing the PIN code Open Settings menu section 1 2...

Страница 73: ...73 Telephone settings Changing the Proxy password Change the Proxy password that is used at SIP authentication Open Settings menu section 1 2 3 8 7 8 9 10 11 n 4 Optional step s 5 6 7...

Страница 74: ...one settings 9 10 11 n Defining the handset name Resetting settings All user determined Settings are set to the default factory values Open Settings menu section 1 2 3 4 Open Settings menu section 1 2...

Страница 75: ...75 Telephone settings 5 6 7 n View status information Open Settings menu section 1 2 3 Note In reality divided over three screens 4 5 n...

Страница 76: ...nown call melody for calls from an unknown source Group ring melody for calls from an group source Intercom ring melody for calls from an intercom source Emergency ring melody for calls from an emerge...

Страница 77: ...increases gradually Vibrator to define the trembler feature for messages Sound settings related to Alerts for Calendar and Alarms Alert volume Alert melody Increasing alert to determine whether the A...

Страница 78: ...78 Telephone settings Incoming call Setting the ring volume Open Settings menu section Or 1 2 3 4 5 Or 6 7 n Setting the ring melodies Open Settings menu section Or 1 2 3 Or Or 4...

Страница 79: ...5 Note Currently set value is marked by a blue dot Optional step s 6 7 8 9 n Setting the increasing ring feature Open Settings menu section Or 1 2 3 4 Or 5 n Setting the vibrator feature Open Setting...

Страница 80: ...80 Telephone settings 3 4 5 Note Currently set value is marked by a blue dot 6 7 n Messagenotifications Setting the notification volume 7 n Open Settings menu section Or 1 2 3 4 5 Or 6...

Страница 81: ......

Страница 82: ...ng the notification melodies Open Settings menu section Or 1 2 3 Or Or 4 5 Optional step s 6 7 8 9 n Note Currently set value is marked by a blue dot Setting the increasing notification feature Open S...

Страница 83: ...85 Telephone settings Setting the vibrator feature Open Settings menu section Or 1 2 3 4 5 Note Currently set value is marked by a blue dot 6 7 n 3 4 Or 5 n...

Страница 84: ...86 Telephone settings Alerts Setting the alert volume Open Settings menu section Or 1 2 3 4 5 Or 6 7 n Setting the alert melody Open Settings menu section Or 1 2 3 4...

Страница 85: ...5 Note Currently set value is marked by a blue dot Optional step s 6 7 8 9 n Setting the increasing alert feature Open Settings menu section Or 1 2 3 4 Or 5 n Setting the vibrator feature Open Setting...

Страница 86: ...rently set value is marked by a blue dot 6 7 n Feedback Setting the key sound feature Open Settings menu section Or 1 2 3 Note Currently set value is marked by a blue dot 4 5 n Setting confirmation so...

Страница 87: ...Telephone settings 89 Setting the coverage warning feature Open Settings menu section Or 1 2 3 4 Or 5 n Setting the charger warning feature 5 n 2 3 4 Or 5 n Open Settings menu section Or 1 2 3 4 Or...

Страница 88: ...ect the startup screen image which displays temporarily when the handset starts 92 Configure the periods of time after which the handset s display is dimmed and turned off 92 Selecting Wallpaper For o...

Страница 89: ...ttings menu section 1 2 3 Note Currently set value is marked by a blue dot Optional step s 4 5 6 7 n Configuring power save The display of your DECT Handset has three intensity levels Display on Displ...

Страница 90: ...92 Telephone settings on the Power save setting Open Settings menu section 1 2 3 4 5 n To never turn off the display set the second value to 0...

Страница 91: ...Normal using Or o By pressing Any key o Automatically Auto answer 95 Selectively block or accept calls from specified callers 96 Configure the Emergency call feature to dial a number or send a text m...

Страница 92: ...ble 14 Calls settings Item Description Page Configure the Voicemail number 116 View statistics information Open Settings menu section 1 2 3 Or 6 n Answer mode configuration Open Settings menu section...

Страница 93: ...95 3 Or Note Currently set Or 4 5 n Caller filter configuration value is marked by a blue dot Adding an entry to the Caller filter list Open Settings menu section 1 2 3 4 5 6 Lookup contact Select req...

Страница 94: ...96 Telephone settings 10 11 n Enter number n Central directory Enter the first character s of the required name Select required contact 7 8 9 10 11 12 13 7 8 9 10...

Страница 95: ...settings 97 11 12 13 n Changing a Caller filter entry Open Settings menu section 1 2 3 4 5 6 7 8 Select required entry 9 Continue as in Adding an entry to the Caller filter list page 96 Enter number f...

Страница 96: ...one settings Deleting an entry from the Caller filter list Open Settings menu section 1 2 3 4 5 6 7 8 Select required entry 9 10 11 n Deleting all entries in the Caller filter list Open Settings menu...

Страница 97: ...Telephone settings 99 2 3 4 5 6 7 8 9 10 11 n Activating Caller filter Open Settings menu section 1 2 3 4...

Страница 98: ...t accept calls from callers in the Caller filter Caller filter not used Note Currently set value is marked by a blue dot 6 7 n Configuring emergency or SOS calls G577 Assigning emergency call number...

Страница 99: ...ings 101 8 9 n Enter number n When no number is entered then the Emergency call feature is disabled Central directory Enter the first character s of the required name Select required contact n 6 7 8 9...

Страница 100: ...l no Emergency call message should be defined 6 7 n Assigning the Silent charging feature Open Settings menu section 1 2 3 Silent charging not used Disconnect from the system while in the charger14 Tu...

Страница 101: ...ties15 You receive a voicemail in the following situations a if your handset is switched off b if your handset is busy c if your handset is out of the coverage area A new voice message dialogue appear...

Страница 102: ...Telephone settings 104 104 symbol appears in the icon line it disappears after you play the message Assigning the Voicemail number Open Settings menu section 1 2 3 4 5 n...

Страница 103: ...rator Remove registration your handset from a DECT system Please contact your System Administrator Select which DECT system is to be used only if the handset is registered to more DECT systems 118 Ena...

Страница 104: ...tem here e g NEC Hilversum Note Currently set value is marked by a blue dot 4 5 n Bluetooth settings G577 Table 16 Bluetooth headset status Icon Description Connected Disconnected In conversation Enab...

Страница 105: ...Telephone settings 107 5 6 66 7 n Disable Bluetooth Open Settings menu section 1 2 3 4 5 6 66 7 n...

Страница 106: ...gs menu section and Enable Bluetooth 1 2 3 Start pairing mode on your Bluetooth headset refer to your headset documentation 4 5 6 7 66 8 8 9 n Connecting a paired Bluetooth headset Open Settings menu...

Страница 107: ...Telephone settings 109 2 3 4 5 6 7 n Disconnecting a paired Bluetooth headset Open Settings menu section 1 2 3 4 5 6 7 n Select required headset e g BT 31R Select required headset e g BT 31R...

Страница 108: ...Telephone settings 110 Renaming a paired Bluetooth headset Open Settings menu section 1 2 3 4 5 6 7 8 9 10 11 n Select required headset e g BT 31R...

Страница 109: ...Telephone settings 111 Retrieve information for a paired Bluetooth headset Open Settings menu section and Enable Bluetooth 1 2 3 4 5 6 7 8 9 10 11 n Select required headset e g BT 31R...

Страница 110: ...Telephone settings 112 Delete a paired Bluetooth headset Open Settings menu section 1 2 3 4 5 6 7 8 9 10 11 n Select required headset e g BT 31R...

Страница 111: ...Telephone settings 113 Delete all paired Bluetooth headsets Open Settings menu section 1 2 3 4 5 6 7 8 9 10 11 n Select required headset e g BT 31R...

Страница 112: ...114 THIS PAGE IS INTENTIONALLY LEFT BLANK...

Отзывы: