background image

1. Installing Internal Optional Devices 


Express5800/B120e  User's Guide 

43

Chapter 2  Preparations 

1.3.3 


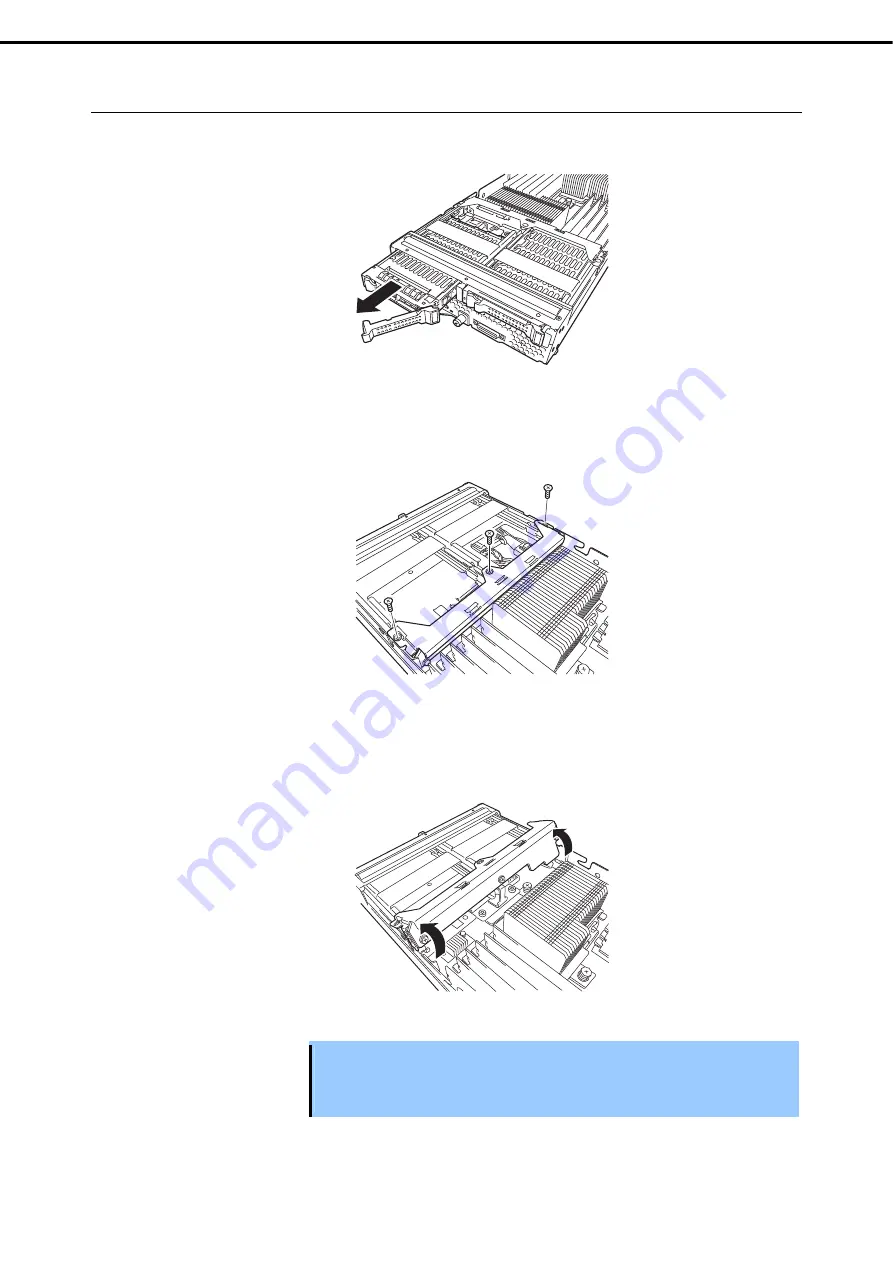
Removal of HSBP bracket 

1. 

Remove both HDDs. 


2. 

Remove three screws from the HSBP bracket. 


3. 

Lift the HSBP bracket and remove it. 

Internal HDD cable and power cable are connected to HSBP. Pay attention not to forcedly pull or bent 

the HSBP. 


Important 


Pay attention not to make the air duct hit any electronic component on the CPU 

blade.  


Pay attention not to damage internal cables. 

Содержание Express5800/B120e

Страница 1: ...s Express5800 B120e User s Guide Chapter 1 General Description Chapter 2 Preparations Chapter 3 Setup Chapter 4 Appendix 40 101 02 101 01 December 2013 First Edition NEC Corporation 2013 Model Number...

Страница 2: ...nection of peripheral devices and proper location for this server Chapter 3 Setup System BIOS configurations and summary of EXPRESSBUILDER PDF Chapter 4 Appendix Specifications and other information I...

Страница 3: ...autions Power saving feature 20 Chapter 1 General Description 22 1 Introduction 23 2 Accessories 24 3 Standard Features 25 3 1 Overview of Blade Server 27 3 2 Management Features 28 3 3 About the Moni...

Страница 4: ...1 10 3 Removal 72 2 Installation and Connection 73 2 1 Installation 73 2 1 1 Checking MAC Address 74 2 2 Connecting Peripheral Devices 76 2 2 1 USB Connection by K410 150 00 SUV Cable 79 2 2 2 Connec...

Страница 5: ...r s Guide 5 5 1 1 About the message caused by power consumption control in Red Hat Enterprise Linux 6 97 6 Device Identification 99 7 Power off of Blade Server 100 Chapter 4 Appendix 101 1 Specificati...

Страница 6: ...functions could occur Note Indicates items that must be confirmed when handling hardware or operating software Tips Indicates information that is helpful to keep in mind when using this server Optical...

Страница 7: ...ial names of Windows Widnows Server 2012 Standard Windows Server 2012 Widnows Server 2012 Datacenter Windows Server 2008 R2 Standard Windows Server 2008 R2 Windows Server 2008 R2 Enterprise Windows Se...

Страница 8: ...arks of Adaptec Inc of the United States LSI and the LSI logo design are trademarks or registered trademarks of LSI Corporation Adobe the Adobe logo and Acrobat are trademarks of Adobe Systems Incorpo...

Страница 9: ...ementation d Industrie Canada Cet appareil num rique de la classe A est conforme la norme NMB 003 du Canada CE Statement This is a Class A product In domestic environment this product may cause radio...

Страница 10: ...lectronic equipment TR on RoHS The content of hazardous substance with the exemption of the applications listed in the Annex 2 of TR on RoHS 1 Lead Pb not over 0 1wt or 1000wt ppm 2 Cadmium Cd not ove...

Страница 11: ...et EEE Y netmeli ine Uygundur Vietnam RoHS information relevant for Vietnam market Complying with CIRCULAR No 30 2011 TT BCT Hanoi August 10 2011 Temporary regulations on content limit for certain haz...

Страница 12: ...ment contact your sales representative 5 Regardless of article 4 NEC Corporation assumes no responsibility for effects resulting from your operations 6 The sample values used in this document are not...

Страница 13: ...WARNING or CAUTION is used to indicate a degree of danger These terms are defined as follows WARNING Indicates there is a risk of death or serious personal injury CAUTION Indicates there is a risk of...

Страница 14: ...ock or fire may be caused Do not touch the server with wet hand Otherwise an electric shock may be caused Do not touch the component specified by this symbol Otherwise an electric shock or burn may be...

Страница 15: ...roduct or your maintenance service company Do not attempt to disassemble the server to replace or recharge the battery by yourself Do not use the server if any smoke odor or noise is present If smoke...

Страница 16: ...ke sure to complete device installation Always install an interface cable CPU blade Solid State Drive and option board firmly An incompletely installed device may cause a contact failure resulting in...

Страница 17: ...nclosure SIGMABLADE Install or remove CPU blades one by one Hold the portions covered with metal plates when a CPU blade is installed or removed To carry a CPU blade put it into the case in which the...

Страница 18: ...ard and external applications Press the POWER switch of the CPU blade Press the RESET switch of the CPU blade Remove the CPU blade from the Blade Enclosure Disconnect the power cord from the power uni...

Страница 19: ...any kind of metal accessories such as a ring bracelet or wrist watch Handling of Components Keep the component in an anti static bag until you install it to the server Hold the component by the edges...

Страница 20: ...autions for Use Be Sure to Read Express5800 B120e User s Guide 20 Handling precautions Power saving feature The server does not support power saving features of OS such as Standby Hibernate and Sleep...

Страница 21: ...rom reflecting bright lights and to make the display contents easy to see Working without adjusting the display to a comfortable angle makes it difficult for you to maintain a proper posture and you w...

Страница 22: ...e server and bundled software and precautions on installation 1 Introduction 2 Accessories Verify the condition of your server s accessories 3 Standard Features Describes standard features of the serv...

Страница 23: ...sor Intel Xeon processor NEC s latest technology and architectures realize more space saving and reduction of running cost than ever The server is designed with consideration of not only reliability b...

Страница 24: ...PDF format on the EXPRESSBUILDER disc Install Adobe Reader into your computer to read them Make sure you have all accessories and inspect them If an accessory is missing or damaged contact your sales...

Страница 25: ...hen registered DIMM is used Forced start up with failed memory Bus parity error detection Temperature detection Error detection Internal voltage monitoring feature BIOS password feature Management Uti...

Страница 26: ...built in Features Software power off Remote power on feature AC Link feature Self diagnosis Power On Self Test POST Test and Diagnosis T D utility Easy setup EXPRESSBUILDER setup utility SETUP BIOS SE...

Страница 27: ...ses such as construction of a power supply and the purchase of the rack for storage may occur With Express5800 BladeSever Series the server function is narrowed to necessity minimum and condensed on o...

Страница 28: ...e and video Monitors temperatures fans voltage power supply door and others Temperature Monitors the temperature inside of the chassis Fan Monitors the fans Voltage Monitors the voltage inside of the...

Страница 29: ...f NEC ESMPRO Manager In Enclosure Power Supply tree in the Information of server state constitution of NEC ESMPRO Manager the status of the power circuit of CPU blade is displayed 3 4 Firmware and Sof...

Страница 30: ...1 CPU 1 Socket for processor 1 CPU 1 CPU 1 and CPU heat sink are factory installed 5 DIMM socket CPU 2 CPU2_DIMM6 CPU2_DIMM3 CPU2_DIMM5 CPU2_DIMM2 CPU2_DIMM4 CPU2_DIMM1 from top 6 DIMM socket CPU 1 CP...

Страница 31: ...ghts when LAN port 2 is connected to the network The lamp blinks when data is being transmitted 8 ID BMC RESET switch Press the ID switch to turn on or off the ID lamp Pressing the ID switch toggles l...

Страница 32: ...nk Access lamp green The lamp lights when LAN port 2 is connected to the network The lamp blinks when data is being transmitted 8 ID BMC RESET switch Press the ID switch to turn on or off the ID lamp...

Страница 33: ...d Features of Component Express5800 B120e User s Guide 33 Chapter 1 General Description External View With top cover installed 1 Top cover 2 Front frame With top cover removed 1 Air duct 2 HSBP bracke...

Страница 34: ...to handle it This section describes SAS Hard Disk Drives as an example 1 Hard Disk Drive 2 BP connector Connect SSD cable to this connector 3 Drive carrier 4 DISK Access lamp green amber Goes on green...

Страница 35: ...The CPU blade of diskless model does not have any Hard Disk Access lamp 1 DMP RST 2 ID 4 3 1 POWER Lamp The POWER lamp lights green while the power of the CPU blade is on The lamp lights amber when t...

Страница 36: ...ction On Green The CPU blade is operating normally Off The power is turned off Turn on the power On Red BMC is being initialized 1 Wait until the lamp goes off 2 If the lamp still goes on check instal...

Страница 37: ...blade is installed Making this lamp being lit can help the maintenance work to identify the faulty device If you press the ID switch the lamp goes on When the recognize command is received from manage...

Страница 38: ...This chapter describes preparations for using this server 1 Installing Internal Optional Devices You can skip this section if you did not purchase any optional devices 2 Ideal Location and Connection...

Страница 39: ...tion make sure to update the system Refer to the Installation Guide for details 1 1 Safety Precautions Be sure to observe the following precautions to install and remove optional devices properly and...

Страница 40: ...over air duct and or front frame removed Do not get your fingers caught when installing components 1 After the shutdown processing for the CPU blade to be removed turn off the power of the CPU blade R...

Страница 41: ...ssing for the CPU blade to be removed turn off the power of the CPU blade 2 Take the CPU blade out from the Blade Enclosure Refer to the User s Guide of the Blade Enclosure 3 Put the CPU blade on an a...

Страница 42: ...ions 1 3 2 Removal of air duct Take steps below to remove air duct Required when installing CPU and DIMMs 1 While pushing latches on both sides of air duct slowly pull the air duct upward to remove it...

Страница 43: ...th HDDs 2 Remove three screws from the HSBP bracket 3 Lift the HSBP bracket and remove it Internal HDD cable and power cable are connected to HSBP Pay attention not to forcedly pull or bent the HSBP I...

Страница 44: ...were Assembling without a component being installed or a cable being disconnected causes the server to malfunction Confirming that no parts such as screws are left in the server Confirm that particul...

Страница 45: ...h the CPU pins by a bare hand or place the CPU directly on the desk For static notes refer to Handling precautions for Anti static Measures Do not operate the system until confirming that the addition...

Страница 46: ...of air duct and 1 3 3 Removal of HSBP bracket 2 Confirm the position of the CPU socket 3 Push down the socket lever once to unlatch it from the hook then slowly open the lever until it stops 4 Lift t...

Страница 47: ...t Be sure to hold the processor only at the edges Pay attention not to touch the bottom of the processor pin section Note the direction of the CPU To prevent the CPU from being inserted into the matin...

Страница 48: ...User s Guide 48 Chapter 2 Preparations 8 Push down the lever to secure the CPU 9 Put the heat sink on the CPU Take care not to touch the cool sheet with your hand Important Install the heat sink in c...

Страница 49: ...emoved 12 Install the CPU blade having been removed to the Blade Enclosure according to the User s Guide of the Blade Enclosure 13 If ACPI uni processor PC or ACPI single processor PC is shown in Driv...

Страница 50: ...the second item of Important in below Important Remove the CPU only when it is defected After operation the cool sheet at the bottom of the heat sink may adhere to the CPU To remove the heat sink fir...

Страница 51: ...or static notes refer to Handling precautions for Anti static Measures Do not use any DIMM not approved by NEC If an unapproved third party s DIMM is installed in the server not only the DIMM but also...

Страница 52: ...uration or RAID configuration using onboard RAID Controller the upper part of DIMM slot is used to connect internal HDD cable Pay attention not to pinch the cable when installing removing a DIMM to fr...

Страница 53: ...g to Chapter 2 1 3 4 Installation of top cover air duct HSBP cover If Mezzanine Card Type 2 for blade is installed remove it according to Chapter 2 1 6 2 Installation 6 Install the CPU blade having be...

Страница 54: ...any error messages are displayed refer to Chapter 3 1 Error Message of POST and Virtual LCD in Maintenance Guide Run SETUP and select Yes after selecting Advanced Memory Configuration Memory Retest Re...

Страница 55: ...metal frame of the server to discharge static electricity from your body before handling the mezzanine card Do not touch the terminals and parts on the mezzanine card by a bare hand and place the car...

Страница 56: ...nine card is MEZ1 and MEZ2 for Type 2 mezzanine card 1000BASE Adapter 4ch N8403 077F can be installed only in the Type 2 mezzanine card slot 1 6 2 Installation Install a mezzanine card in mezzanine ca...

Страница 57: ...CPU blade 6 Install the top cover and air duct according to Chapter 2 1 3 4 Installation of top cover air duct 7 Install the CPU blade having been removed to the Blade Enclosure according to the User...

Страница 58: ...the Hard Disk Drive Do not touch the terminals and parts on the Hard Disk Drive by a bare hand and place the Hard Disk Drive directly on the desk For static notes refer to Handling precautions for An...

Страница 59: ...Solid State Drive in the following procedure Install the first hard disk drive in slot 0 upper then the second hard disk drive in slot 1 lower 1 Remove the dummy tray from the slot if installed Import...

Страница 60: ...ly and gently 4 Insert the hard disk drive until it hits the slot end and close the lever A click occurs when the hard disk drive is locked Important Make sure that the lever hook is engaged with the...

Страница 61: ...mirrored volume Replace the Hard Disk Drives in the procedure meeting your system environment based on the figure on the next page To replace a Hard Disk Drive in a RAID system RAID 1 you can use the...

Страница 62: ...to delete volumes and partitions from a normal disk The volume and partition deletion disables the data to be recovered Take the proper action such as data backup if necessary 2 Shutdown the CPU blade...

Страница 63: ...uch as data backup if necessary 3 Shutdown the CPU blade system and turn off the power of the CPU blade 4 Remove the Hard Disk Drive 5 Install a Hard Disk Drive 6 Turn on the power of the CPU blade 7...

Страница 64: ...e Start menu NEC ESMPRO Agent Properties is displayed 2 Click on the General tab in NEC ESMPRO Agent Properties 3 Select Storage Setting in the General tab Storage is displayed 4 Click on the Reset ta...

Страница 65: ...of each RAID Controller such as available RAID levels or Hard Disk Drives and choose an appropriate RAID Controller Logical Drives except for RAID0 have a smaller usable capacity compared to the total...

Страница 66: ...ard Disk Drives with the same model number If you intend to install the OS to the RAID System the process from RAID configuration to OS installation can be easily completed by using the EXPRESSBUILDER...

Страница 67: ...actory installed TPM kit connector on CPU blade to install TPM kit Important TPM kit is extremely sensitive to static electricity Be sure to touch the metal frame of the server to discharge static ele...

Страница 68: ...nnector on TPM kit is aligned with TPM kit connector on CPU blade Important Do not touch the terminals of the card with your bare hand Fingerprints and dust left on it causes the CPU blade to malfunct...

Страница 69: ...omponents you removed in earlier steps 6 Install the CPU blade having been removed to the Blade Enclosure according to the User s Guide of the Blade Enclosure 7 Turn on the power of the CPU blade Make...

Страница 70: ...ant Internal Flash Memory is extremely sensitive to static electricity Be sure to touch the metal frame of the server to discharge static electricity from your body before handling the Internal Flash...

Страница 71: ...with Internal Flash Memory connector on CPU blade Important Do not touch the terminals of the card with your bare hand Fingerprints and dust left on it causes the CPU blade to malfunction Insert Inte...

Страница 72: ...r side of chassis 5 Install the CPU blade having been removed to the Blade Enclosure according to the User s Guide of the Blade Enclosure 6 Turn on the power of the CPU blade Make sure that no error m...

Страница 73: ...ppropriate to Blade Enclosure and how to install the CPU blade Important The CPU blade is extremely sensitive to static electricity Make sure to touch the metal frame of the CPU blade to discharge sta...

Страница 74: ...he MAC address of LAN port is derived by adding the base value in the table below for the address For convenience the added values of in the table below are quoted in decimal number The MAC address is...

Страница 75: ...1 2 4 5 4 8 9 1 6 12 13 1 2 3 3 6 7 5 10 11 2 7 14 15 PF Physical Function The MAC addresses can be checked from the proper Windows command Windows Enter ipconfig all for the command prompt or from R...

Страница 76: ...safety Failure to observe the precautions may cause death or serious injury For details refer to Safety precautions in Precautions for Use Do not hold the power plug with a wet hand Do not connect ea...

Страница 77: ...se K410 150 00 SUV cable for connection of CPU blade K410 150 00 SUV cable is a standard accessory for the Blade Enclosure SIGMABLADE Important Do not use an external DVD ROM drive connected via the K...

Страница 78: ...he operating system starts running To connect disconnect the SUV cable or add remove the USB device after OS startup follow restrictions of operating system If the device having serial interface is co...

Страница 79: ...IGMABLADE However when using a display unit keyboard and mouse connected to the Blade Enclosure by using the KVM selection feature of the Blade Enclosure do not connect those devices by way of a SUV c...

Страница 80: ...losure is connected to a UPS you may need to change the BIOS SETUP of the CPU blade to link with power supply from the UPS Run BIOS SETUP and select Server AC LINK and change parameter appropriately S...

Страница 81: ...ns in this section 3 EXPRESSSCOPE Engine 3 EXPRESSSCOPE Engine 3 provides useful features through the Baseboard Management Controller BMC 4 EXPRESSBUILDER EXPRESSBUILDER helps you to install Windows a...

Страница 82: ...amp on CPU blade is lit amber The power on operation within the period of 60 seconds from the supply of AC power to every power unit may not turn on the power of the CPU blade If so turn on the power...

Страница 83: ...erver Express5800 B120e User s Guide 83 Chapter 3 Setup 1 1 Power ON from CPU Blade Press the POWER switch on the panel of the CPU blade the POWER lamp on the CPU blade goes on green 1 DMP RST 2 ID PO...

Страница 84: ...vents of System Hardware in the BIOS SETUP Utility 1 3 Power ON from Remote Console The power of the CPU blade can be turned on by using remote control feature of EXPRESSSCOPE Engine 3 BMC 1 4 Operati...

Страница 85: ...ess Any Key to prompt a key entry This message is driven by BIOS of an installed optional board Make sure to read the manual that comes with the optional board before any key entry Powering on the ser...

Страница 86: ...gnated function key following messages you can call the functions below upon completion of POST F2 key Run BIOS Setup Utility SETUP For information on the SETUP refer to Chapter 3 2 BIOS Setup Utility...

Страница 87: ...ails on the utility refer to the manual supplied with each optional board Depending on the configuration the message Press Any Key might appear to prompt a key entry This is a behavior of the BIOS of...

Страница 88: ...tion Flow After a while the following message will be displayed on the lower left of the screen Press F2 SETUP F3 Internal Flash Memory F4 ROM Utility F12 Network If you press F2 key at this time SETU...

Страница 89: ...t use this key when a menu which has on the left is selected Enter key Press this key to confirm the selected parameter Esc key Press this key to cancel pop up menu In sub menu press this key takes yo...

Страница 90: ...are restored Load Previous Values Yes No F3 key If you press this key the following window appears If you select Yes restore the SETUP parameters of the currently selected item to the default setting...

Страница 91: ...ROM Enabled n is PCI slot number of the RAID Controller Change the boot order of devices Boot Boot Option Priorities Change the boot priority Use remote power on function from modem Advanced Advanced...

Страница 92: ...g password 3 times operation stops You cannot operate further Turn off the power Saving changes If you finish configuration select Save Exit and then Save Changes and Exit to save changes and exit If...

Страница 93: ...se functions virtual USB mass storage device Remote FD Remote CD DVD Remote USB Memory or Vritual Flash is always connected as USB mass storage devices for CPU blade Tips More than one removable drive...

Страница 94: ...3 follow steps below to configure the network 1 Run POST following Chapter 3 1 5 1 POST Execution Flow Wait until the following message appears on the lower left of the screen Press F2 SETUP F3 Intern...

Страница 95: ...Property is selected the following screen is displayed On this screen specify whether to use DHCP and if DHCP is not used configure IP Address Subnet Mask 6 It will be available for use if you access...

Страница 96: ...Menu Instruction manuals Stores documents including Instruction Manual of the server Manuals and some software components are not stored in Internal Flash Memory 4 2 Starting EXPRESSBUILDER If you wan...

Страница 97: ...consumption of each CPU blade When the power consumption of a CPU blade has reached the upper limit value the value is changed automatically by optimally allocating the power across the CPU blades th...

Страница 98: ...Model 45 Hardware event This is not a software error It s possible to be to change the power control mode of this product to Static mode from Dynamic mode of default and reduce the output frequency of...

Страница 99: ...llows you to identify the device subject to maintenance among more than one CPU blade installed in the Blade Enclosure The ID lamp on CPU blade can be made lit blue by proper software commands NEC ESM...

Страница 100: ...ess the POWER switch on the panel of the CPU blade Power off from Remote Console The power of the CPU blade can be turned off by using OS Shutdown in remote control feature of EXPRESSSCOPE Engine 3 BM...

Страница 101: ...00 B120e User s Guide 101 NEC Express5800 Series Express5800 B120e Appendix 1 Specifications Describes the specifications of this server 2 Interrupt Lines Describes the interrupt lines assigned to thi...

Страница 102: ...imum SATA_SSD x2 or SATA_HDD x2 or SAS_HDD x2 Graphics VRAM 640 480 to 1280 1024 VRAM 32 MB Floppy disk drive Option USB Auxiliary input device CD DVD ROM drive Option USB Type 1 2 slots when Mezzanin...

Страница 103: ...DD x2 Graphics VRAM 640 480 to 1280 1024 VRAM 32 MB Floppy disk drive Option USB Auxiliary input device CD DVD ROM drive Option USB Type 1 2 slots when Mezzanine Card Type 2 is not used Mezzanine card...

Страница 104: ...you add optional devices Interrupt lines As factory settings interrupt lines are assigned as follows IRQ Peripheral Device Controller IRQ Peripheral Device Controller 0 System timer 8 Real time clock...

Отзывы: