background image

 91 

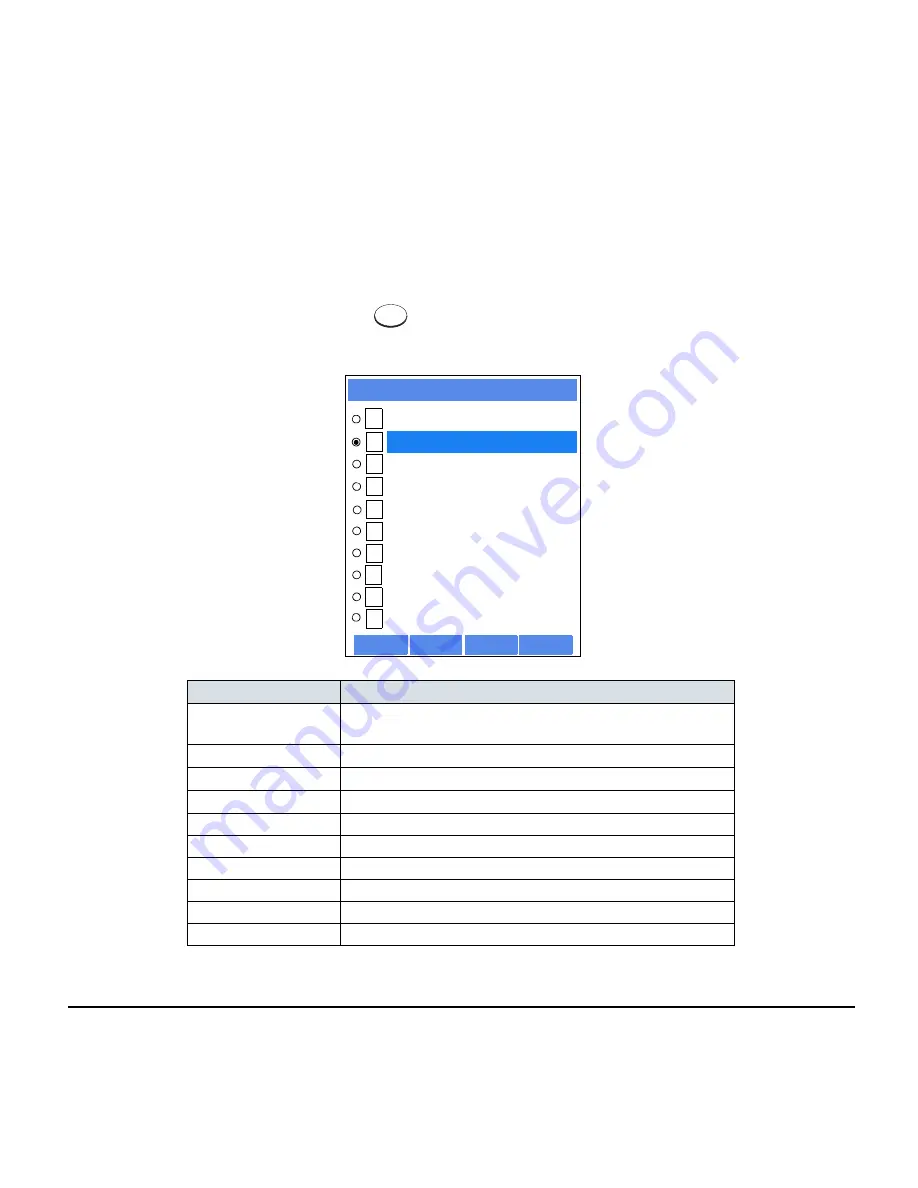
To display the Sub Menu screen, press 

 key or 

Option

 Soft Key while the text input screen is displayed.

Also, the following operations are available from the Sub Menu screen. 

Sub Menu Items

Descriptions

Change-word

Change character entry mode between uppercase alphabetic, 
lowercase alphabetic and numeric character. 

Word-case

Switch between uppercase and lowercase.

Word-width

Not used.

Delete

Delete a single character.

Copy

Copy the specified characters.

Cut

Cut the specified characters.

Paste

Paste the specified characters.

Space

Enter a space.

Return

Start a new line.

Overwrite/Insert

Write over existing characters.

Menu

1

2

Word-width

SubMenu

3

4

5

6

7

8

Paste
Space

Change-word

OK

Cancel

Cut

Delete

Copy

Return

Overwrite/Insert

9

10

Word-case

Содержание DT750

Страница 1: ...DT750 USER S GUIDE NEC Infrontia Corporation 2008 March NWA 039786 001 ISSUE 1 0 UNIVERGE Terminal ...

Страница 2: ......

Страница 3: ... this document for use by its employees and customers The information contained herein is the property of NEC Infrontia Corporation and shall not be reproduced without prior written approval from NEC Infrontia Corporation All brand names and product names on this document are trademarks or registered trademarks of their respective companies Copyright 2008 NEC Infrontia Corporation ...

Страница 4: ......

Страница 5: ...P DOWN KEY 16 SETUP WITH MENU KEY 17 3 BASIC OPERATION TO LOGIN 72 TO LOGOUT 72 TO MAKE AN EXTERNAL CALL 73 TO MAKE AN INTERNAL CALL 74 TO ANSWER AN EXTERNAL CALL 75 TO ANSWER AN INTERNAL CALL 76 MULTILINE APPEARANCE 77 TO HOLD A CALL 78 TO PLACE A CALL ON EXCLUSIVE HOLD 79 TO TRANSFER A CALL 80 TO MAKE A CALL USING ONE TOUCH SPEED CALLING KEYS 81 TO REGISTER NAME ON ONE TOUCH SPEED CALLING KEY 83...

Страница 6: ... DIRECTORY OPERATION TO ADD NEW DATA 125 TO CHANGE GROUP NAME 132 TO FIND A REGISTERED DATA 134 TO MAKE A CALL FROM DIRECTORY 148 TO ADD PREFIX TO NUMBER 150 TO EDIT DIRECTORY DATA 153 TO DELETE ALL DATA 154 TO DELETE A SPECIFIC DATA 155 5 CALL HISTORY OPERATION TO VIEW CALL HISTORY 158 TO MAKE A CALL FROM CALL HISTORY 159 TO ADD CALL HISTORY DATA TO DIRECTORY 161 TO EDIT DIRECTORY DATA FROM CALL ...

Страница 7: ...iii TABLE OF CONTENTS 6 MENU LIST MENU LIST FOR DT750 170 7 ONLINE MONITORING ...

Страница 8: ...1 1 1 INTRODUCTION FACE LAYOUT DT750 ITL 320C 1 Exit Help 1 2 ABC 3 DEF 4 GHI 5 JKL 6 MNO 7 PQRS 8 TUV 9 WXYZ 0 Menu HOLD Transfer Speaker Recall Feautre Answer Mic Redial 227 mm 227 mm ...

Страница 9: ...erface 2 port 10BASE T 100BASE TX Full duplex Half duplex Auto Negotiation Fixed Voice CODEC G 711 G 729a G 722 IP Address Setting Sets via DHCP server Sets Directly QoS ToS IP Precedence Diffserv VLAN Tag VLAN IEEE802 1Q p Security IEEE802 1x authentication EAP MD5 EAP TLS EAPOL Forwarding RTP Encryption Auto Config Encryption Power Supply Center Power Supply IEEE802 3af Local Power Supply AC ada...

Страница 10: ...el LCD Liquid Crystal Display provides DT750 activity information Basically the screen on the LCD consists of the following three information areas 1 Icon Area This area displays Desktop Icons which provide Exit Help 1 2 ABC 3 DEF 4 GHI 5 JKL 6 MNO 7 PQRS 8 TUV 9 WXYZ 0 Menu HOLD Transfer Speaker Recall Feautre Answer Mic Redial 1 2 3 4 5 6 7 8 9 10 12 15 14 13 11 LINE 01 LINE 02 LINE 03 LINE 04 L...

Страница 11: ... on the LCD by pressing this key 7 Recall Press key to finish the call and hear the dial tone 8 Feature Used to activate any features as terminal setup functions etc and to program One Touch Speed Dial Keys 9 Answer When LED on this key is lit press key to answer a waiting call 10 Mic Press key to respond hands free LED on this key lights during speakerphone operation 11 Menu To access the local m...

Страница 12: ...eaker which can be used for Hands Free dialing monitoring LED on key lights when key is active All standard IP versions include support for full duplex hands free mode All TDM and IP enabled versions are half duplex hands free mode 14 Transfer Allows the station user to transfer established calls to another station without attendant assistance 15 Hold Press this key to place an internal or externa...

Страница 13: ... Directory To use Directory features There are the following three types of directory features Personal Directory Controlled by telephone set For details see 4 DI RECTORY OPERATION Phonebook Controlled by the system For details see PHONE BOOK Corporate Directory Controlled by the external XML server For de tails please contact the system ad ministrator Tool Uses when accessing external XML server ...

Страница 14: ...tatus Icon Status information on the Line key such as call ter mination Call Hold or Busy can be indicated as fol lowing Icons LINE 01 LINE 02 LINE 03 LINE 04 LINE 05 LINE 06 LINE 07 LINE 08 1 2 4 3 MIC DND 7 25 AM MON 18 JUL 2008 a Status Icon b Programmable Key Information c Page USER S STATUS ICON FLASHIN PATTERN Idle No Icon Call Hold Individual Hold Individual Hold on Call Park Group Blink Th...

Страница 15: ...ay when a feature is assigned to a Programmable Key The following shows an example of LCD display when One Touch Speed Dial Key is assigned to a Programmable Key For One Touch Speed Dial Key No status icon is displayed Users can register name on each One Touch Speed Dial key OR KEY DESCRIPTION NUMBER OF DIGITS Line Key Name and Number infor mation 8 digits One Touch Speed Dial Key Speed Dial Name ...

Страница 16: ...age Switching Form Page 1 to 3 STATUS OF PAGE ICON DESCRIPTION Steady Lit Indicates currently displayed page Blink Indicates page with event happening 1 1 2 3 4 2 3 4 LINE 01 LINE 02 LINE 03 LINE 04 LINE 05 LINE 06 LINE 07 LINE 08 LINE 17 LINE 18 LINE 19 LINE 20 LINE 21 LINE 22 LINE 23 LINE 24 FLASHING INCOMING CALL Touch flashing button to go to Page 3 Touch this Line Key to asnswer Incoming Call...

Страница 17: ...en desired Soft Key for helpful information about that key MIC Microphone Press the Soft Key below MIC to activate or deactivate the Microphone LED on Mic key will illuminate when Mic is on DND Do Not Disturb Press the Soft Key to reject call termination to the preassigned station Default Displays for Each Status Default Soft Key settings are provided corresponding to particular functions Differen...

Страница 18: ...lready been registered is in logout status E OVR Executive Override Enables selected station users upon encountering a busy condition at an internal station to bridge into the busy connection CW Call Waiting Enables a busy station to receive a second incoming call A camp on indication tone is sent to the busy station and the user can use a switchhook flash to answer the second call CB Call Back Pr...

Страница 19: ... user to send a switchhook flash while on an outside trunk UCDBO UCD Busy Out Allows a station user to block UCD calls and to cancel Busy Out FLASH Flash Provides the station with a switchhook flash FDN Call Forward No Answer Permits a call to an unanswered station to be forwarded to a predesignated station if the called station does not answer within a predetermined period of time C RPT ISDN Mali...

Страница 20: ... Zone Paging Allows a user to make a voice call through the speakers of the designated group IDCHG Call ID Change Display Allows the user to toggle between standard display and an alternate display GPICK Call Pickup Group Enhancement Allows the user to answer any ringing station within the user s expanded call pickup group CHCNF Call Hold Conference Allows a station user to establish a conference ...

Страница 21: ...UL 2008 Icon Display Area 1 LINE 01 LINE 02 LINE 03 LINE 04 FEATURE ICON DESCRIPTION Missed Call This icon appears when there is a missed call Once the user has checked the missed call this icon will disappear Voice Mail This icon provides notification of incoming Voice Mail Once the user has checked the mail this icon will disappear Cursor This icon indicates the currently available direction of ...

Страница 22: ...ote Unavailable Menu items are grayed out FEATURE DESCRIPTION Missed Calls Access to history of Missed Call Voice Mail Access to history of incoming Voice Mail IM Currently Not Used grayed out Presence Currently Not Used grayed out Bluetooth Currently Not Used grayed out GHI 9 XYZ Menu eaker Answer Mic Redial Press Enter Key Shortcut Menu 2 Voice Mail 3 Receive IM 1 Missed Calls 3 Bluetooth 3 Pres...

Страница 23: ...k status or during the call UP DOWN TO ADJUST SPEAKER VOLUME Press Up Down Cursor key during speakerphone operation or during the call UP DOWN TO ADJUST RINGER TONE Press Up Down Cursor key during ringing UP DOWN 5 17 PM WED 15 APR 2008 1 2 3 4 31310 31311 31312 31313 31314 31315 31316 31317 HANDSET 31310 5 17 PM WED 15 APR 2008 1 2 3 4 31310 31311 31312 31313 31314 31315 31316 31317 SPEAKER 31310...

Страница 24: ... cursor or OK soft key or press key Select Incoming Call and then press Enter Right cursor or OK soft key or press key Note On the Menu use or soft key to move the cursor up down a line Note The user can also navigate through the menu with touch panel operation OK Menu History Menu Directory Tool Call Func Presence Setting Favorite Config OK Back Menu 5 Back OK Tool Directory History Setting Prese...

Страница 25: ...oft key OK Back 1 1 User Setting 1 2 3 4 5 6 0 Display Change Password Peripherals Setting Reset Talk Security Incoming Call 2 2 OK Back 1 1 Incoming Call 1 2 3 4 5 6 Headset Ring Ring Tone Headset Ring Volume Illumination Ring Volume Offhook Ring 1 2 Note Default setting is 2 Enable Note The currently enabled item is highlighted 1 2 1 1 Disable OK Back Enable Offhook Ring ...

Страница 26: ...ht cursor or OK soft key or press key Select Incoming Call and then press Enter Right cursor or OK soft key or press key Select Headset Ring and then press Enter Right cursor or OK soft key or press key Menu 5 Back OK Tool Directory History Setting Presence Favorite Config Call Func Menu 1 1 Back OK 1 2 Data Backup Restore Setting 3 Download User Setting 1 1 1 1 OK Back 1 1 User Setting 1 2 3 4 5 ...

Страница 27: ... press Enter or OK soft key Note Default setting is 1 Disable Note The currently enabled item is highlighted OK Back 1 1 Incoming Call 1 2 3 4 5 6 Ring Tone Headset Ring Volume Illumination Ring Volume Offhook Ring Headset Ring 1 2 1 2 Enable 1 1 Disable OK Back Headset Ring ...

Страница 28: ...nter Right cursor or OK soft key or press key Select Incoming Call and then press Enter Right cursor or OK soft key or press key Select Ring Tone and then press Enter Right cursor or OK soft key or press key Menu 5 Back OK Tool Directory History Setting Presence Favorite Config Call Func Menu 1 1 Back OK 1 2 Data Backup Restore Setting 3 Download User Setting 1 1 1 1 OK Back 1 1 User Setting 1 2 3...

Страница 29: ...Call 1 1 IM Internal Call No Menu Item Frequency Hz Remarks 1st 2nd 0 Automatic 520 660 16Hz modulation 1 Tone Type1 520 660 16Hz modulation 2 Tone Type2 520 660 8Hz modulation 3 Tone Type3 1400 1100 Door Phone 4 Tone Type4 1100 No modulation 5 Tone Type5 540 No modulation 6 Tone Type6 1100 1400 16Hz modulation 7 Tone Type7 660 760 16Hz modulation 8 Tone Type8 1100 Envelope 9 Tone Type9 Door Phone...

Страница 30: ...ne set here Ringer Tone type can be set for Name Group and Telephone set The ringer Tone type set for Name has higher priority than the types set for Group and Terminal set Note When 0 Automatic is selected or the ringer tone setting is not performed 1 Tone Type1 is applied No Menu Item Frequency Hz Remarks 1st 2nd ...

Страница 31: ...nd then press Enter Right cursor or OK soft key or press key Select Incoming Call and then press Enter Right cursor or OK soft key or press key Select Illumination and then press Enter Right cursor or OK soft key or press key Menu 5 Back OK Tool Directory History Setting Presence Favorite Config Call Func Menu 1 1 Back OK 1 2 Data Backup Restore Setting 3 Download User Setting 1 1 1 1 OK Back 1 1 ...

Страница 32: ...ion pattern and then press Enter or OK soft key OK Back 1 1 Incoming Call 1 2 3 4 5 6 Headset Ring Volume Ring Volume Offhook Ring Headset Ring Ring Tone Illumination 1 2 Back OK 1 2 3 External Call 1 1 IM Internal Call Illumination Note The default setting is 0 Automatic Note The currently enabled item is highlighted 0 1 2 3 OK Back 4 5 6 7 1 2 Automatic External Call Disable Red Green Yellow Blu...

Страница 33: ...ht cursor or OK soft key or press key Select Talk and then press Enter Right cursor or OK soft key or press key Select RTP Alarm and then press Enter Right cursor or OK soft key or press key Menu 5 Back OK Tool Directory History Setting Presence Favorite Config Call Func Menu 1 1 Back OK 1 2 Data Backup Restore Setting 3 Download User Setting 1 1 2 2 OK Back 1 1 User Setting 1 2 3 4 5 6 0 Display ...

Страница 34: ...tem the default setting Alarm ON is applied 1 Disable Follow the setting on the terminal OFF 2 Enable Follow the setting on the terminal ON Back OK 1 1 Talk 1 2 3 4 5 DTMF Tone Key Touch Tone Hold Music Prefix RTP Alarm 0 1 2 0 1 1 1 Automatic OK Back Disable RTP Alarm 2 Enable Note For the setting on the System contact to the Sys tem Administrator Note The currently enabled item is highlighted ...

Страница 35: ...ht cursor or OK soft key or press key Select Talk and then press Enter Right cursor or OK soft key or press key Select DTMF Tone and then press Enter Right cursor or OK soft key or press key Menu 5 Back OK Tool Directory History Setting Presence Favorite Config Call Func Menu 1 1 Back OK 1 2 Data Backup Restore Setting 3 Download User Setting 1 1 2 2 OK Back 1 1 User Setting 1 2 3 4 5 6 0 Display ...

Страница 36: ...tem the default setting DTMF ON is applied 1 Disable Follow the setting on the terminal OFF 2 Enable Follow the setting on the terminal ON Back OK 1 1 Talk 1 2 3 4 5 Key Touch Tone Hold Music Prefix RTP Alarm DTMF Tone 0 1 2 0 1 1 1 Automatic OK Back Disable 2 Enable DTMF Tone Note For the setting on the System contact to the Sys tem Administrator Note The currently enabled item is highlighted ...

Страница 37: ...er Setting and then press Enter Right cursor or OK soft key or press key Select Talk and then press Enter Right cursor or OK soft key or press key Select Key Touch Tone and then press Enter Right cursor or OK soft key or press key Menu 5 Back OK Tool Directory History Setting Presence Favorite Config Call Func Menu 1 1 Back OK 1 2 Data Backup Restore Setting 3 Download User Setting 1 1 2 2 OK Back...

Страница 38: ...t key Note When 0 Automatic is set the default setting Tone is applied Note The currently enabled item is highlighted Back OK 1 1 Talk 1 2 3 4 5 Hold Music Prefix RTP Alarm DTMF Tone Key Touch Tone 0 1 2 3 0 1 2 3 OK Back 1 1 Key Touch Tone No Tone Tone Automatic Voice ...

Страница 39: ...er Right cursor or OK soft key or press key Select Talk and then press Enter Right cursor or OK soft key or press key Select Hold Music and then press Enter Right cursor or OK soft key or press key Menu 5 Back OK Tool Directory History Setting Presence Favorite Config Call Func Menu 1 1 Back OK 1 2 Data Backup Restore Setting 3 Download User Setting 1 1 2 2 OK Back 1 1 User Setting 1 2 3 4 5 6 0 D...

Страница 40: ...d Select Download when a downloaded data is used as Music on Hold Then press Enter or OK soft key Note The currently enabled item is highlighted Back OK 1 1 Talk 1 2 3 4 5 Prefix RTP Alarm DTMF Tone Key Touch Tone Hold Music 1 2 1 2 OK Back 1 1 Default Download Hold Music ...

Страница 41: ...ess Enter Right cursor or OK soft key or press key Select Time Format and then press Enter Right cursor or OK soft key or press key Note This setting is available for Time Display only Call Log feature displays the time in 24 hour for mat regardless of this setting Menu 5 Back OK Tool Directory History Setting Presence Favorite Config Call Func Menu 1 1 Back OK 1 2 Data Backup Restore Setting 3 Do...

Страница 42: ...hour Indication 12 hour clock 2 24 hour Indication 24 hour clock Note For the setting on the System contact to the Sys tem Administrator Note The currently enabled item is highlighted Back OK 1 1 1 2 3 4 5 6 Back Light Language Font Size Local Volume Screen Server Time Format Display 7 Advanced 0 1 OK Back 1 1 2 12 hour Indication 24 hour Indication Automatic Time Format ...

Страница 43: ...Select User Setting and then press Enter Right cursor or OK soft key or press key Select Display and then press Enter Right cursor or OK soft key or press key Select Local Volume and then press Enter Right cursor or OK soft key or press key Menu 5 Back OK Tool Directory History Setting Presence Favorite Config Call Func Menu 1 1 Back OK 1 2 Data Backup Restore Setting 3 Download User Setting 1 1 3...

Страница 44: ...l is displayed on LCD default 1 Disable Each volume level is not displayed on LCD 2 Enable Each volume level is displayed on LCD Note The currently enabled item is highlighted Back OK 1 1 1 2 3 4 5 6 Back Light Language Font Size Screen Server Time Format Display 7 Advanced Local Volume 0 1 OK Back 1 1 2 Automatic Local Volume Disable Enable ...

Страница 45: ...Enter Right cursor or OK soft key or press key Select Display and then press Enter Right cursor or OK soft key or press key Select Back Light and then press Enter Right cursor or OK soft key or press key Menu 5 Back OK Tool Directory History Setting Presence Favorite Config Call Func Menu 1 1 Back OK 1 2 Data Backup Restore Setting 3 Download User Setting 1 1 3 3 OK Back 1 1 User Setting 1 2 3 4 5...

Страница 46: ...selection press Enter or OK soft key Note The currently enabled item is highlighted Back OK 1 1 1 2 3 4 5 6 Language Font Size Screen Server Time Format Display 7 Advanced Local Volume Back Light 1 2 OK Back 1 1 3 Level 1 Bright Level 3 Back Light 4 Level 4 Dark Level 2 ...

Страница 47: ...ter Right cursor or OK soft key or press key Select Display and then press Enter Right cursor or OK soft key or press key Select Font Size and then press Enter Right cursor or OK soft key or press key Menu 5 Back OK Tool Directory History Setting Presence Favorite Config Call Func Menu 1 1 Back OK 1 2 Data Backup Restore Setting 3 Download User Setting 1 1 3 3 OK Back 1 1 User Setting 1 2 3 4 5 6 ...

Страница 48: ...aking a selection press Enter or OK soft key Note The currently enabled item is highlighted Back OK 1 1 1 2 3 4 5 6 Language Screen Server Time Format Display 7 Advanced Local Volume Back Light Font Size 1 2 OK Back 1 1 Font Size Small 12dot Standard 16dot ...

Страница 49: ...er Right cursor or OK soft key or press key Select Display and then press Enter Right cursor or OK soft key or press key Select Language and then press Enter Right cursor or OK soft key or press key Menu 5 Back OK Tool Directory History Setting Presence Favorite Config Call Func Menu 1 1 Back OK 1 2 Data Backup Restore Setting 3 Download User Setting 1 1 3 3 OK Back 1 1 User Setting 1 2 3 4 5 6 0 ...

Страница 50: ...y Note The currently enabled item is highlighted Back OK 1 1 1 2 3 4 5 6 Screen Server Time Format Display 7 Advanced Local Volume Back Light Font Size Language 0 1 2 3 OK Back 4 5 6 7 1 3 Automatic Japanese NEC English NEC Spanish NEC French German Italian NEC Portuguese Language ...

Страница 51: ...en press Enter Right cursor or OK soft key or press key Select Display and then press Enter Right cursor or OK soft key or press key Select Advanced and then press Enter Right cursor or OK soft key or press key Menu 5 Back OK Tool Directory History Setting Presence Favorite Config Call Func Menu 1 1 Back OK 1 2 Data Backup Restore Setting 3 Download User Setting 1 1 3 3 OK Back 1 1 User Setting 1 ...

Страница 52: ...d then Enter or OK soft key Back OK 1 1 1 2 3 4 5 6 Screen Server Time Format Display 7 Local Volume Back Light Font Size Language Advanced 2 2 Back OK 1 2 Shortcut Icon Advanced 3 Wallpaper Select 1 1 Font Color 4 Touch Panel 1 2 Note The currently enabled item is highlighted 1 1 1 OK Back Disable 2 Enable Touch Panel ...

Страница 53: ...ress key Select User Setting and then press Enter Right cursor or OK soft key or press key Select Change and then press Enter Right cursor or OK soft key or press key The Change Password screen is displayed Enter the old password and then press Down cursor or Set soft key Menu 5 Back OK Tool Directory History Setting Presence Favorite Config Call Func Menu 1 1 Back OK 1 2 Data Backup Restore Setti...

Страница 54: ...hanging the password for the first time enter 0000 as the old password OK Cancel BK 1 Change Password New Pass Retry Pass Old Pass Set OK Cancel BK 1 Change Password Retry Pass Old Pass Set New Pass Note A maximum of 32 digits 0 9 and can be set as a password Note When the password entry ends in failure the fol lowing error message is issued In that case press OK soft key and then make a retry OK ...

Страница 55: ...48 OK Password Error Password ...

Страница 56: ...hen press Enter Right cursor or OK soft key or press key Select Setting and then press Enter Right cursor or OK soft key or press key Enter the password and then press Enter or OK soft key Menu 5 Back OK Tool Directory History Setting Presence Favorite Config Call Func Menu 1 1 Back OK 1 2 Data Backup Restore Setting 3 Download User Setting 1 1 0 0 OK Back 1 1 User Setting 1 2 3 4 5 6 0 Peripheral...

Страница 57: ...50 Press Enter or OK soft key to clear the per sonal data of the telephone OK Back Setting Reset Input a password BK 1 OK Setting Reset Are you sure Back ...

Страница 58: ...to a desired direc tory of TFTP server and then specify it as the directory for downloading STEP 2 While indicating the current time on LCD press key to open the Menu screen Select Setting and then press Enter or OK soft key or press key STEP 3 Select Download and then press En ter Right cursor or OK soft key or press key STEP 4 Select Protocol and then press En ter Right cursor or OK soft key or ...

Страница 59: ...hen TFTP is selected here go to the next STEP 15 STEP 7 Select FTP Settings and then press Enter Right cursor or OK soft key or press key STEP 8 Select User ID and then press Enter Right cursor or OK soft key or press key Back OK 1 2 Download Menu 3 1 1 4 FTP Settings Download Files Download Address Protocol 1 2 OK Back 1 1 FTP TFTP Protocol 1 2 4 4 OK Back 1 1 Download Menu 1 2 3 4 Download Files...

Страница 60: ...OK soft key STEP 12 The display goes back to the FTP Settings screen Select Folder and then press Note For details on character entry method see LAST NUMBER REDIAL in chapter 4 Basic Operation Back OK 1 2 FTP Settings 3 1 1 Password Folder User ID OK Back BK A User ID Input a user ID 2 Note For details on character entry method see LAST NUMBER REDIAL in chapter 4 Basic Operation 2 Back OK 1 2 3 1 ...

Страница 61: ...P 15 Select Download Address and then press Enter Right cursor or OK soft key or press key STEP 16 Enter an IP address of the FTP TFTP server Note For details on character entry method see LAST NUMBER REDIAL in chapter 4 Basic Operation 3 OK Back 1 1 1 2 3 FTP Settings User ID Password Folder OK Back BK A Folder Input a folder name Back OK 1 2 FTP Settings 3 1 1 Password Folder User ID 2 2 OK Back...

Страница 62: ...hen Ring Tone is selected at STEP 16 the following Ring Tone screen is displayed Select either Download1 Download2 or Download3 OK Back BK 1 Download Address For 0 0 0 0 1 1 Back OK 1 2 Download Menu 3 1 1 4 FTP Settings Download Address Protocol Download Files When downloading a file for Music on Hold Select Hold Music and go to STEP 18 When downloading a file for ringer tone Select Ring Tone and...

Страница 63: ...le Format Maximum Size PCM µ low 16kHz s wav under 15 seconds PCM µ low 8kHz s wav under 30 seconds Back OK 1 2 Ring Tone 3 1 1 Download 2 Download 3 Download 1 Hold Music BK A Input a file name MOH wav Cancel Exec File Format Maximum Size PCM µ low 16kHz s wav under 15 seconds PCM µ low 8kHz s wav under 30 seconds File Name Directory csv Fixed Code Unicode UTF 8 Download 1 2 3 BK A Input a file n...

Страница 64: ... _ can be entered as a file name Note To delete an entered character press BK soft key Note Be sure not to turn OFF the DT750 while Sav ing is displayed on the LCD Note When the downloading process ends in failure Downloading Failed is displayed on the LCD Check to see the following and then make a retry Check Points Actions Download file is not placed in the specified directory Place the download...

Страница 65: ...estination directory for the backed up file STEP 2 While indicating the current time on LCD press key to open the Menu screen Select Setting and then press Enter Right cursor or OK soft key or press key STEP 3 Select Data Backup Restore and then press Enter Right cursor or OK soft key or press key STEP 4 Select Protocol and then press En ter Right cursor or OK soft key or press key Note For detail...

Страница 66: ... here go to the next STEP 15 STEP 7 Select FTP Settings and then press Enter Right cursor or OK soft key or press key STEP 8 Select User ID and then press Enter Right cursor or OK soft key or press key Back OK 1 2 3 1 1 4 Data Backup Data Restore Server Address FTP Settings Protocol 5 Backup Restore 1 2 OK Back 1 1 FTP TFTP Protocol 1 2 5 5 OK Back 1 1 1 2 3 4 Server Address Protocol Backup Restor...

Страница 67: ...OK soft key STEP 12 The display goes back to the FTP Settings screen Select Folder and then press Note For details on character entry method see LAST NUMBER REDIAL in chapter 4 Basic Operation Back OK 1 2 FTP Settings 3 1 1 Password Folder User ID OK Back BK A User ID Input a user ID 2 Note For details on character entry method see LAST NUMBER REDIAL in chapter 4 Basic Operation 2 Back OK 1 2 3 1 ...

Страница 68: ...5 Select Server Address and then press Enter Right cursor or OK soft key or press key STEP 16 Enter an IP address of the destination FTP Note For details on character entry method see LAST NUMBER REDIAL in chapter 4 Basic Operation 3 OK Back 1 1 1 2 3 FTP Settings User ID Password Folder OK Back BK A Folder Input a folder name Back OK 1 2 FTP Settings 3 1 1 Password Folder User ID 3 3 OK Back 1 1 ...

Страница 69: ...LCD displays Uploading first and then Saving OK Back BK 1 For 0 0 0 0 Server Address 1 1 Note Do not change the extension of the backup file The setting data of the telephone can only be backed up as a tgz file Note When changing the default file name press BK soft key once to delete the default file name and then enter a new file name by using the digits keys Note For details on character entry m...

Страница 70: ...LCD Check to see the following and then make a retry Check Points Actions A different file name is specified between DT750 and FTP TFTP server Set the same file name from both DT750 and FTP TFTP server Incorrect IP address of FTP TFTP server has been entered from the telephone Set the proper IP address of FTP TFTP server Exit Upload Complete The power to FTP TFTP server or network equipment is OFF...

Страница 71: ...ore into a desired directory of TFTP server and then specify it as the directory for downloading STEP 2 While indicating the current time on LCD press key to open the Menu screen Select Setting and then press Enter Right cursor or OK soft key or press key STEP 3 Select Data Backup Restore and then press Enter Right cursor or OK soft key or press key STEP 4 Select Protocol and then press En ter Rig...

Страница 72: ... selected here go to the next STEP 15 STEP 7 Select FTP Settings and then press Enter Right cursor or OK soft key or press key STEP 8 Select User ID and then press Enter Right cursor or OK soft key or press key Back OK 1 2 3 1 1 4 Data Backup Data Restore Server Address FTP Settings Protocol 5 Backup Restore 1 2 OK Back 1 1 FTP TFTP Protocol 1 2 5 5 OK Back 1 1 1 2 3 4 Server Address Protocol Back...

Страница 73: ...OK soft key STEP 12 The display goes back to the FTP Settings screen Select Folder and then press Note For details on character entry method see LAST NUMBER REDIAL in chapter 4 Basic Operation Back OK 1 2 FTP Settings 3 1 1 Password Folder User ID OK Back BK A User ID Input a user ID 2 Note For details on character entry method see LAST NUMBER REDIAL in chapter 4 Basic Operation 2 Back OK 1 2 3 1 ...

Страница 74: ...Select Server Address and then press Enter Right cursor or OK soft key or press key STEP 16 Enter an IP address of the FTP TFTP server Note For details on character entry method see LAST NUMBER REDIAL in chapter 4 Basic Operation 3 OK Back 1 1 1 2 3 FTP Settings User ID Password Folder OK Back BK A Folder Input a folder name Back OK 1 2 FTP Settings 3 1 1 Password Folder User ID 3 3 Back OK 1 2 3 ...

Страница 75: ...ing the backup data the LCD displays Downloading first and then Sav ing OK Back BK 1 For 0 0 0 0 Server Address 2 1 Note Do not change the extension of the backup file The setting data of the telephone can only be backed up as a tgz file Note When changing the default file name press BK soft key once to delete the default file name and then enter a new file name by using the digits keys Note For d...

Страница 76: ...a retry Check Points Actions Download file is not placed in the specified directory Place the download file in the specified directory A different file name is specified between DT750 and FTP TFTP server Set the same file name from both DT750 and FTP TFTP server Exit Download Complete Incorrect IP address of FTP TFTP server has been entered from the telephone Set the proper IP address of FTP TFTP ...

Страница 77: ... CALL MULTILINE APPEARANCE TO HOLD A CALL TO PLACE A CALL ON EXCLUSIVE HOLD TO TRANSFER A CALL TO MAKE A CALL USING ONE TOUCH SPEED CALLING KEYS TO REGISTER NAME ON ONE TOUCH SPEED CALLING KEY TO MAKE A CALL USING SPEED CALLING STATION GROUP TO MAKE A CALL USING SPEED CALLING SYSTEM LAST NUMBER REDIAL THREE PARTY CONFERENCE HOW TO INPUT CHARACTERS SECURITY MODE EMERGENCY CALL PHONEBOOK CALL HISTOR...

Страница 78: ... Logout soft key on the ter minal LOGOUT is displayed on the LCD of the termi nal Press the Logout soft key on the terminal again Cancel BK Set OK Password Login ID Time Feature Activity Information Area of LCD Cancel BK Set OK Password Login ID 2000 Cancel BK Set OK Password Login ID 2000 Note The soft key location is an example Note Logout soft key is assigned by data setting at the ECP Enterpri...

Страница 79: ...s My Line of the telephone 1 25 PM TUE 18 MAR 2008 XXXX Station Number of My Line MIC DND 1 25 PM TUE 18 MAR 2008 9 Dialed Code 1 25 PM TUE 18 MAR 2008 9XXXXXXXXX Dialed Code Number Note My Line is an actual line that is directly associ ated with station number of the telephone The user can make answer a call via this line Usually My line is seized automatically only by lifting the handset or pres...

Страница 80: ...mmodates My Line of the telephone 1 25 PM TUE 18 MAR 2008 XXXX Station Number of My Line Blink 1 25 PM TUE 18 MAR 2008 XXXX Dialed Number 1 25 PM TUE 18 MAR 2008 XXXX Dialed Number Note My Line is an actual line that is directly associ ated with station number of the telephone The user can make answer a call via this line Usually My line is seized automatically only by lifting the handset or press...

Страница 81: ...caller ID is not received the LCD displays as follows Answer 31315 Line Key receving an Incoming Call Starts to falsh Answer 31315 Status icon changes as follows Calling Party Number 15 39 Elapsed Time Note When an incoming call is terminated to My Line of the telephone the user can usually answer the call only by lifting the handset or pressing the Speaker Key 1 25 PM TUE 18 MAR 2008 15 39 DDD 3 ...

Страница 82: ...et to answer the call Answer 31313 Starts to falsh Line Key which accommodates My Line of the telephone 1 25 PM TUE 18 MAR 2008 XXXX Calling Station Number Blink 31313 Status icon changes as follows 1 25 PM TUE 18 MAR 2008 XXXX Calling Station Number Note When an incoming call is terminated to My Line of the telephone the user can usually answer the call only by lifting the handset or pressing the...

Страница 83: ...y TO ANSWER A CALL A call is terminated to the telephone whose station number is accommodated to the MULTILINE APPEARANCE Feature key ringing and flashing Call Indicator lamp alert user to incoming call Touch the MULTILINE APPEARANCE Feature key on the display key lamp lights red Lift handset to start a conversation key lamp goes off Note For the setting of Multiline Appearance contact the System ...

Страница 84: ... the display IF UNANSWERED After preprogrammed time Automatic Recall is initi ated Call Indicator lamp flashes and the user hears Automatic Recall Ringer 31313 Line Key which is being used HOLD 31313 31313 Status icon changes as follows Flashing 1 25 PM TUE 18 MAR 2008 HOLD XXXX Held Station Number Speaker Note Any station with this line appearance can retrieve the call 31313 Status icon changes a...

Страница 85: ...y on the display The con versation is re established IF UNANSWERED After preprogrammed time Automatic Recall is initi ated Call Indicator lamp flashes and the user hears Automatic Recall Ringer 31313 Line Key which is being used HOLD 31313 31313 Status icon changes as follows Flashing 1 25 PM TUE 18 MAR 2008 E_HOLD XXXX Held Station Number Speaker Note Only the telephone that set Exclusive Hold op...

Страница 86: ...rs the music on hold Dial the destination party s number Receive Ring back Tone The destination party answers the call Announce the call to the destination party Replace the handset The transfer is complete Transfer 1 25 PM TUE 18 MAR 2008 TRANSFER Destination station or trunk number 1 25 PM TUE 18 MAR 2008 TRANSFER XXXX ...

Страница 87: ...y Enter a desired telephone number or feature access code up to 32 digits on the keypad Dis play indicates the digits dialed Press key again to save the number key lamp goes off TO VERIFY Press key key lamp lights red Touch a desired One Touch Speed Calling key on the display Display indicates the assigned number 0821111 Speaker 1 25 PM TUE 18 MAR 2008 0821111 Speaker Feature Feature 1 25 PM TUE 1...

Страница 88: ...r dialing station number V displays on LCD Note One Touch Speed Calling key for feature access One Touch Speed Calling key may be used as a feature key by storing the UNIVERGE SV7000 feature access code The features may be pro grammed on a system basis by the Telephony Server Administrator Access codes may be stored in conjunction with telephone numbers For example one button can be programmed by ...

Страница 89: ...entered name Name information displayed on the One Touch Speed Calling key changes as follows Note For the key to which no name information is reg istered the character SPD will be displayed 1 25 PM TUE 18 MAR 2008 NAME Push Speed Calling Key SPD BK BK NEC BNET Note To delete the entry press DEL or BK key and delete each one character Note To delete the whole setting press CLEAR key and back to id...

Страница 90: ...mation of One Touch Speed Calling Key Uppercase Alphabetic Characters DIGIT KEY 1 2 3 4 5 6 7 8 9 0 CHARACTER 1 A D G J M P T W 0 B E H K N Q U X C F I L O R V Y a d g j m S t Z b e h k n p u w c f i l o q v x 2 3 4 5 6 r 8 y s z 7 9 ...

Страница 91: ...GIT KEY 1 2 3 4 5 6 7 8 9 0 CHARACTER A D G J M P T W 0 B E H K N Q U X C F I L O R V Y À È Ì 5 Ñ S Ù Z Á É Í Ò β Ú 9 Â Ê Î Ó 7 Û Ã Ë Ï Ô Ü Ä 3 4 Õ 8 Å Ö Æ Œ Ç Ø 2 6 1 Note The shaded area indicates the characters which cannot be entered ...

Страница 92: ...GIT KEY 1 2 3 4 5 6 7 8 9 0 CHARACTER a d g j m p t w 0 b e h k n q u x c f i l o r v y à è ì 5 ñ s ù z á é í ò β ú 9 â ê î ó 7 û ã ë ï ô ü ä 3 4 õ 8 å ö æ œ ç ø 2 6 1 Note The shaded area indicates the characters which cannot be entered ...

Страница 93: ... key The LCD displays previously stored digits Dial the Speed Calling System access code and the abbreviated call code Press key again key lamp goes off TO OPERATE FROM SPEED CALLING SYSTEM KEY Press the Speed Calling System key If the DT750 does not have the Speed Calling System key dial the Speed Calling System access code then the abbreviated call code Speaker 31313 Line Key which accommodates ...

Страница 94: ... previously dialed numbers are available Press or The number on the display is auto matically redialed When party has answered lift handset or speak hands free Speaker 31313 Line Key which accommodates My Line of the telephone XXXXXX LNR SPD _ _ 1 Number to be Redialed Note A law Countries Australia Russia Latin Amer ica UK Middle near East other Asian nations µ law Countries North America Japan H...

Страница 95: ...ears Special Dial Tone Station B hears the music on hold Station A dials a desired Station Number Station C After Station C answers the transferred call Station A presses CONF soft key Three Party call is now established Transfer 1 25 PM TUE 18 MAR 2008 TRANSFER 1 25 PM TUE 18 MAR 2008 TRANSFER XXXX 1 25 PM TUE 18 MAR 2008 CONF ...

Страница 96: ...enu screen The currently enabled entry mode is indicated in the top portion of the LCD screen Uppercase Alphabetic Lowercase Alphabetic Numeric Character Mode By pressing key Indicates the currently enabled character mode Input a name Name OK Back Option BK 1 2 Word width SubMenu 3 4 5 6 7 8 Paste Space Change word OK Cancel Cut Delete Copy Return Overwrite Insert 9 10 Word case Character Mode Cha...

Страница 97: ... lowercase alphabetic and numeric character Word case Switch between uppercase and lowercase Word width Not used Delete Delete a single character Copy Copy the specified characters Cut Cut the specified characters Paste Paste the specified characters Space Enter a space Return Start a new line Overwrite Insert Write over existing characters Menu 1 2 Word width SubMenu 3 4 5 6 7 8 Paste Space Chang...

Страница 98: ... 1 2 DIGIT KEY CASE SHIFT 1st 2nd 3rd 4th 5th 6th 7th 8th 9th 10th 11th 12th 13th 1 A B C a b c D E F d e f G H I g h i J K L j k l M N O m n o P Q R S p q r s T U V t u v W X Y Z w x y z SP 1 A a 2 A a 3 A a 4 A a 5 A a 6 A a 7 A a 8 A a 9 A a 0 A a ...

Страница 99: ... 2nd 3rd 4th 5th 6th 7th 8th 9th 10th 11st 12st 13st 14st 15st 16st 17st 18st 19st 20st _ 21st 22st 23st 24st 25st 26st 27st 28st 29st 30st Used as a case shift key Shifts the characters between uppercase lowercase and numeric A a A a A a ...

Страница 100: ...3rd 4th 5th 6th 7th 8th 9th 10th 11th 12th 13th 14th 15th A Б В Г а б в г Д Е Ё Ж З д е ё ж з И Й К Л и й к л М Н О П м н о п Р С Т У р с т у Ф Х Ц Ч ф х ц ч Ш Щ Ъ Ы Ь ш щ ъ ы ь Э Ю Я э ю я SP 1 A a 2 A a 3 A a 4 A a 5 A a 6 A a 7 A a 8 A a 9 A a 0 A a A a A a ...

Страница 101: ...1st 2nd 3rd 4th 5th 6th 7th 8th 9th 10th 11th 12th 13th 14th 15th A B C Ç a b c ç D E F d e f G H I g h I J K L j k l M N O Ö m n o ö P R S p r s T U Ü V t u ü v Y Z y z SP 1 A a 2 A a 3 A a 4 A Ğ İ a ğ i 5 A a 6 A a 7 A Ş a Ş 8 A a 9 A a 0 A a A a A a ...

Страница 102: ...th 13th 14th 15th A B C À Á Â Ã Ä Å Æ Ç a b c à á â ã ä å æ ç D E F È É Ê Ë d e f è é ê ë G H I Ì Í Î Ï g h i ì í î ï J K L j k l M N O Ñ Ò Ó Ô Õ Ö Œ Ø m n o ñ ò ó ô õ ö œ ø P Q R S ß p q r s ß T U V Ù Ú Û Ü t u v ù ú û ü W X Y Z w x y z SP 1 A a 2 A a 3 A a 4 A a 5 A a 6 A a 7 A a 8 A a 9 A a 0 A a A a A a ...

Страница 103: ...1th 12th 13th 14th 15th 1 2 3 4 5 6 7 8 9 0 _ Used as a case shift key Shifts the characters between uppercase lowercase and numeric Note When entering password 0 9 and are available is entered by pressing key is entered by pressing key 1 1 2 1 3 1 4 1 5 1 6 1 7 1 8 1 9 1 0 1 1 1 ...

Страница 104: ... CASE SHIFT 1st 2nd 3rd 4th 5th 6th 7th 8th 9th 10th 11th 12th 13th 14th 15th 1 2 3 4 5 6 7 8 9 0 _ Used as a case shift key Shifts characters between uppercase lowercase and numeric 1 1 2 1 3 1 4 1 5 1 6 1 7 1 8 1 9 1 0 1 1 1 ...

Страница 105: ...uppercase to low ercase Press Enter or OK soft key on the Sub Menu to go back to text input screen Enter en by using digit keys Press key twice to enter e Press key twice to enter n Press key once to enter a space 5 OK Back Name Input a name Option BK A M K Menu 2 1 2 Word width SubMenu 3 4 5 6 7 8 Paste Space Change word OK Cancel Cut Delete Copy Word case 1 2 OK Back Name Input a name Option BK ...

Страница 106: ...en Press key twice to enter K Press key or Option soft key to display Sub Menu screen and then select Word case to switch the text input mode from lowercase to uppercase OK Back Name Input a name Option BK a M Ken Menu 2 1 2 Word width SubMenu 3 4 5 6 7 8 Paste Space Change word OK Cancel Cut Delete Copy Word case 1 2 OK Back Name Input a name Option BK A M Ken 5 OK Back Name Input a name Option B...

Страница 107: ...mes to enter o Press key twice to enter b Press key twice to enter u Press key four times to enter s Press Enter or OK soft key 1 2 Word width SubMenu 3 4 5 6 7 8 Paste Space Change word OK Cancel Cut Delete Copy Word case 1 2 OK Back Name Input a name Option BK a M Ken K 6 2 8 7 OK Back Name Input a name Option BK a M Ken Kobus ...

Страница 108: ... the following Sub Menu screen select Over write Insert and then press Enter Right cursor or OK soft key Enter new words over existing characters In this example F is entered OK Back Name Input a name Option BK A M ABCDE Menu 10 9 10 SubMenu Return OK Cancel Overwrite Insert 2 2 OK Back Name Input a name Option BK A M ABFDE ...

Страница 109: ...t cursor and then press Start soft key Place the cursor at the end point of the target char acters Right cursor and then press End soft key Place the cursor at position where you want to paste the copied characters and then press key or Option soft key Menu OK Back Name Input a name Option BK A M ABCDE 5 5 1 2 Word width SubMenu 3 4 5 6 7 8 Paste Space Change word OK Cancel Cut Delete Word case 1 ...

Страница 110: ... or OK soft key or press key The copied characters CD are inserted as follows OK Back Name Input a name Option BK A M ABCDE 7 7 1 2 Word width SubMenu 3 4 5 6 7 8 Space Change word OK Cancel Cut Delete Word case 1 2 Copy Paste OK Back Name Input a name Option BK A M CDABCDE ...

Страница 111: ...isplayed on LCD Press Enter or OK soft key to place DT750 in Security mode When the telephone is placed in Security mode Security Lamp lights red and the screen saver will be activated TO UNLOCK THE TELEPHONE Display the Password Entry screen by either of the following operations Press any key while the screen saver is activated Press Security key while the screen server is activated Security Lamp...

Страница 112: ... message is issued In that case press or OK soft key and then make a retry Note After a third attempt if incorrect password entered three times the following error message is issued Press or OK soft key The tele phone locks up and any key operation will be disabled for 10 minutes After 10 minutes make a retry Password Error OK Cancel Retry Incorrect security code password entered OK ...

Страница 113: ...ency call cannot be made with Speaker key Note When pressing Unlock soft key the telephone prompts for the Security mode cancellation pass word Note Emergency telephone number needs to be set in advance For the setting of the emergency tele phone numbers contact the system administra tor Note The user can make a call to only the predeter mined number When When telephone numbers other than the pred...

Страница 114: ...Pbook soft key while Station is in Idle state If Local Phonebook is enabled by the setting on the system side go to STEP2 If Local Phonebook is disabled by the setting on the system side go to STEP 3 OR Press key to display the Menu screen On the Menu screen select Directory If Local Phonebook is enabled by the setting on the system side go to STEP 2 If Local Phone is disabled the display changes ...

Страница 115: ...ght cursor or OK soft key OK Back 1 2 Directory 3 Corporate Personal 1 1 System Phonebook Local Sys Cnl 6 3 2 Name OK Clr NEC Note If soft Key is pressed on the above screen the following soft keys appear Pressing or Eu s Eu l soft key shifts characters between uppercase and lowercase Note To delete an entered character press or Clr soft key Note To move the cursor one space to the right press key...

Страница 116: ...the name or telephone number exceeds the displayable limit press or More soft key to display the last 17 characters digits of the name telephone number Example Name Suzuki Taro JapanSumida 24 characters Number 01234567890123456789 20 digits Display area Name Suzuki Taro JapanSumida Number 01234567890123456789 Speaker Cnl Number XXXXXXXX Name NEC BNET More More Cnl Name Number Suzuki Taro Japan 012...

Страница 117: ...t key STEP 4 Enter a name and then press Enter or OK soft key Ex To enter NEC Press key twice to enter N Press key four times to enter E Press key twice to enter C 4 26 PM TUE 13 APR 2007 Pbook MIC DND Menu Back OK Tool Directory History Setting Presence Favorite Config Call Func Menu Note Select an item on the menu screen in either of the following three ways Touch a desired item on the display P...

Страница 118: ...ta is registered in Local Phonebook the message Local phone book empty appears STEP 2 Name Entry screen appears Note If soft Key is pressed on the above screen the following soft keys appear Pressing or Eu s Eu l soft key shifts characters between uppercase and lowercase Note To delete an entered character press or Clr soft key Note To move the cursor one space to the right press key or soft key o...

Страница 119: ...From this screen you can make a call by go ing off hook or pressing key Note If soft Key is pressed on the above screen the following soft keys appear Pressing or Eu s Eu l soft key shifts characters between uppercase and lowercase Note To delete an entered character press or Clr soft key Note To move the cursor one space to the right press key or soft key once OK Clr Name OK Clr Name NEC Eu s Cnl...

Страница 120: ...key two times to erase me Note More soft key appears in Phonebook data screen when the number of characters name or digits telephone number are exceeding displayable limit Up to 17 characters or digits can be displayed at a time If the name or telephone number exceeds the displayable limit press or More soft key to display the last 17 characters digits of the name telephone number Pref Cnl More Nu...

Страница 121: ...s completed Two seconds later the display returns to Local Phonebook screen Note If soft Key is pressed on the above screen the following soft keys appear Pressing or Eu s Eu l soft key shifts characters between uppercase and lowercase Note To delete an entered character press or Clr soft key OK Clr Edit Name Ho 8 7 3 OK Clr Edit Name House Eu s Cnl Lower case character Eu l Cnl Upper case charact...

Страница 122: ...er The procedure shown below is available in Local Phonebook Example To add a prefix 0184 in front of telephone number 0123456789 Press Prfi Soft Key while the target Phonebook data is displayed Enter a prefix In this example 0184 is entered by using digit keys and press Enter or OK Soft Key Entry edited Prfi Cnl More Number 0123456789 Name NEC ABIKO OK Cnl Name NEC ABIKO Delete this entry Entry d...

Страница 123: ...y appears in Phonebook data screen when the number of characters name or digits telephone number are exceeding displayable limit Up to 17 characters or digits can be displayed at a time If the name or telephone number exceeds the displayable limit press or More soft key to display the last 17 characters digits of the name telephone number Cnl More Number 01840123456789 Name Takahashi ...

Страница 124: ...tables show available characters in Local Phonebook UPPERCASE CHARACTER SP Blank Space Digit Code 1 2 3 4 5 6 7 8 9 0 Character A D G J M P T W SP B E H K N Q U X 0 C F I L O R V Y À È Ì 5 Ñ S Ù Z Á É Í Ò β Ú 9 Â Ê Î Ó 7 Û Ã Ë Ï Ô Ü Ä 3 4 Õ 8 Å Ö Æ Œ Ç Ø 2 6 1 ...

Страница 125: ...9 LOWERCASE CHARACTER SP Blank Space Digit Code 1 2 3 4 5 6 7 8 9 0 Character a d g j m p t w SP b e h k n q u x 0 c f i l o r v y à è ì 5 ñ s ù z á é í ò β ú 9 â ê î ó 7 û ä ë ï ô ü å 3 4 õ 8 æ ö 1 ç 6 2 ...

Страница 126: ...an store up to 32 digits of dial number and 16 characters of name information per record To View Call History Press iCall soft key or Call History Feature key while the current time is displayed on LCD OR Press key to display the Menu screen On the Menu screen select History and then press Enter or OK soft key or press key The history data of the last received call is dis played Press or soft key ...

Страница 127: ...ame information the name is displayed as follows Note Call History will display for an unanswered incoming call Note While the history data is displayed the user can not make a call by dialing a telephone number Pbook 51500 12 55 PM TUE 26 FEB 2008 Speaker Pbook 31300 1 03 PM TUE 26 FEB 2008 Note A maximum of 10 digits 0 9 and can be set as a prefix Note When prefix is added up to 32 digits includ...

Страница 128: ... displayed at a time If the name or telephone number exceeds the displayable limit press or More soft key to display the last 17 characters digits of the name telephone number Note If you want to exit from Call History press END soft key Speaker Pbook 31300 1 03 PM TUE 26 FEB 2008 31300 1 03 PM TUE 26 FEB 2008 DEL END Pref Note The Call History data stored on the system can be added to Phonebook c...

Страница 129: ...honebook Note If name information is soared on the call history the name is displayed Note If soft Key is pressed on the above screen the following soft keys appear Pressing or Eu s Eu l soft key shifts characters between uppercase and lowercase Clr OK Add name NEC ABIKO Eu s Cnl Lower case character Eu l Cnl Upper case character Clr OK Cnl Name Number NEC ABIKO 31300 ...

Страница 130: ...irectory function can register up to 500 entries The user can add view edit delete these entries Note A maximum of 500 entries can be registered in Directory Note On the Menu use or soft key to move the cursor up down a line Note The user can also navigate through the menu with touch panel operation OK Menu History Menu Directory Tool Call Func Presence Setting Favorite Config OK Back ...

Страница 131: ... OK soft key or press key STEP 4 Select Edit and then press Enter Right cursor or OK soft key or press key STEP 5 The following Edit screen appears Select Name and then press Enter Menu 2 Back OK Tool Directory History Setting Presence Favorite Config Call Func Menu 1 1 Note When using Phonebook feature is disabled this screen will not be displayed In that case skip this step Menu OK Back 1 2 Dire...

Страница 132: ... a de sired group is highlighted or press a digit key corresponding to the desired group In this example Colleagues is selected Note For details on character entry method see LAST NUMBER REDIAL in chapter 4 1 Menu OK Back 1 2 Edit Save Group 1 2 Tel 1 3 4 5 6 7 8 Company Name Ring Tone Name Tel 4 Tel 2 Tel 3 OK Back Name Input a name Option BK A M Note Up to 32 characters can be entered as a name ...

Страница 133: ...his example Compa ny is selected Selectable categories are as follows Note Each group name can be changed from the Group Setting screen For details see TO CHANGE GROUP NAME 1 2 Group Select 3 4 OK Back Group 6 Family Friends Default VIPs 5 6 7 8 Group 8 Group 7 Colleagues 1 3 3 5 OK Back 1 2 Edit Save Group 1 2 3 4 5 6 7 8 Company Name Ring Tone Name Tel 4 Tel 2 Tel 3 Ken Kobus Tel 1 Colleagues Ne...

Страница 134: ...y name then press Enter or OK soft key Category ICON Company Mobile Voice Mail Home Other 1 2 1 2 Priority Flag Enable 1 1 Disable OK Prev 7 Note A maximum of four telephone numbers can be set to an entry If two or more telephone numbers are required to be set set the remaining tele phone numbers to Tel 2 Tel 4 7 OK Back 1 2 Edit Save Group 1 2 3 4 5 6 7 8 Ring Tone Name Tel 4 Tel 2 Tel 3 Ken Kobu...

Страница 135: ... 6 7 8 Name Tel 4 Tel 2 Tel 3 Ken Kobus Tel 1 Colleagues Company Name 31300 Ring Tone NEC Note For details on each ringer tone type see TO SET RINGER TONE in chapter 3 Note The user can set ringer tone for calls routed to the specified name calling party here Ringer Tone type can be set for Name Group and Telephone set The ringer Tone type set for Name has higher priority than the types set for Gr...

Страница 136: ...6 7 8 1 2 Automatic Default Illumination Disable Yellow Red Green Blue Light Blue Note The user can set illumination type for calls routed to the specified name calling party here Illumi nation type can be set for Name Group and Telephone set The illumination type set for Name has higher priority than the types set for Group and Terminal set Note If the illumination setting is not performed 1 Auto...

Страница 137: ...will appear In that case the existing data is overwritten with new If you do not overwrite press Back soft key Note A maximum of 500 Memory IDs can be regis tered If multiple telephone numbers are assigned to a Memory ID the user may not regis ter up to 500 Memory IDs OK Back Memory ID Input a Memory number BK 1 0 499 0 Note If a duplicate Memory ID is entered It will over write a data at memory n...

Страница 138: ...er or OK soft key In this example Default is selected STEP 4 Select Name and then press Enter Right cursor or OK soft key or press key STEP 5 Enter a new group name and then press Enter or OK soft key 3 3 OK Back Directory 1 1 Search 1 2 3 4 0 Own Number Delete All Edit Group Setting 1 1 2 Group 3 4 OK Back Group 6 Family Friends VIPs 5 6 7 8 Group 8 Group 7 Colleagues 1 3 Default 1 1 Menu OK Back...

Страница 139: ...ing Tone and illumination types select 3 Illumina tion for calls routed to the specified group here Ringer tone and illumination types can be set for Name Group and Telephone set The ringer tone and illumination types set for Name have higher priority than the types set for Group and Telephone set Also the ringer tone and illumina tion types for Group have higher priority than the types set for Te...

Страница 140: ...sor or OK soft key or press key STEP 4 Select a target group and then press En ter or OK soft key In this example Col leagues is selected STEP 5 The names belonging to the selected group are displayed in alphabetical order 1 1 OK Back Directory 1 1 1 2 Group Setting 3 4 0 Own Number Delete All Edit Search 1 1 OK Back Search 1 1 1 2 Tel Number 3 4 Others Name Group 2 1 2 Group 3 4 OK Back Group 6 F...

Страница 141: ...selected group No data is issued OK Back Option Detail Ken Kobus Directory 1 1 M John Smith Julia Call Back 1 2 Detail Group 1 2 3 4 5 6 7 8 Tel 4 Tel 2 Tel 3 Tel 1 Colleagues Company Name 31300 Ring Tone NEC Name Ken Kobus Automatic Note To go back to the former screen press Left cursor or Back soft key Note When pressing Enter or Call soft key while the above screen is displayed a call is origin...

Страница 142: ... Edit Search 2 2 OK Back Search 1 1 1 2 Tel Number 3 4 Others Group Name Note A distinction is made between upper case and lower case characters For example Ken Kobus and ken kobus are distinguished as dif ferent character strings Note A blank space is also distinguished while search ing database for a name Note Even if the name is not entered to the end the user can search for a name Note For det...

Страница 143: ...ty OK Back Option Detail Ken Kobus Directory 1 1 M Kimura Koike Call Back 1 2 Detail Group 1 2 3 4 5 6 7 8 Tel 4 Tel 2 Tel 3 Tel 1 Colleagues Company Name 31300 Ring Tone NEC Name Ken Kobus Automatic Note To go back to the formaer screen press Left cursor or Back soft key Note When pressing Enter or Call soft key while the above screen is displayed a call is originated to the target party ...

Страница 144: ...one number After enter ing the number press Enter or OK soft key STEP 5 The list of applicable names will be dis played 1 1 OK Back Directory 1 1 1 2 Group Setting 3 4 0 Own Number Delete All Edit Search 3 3 OK Back Search 1 1 1 2 3 4 Others Group Name Tel Number Note Even if the telephone number is not entered to the end the user can search for a telephone number OK Back Tel Number Input a Teleph...

Страница 145: ...ty Note If there is no entry corresponding to the entered name No data is issued Note To go back to the formaer screen press or Back soft key Note When pressing or Call soft key while the above screen is displayed a call is originated to the target party Call Back 1 2 Detail Group 1 2 3 4 5 6 7 8 Tel 4 Tel 2 Tel 3 Tel 1 Colleagues Company Name 31300 Ring Tone NEC Name Ken Kobus Automatic ...

Страница 146: ...t Memory ID and then press En ter Right cursor or OK soft key or press key STEP 5 Enter a memory number 0 499 and then press Enter or OK soft key STEP 6 The name of appropriate party will be dis played 1 1 OK Back Directory 1 1 1 2 Group Setting 3 4 0 Own Number Delete All Edit Search 4 4 OK Back Search 1 1 1 2 3 4 Group Name Tel Number Others 1 1 OK Back Others 1 1 1 2 Company 3 4 Alphabet Catego...

Страница 147: ...rresponding to the entered name No data is issued Call Back Option Detail Ken Kobus Directory 1 1 M Suzuki Taro Call Back 1 2 Detail Group 1 2 3 4 5 6 7 8 Tel 4 Tel 2 Tel 3 Tel 1 Colleagues Company Name 31300 Ring Tone NEC Name Ken Kobus Automatic Note To go back to the formaer screen press or Back soft key Note When pressing or Call soft key while the above screen is displayed a call is originate...

Страница 148: ...then press En ter Right cursor or OK soft key or press key STEP 5 Select a desired category from the list and then press Enter or OK soft key STEP 6 The list of applicable names will be dis played 1 1 OK Back Directory 1 1 1 2 Group Setting 3 4 0 Own Number Delete All Edit Search 4 4 OK Back Search 1 1 1 2 3 4 Group Name Tel Number Others 2 2 OK Back Others 1 1 1 2 Company 3 4 Alphabet Memory ID C...

Страница 149: ...to the entered name No data is issued OK Back Option Detail Ken Kobus Directory 1 1 M Masakazu Suzuki Taro Call Back 1 2 Detail Group 1 2 3 4 5 6 7 8 Tel 4 Tel 2 Tel 3 Tel 1 Colleagues Company Name 31300 Ring Tone NEC Name Ken Kobus Automatic Note To go back to the formaer screen press Left cursor or Back soft key Note When pressing Enter or Call soft key while the above screen is displayed a call...

Страница 150: ...t key or press key STEP 5 Enter a company name After entering the name Press Enter or OK soft key 1 1 OK Back Directory 1 1 1 2 Group Setting 3 4 0 Own Number Delete All Edit Search 4 4 OK Back Search 1 1 1 2 3 4 Group Name Tel Number Others Note A distinction is made between upper case and lower case characters For example Ken Kobus and ken kobus are distinguished as dif ferent character strings ...

Страница 151: ...r 4 Note Up to 32 charancters can be entered as a com pany name Note When pressing or Call soft key a call is orig inated to the selected party Note If there is no entry corresponding to the entered name No data is issued OK Back Option Detail Ken Kobus Directory 1 1 M Masakazu Suzuki Taro Note To go back to the formaer screen press or Back soft key Note When pressing or Call soft key while the ab...

Страница 152: ... STEP 4 Select Alphabet and then press Enter Right cursor or OK soft key or press key STEP 5 Select a desired group of alphabets and then press Enter or OK soft key 1 1 OK Back Directory 1 1 1 2 Group Setting 3 4 0 Own Number Delete All Edit Search 4 4 OK Back Search 1 1 1 2 3 4 Group Name Tel Number Others 4 4 OK Back 1 1 1 2 3 4 Company Memory ID Category Alphabet Others 0 1 2 3 OK Back 4 5 6 7 ...

Страница 153: ...oft key a call is orig inated to the selected party Note If there is no entry corresponding to the entered name No data is issued OK Back Option Detail Directory 1 1 M Aikawa Abe Shintaro Akai Note To go back to the formaer screen press or Back soft key Note When pressing or Call soft key while the above screen is displayed a call is originated to the target party Call Back 1 2 Detail Group 1 2 3 ...

Страница 154: ... key CASE 2 STEP 1 Display the list of applicable names and then select a target name see TO FIND A REG ISTERED DATA STEP 2 Press Enter key or Call soft key to make a call to the displayed party Call Back 1 2 Detail Group 1 2 3 4 5 6 7 8 Tel 4 Tel 2 Tel 3 Tel 1 Colleagues Company Name 31300 Ring Tone NEC Name Automatic Abe Shintaro 3 3 Call Back 1 2 Detail Group 1 2 3 4 5 6 7 8 Tel 4 Tel 2 Tel 3 C...

Страница 155: ...149 Note If multiple telephone numbers are registered to a target party a call is made to the first priority tele phone number ...

Страница 156: ...3 Select User Setting and then press Enter Right cursor or OK soft key or press key STEP 4 Select Talk and then press Enter Right cursor or OK soft key or press key STEP 5 Select Prefix and then press Enter Right cursor or OK soft key or press key Menu 5 5 Back OK Tool Directory History Setting Presence Favorite Config Call Func Menu 1 1 Back OK 1 2 Data Backup Restore Setting 3 Download User Sett...

Страница 157: ...TEP 5 If multiple prefixes need to be set re peat STEP 5 and STEP 6 In that case select Prefix 2 and Prefix 3 Back OK 1 1 Talk 1 2 3 4 5 DTMF Tone Key Touch Tone Hold Music RTP Alarm Prefix 1 1 Back OK 1 2 3 1 1 Prefix Prefix 3 Prefix 2 Prefix 1 Note A maximum of 10 digits 0 9 and can be set as a prefix Note When prefix is added up to 32 digits including the prefix can be sent as dial number OK Ba...

Страница 158: ...r Right cursor or OK soft key or press key STEP 3 Predetermined prefixes are displyed Select a prefix and then press Enter or OK soft key to make a call Call Back Option Detail Directory 1 1 M Aikawa Abe Shintaro Akai 1 1 Call Back Option Detail 1 2 13 MAR 2008 TUE 11 00 Ken Kobus Tel 7205 13 MAR 2008 TUE 10 00 Abe Shintaro Tel 7207 1 2 3 Delete All 4 Delete One Edit SubMenu 1 1 Cancel OK Prefix C...

Страница 159: ...ayed Modify the nec essary data by referring to TO ADD NEW DA TA After the data modification is complete press Save soft key on the Edit screen Menu Call Back Option Detail Directory 1 1 M Aikawa Abe Shintaro Akai 4 4 Call Back Option Detail 1 2 13 MAR 2008 TUE 11 00 Ken Kobus Tel 7205 13 MAR 2008 TUE 10 00 Abe Shintaro Tel 7207 1 2 3 Delete All 4 Delete One SubMenu 1 1 Cancel OK Prefix Edit Call ...

Страница 160: ...l the registered data press Enter or OK soft key to delete all the da ta STEP 4 After all the directory data is deleted the dis play changes as follows STEP 5 Press Enter or OK soft key 0 0 OK Back Directory 1 1 1 2 Group Setting 3 4 0 Own Number Edit Search Delete All OK Back Directory Delete All Directory Note To cancel the data deletion press or Back soft key OK Directory Deleted ...

Страница 161: ... key or press key STEP 3 The following confirmation message appears Press Enter or OK soft key to delete the appropriate directory data STEP 4 After the appropriate directory data is delet Menu Call Back Option Detail Directory 1 1 M Aikawa Abe Shintaro Akai 2 2 Note To cancel the data deletion press or Back soft key Call Back Option Detail 1 2 13 MAR 2008 TUE 11 00 Ken Kobus Tel 7205 13 MAR 2008 ...

Страница 162: ...156 ed the display changes as follows STEP 5 Press Enter or OK soft key OK Directory Deleted ...

Страница 163: ... 50 records a record will be deleted in order of occurrence Note The Call History data which stored in the memory of each telephone cannot be added to Phonebook both System Phonebook and Local Phonebook controlled by the system Note On the Menu use or soft key to move the cursor up down a line Note The user can also navigate through the menu with touch panel operation OK Menu History Menu Director...

Страница 164: ...of missed calls Outgoing Display the history of outgoing calls Incoming Display the history of incoming calls Menu 1 Back OK Tool Directory History Setting Presence Favorite Config Call Func Menu 1 Note If two or more records exist use or soft key to display the next former records Note If no history data is saved No data will be dis played on LCD Note To go back to former menu STEP 3 press or Bac...

Страница 165: ...layed STEP 2 On the above screen press key or Op tion soft key to display the following Sub Menu STEP 3 Select Call and then press Enter Right cursor or OK soft key or press key Note While the history data is displayed the user can not make a call by dialing a telephone number 1 2 Option Back 1 1 13 MAR 2008 TUE 11 00 Missed Ken Kobus Tel 7205 13 MAR 2008 TUE 10 00 Abe Shintaro Tel 7207 M 1 2 Opti...

Страница 166: ...case select 3 Prefix on the SubMenu indicated at STEP 2 of CASE 2 to display the Prefix screen On the Prefix screen choose a prefix to be added to the dial number Also prefixes need to be set in advance For details on setting of prefix see TO ADD PREFIX TO NUMBER in Chapter 6 Directory Operation ...

Страница 167: ...hen press Enter Right cursor or OK soft key or press key STEP 3 Select New and then press Enter Right cursor or OK soft key or press key STEP 4 Select a category in this example Com pany is selected and then press Enter or Next soft Key 1 2 Option Back 1 1 13 MAR 2008 TUE 11 00 Missed Ken Kobus Tel 7205 13 MAR 2008 TUE 10 00 Abe Shintaro Tel 7207 M Menu 2 2 1 2 Option Back 13 MAR 2008 TUE 11 00 Ke...

Страница 168: ...ed data such as name group etc to directory Category ICON Company Mobile Voice Mail Home Others 1 2 3 4 Next Back 5 1 1 Company Others Home Mobile Voice Mail Category 1 2 Note If the no corresponding data is stored in the directory only the telephone number will be dis played as Tel 1 1 2 Priority Flag Enable 1 1 Disable OK Prev Menu OK Back 1 2 Edit Save Group 1 2 Tel 1 3 4 5 6 7 8 Company Name R...

Страница 169: ...163 Note If the corresponding data has already stored in the directory the detailed data such as name group etc is displayed ...

Страница 170: ...t cursor or OK soft key or press key STEP 3 Select Addition and then press En ter Right cursor or OK soft key or press key STEP 4 Select a search method and then press Enter or OK soft key See TO FIND A REGISTERED DATA for the procedure of the searching method 1 2 Option Back 1 1 13 MAR 2008 TUE 11 00 Missed Ken Kobus Tel 7205 13 MAR 2008 TUE 10 00 Abe Shintaro Tel 7207 M Menu 2 2 1 2 Option Back ...

Страница 171: ... key STEP 7 Select a registration destination and then press Enter or OK soft key STEP 8 The Category Set screen is displayed Se lect a Category to which the telephone num ber belongs Then press Enter or OK 1 Menu OK Back 1 1 1 2 3 Directory Search 4 Group Others Name Tel Number 2 1 2 Group 3 4 OK Back Group 6 Family Friends VIPs 5 6 7 8 Group 8 Group 7 1 3 Default Colleagues OK Back Ken Kobus Dir...

Страница 172: ...ayed on the Edit screen See TO EDIT DIRECTORY DATA in chapter 6 Directory Operation and edit the data as necessary 1 2 3 4 Back 1 1 5 Company Others Home Mobile Voice Mail Category Next 1 2 1 2 Priority Flag Enable 1 1 Disable OK Prev Menu OK Back 1 2 Edit Save Group 1 2 Tel 1 3 4 5 6 7 8 Company Name Ring Tone Name Tel 4 Tel 2 Tel 3 7205 Ken Kobus Colleagues NEC Automatic ...

Страница 173: ...confirmation message appears Press Enter or OK soft key to delete all the data STEP 5 After all history data is deleted the display changes as follows STEP 6 Press Enter or OK soft key Menu 1 Back OK Tool Directory History Setting Presence Favorite Config Call Func Menu 4 4 Back OK 1 2 3 1 1 History 4 Outgoing Incoming Missed Delete All Note To cancel the data deletion press or Back soft key OK Ba...

Страница 174: ...or OK soft key or press key STEP 3 The following confirmation message appears Press Enter or OK soft key to delete the appropriate history data 1 2 Option Back 1 1 13 MAR 2008 TUE 11 00 Missed Ken Kobus Tel 7205 13 MAR 2008 TUE 10 00 Abe Shintaro Tel 7207 M Menu 4 4 Note To cancel the data deletion press or Back soft key Note By selecting 5 Delete All all records of missed call can be deleted 1 2 ...

Страница 175: ...169 STEP 4 After the appropriate call history data is delet ed the display changes as follows STEP 5 Press Enter or OK soft key OK Missed Deleted ...

Страница 176: ...wing three types of directory features Personal Directory Phonebook and Corporate Directory This chapter explains the menu list for Personal Directory feature Tool Uses when accessing external XML server For details please contact the system administrator Call Function Not used Setting To make the user setting of DT750 Presence Not used Favorite Not used Config To make the configuration setting of...

Страница 177: ... Call Make a call to the currently displayed party 2 Directory Add Add the currently displayed history data to the personal directory 1 New Add call history data to the personal directory Category Set Select Company Mobile Voice Mail Home or Others Company Priority Flag Select either Enable or Disable Disable Edit Edit the directory data 2 Addition Edit the personal directory data from call histor...

Страница 178: ...to which the target party belongs Default 3 6 Tel 1 Tel 4 Enter the telephone number Category Set Select Company Mobile Voice Mail Home or Others Company Priority Flag Select either Enable or Disable Disable 7 Company Name Enter the company name of the target party 8 Ring Tone Select a ringer tone type per caller Automatic 9 Illumination Select a illumination pattern color of the call indication l...

Страница 179: ...173 Menu List For Tool Menu Item Description Default Value 3 Tool 1 Service Activate XML browser 2 IM Not used ...

Страница 180: ...on pattern Automatic 6 Headset Ring Volume Not used 2 Talk Settings for telephone conversation 1 RTP Alarm Enable disable RTP alarm Automatic 2 DTMF Tone Enable disable DTMF tone Automatic 3 Key Touch Tone Set key touch tone generated when the digit keys are pressed while the telephone is off hook Automatic 4 Hold Music Select a Music on Hold to be heard by DT750 user Default 5 Prefix Register Pre...

Страница 181: ... Files Download the files for Music on Hold ringer tone and 1 Hold Music Download a file for Music on Hold MOH wav 2 Ring Tone Download files for ringer tones Download 1 to 3 1 Download 1 Download a file for ringer tone Download 1 Melody1 wav 2 Download2 Download a file for ringer tone Download 2 Melody2 wav 3 Download 3 Download a file for ringer tone Download 3 Melody3 wav 3 Directory Download t...

Страница 182: ...a gz 3 Server Address Enter an IP address of the FTP TFTP server 0 0 0 0 4 Protocol Select a protocol of the server either FTP or TFTP FTP 5 FTP Settings Set necessary data when using FTP service 1 User ID Enter a user ID for the data backup via FTP server 2 Password Enter a password for data backup via FTP server 3 Folder Specify the destination directory of FTP server Menu Item Description Defau...

Страница 183: ...in screen of Online Monitoring will be displayed To exit from Online Monitoring press Exit key When just pressing Help key Help information will be displayed Key operation chart 3 Ping Exit 2 System Information 1 QoS Time Feature Activity Information Area of LCD Press Help key for two seconds 1 QoS 1 Lost Packet 2 Codec 3 Payload 2 System Information 1 Network Settings 2 SIP Settings 3 Audio Visua...

Страница 184: ...ern of Codec and Payload is as follows System Information Press 2 in main screen and move to System informa tion menu Following information can be confirmed in System information Network Settings SIP Settings Audio Visual Settings Maintenance Settings Terminal Information Note For the detail of each Settings refer to the De tail of System Information Menu Codec Payload msec G 711u 10 20 30 40 G 71...

Страница 185: ...y To see SIP Settings Information Press 2 in System Information menu Each SIP Setting can be confirmed by pressing Up and Down key Note To go back to System Information menu press Prev soft key DHCP Mode Disable Enable Prev Down Up IP Address XXX XXX XXX XXX Prev Down Up Prev Down Up 802 1X Status XXXXX Prev Down Up User ID XXXXX Prev Down Up Terminal URI XXXXX Prev Down Up Howler Tone Disable Ena...

Страница 186: ...ystem Information menu press Prev soft key To see Maintenance Settings Information Press 4 in System Information menu Download address can be confirmed Note To go back to System Information menu press Prev soft key Prev Down Up Disable Enable Confirmation Tone Prev Down Up Music Default Download Data Prev Down Up DTMF Play Mode ON OFF Prev XXX XXX XXX XXX Download Address ...

Страница 187: ...the server to send Ping and press OK key Note If Network Interface is not operated following message will be displayed Ping will be sent to the server 4 times If Retry was selected screen will back to the Ping menu Prev Hardware Version XXXXX Down Up Prev Down Up Mac Address XX XX XX XX XX XX Prev Down Up Side Option 2 XXXXX BK Cancel OK PingAdr Use For 0 0 0 0 XX XX XX XX 1 NG 2 NG 3 NG 4 NG Comp...

Страница 188: ...VLAN Mode Account MD5 802 1X Status SIP Settings User ID Terminal URI Connecting Server 1st SIP Server Note1 2nd SIP Server Note1 3rd SIP Server Note1 4th SIP Server Note1 Access Mode to the SIP Server Port for 1st SIP Server Port for 2nd SIP Server Port for 3rd SIP Server Port for 4th SIP Server Area ID Country Authentication Mode Retransmit Interval Keeping Call Howler Tone Audio Visual Settings...

Страница 189: ...n the parameter is obtained from the DHCP server ex IP Address Terminal Infor mation Hardware Version MAC Address Firmware Version Bottom option Side Option 1 Side Option 2 System Information Menu Items Prev Down Up IP Address DHCP XX XX XX XX XX XX ...

Страница 190: ...Printed in Japan 0803 001 ...

Страница 191: ......

Отзывы: